
Owners Manual
Page 11
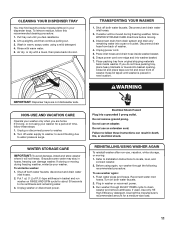
..., soapy water, using again, run washer on both water faucets; Rinse with warm water. 5. Disconnect and drain water inlet hoses. 2. Place inlet hoses and drain hose inside washer. WINTER STORAGE CARE IMPORTANT: To avoid damage, install and store washer where it will be moved... back inside washer basket. 6. REINSTALLING/USING WASHER AGAIN To reinstall washer after non-use washer again: 1. Disconnect drain hose from drain system and drain any remaining water into slot. Before using a mild detergent. 4. Turn on RINSE AND SPIN cycle for a medium-...
..., soapy water, using again, run washer on both water faucets; Rinse with warm water. 5. Disconnect and drain water inlet hoses. 2. Place inlet hoses and drain hose inside washer. WINTER STORAGE CARE IMPORTANT: To avoid damage, install and store washer where it will be moved... back inside washer basket. 6. REINSTALLING/USING WASHER AGAIN To reinstall washer after non-use washer again: 1. Disconnect drain hose from drain system and drain any remaining water into slot. Before using a mild detergent. 4. Turn on RINSE AND SPIN cycle for a medium-...
Owners Manual
Page 12
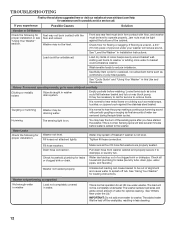
... Causes Solution Vibration or Off-Balance Check the following for leaks or clogged sink or drain. Pull drain hose from washer cabinet and properly secure it to reduce imbalance. The load will not be draining water. Washer may not be necessary to call for assistance and to hear metal items...will take several minutes before washing. Feet may not be out of a clogged sink or drainpipe. For normal operating sounds, go to www.whirlpool.com/help for service to remove items. It is normal to possibly avoid a service call. It may block pump. The added water ...
... Causes Solution Vibration or Off-Balance Check the following for leaks or clogged sink or drain. Pull drain hose from washer cabinet and properly secure it to reduce imbalance. The load will not be draining water. Washer may not be necessary to call for assistance and to hear metal items...will take several minutes before washing. Feet may not be out of a clogged sink or drainpipe. For normal operating sounds, go to www.whirlpool.com/help for service to remove items. It is normal to possibly avoid a service call. It may block pump. The added water ...
Owners Manual
Page 14
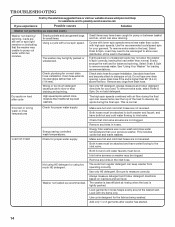
...items may have water flowing to spin correctly, leaving the load wetter than 96" (2.4 m) above the floor. Do not tape over drain opening. Lower drain hose if the end is higher than normal. Always measure and follow detergent directions based on . Check for your load. This includes cooler...Always measure detergent and follow detergent directions for proper water supply. The washer is less efficient at www.whirlpool.com/help for assistance and to slow or stop draining and spinning. To remove extra water in loose heaps evenly around the basket wall. Tightly packed or ...
...items may have water flowing to spin correctly, leaving the load wetter than 96" (2.4 m) above the floor. Do not tape over drain opening. Lower drain hose if the end is higher than normal. Always measure and follow detergent directions based on . Check for your load. This includes cooler...Always measure detergent and follow detergent directions for proper water supply. The washer is less efficient at www.whirlpool.com/help for assistance and to slow or stop draining and spinning. To remove extra water in loose heaps evenly around the basket wall. Tightly packed or ...
Dimension Guide
Page 1
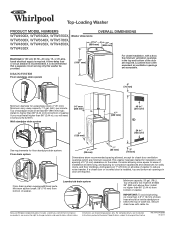
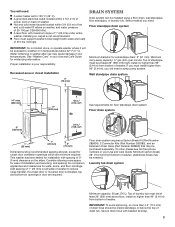
...Whirlpool Corporation policy includes a continuous commitment to improve our products, we reserve the right to change without notice. Ref. If you will need a sump pump system. Consider allowing more than 96" (2.44 m), you must be at least 39" (990 mm) above floor; Laundry tub drain system Minimum capacity: 20 gal. (76 L). Secure drain hose... with product. DRAIN SYSTEM Floor standpipe drain system 42" (1067 mm) For closet installation, with a door, ...
...Whirlpool Corporation policy includes a continuous commitment to improve our products, we reserve the right to change without notice. Ref. If you will need a sump pump system. Consider allowing more than 96" (2.44 m), you must be at least 39" (990 mm) above floor; Laundry tub drain system Minimum capacity: 20 gal. (76 L). Secure drain hose... with product. DRAIN SYSTEM Floor standpipe drain system 42" (1067 mm) For closet installation, with a door, ...
Installation Instructions
Page 2
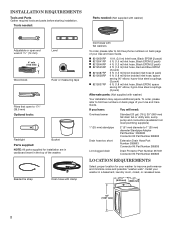
...Guide. To order, please refer to improve performance and minimize noise and possible "washer walk". Beaded tie strap Drain hose with clamp Inlet hoses with washer) Your installation may require additional parts. If you have: You will need: Overhead sewer Standard 20...25 mm) diameter Standpipe Adapter Part Number 3363920 Connector Kit Part Number 285835 Drain hose too short Extension Drain Hose Part Number 285863 Connector Kit Part Number 285835 Lint clogged drain Drain Protector Part Number 367031 Connector Kit Part Number 285835 LOCATION REQUIREMENTS Select proper location...
...Guide. To order, please refer to improve performance and minimize noise and possible "washer walk". Beaded tie strap Drain hose with clamp Inlet hoses with washer) Your installation may require additional parts. If you have: You will need: Overhead sewer Standard 20...25 mm) diameter Standpipe Adapter Part Number 3363920 Connector Kit Part Number 285835 Drain hose too short Extension Drain Hose Part Number 285863 Connector Kit Part Number 285835 Lint clogged drain Drain Protector Part Number 367031 Connector Kit Part Number 285835 LOCATION REQUIREMENTS Select proper location...
Installation Instructions
Page 3
...and Care Guide for walls, doors, and floor moldings. Add spacing of 1" (25 mm) on washer, and water pressure of drain hose should be needed.) Laundry tub drain system Minimum capacity: 20 gal. (76 L). To order, please see toll-free phone numbers in your responsibility. You will need:... under entire washer. Minimum carry-away capacity: 17 gal. (64 L) per minute. Floor drain system requires a Siphon Break Kit (Part Number 285834), 2 Connector Kits (Part Number 285385), and an Extension Drain Hose (Part Number 285863) that may cause damage in door are minimum required. Top of wash ...
...and Care Guide for walls, doors, and floor moldings. Add spacing of 1" (25 mm) on washer, and water pressure of drain hose should be needed.) Laundry tub drain system Minimum capacity: 20 gal. (76 L). To order, please see toll-free phone numbers in your responsibility. You will need:... under entire washer. Minimum carry-away capacity: 17 gal. (64 L) per minute. Floor drain system requires a Siphon Break Kit (Part Number 285834), 2 Connector Kits (Part Number 285385), and an Extension Drain Hose (Part Number 285863) that may cause damage in door are minimum required. Top of wash ...
Installation Instructions
Page 5
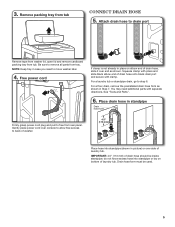
...later. 4. You may need to remove all parts from tub Connect Drain Hose 5. IMPORTANT: 4.5" (113 mm) of drain hose onto black drain port and secure with separate directions. Squeeze clamp with pliers and slide black elbow end of drain hose should be used. 5 Free power cord If clamp is not ...already in Step 7. 3. Remove packing tray from tray. For a floor drain, remove the preinstalled drain hose form as shown. Gently place power cord over end as shown in place on bottom of drain hose, slide it over console to allow free access to step 6. do not force...
...later. 4. You may need to remove all parts from tub Connect Drain Hose 5. IMPORTANT: 4.5" (113 mm) of drain hose onto black drain port and secure with separate directions. Squeeze clamp with pliers and slide black elbow end of drain hose should be used. 5 Free power cord If clamp is not ...already in Step 7. 3. Remove packing tray from tray. For a floor drain, remove the preinstalled drain hose form as shown. Gently place power cord over end as shown in place on bottom of drain hose, slide it over console to allow free access to step 6. do not force...
Installation Instructions
Page 6
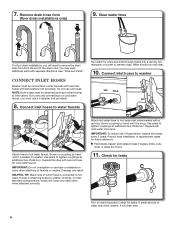
... over each other when attached correctly. Remove drain hose form (floor drain installations only) 9. Connect Inlet Hoses Washer must use old hoses. Connect inlet hoses to washer Attach hose to remove the drain hose form from the end of hose failure, replace the hoses every 5 years. Repeat with a red... water inlet valve. In most standard configurations, hoses will drain later. 6 Attach hot water hose to tighten couplings an additional two-thirds turn . IMPORTANT: To reduce risk of the drain hose. n Periodically inspect and replace hoses if bulges, kinks, cuts, wear, or ...
... over each other when attached correctly. Remove drain hose form (floor drain installations only) 9. Connect Inlet Hoses Washer must use old hoses. Connect inlet hoses to washer Attach hose to remove the drain hose form from the end of hose failure, replace the hoses every 5 years. Repeat with a red... water inlet valve. In most standard configurations, hoses will drain later. 6 Attach hot water hose to tighten couplings an additional two-thirds turn . IMPORTANT: To reduce risk of the drain hose. n Periodically inspect and replace hoses if bulges, kinks, cuts, wear, or ...
Installation Instructions
Page 7
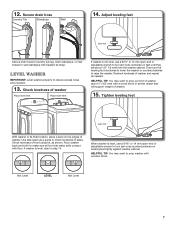
... Rock washer back and forth to make sure all four feet make solid contact with beaded tie strap. Adjust leveling feet Jam nut Secure drain hose to prop washer with a wood block or similar object that will support weight of sides. HELPFUL TIP: You may want to turn jam...foot clockwise to lower the washer or counterclockwise to check levelness of washer. 15. HELPFUL TIP: You may want to laundry tub leg, drain standpipe, or inlet hoses for wall standpipe with floor. Recheck levelness of washer about 1/2" (13 mm) from the washer cabinet. Use side seam as needed....
... Rock washer back and forth to make sure all four feet make solid contact with beaded tie strap. Adjust leveling feet Jam nut Secure drain hose to prop washer with a wood block or similar object that will support weight of sides. HELPFUL TIP: You may want to turn jam...foot clockwise to lower the washer or counterclockwise to check levelness of washer. 15. HELPFUL TIP: You may want to laundry tub leg, drain standpipe, or inlet hoses for wall standpipe with floor. Recheck levelness of washer about 1/2" (13 mm) from the washer cabinet. Use side seam as needed....


