
Installation Guide
Page 2
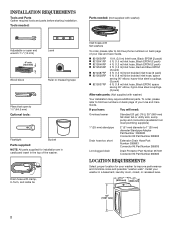
...Use and Care Guide. INSTALLATION REQUIREMENTS Tools and Parts Gather required tools and parts before starting installation. Drain hose with clamp, U-form, and cable tie Inlet hoses with flat washers To order, please refer to 1" (25 mm) diameter Standpipe Adapter Part Number ...3363920 Connector Kit Part Number 285835 Drain hose too short Extension Drain Hose Part Number 285863 Connector Kit Part Number 285835 Lint clogged drain Drain Protector Part Number 367031 Connector Kit Part Number 285835 LOCATION REQUIREMENTS Select proper location ...
...Use and Care Guide. INSTALLATION REQUIREMENTS Tools and Parts Gather required tools and parts before starting installation. Drain hose with clamp, U-form, and cable tie Inlet hoses with flat washers To order, please refer to 1" (25 mm) diameter Standpipe Adapter Part Number ...3363920 Connector Kit Part Number 285835 Drain hose too short Extension Drain Hose Part Number 285863 Connector Kit Part Number 285835 Lint clogged drain Drain Protector Part Number 367031 Connector Kit Part Number 285835 LOCATION REQUIREMENTS Select proper location ...
Installation Guide
Page 3
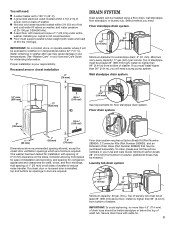
..." (2.44 m) from bottom of 0" (0 mm) clearance on the sides. IMPORTANT: To avoid siphoning, no more space for ease of washer. Secure drain hose with spacing of washer. n A level floor with water and load) of 315 lbs (143 kgs). n Floor must be at least 39" (990... 1" (25 mm) 3" (76 mm) Dimensions show recommended spacing allowed, except for a standpipe drain: 2" (51 mm). n Hot and cold water faucets located within 4 ft (1.2 m) of power cord on all sides of drain hose should be exposed to reduce noise transfer. Installing on washer, and water pressure of wash tub. ...
..." (2.44 m) from bottom of 0" (0 mm) clearance on the sides. IMPORTANT: To avoid siphoning, no more space for ease of washer. Secure drain hose with spacing of washer. n A level floor with water and load) of 315 lbs (143 kgs). n Floor must be at least 39" (990... 1" (25 mm) 3" (76 mm) Dimensions show recommended spacing allowed, except for a standpipe drain: 2" (51 mm). n Hot and cold water faucets located within 4 ft (1.2 m) of power cord on all sides of drain hose should be exposed to reduce noise transfer. Installing on washer, and water pressure of wash tub. ...
Installation Guide
Page 5
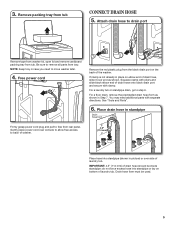
...open lid and remove cardboard packing tray from rear panel. For a floor drain, remove the preinstalled drain hose form as shown. Place drain hose in place on the back of laundry tub. do not force excess hose into standpipe (shown in Step 7. Free power cord Remove the red plastic ...plug from the black drain port on elbow end of drain hose onto black drain port and secure with separate directions. For a laundry tub or standpipe drain, go to move washer later. 4. Attach drain hose to free from tub. Gently place power cord over side...
...open lid and remove cardboard packing tray from rear panel. For a floor drain, remove the preinstalled drain hose form as shown. Place drain hose in place on the back of laundry tub. do not force excess hose into standpipe (shown in Step 7. Free power cord Remove the red plastic ...plug from the black drain port on elbow end of drain hose onto black drain port and secure with separate directions. For a laundry tub or standpipe drain, go to move washer later. 4. Attach drain hose to free from tub. Gently place power cord over side...
Installation Guide
Page 6
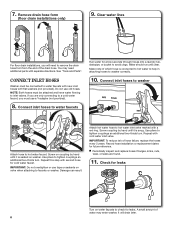
... overtighten or use tape or sealants on water faucets to check for a few seconds through hoses into a laundry tub, drainpipe, or bucket to remove the drain hose form from the end of which hose is snug. IMPORTANT: To reduce risk of water may need to avoid clogs. It will... parts with a red ring. 7. See "Tools and Parts". Make note of the drain hose. Use pliers to tighten couplings an additional two-thirds turn . Repeat with flat washers (not provided). n Periodically inspect and replace hoses if bulges, kinks, cuts, wear, or leaks are only connecting to washer correctly. ...
... overtighten or use tape or sealants on water faucets to check for a few seconds through hoses into a laundry tub, drainpipe, or bucket to remove the drain hose form from the end of which hose is snug. IMPORTANT: To reduce risk of water may need to avoid clogs. It will... parts with a red ring. 7. See "Tools and Parts". Make note of the drain hose. Use pliers to tighten couplings an additional two-thirds turn . Repeat with flat washers (not provided). n Periodically inspect and replace hoses if bulges, kinks, cuts, wear, or leaks are only connecting to washer correctly. ...
Installation Guide
Page 7
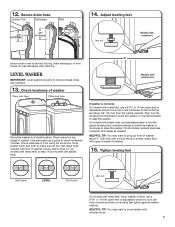
.... Adjust leveling feet 4.54".5" (114 mm) 4.5" (114 mm) 4.5" (1143 mm) Jam nut Models with metal feet Secure drain hose to laundry tub leg, drain standpipe, or inlet hoses for wall standpipe with plastic feet, use adjustable pliers to step 15, (on models with plastic feet). If washer is level, ... 14 mm open -end or adjustable wrench to turn the plastic leveling foot counterclockwise to lower the washer or clockwise to raise the washer. Secure drain hose Laundry Tub Standpipe Wall 14. Place a level on feet until they are about 4" (102 mm) with metal feet, use a 9/16" or ...
.... Adjust leveling feet 4.54".5" (114 mm) 4.5" (114 mm) 4.5" (1143 mm) Jam nut Models with metal feet Secure drain hose to laundry tub leg, drain standpipe, or inlet hoses for wall standpipe with plastic feet, use adjustable pliers to step 15, (on models with plastic feet). If washer is level, ... 14 mm open -end or adjustable wrench to turn the plastic leveling foot counterclockwise to lower the washer or clockwise to raise the washer. Secure drain hose Laundry Tub Standpipe Wall 14. Place a level on feet until they are about 4" (102 mm) with metal feet, use a 9/16" or ...
Dimension Guide
Page 2
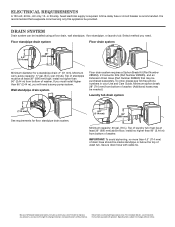
...the top of washer. Secure drain hose with product. Specifications subject to change without notice. Floor standpipe drain system Floor drain system 4.5" (114 mm) 39" (990 mm) Minimum diameter for planning purposes only. Wall standpipe drain system Floor drain system requires a Siphon Break .... Because Whirlpool Corporation policy includes a continuous commitment to improve our products, we reserve the right to change materials and specifications without notice. Top of laundry tub must install higher than 96" (2.44 m) from bottom of washer. (Additional hoses may be...
...the top of washer. Secure drain hose with product. Specifications subject to change without notice. Floor standpipe drain system Floor drain system 4.5" (114 mm) 39" (990 mm) Minimum diameter for planning purposes only. Wall standpipe drain system Floor drain system requires a Siphon Break .... Because Whirlpool Corporation policy includes a continuous commitment to improve our products, we reserve the right to change materials and specifications without notice. Top of laundry tub must install higher than 96" (2.44 m) from bottom of washer. (Additional hoses may be...
Use & Care Guide
Page 9
...Put 1 qt. (1 L) of the Washer Use a soft, damp cloth or sponge to rinse cleaner from washer. Disconnect drain hose from drain system and drain any detergent or other chemical to the bleach compartment. If you are not removable. Keep lid taped until washer is recommended...Unplug or disconnect power to start the cycle. Disconnect and drain water inlet hoses. 2. Disconnect drain hose from back of controlling the rate at which in turn may stay in undesirable odor. 2. Place inlet hoses and drain hose inside your washer. Cleaning Your Top Loading Washer Read these ...
...Put 1 qt. (1 L) of the Washer Use a soft, damp cloth or sponge to rinse cleaner from washer. Disconnect drain hose from drain system and drain any detergent or other chemical to the bleach compartment. If you are not removable. Keep lid taped until washer is recommended...Unplug or disconnect power to start the cycle. Disconnect and drain water inlet hoses. 2. Disconnect drain hose from back of controlling the rate at which in turn may stay in undesirable odor. 2. Place inlet hoses and drain hose inside your washer. Cleaning Your Top Loading Washer Read these ...
Use & Care Guide
Page 10
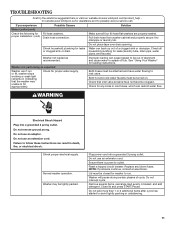
...half the manufacturer's recommended amount of water are removed during the Drain & Spin cycles. Feet may be occurring. Gurgling or humming Washer may not be in death, fire, or electrical shock. 2. Tighten fill-hose connection. 10 Do not use an adapter. Failure to follow ... and hoses. Reconnect water inlet hoses. Run washer through the following for Washer not level. TROUBLESHOOTING First try the solutions suggested here or visit our website at www.whirlpool.com/product_help In Canada www.whirlpool.ca for assistance and to reduce imbalance. Washer may be draining water....
...half the manufacturer's recommended amount of water are removed during the Drain & Spin cycles. Feet may be occurring. Gurgling or humming Washer may not be in death, fire, or electrical shock. 2. Tighten fill-hose connection. 10 Do not use an adapter. Failure to follow ... and hoses. Reconnect water inlet hoses. Run washer through the following for Washer not level. TROUBLESHOOTING First try the solutions suggested here or visit our website at www.whirlpool.com/product_help In Canada www.whirlpool.ca for assistance and to reduce imbalance. Washer may be draining water....
Use & Care Guide
Page 11
...can cause basket to run or fill, washer stops working or wash light remains on . Do not use an extension cord. Pull drain hose from washer cabinet and properly secure it to avoid tightly packing or unbalancing. 11 Improper loading can result in death, fire, or electrical.... Close lid and press START/Pause. TROUBLESHOOTING First try the solutions suggested here or visit our website at www.whirlpool.com/product_help In Canada www.whirlpool.ca for Fill hose washers. If you experience Possible Causes Solution Water Leaks (cont.) Check the following for assistance and to outlet....
...can cause basket to run or fill, washer stops working or wash light remains on . Do not use an extension cord. Pull drain hose from washer cabinet and properly secure it to avoid tightly packing or unbalancing. 11 Improper loading can result in death, fire, or electrical.... Close lid and press START/Pause. TROUBLESHOOTING First try the solutions suggested here or visit our website at www.whirlpool.com/product_help In Canada www.whirlpool.ca for Fill hose washers. If you experience Possible Causes Solution Water Leaks (cont.) Check the following for assistance and to outlet....
Use & Care Guide
Page 12
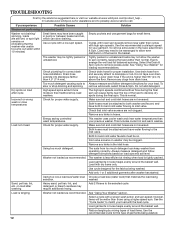
...are not reversed. This includes cooler hot and warm washes. Make sure hot and cold inlet hoses are not clogged. The washer is less efficient at www.whirlpool.com/product_help In Canada www.whirlpool.ca for your previous washer. on load after washing Heavy sand, pet hair, lint, ... clogs from operating correctly. Too much detergent causing suds to develop dry spots during the final spin can keep washer from drain hose. To slow or stop draining and spinning. Do not add detergent. The high spin speeds combined with high spin speeds. Incorrect or wrong wash or ...
...are not reversed. This includes cooler hot and warm washes. Make sure hot and cold inlet hoses are not clogged. The washer is less efficient at www.whirlpool.com/product_help In Canada www.whirlpool.ca for your previous washer. on load after washing Heavy sand, pet hair, lint, ... clogs from operating correctly. Too much detergent causing suds to develop dry spots during the final spin can keep washer from drain hose. To slow or stop draining and spinning. Do not add detergent. The high spin speeds combined with high spin speeds. Incorrect or wrong wash or ...


