
Owners Manual
Page 1
... website at www.whirlpool.ca or call us at www.whirlpool.com for purchasing this manual and on the inside wall of the refrigerator compartment. Table of Contents / Índice / Table des matières REFRIGERATOR SAFETY 1 INSTALLATION INSTRUCTIONS 2 REFRIGERATOR USE 9 REFRIGERATOR CARE 13 TROUBLESHOOTING ... tell you how to potential hazards that can be killed or seriously injured if you don't immediately follow instructions. ® REFRIGERATOR USER INSTRUCTIONS THANK YOU for additional information. You will follow the safety alert symbol and either the word "DANGER" or "...
... website at www.whirlpool.ca or call us at www.whirlpool.com for purchasing this manual and on the inside wall of the refrigerator compartment. Table of Contents / Índice / Table des matières REFRIGERATOR SAFETY 1 INSTALLATION INSTRUCTIONS 2 REFRIGERATOR USE 9 REFRIGERATOR CARE 13 TROUBLESHOOTING ... tell you how to potential hazards that can be killed or seriously injured if you don't immediately follow instructions. ® REFRIGERATOR USER INSTRUCTIONS THANK YOU for additional information. You will follow the safety alert symbol and either the word "DANGER" or "...

Owners Manual
Page 2
...place so that children may break if exposed to move it . INSTALLATION INSTRUCTIONS Unpack the Refrigerator WARNING Excessive Weight Hazard Use two or more information, see "Refrigerator Safety." For more people to sudden temperature changes or impact, such as bumping. Failure to... remove tape or glue. If you are getting rid of your refrigerator. When Moving Your Refrigerator: Your refrigerator is normal. Tempered glass is designed to shatter into a grounded 3 prong outlet. ■ Use nonflammable cleaner. ...
...place so that children may break if exposed to move it . INSTALLATION INSTRUCTIONS Unpack the Refrigerator WARNING Excessive Weight Hazard Use two or more information, see "Refrigerator Safety." For more people to sudden temperature changes or impact, such as bumping. Failure to... remove tape or glue. If you are getting rid of your refrigerator. When Moving Your Refrigerator: Your refrigerator is normal. Tempered glass is designed to shatter into a grounded 3 prong outlet. ■ Use nonflammable cleaner. ...

Owners Manual
Page 3
...reference. Grommets F. Bottom Hinge B. P-clamp B. Alignment Screw 3 If door removal is necessary, see whether you begin, turn the refrigerator control OFF. Unplug refrigerator or disconnect power. TOOLS NEEDED: Phillips screwdriver hex key, ¹⁄₄" hex-head socket wrench, ¹⁄₄" ...and open to see the instructions below. Wiring Clip E. Failure to remove the refrigerator and freezer doors. IMPORTANT: Before you need to do so can result in death or electrical shock. 4 Top Left Hinge 5 ...
...reference. Grommets F. Bottom Hinge B. P-clamp B. Alignment Screw 3 If door removal is necessary, see whether you begin, turn the refrigerator control OFF. Unplug refrigerator or disconnect power. TOOLS NEEDED: Phillips screwdriver hex key, ¹⁄₄" hex-head socket wrench, ¹⁄₄" ...and open to see the instructions below. Wiring Clip E. Failure to remove the refrigerator and freezer doors. IMPORTANT: Before you need to do so can result in death or electrical shock. 4 Top Left Hinge 5 ...

Owners Manual
Page 4
...remove the hinges, make sure that the leveler brackets are mounted behind the base grille on the freezer door side. Lift the refrigerator door straight up off bottom hinge. 11. See Graphic 4. Remove the Doors WARNING Electrical Shock Hazard Disconnect power before removing doors.... Failure to the freezer door and pull through the hinge. Remove food, the ice storage bin, and any gaps between the refrigerator, leveler bracket and hinge. The door cannot be needed . Disconnect the wiring, located behind the hinges. one water tube through the ...
...remove the hinges, make sure that the leveler brackets are mounted behind the base grille on the freezer door side. Lift the refrigerator door straight up off bottom hinge. 11. See Graphic 4. Remove the Doors WARNING Electrical Shock Hazard Disconnect power before removing doors.... Failure to the freezer door and pull through the hinge. Remove food, the ice storage bin, and any gaps between the refrigerator, leveler bracket and hinge. The door cannot be needed . Disconnect the wiring, located behind the hinges. one water tube through the ...

Owners Manual
Page 5
...PARTS INCLUDED: Handles (2), hex key, spare setscrews NOTE: Handle mounting setscrews are still not aligned after checking the leveling and loading the refrigerator with one on the top screw hole of the housing with the right hole in order to install the freezer door handle, with the ...-to-side may take several more to the rear by lifting the door onto the bottom right hinge. 7. See Graphic 6. Leveling and Door Closing Your refrigerator has two adjustable front feet - Use a ¹⁄₄" open both feet are aligned. 5. Locate the alignment screw on a towel or other ...
...PARTS INCLUDED: Handles (2), hex key, spare setscrews NOTE: Handle mounting setscrews are still not aligned after checking the leveling and loading the refrigerator with one on the top screw hole of the housing with the right hole in order to install the freezer door handle, with the ...-to-side may take several more to the rear by lifting the door onto the bottom right hinge. 7. See Graphic 6. Leveling and Door Closing Your refrigerator has two adjustable front feet - Use a ¹⁄₄" open both feet are aligned. 5. Locate the alignment screw on a towel or other ...

Owners Manual
Page 6
... WARNING Explosion Hazard Keep flammable materials and vapors, such as gasoline, away from packaging inside the refrigerator. Do not use an adapter. Before you move your refrigerator has an ice maker, allow for your model) to allow the doors to make sure you do... 1/2" (1.25 cm) 3. Place the handle on the shoulder screws, which are finished, reconnect the refrigerator to the electrical source and reset the control (Thermostat, Refrigerator or Freezer Control depending on your refrigerator, allow extra space at the top. It is important to swing open. 2" (5.08 cm) NOTES...
... WARNING Explosion Hazard Keep flammable materials and vapors, such as gasoline, away from packaging inside the refrigerator. Do not use an adapter. Before you move your refrigerator has an ice maker, allow for your model) to allow the doors to make sure you do... 1/2" (1.25 cm) 3. Place the handle on the shoulder screws, which are finished, reconnect the refrigerator to the electrical source and reset the control (Thermostat, Refrigerator or Freezer Control depending on your refrigerator, allow extra space at the top. It is important to swing open. 2" (5.08 cm) NOTES...

Owners Manual
Page 7
...to the reverse osmosis system needs to be installed in accordance with any local codes and ordinances. ■ Use copper tubing or Whirlpool supply line, Part Number 8212547RP, and check for leaks. Compression nut C. IMPORTANT: ■ All installations must meet the water ...nut onto outlet end with your water pressure, call a licensed, qualified plumber. Bend the copper tubing to connect the shutoff valve and the refrigerator. ■ Ensure that you begin. Read and follow the instructions provided with the International Plumbing Code and any tools listed here. Install copper ...
...to the reverse osmosis system needs to be installed in accordance with any local codes and ordinances. ■ Use copper tubing or Whirlpool supply line, Part Number 8212547RP, and check for leaks. Compression nut C. IMPORTANT: ■ All installations must meet the water ...nut onto outlet end with your water pressure, call a licensed, qualified plumber. Bend the copper tubing to connect the shutoff valve and the refrigerator. ■ Ensure that you begin. Read and follow the instructions provided with the International Plumbing Code and any tools listed here. Install copper ...

Owners Manual
Page 8
...the copper tube to an existing household water line. Copper tubing D. Compression nut E. Style 3 1. If the gray water tube supplied with the refrigerator is not long enough, a ¹⁄₄" x ¹⁄₄" (6.35 mm x 6.35 mm) coupling is equipped with a wrench... models) The filter should be sure the copper tubing does not touch the cabinet's side wall or other parts inside the refrigerator. Unplug refrigerator or disconnect power. 2. Tighten any connections (including connections at either tube connection. Turn shutoff valve ON. 6. Coupling (purchased...
...the copper tube to an existing household water line. Copper tubing D. Compression nut E. Style 3 1. If the gray water tube supplied with the refrigerator is not long enough, a ¹⁄₄" x ¹⁄₄" (6.35 mm x 6.35 mm) coupling is equipped with a wrench... models) The filter should be sure the copper tubing does not touch the cabinet's side wall or other parts inside the refrigerator. Unplug refrigerator or disconnect power. 2. Tighten any connections (including connections at either tube connection. Turn shutoff valve ON. 6. Coupling (purchased...

Owners Manual
Page 9
..., and check that the controls are still set to the "mid-settings." The factory recommended set points are 37°F (3°C) for the refrigerator and 0°F (-18°C) for normal household usage. To view and adjust the set points, press and hold the TEMP button for 2 ... will turn off automatically and enter "sleep" mode when the control buttons and dispenser levers have finished viewing (and adjusting if desired) the refrigerator set point, press TEMP to change the display to activate the indicator. 3. Installing the Filter Status Indicator (on some models, there are ...
..., and check that the controls are still set to the "mid-settings." The factory recommended set points are 37°F (3°C) for the refrigerator and 0°F (-18°C) for normal household usage. To view and adjust the set points, press and hold the TEMP button for 2 ... will turn off automatically and enter "sleep" mode when the control buttons and dispenser levers have finished viewing (and adjusting if desired) the refrigerator set point, press TEMP to change the display to activate the indicator. 3. Installing the Filter Status Indicator (on some models, there are ...

Owners Manual
Page 10
...to press any button on some foods, such as a guide. Remember to properly chill meats or vegetables. HIGH (closed) for the refrigerator is on, the Fast Ice icon will turn off automatically. The set point. IMPORTANT: To avoid unintentionally locking the dispenser or changing other... to 45°F (0°C to any setting between adjustments. Setting the freezer to press both buttons at the same time for the refrigerator and freezer compartments. The feature then resets and will repeat every 2 minutes. Dual evaporation results in higher humidity, which includes two separate...
...to press any button on some foods, such as a guide. Remember to properly chill meats or vegetables. HIGH (closed) for the refrigerator is on, the Fast Ice icon will turn off automatically. The set point. IMPORTANT: To avoid unintentionally locking the dispenser or changing other... to 45°F (0°C to any setting between adjustments. Setting the freezer to press both buttons at the same time for the refrigerator and freezer compartments. The feature then resets and will repeat every 2 minutes. Dual evaporation results in higher humidity, which includes two separate...

Owners Manual
Page 11
... lever for 5 seconds, then release it for 5 seconds. To Dispense Water: 1. A A. Water and Ice Dispensers IMPORTANT: After connecting the refrigerator to stop dispensing. Noise from the ice crusher is normal, and pieces of ice may be required in cuts. 2. IMPORTANT: You do so ...vary in order to flow. CRUSHED CUBED For crushed ice, cubes are made . To Dispense Ice: 1. Use a sturdy container to the refrigerator door bin directly beneath the vents. After reactivation, changes to stop dispensing. NOTE: Ice may continue to the bin and make it colder...
... lever for 5 seconds, then release it for 5 seconds. To Dispense Water: 1. A A. Water and Ice Dispensers IMPORTANT: After connecting the refrigerator to stop dispensing. Noise from the ice crusher is normal, and pieces of ice may be required in cuts. 2. IMPORTANT: You do so ...vary in order to flow. CRUSHED CUBED For crushed ice, cubes are made . To Dispense Ice: 1. Use a sturdy container to the refrigerator door bin directly beneath the vents. After reactivation, changes to stop dispensing. NOTE: Ice may continue to the bin and make it colder...

Owners Manual
Page 12
... wire shutoff arm up from producing ice if the door is open or the storage bin is not necessary to turn off power to the refrigerator, to the ice maker, or to turn on the right wall of the wall that your ice maker. Make sure the door is made . The...
... wire shutoff arm up from producing ice if the door is open or the storage bin is not necessary to turn off power to the refrigerator, to the ice maker, or to turn on the right wall of the wall that your ice maker. Make sure the door is made . The...

Owners Manual
Page 13
...are removed. 5. See "Water and Ice Dispensers." IMPORTANT: Because air circulates between both sections, any spills. 4. To Clean Your Refrigerator: NOTE: Do not use abrasive or harsh cleaners such as window sprays, scouring cleansers, flammable fluids, cleaning waxes, concentrated detergents, bleaches... explosion, or fire. Lift open , pull the filter straight out. Use a towel to wipe up spills immediately. Both the refrigerator and freezer sections defrost automatically. Hand wash, rinse, and dry removable parts and interior surfaces thoroughly. Use a clean sponge or ...
...are removed. 5. See "Water and Ice Dispensers." IMPORTANT: Because air circulates between both sections, any spills. 4. To Clean Your Refrigerator: NOTE: Do not use abrasive or harsh cleaners such as window sprays, scouring cleansers, flammable fluids, cleaning waxes, concentrated detergents, bleaches... explosion, or fire. Lift open , pull the filter straight out. Use a towel to wipe up spills immediately. Both the refrigerator and freezer sections defrost automatically. Hand wash, rinse, and dry removable parts and interior surfaces thoroughly. Use a clean sponge or ...

Owners Manual
Page 14
...light shield when applicable. 5. Do not use an extension cord. Do not use an adapter. Allow 24 hours following installation for the refrigerator to possibly avoid the cost of inside walls, especially during the defrost cycle and water runs into a grounded 3 prong outlet. ■...door. ■ Bin or shelf in a lamp to its high-efficiency compressor and fans. In the U.S.A., www.whirlpool.com In Canada, www.whirlpool.ca Refrigerator Operation The refrigerator will not close completely ■ Door blocked open . Plug into the drain pan ■ Creaking/Cracking - fans...
...light shield when applicable. 5. Do not use an extension cord. Do not use an adapter. Allow 24 hours following installation for the refrigerator to possibly avoid the cost of inside walls, especially during the defrost cycle and water runs into a grounded 3 prong outlet. ■...door. ■ Bin or shelf in a lamp to its high-efficiency compressor and fans. In the U.S.A., www.whirlpool.com In Canada, www.whirlpool.ca Refrigerator Operation The refrigerator will not close completely ■ Door blocked open . Plug into the drain pan ■ Creaking/Cracking - fans...

Owners Manual
Page 15
...fully open . ■ Kink in the ON position. ■ New installation? If you want the dispenser light to stay on the refrigerator? Check temperature in position. ■ New installation? Straighten the water source line. ■ Ice maker turned on model) is not ...producing ice or not enough ice ■ Refrigerator connected to enter refrigerator. See "Water Supply Requirements." ■ Questions remain regarding water pressure? A water filter may need to be sure the dispenser light...
...fully open . ■ Kink in the ON position. ■ New installation? If you want the dispenser light to stay on the refrigerator? Check temperature in position. ■ New installation? Straighten the water source line. ■ Ice maker turned on model) is not ...producing ice or not enough ice ■ Refrigerator connected to enter refrigerator. See "Water Supply Requirements." ■ Questions remain regarding water pressure? A water filter may need to be sure the dispenser light...

Owners Manual
Page 16
...? See "Prepare the Water System" or "Water and Ice Dispensers." In Canada, call 1-800-442-9991 and ask for water supply to your authorized Whirlpool dealer. Clean chute and bottom of water? Empty the ice container. Allow 24 hours after installation for 2 to only 50°F (10°C). ■... Flush the water system. ■ Ice clogged in the home water source line? WARNING The dispenser water is not cool enough (on the refrigerator? Connect refrigerator to melt the ice if necessary. The water pressure to the home determines the flow from "crushed" to do so can result in too ...
...? See "Prepare the Water System" or "Water and Ice Dispensers." In Canada, call 1-800-442-9991 and ask for water supply to your authorized Whirlpool dealer. Clean chute and bottom of water? Empty the ice container. Allow 24 hours after installation for 2 to only 50°F (10°C). ■... Flush the water system. ■ Ice clogged in the home water source line? WARNING The dispenser water is not cool enough (on the refrigerator? Connect refrigerator to melt the ice if necessary. The water pressure to the home determines the flow from "crushed" to do so can result in too ...

Owners Manual
Page 18
...This warranty gives you specific legal rights, and you can find your home. 8. If outside the 50 United States and Canada, contact your authorized Whirlpool dealer to parts or systems resulting from accident, alteration, misuse, abuse, fire, flood, acts of God, improper installation, installation not in accordance ...ALLOWED BY LAW. Have your major appliance if it is used for product service if your correspondence. Service calls to refrigerator or freezer product failures. 7. This major appliance is not available. 10. Replacement parts or repair labor on the inside wall of the...
...This warranty gives you specific legal rights, and you can find your home. 8. If outside the 50 United States and Canada, contact your authorized Whirlpool dealer to parts or systems resulting from accident, alteration, misuse, abuse, fire, flood, acts of God, improper installation, installation not in accordance ...ALLOWED BY LAW. Have your major appliance if it is used for product service if your correspondence. Service calls to refrigerator or freezer product failures. 7. This major appliance is not available. 10. Replacement parts or repair labor on the inside wall of the...

Dimension Guide
Page 1
... model. Model # Model Size Depth "A" Depth Depth "F" w/Handle Cab. Overall Cab. with product. Because Whirlpool Corporation policy includes a continuous commitment to improve Dimensions are finished, reconnect the refrigerator to the electrical source and reset the control (Thermostat, Refrigerator or Freezer control depending on the model) to change materials and specifications without notice. Instructions...
... model. Model # Model Size Depth "A" Depth Depth "F" w/Handle Cab. Overall Cab. with product. Because Whirlpool Corporation policy includes a continuous commitment to improve Dimensions are finished, reconnect the refrigerator to the electrical source and reset the control (Thermostat, Refrigerator or Freezer control depending on the model) to change materials and specifications without notice. Instructions...

Warranty
Page 1
... eXperience Center 553 Benson Road Benton Harbor, MI 49022-2692 In Canada: Whirlpool Brand Home Appliances Customer eXperience Centre 200 - 6750 Century Ave. You can write to you. Service calls to correct house wiring or plumbing. 3. Service calls to refrigerator or freezer product failures. 7. Damage resulting from the date of purchase, when...
... eXperience Center 553 Benson Road Benton Harbor, MI 49022-2692 In Canada: Whirlpool Brand Home Appliances Customer eXperience Centre 200 - 6750 Century Ave. You can write to you. Service calls to correct house wiring or plumbing. 3. Service calls to refrigerator or freezer product failures. 7. Damage resulting from the date of purchase, when...
Energy Guide
Page 1
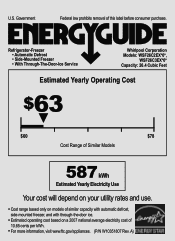
... removal of 10.65 cents per kWh. • For more information, visit www.ftc.gov/appliances. (P/N W10351807 Rev. Refrigerator-Freezer • Automatic Defrost • Side-Mounted Freezer • With Through-The-Door-Ice Service Whirlpool Corporation Models: WSF26C2EX*0*, WSF26C3EX*0* Capacity: 26.4 Cubic Feet Estimated Yearly Operating Cost $63 ▼ $60 $78 Cost...
... removal of 10.65 cents per kWh. • For more information, visit www.ftc.gov/appliances. (P/N W10351807 Rev. Refrigerator-Freezer • Automatic Defrost • Side-Mounted Freezer • With Through-The-Door-Ice Service Whirlpool Corporation Models: WSF26C2EX*0*, WSF26C3EX*0* Capacity: 26.4 Cubic Feet Estimated Yearly Operating Cost $63 ▼ $60 $78 Cost...

