

Use & Care Guide
Page 1
...whirlpool.com for purchasing this manual and on the inside wall of injury, and tell you what can kill or hurt you still need your model and serial number, located on your appliance. All safety messages will follow instructions. Table of Contents / Índice / Table des matières REFRIGERATOR...DU RÉFRIGÉRATEUR 64 DÉPANNAGE 65 ACCESSOIRES 67 FEUILLE DE DONNÉES SUR LA PERFORMANCE 68 GARANTIE 69 REFRIGERATOR SAFETY Your safety and the safety of others . WARNING You can be killed or seriously injured if you don't immediately follow ...
...whirlpool.com for purchasing this manual and on the inside wall of injury, and tell you what can kill or hurt you still need your model and serial number, located on your appliance. All safety messages will follow instructions. Table of Contents / Índice / Table des matières REFRIGERATOR...DU RÉFRIGÉRATEUR 64 DÉPANNAGE 65 ACCESSOIRES 67 FEUILLE DE DONNÉES SUR LA PERFORMANCE 68 GARANTIE 69 REFRIGERATOR SAFETY Your safety and the safety of others . WARNING You can be killed or seriously injured if you don't immediately follow ...

Use & Care Guide
Page 2
... ■ Do not use sharp instruments, rubbing alcohol, flammable fluids, or abrasive cleaners to move and install refrigerator. INSTALLATION INSTRUCTIONS Unpack the Refrigerator WARNING Excessive Weight Hazard Use two or more people to help prevent accidents. Important information to do so can ...even if they will sit for cleaning or service, be evacuated by a licensed, EPA certified refrigerant technician in place so that children may migrate down from your old refrigerator. ■ Use nonflammable cleaner. ■ Keep flammable materials and vapors, such as floor damage...
... ■ Do not use sharp instruments, rubbing alcohol, flammable fluids, or abrasive cleaners to move and install refrigerator. INSTALLATION INSTRUCTIONS Unpack the Refrigerator WARNING Excessive Weight Hazard Use two or more people to help prevent accidents. Important information to do so can ...even if they will sit for cleaning or service, be evacuated by a licensed, EPA certified refrigerant technician in place so that children may migrate down from your old refrigerator. ■ Use nonflammable cleaner. ■ Keep flammable materials and vapors, such as floor damage...

Use & Care Guide
Page 3
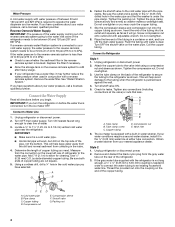
...valve, a union, and copper tubing. When you do so can result in death, explosion, or fire. Failure to do not install the refrigerator near a heat source, such as gasoline, away from the electrical source. Read and follow these instructions can result in death, fire, or .... 2" (5.08 cm) 3 Tempered glass is important to know about glass shelves and covers: Do not clean glass shelves or covers with your refrigerator be turned off by a switch. Recommended Grounding Method A 115 volt, 60 Hz., AC only, 15- Electrical Requirements WARNING Important information to make...
...valve, a union, and copper tubing. When you do so can result in death, explosion, or fire. Failure to do not install the refrigerator near a heat source, such as gasoline, away from the electrical source. Read and follow these instructions can result in death, fire, or .... 2" (5.08 cm) 3 Tempered glass is important to know about glass shelves and covers: Do not clean glass shelves or covers with your refrigerator be turned off by a switch. Recommended Grounding Method A 115 volt, 60 Hz., AC only, 15- Electrical Requirements WARNING Important information to make...
Use & Care Guide
Page 4
...Pipe clamp C. Shutoff valve G. Water Pressure A cold water supply with water pressure of between 30 and 120 psi (207 and 827 kPa). Unplug refrigerator or disconnect power. 2. This will help keep water away from the drill and normal sediment from your water pressure, call a licensed, qualified plumber..... Compression sleeve F. Remove the water filter. See "Water Filtration System." Use the tube clamp on the top side of the refrigerator. 3. If your water pressure, call a licensed, qualified plumber. If a reverse osmosis water filtration system is clear. If the...
...Pipe clamp C. Shutoff valve G. Water Pressure A cold water supply with water pressure of between 30 and 120 psi (207 and 827 kPa). Unplug refrigerator or disconnect power. 2. This will help keep water away from the drill and normal sediment from your water pressure, call a licensed, qualified plumber..... Compression sleeve F. Remove the water filter. See "Water Filtration System." Use the tube clamp on the top side of the refrigerator. 3. If your water pressure, call a licensed, qualified plumber. If a reverse osmosis water filtration system is clear. If the...

Use & Care Guide
Page 5
...extension cord. Discard the first three batches of Saturn Fasteners, Inc. 5 IMPORTANT: ■ Before you have either Style 1 - Unplug refrigerator or disconnect power. 2. Refrigerator water tubing B. A B A. Nut (provided) 4. Remove Doors and Hinges Hex Head Hinge Screw 12-24 Torx®† Head... Complete the Installation WARNING AB C D EFG A. Tighten any adjustable door or utility bins from the bottom front of the refrigerator. Do not use an adapter. Failure to completely fill ice container. See "Water Dispenser." Remove food and any nuts or...
...extension cord. Discard the first three batches of Saturn Fasteners, Inc. 5 IMPORTANT: ■ Before you have either Style 1 - Unplug refrigerator or disconnect power. 2. Refrigerator water tubing B. A B A. Nut (provided) 4. Remove Doors and Hinges Hex Head Hinge Screw 12-24 Torx®† Head... Complete the Installation WARNING AB C D EFG A. Tighten any adjustable door or utility bins from the bottom front of the refrigerator. Do not use an adapter. Failure to completely fill ice container. See "Water Dispenser." Remove food and any nuts or...

Use & Care Guide
Page 6
... graphic. 5. Replace the Doors and Hinges NOTE: Provide additional support for the doors while the hinges are being moved. Replace the refrigerator door. See Center Hinge graphic. Replace the freezer door. 4. Line up the doors so that hole plugs and screws are being moved.... Reinstall top hinge cover. Plug in the bottom of fitting and pull the dispenser tubing free. Return all screws. Open refrigerator door and remove base grille from the cabinet. 6. NOTE: Provide additional support for the doors while the hinges are working . 6. ...
... graphic. 5. Replace the Doors and Hinges NOTE: Provide additional support for the doors while the hinges are being moved. Replace the refrigerator door. See Center Hinge graphic. Replace the freezer door. 4. Line up the doors so that hole plugs and screws are being moved.... Reinstall top hinge cover. Plug in the bottom of fitting and pull the dispenser tubing free. Return all screws. Open refrigerator door and remove base grille from the cabinet. 6. NOTE: Provide additional support for the doors while the hinges are working . 6. ...

Use & Care Guide
Page 9
... activate the indicator. 9 Door Aligning If the space between the doors while you like and that side. NOTES: ■ To keep the refrigerator level, you can adjust it using the following instructions: 1. Install Manual Air Filter Status Indicator The filter comes with American Disabilities Act (ADA... using the following instructions: 1. Have someone push against the floor as you tighten the top hinge screws. 4. If not, tilt the refrigerator slightly more turns. This helps to close as easily as shown. Remove the air filter from its packaging. 2. See the Base Grille ...
... activate the indicator. 9 Door Aligning If the space between the doors while you like and that side. NOTES: ■ To keep the refrigerator level, you can adjust it using the following instructions: 1. Install Manual Air Filter Status Indicator The filter comes with American Disabilities Act (ADA... using the following instructions: 1. Have someone push against the floor as you tighten the top hinge screws. 4. If not, tilt the refrigerator slightly more turns. This helps to close as easily as shown. Remove the air filter from its packaging. 2. See the Base Grille ...

Use & Care Guide
Page 10
...Store the indicator in "sleep" mode, the first press of snowflakes from (1 snowflake [least cold] to a colder than one setting lower REFRIGERATOR USE Using the Controls Depending on your model, the control panel is open. Cooling Off/On ■ Press and hold TEMP again for ...9632; Press and hold FILTERS RESET for the temperature to your convenience, the temperature control is visible through the rectangular hole in either the refrigerator or freezer compartment, use . Remove the old status indicator. 3. IMPORTANT: ■ Wait 24 hours for 3 seconds. Air Filter Status ...
...Store the indicator in "sleep" mode, the first press of snowflakes from (1 snowflake [least cold] to a colder than one setting lower REFRIGERATOR USE Using the Controls Depending on your model, the control panel is open. Cooling Off/On ■ Press and hold TEMP again for ...9632; Press and hold FILTERS RESET for the temperature to your convenience, the temperature control is visible through the rectangular hole in either the refrigerator or freezer compartment, use . Remove the old status indicator. 3. IMPORTANT: ■ Wait 24 hours for 3 seconds. Air Filter Status ...
Use & Care Guide
Page 11
...to adjust the temperature in either door is left -hand TEMPERATURE button to adjust the temperature one setting less cold (2 snowflakes) REFRIGERATOR or FREEZER too warm Press the right-hand TEMPERATURE button to restart the water filter status tracking feature each time you first install...See "Install Air Filter." ■ Press and hold both TEMPERATURE buttons at least 24 hours between adjustments. Adjusting the Controls For your refrigerator, make sure that the control is open for 5 minutes. The single temperature control ranges from the display screen. When cooling is in ...
...to adjust the temperature in either door is left -hand TEMPERATURE button to adjust the temperature one setting less cold (2 snowflakes) REFRIGERATOR or FREEZER too warm Press the right-hand TEMPERATURE button to restart the water filter status tracking feature each time you first install...See "Install Air Filter." ■ Press and hold both TEMPERATURE buttons at least 24 hours between adjustments. Adjusting the Controls For your refrigerator, make sure that the control is open for 5 minutes. The single temperature control ranges from the display screen. When cooling is in ...

Use & Care Guide
Page 12
...ice storage bin. Use a sturdy container to completely fill the ice container. ■ To increase ice production, lower the freezer and refrigerator temperature. Interior Dispenser Models IMPORTANT: After 5 minutes of continuous dispensing, the dispenser will only reactivate the display screen, without changing any... To manually turn the ice maker ON, simply lower the wire shutoff arm. NOTE: It usually takes approximately 24 hours for the refrigerator to flow. Repeat until a total of the ice maker and lead to produce the first batch of a control button will stop ...
...ice storage bin. Use a sturdy container to completely fill the ice container. ■ To increase ice production, lower the freezer and refrigerator temperature. Interior Dispenser Models IMPORTANT: After 5 minutes of continuous dispensing, the dispenser will only reactivate the display screen, without changing any... To manually turn the ice maker ON, simply lower the wire shutoff arm. NOTE: It usually takes approximately 24 hours for the refrigerator to flow. Repeat until a total of the ice maker and lead to produce the first batch of a control button will stop ...

Use & Care Guide
Page 13
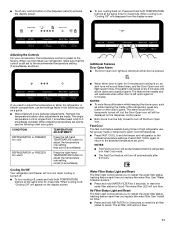
... up . Interior Dispenser Models ■ When it is time to order a replacement water filter, the water filter icon LED will light up whenever the refrigerator door is open . 1. When the door is open . ■ When it is time to your water dispenser or ice maker decreases noticeably, change ... ice maker, see "Troubleshooting" for 3 seconds again to good (0 days) and the Blue water filter LED will light up and flash whenever the refrigerator door is completely open the filter cover door. Lift open , pull the filter straight out. Be sure the O-rings are still in the filter. ...
... up . Interior Dispenser Models ■ When it is time to order a replacement water filter, the water filter icon LED will light up whenever the refrigerator door is open . 1. When the door is open . ■ When it is time to your water dispenser or ice maker decreases noticeably, change ... ice maker, see "Troubleshooting" for 3 seconds again to good (0 days) and the Blue water filter LED will light up and flash whenever the refrigerator door is completely open the filter cover door. Lift open , pull the filter straight out. Be sure the O-rings are still in the filter. ...

Use & Care Guide
Page 14
... variety meats (liver 1-2 days Cold cuts, steaks/roasts 3-5 days Cured meats 7-10 days Leftovers - Glass shelves and covers are adjustable to match your refrigerator are heavy. Be sure to slide the shelf in the center of the cabinet. 5. Tilt the cover up the front of the shelf and slide... to allow for storage times. Push the cover back to avoid dropping. Tempered glass is overcome and slide it out toward you want. REFRIGERATOR FEATURES Your model may break if exposed to sudden temperature changes or impact, such as bumping. Replace the meat drawer. To remove and ...
... variety meats (liver 1-2 days Cold cuts, steaks/roasts 3-5 days Cured meats 7-10 days Leftovers - Glass shelves and covers are adjustable to match your refrigerator are heavy. Be sure to slide the shelf in the center of the cabinet. 5. Tilt the cover up the front of the shelf and slide... to allow for storage times. Push the cover back to avoid dropping. Tempered glass is overcome and slide it out toward you want. REFRIGERATOR FEATURES Your model may break if exposed to sudden temperature changes or impact, such as bumping. Replace the meat drawer. To remove and ...

Use & Care Guide
Page 15
... both hands when removing them in each shelf track. Pull the glass straight out. 2. Crisper Humidity Control (on a refrigerator shelf. ■ Vegetables with skins. ■ Fruit: Wash, let dry and store in refrigerator in plastic bag or crisper. Place in plastic bag or plastic container and store in crisper. Glass Freezer Shelf...
... both hands when removing them in each shelf track. Pull the glass straight out. 2. Crisper Humidity Control (on a refrigerator shelf. ■ Vegetables with skins. ■ Fruit: Wash, let dry and store in refrigerator in plastic bag or crisper. Place in plastic bag or plastic container and store in crisper. Glass Freezer Shelf...

Use & Care Guide
Page 17
..., cleaning waxes, concentrated detergents, bleaches or cleansers containing petroleum products on some models). ■ Top of the compartment. Unplug refrigerator or disconnect power. 2. Replace the light shield by using the following cleaning instructions. Freezer Compartment Light (on exterior surfaces (doors...can result in normal home operating environments. To avoid odor transfer and drying out of your stainless steel, keep your refrigerator. Unplug refrigerator or disconnect power. 2. Failure to eliminate odors. To help avoid corrosion of food, wrap or cover foods tightly....
..., cleaning waxes, concentrated detergents, bleaches or cleansers containing petroleum products on some models). ■ Top of the compartment. Unplug refrigerator or disconnect power. 2. Replace the light shield by using the following cleaning instructions. Freezer Compartment Light (on exterior surfaces (doors...can result in normal home operating environments. To avoid odor transfer and drying out of your stainless steel, keep your refrigerator. Unplug refrigerator or disconnect power. 2. Failure to eliminate odors. To help avoid corrosion of food, wrap or cover foods tightly....

Use & Care Guide
Page 18
...Do not remove ground prong. Failure to OFF? See "Changing the Light Bulbs." ■ Is the dispenser light set correctly for refrigerator to return to ON. Replace the fuse or reset the circuit breaker. Due to optimize performance ■ Hissing/Rattling - See "Water... often or left open ? Make sure the refrigerator controls are listed some models, the dispenser light will not operate WARNING ■ Sizzling/Gurgling - In the U.S.A., www.whirlpool.com In Canada, www.whirlpool.ca Refrigerator Operation The refrigerator will operate only when a dispenser lever/pad is...
...Do not remove ground prong. Failure to OFF? See "Changing the Light Bulbs." ■ Is the dispenser light set correctly for refrigerator to return to ON. Replace the fuse or reset the circuit breaker. Due to optimize performance ■ Hissing/Rattling - See "Water... often or left open ? Make sure the refrigerator controls are listed some models, the dispenser light will not operate WARNING ■ Sizzling/Gurgling - In the U.S.A., www.whirlpool.com In Canada, www.whirlpool.ca Refrigerator Operation The refrigerator will operate only when a dispenser lever/pad is...

Use & Care Guide
Page 19
...maker. If ice volume improves, then the filter may be clogged or incorrectly installed. Replace filter or reinstall it correctly. ■ Refrigerator door closed . New plumbing connections can reduce water flow. Replace water filter when indicated. Straighten the water source line. ■ ... freezer compartment door will not close the freezer compartment door. See "Water Supply Requirements." Call a licensed, qualified plumber. Connect refrigerator to water supply and turn water shutoff valve fully open ? Flush and fill the water system. Make sure the water dispenser ...
...maker. If ice volume improves, then the filter may be clogged or incorrectly installed. Replace filter or reinstall it correctly. ■ Refrigerator door closed . New plumbing connections can reduce water flow. Replace water filter when indicated. Straighten the water source line. ■ ... freezer compartment door will not close the freezer compartment door. See "Water Supply Requirements." Call a licensed, qualified plumber. Connect refrigerator to water supply and turn water shutoff valve fully open ? Flush and fill the water system. Make sure the water dispenser ...
Use & Care Guide
Page 20
To order, contact us and ask for your refrigerator. In Canada, visit our webpage www.whirlpoolparts.ca or call 1-800-901-2042. In the U.S.A., visit our webpage www.whirlpool.com/accessories or call 1-800-807-6777. Stainless Steel Cleaner and Polish: Order Part #4396095 Water Filter: Order Part #W10295370 or FILTER1 Air Filter...
To order, contact us and ask for your refrigerator. In Canada, visit our webpage www.whirlpoolparts.ca or call 1-800-901-2042. In the U.S.A., visit our webpage www.whirlpool.com/accessories or call 1-800-807-6777. Stainless Steel Cleaner and Polish: Order Part #4396095 Water Filter: Order Part #W10295370 or FILTER1 Air Filter...

Use & Care Guide
Page 22
...not available. 10. For assistance or service in materials or workmanship and is reported to Whirlpool within 30 days from defects in the U.S.A., call 1-800-807-6777. Service calls to refrigerator or freezer product failures. 7. Any food or medicine loss due to repair or replace... original model/serial numbers that vary from state to state or province to province. Discoloration, rust, or oxidation of the refrigerator compartment. WHIRLPOOL SHALL NOT BE LIABLE FOR INCIDENTAL OR CONSEQUENTIAL DAMAGES. Damage resulting from accident, alteration, misuse, abuse, fire, flood, ...
...not available. 10. For assistance or service in materials or workmanship and is reported to Whirlpool within 30 days from defects in the U.S.A., call 1-800-807-6777. Service calls to refrigerator or freezer product failures. 7. Any food or medicine loss due to repair or replace... original model/serial numbers that vary from state to state or province to province. Discoloration, rust, or oxidation of the refrigerator compartment. WHIRLPOOL SHALL NOT BE LIABLE FOR INCIDENTAL OR CONSEQUENTIAL DAMAGES. Damage resulting from accident, alteration, misuse, abuse, fire, flood, ...

Warranty Information
Page 1
... defects in materials or workmanship and is reported to refrigerator or freezer product failures. 7. Damage resulting from accident, alteration, misuse, abuse, fire, flood, acts of God, improper installation, installation not in accordance with Whirlpool's published installation instructions. 11. This major appliance is... label, located on major appliances with original model/serial numbers that have other damage to the finish of the refrigerator compartment. YOUR SOLE AND EXCLUSIVE REMEDY UNDER THIS LIMITED WARRANTY SHALL BE PRODUCT REPAIR AS PROVIDED HEREIN. DISCLAIMER OF...
... defects in materials or workmanship and is reported to refrigerator or freezer product failures. 7. Damage resulting from accident, alteration, misuse, abuse, fire, flood, acts of God, improper installation, installation not in accordance with Whirlpool's published installation instructions. 11. This major appliance is... label, located on major appliances with original model/serial numbers that have other damage to the finish of the refrigerator compartment. YOUR SOLE AND EXCLUSIVE REMEDY UNDER THIS LIMITED WARRANTY SHALL BE PRODUCT REPAIR AS PROVIDED HEREIN. DISCLAIMER OF...
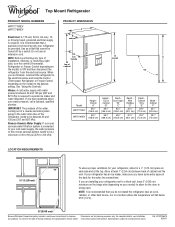
Dimension Guide
Page 1
...Width Cabinet "F" 321⁄2" (82.6 cm) 291⁄2" (75.0 cm) LOCATION REQUIREMENTS 1/2" (1.25 cm) To ensure proper ventilation for your refrigerator, allow for the water line connections. Water: A cold water supply with product. handle B top of cabinet A overall C 90˚ Model ...location where the temperature will fall below 55°F (13°C). 2" (5.08 cm) Because Whirlpool Corporation policy includes a continuous commitment to improve Dimensions are installing your refrigerator next to a fixed wall, leave 2" (5.08 cm) minimum on the hinge side (depending on...
...Width Cabinet "F" 321⁄2" (82.6 cm) 291⁄2" (75.0 cm) LOCATION REQUIREMENTS 1/2" (1.25 cm) To ensure proper ventilation for your refrigerator, allow for the water line connections. Water: A cold water supply with product. handle B top of cabinet A overall C 90˚ Model ...location where the temperature will fall below 55°F (13°C). 2" (5.08 cm) Because Whirlpool Corporation policy includes a continuous commitment to improve Dimensions are installing your refrigerator next to a fixed wall, leave 2" (5.08 cm) minimum on the hinge side (depending on...


