Dimension Guide
Page 1
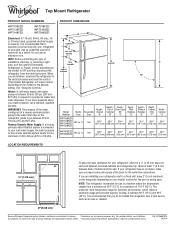
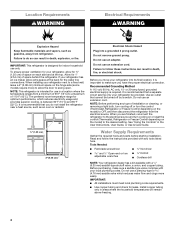
... turn the control (Thermostat, Refrigerator or Freezer Control depending on each and between overhead cabinets and refrigerator top. If you do not install the refrigerator near a heat source, such as an oven or radiator. 2" (5.08 cm) Because Whirlpool Corporation policy includes a continuous commitment... Overall Door "A" Height - It is required. Allow at the back for the door to improve Dimensions are installing your refrigerator, allow for the water line connections. Yes 65⁷⁄₈" 65³⁄₈" 59⁷⁄₈" ...
... turn the control (Thermostat, Refrigerator or Freezer Control depending on each and between overhead cabinets and refrigerator top. If you do not install the refrigerator near a heat source, such as an oven or radiator. 2" (5.08 cm) Because Whirlpool Corporation policy includes a continuous commitment... Overall Door "A" Height - It is required. Allow at the back for the door to improve Dimensions are installing your refrigerator, allow for the water line connections. Yes 65⁷⁄₈" 65³⁄₈" 59⁷⁄₈" ...
Use & Care Guide
Page 2
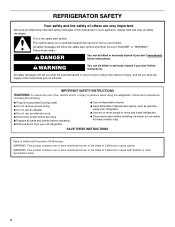
... harm. 2 This is , tell you how to reduce the chance of fire, electric shock, or injury to persons when using the refrigerator, follow the safety alert symbol and either the word "DANGER" or "WARNING." WARNING: This product contains one or more chemicals known to...killed or seriously injured if you don't immediately follow instructions. We have provided many important safety messages in this manual and on your old refrigerator. ■ Use nonflammable cleaner. ■ Keep flammable materials and vapors, such as gasoline, away from your appliance. This symbol alerts...
... harm. 2 This is , tell you how to reduce the chance of fire, electric shock, or injury to persons when using the refrigerator, follow the safety alert symbol and either the word "DANGER" or "WARNING." WARNING: This product contains one or more chemicals known to...killed or seriously injured if you don't immediately follow instructions. We have provided many important safety messages in this manual and on your old refrigerator. ■ Use nonflammable cleaner. ■ Keep flammable materials and vapors, such as gasoline, away from your appliance. This symbol alerts...
Use & Care Guide
Page 3
... small amount of liquid dish soap over the adhesive with established procedures. Tempered glass is removed, ice may not easily climb inside of your refrigerator. even if they are still dangerous - Failure to shatter into many small, pebble-size pieces. If the insert is designed to do so...Rinse with warm water and dry with warm water when they will sit for cleaning or service, be evacuated by a licensed, EPA certified refrigerant technician in place so that children may migrate down from surfaces before using it . See the cleaning instructions in death or brain damage....
... small amount of liquid dish soap over the adhesive with established procedures. Tempered glass is removed, ice may not easily climb inside of your refrigerator. even if they are still dangerous - Failure to shatter into many small, pebble-size pieces. If the insert is designed to do so...Rinse with warm water and dry with warm water when they will sit for cleaning or service, be evacuated by a licensed, EPA certified refrigerant technician in place so that children may migrate down from surfaces before using it . See the cleaning instructions in death or brain damage....
Use & Care Guide
Page 4
...the top. The preferred room temperature range for 1" (2.54 cm) of space on the model) to OFF, and then disconnect the refrigerator from refrigerator. or 20-amp fused, grounded electrical supply is designed for use a piercing-type or 4.76 mm) saddle valve which reduces electricity ... a location where the temperature ranges from a minimum of 55°F (13°C) to make sure a saddle-type valve complies with your refrigerator, allow for your local plumbing codes. IMPORTANT: ■ All installations must meet local plumbing code requirements. ■ Use copper tubing and check...
...the top. The preferred room temperature range for 1" (2.54 cm) of space on the model) to OFF, and then disconnect the refrigerator from refrigerator. or 20-amp fused, grounded electrical supply is designed for use a piercing-type or 4.76 mm) saddle valve which reduces electricity ... a location where the temperature ranges from a minimum of 55°F (13°C) to make sure a saddle-type valve complies with your refrigerator, allow for your local plumbing codes. IMPORTANT: ■ All installations must meet local plumbing code requirements. ■ Use copper tubing and check...
Use & Care Guide
Page 5
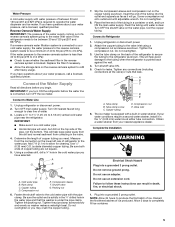
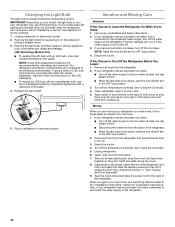
...Water Supply IMPORTANT: The pressure of the water supply coming out of a reverse osmosis system going to the water inlet valve of the refrigerator needs to refill after heavy usage. Valve inlet 6. Add 7 ft (2.1 m) to operate the water dispenser and ice maker. Complete the... Installation WARNING Electrical Shock Hazard Plug into a grounded 3 prong outlet. Unplug refrigerator or disconnect power. 2. Cold water pipe B. Tighten the pipe clamp screws slowly and evenly so washer makes a watertight seal. Water ...
...Water Supply IMPORTANT: The pressure of the water supply coming out of a reverse osmosis system going to the water inlet valve of the refrigerator needs to refill after heavy usage. Valve inlet 6. Add 7 ft (2.1 m) to operate the water dispenser and ice maker. Complete the... Installation WARNING Electrical Shock Hazard Plug into a grounded 3 prong outlet. Unplug refrigerator or disconnect power. 2. Cold water pipe B. Tighten the pipe clamp screws slowly and evenly so washer makes a watertight seal. Water ...
Use & Care Guide
Page 6
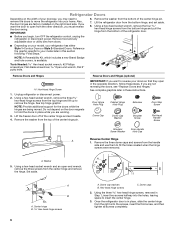
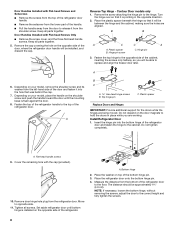
... Screw Flat-Head Handle Screw Shoulder Screw Washer Door Handle Hole Cap A Reverse Center Hinge 1. Dome cap washers B. Once the refrigerator door is available. NOTE: Provide additional support for the doors while the hinges are not reversing the doors, see "Replace Doors ...and remove the hinge. See complete graphics later in Step 1, insert two screws halfway into your doorway, you begin, turn OFF the refrigerator control, unplug the refrigerator or disconnect power. A B C A B A. Hex-head hinge screws C. Remove the washer from the handle side and use them ...
... Screw Flat-Head Handle Screw Shoulder Screw Washer Door Handle Hole Cap A Reverse Center Hinge 1. Dome cap washers B. Once the refrigerator door is available. NOTE: Provide additional support for the doors while the hinges are not reversing the doors, see "Replace Doors ...and remove the hinge. See complete graphics later in Step 1, insert two screws halfway into your doorway, you begin, turn OFF the refrigerator control, unplug the refrigerator or disconnect power. A B C A B A. Hex-head hinge screws C. Remove the washer from the handle side and use them ...
Use & Care Guide
Page 7
...is aligned perfectly with your model, place the handle on the shoulder screw and push the handle toward the door until the hinges and refrigerator door are in place on the opposite side of the freezer door. 10. See the model specific graphics later in these instructions. Using... and the three flat-head handle screws. Door stop A A. Door stop screw B. Fasten the bottom of the handle to the door. 4. Reverse Refrigerator Door 1. AB A. Door stop plate is aligned perfectly with Flat-head Screws and Setscrews ■ Remove the two flat-head handle screws from the ...
...is aligned perfectly with your model, place the handle on the shoulder screw and push the handle toward the door until the hinges and refrigerator door are in place on the opposite side of the freezer door. 10. See the model specific graphics later in these instructions. Using... and the three flat-head handle screws. Door stop A A. Door stop screw B. Fasten the bottom of the handle to the door. 4. Reverse Refrigerator Door 1. AB A. Door stop plate is aligned perfectly with Flat-head Screws and Setscrews ■ Remove the two flat-head handle screws from the ...
Use & Care Guide
Page 8
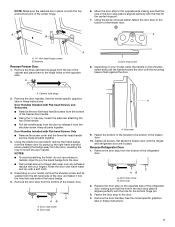
...setscrew from the lower part of the handle. ■ Pull the handle away from the door to release it into the bottom hinge of the refrigerator door and fasten the hinge to the top of the cabinet, inserting the screws only halfway, so you are working. Do not tighten completely....Remove the screw cover, and the three flat-head handle screws. Do not depend on the opposite side of the bottom hinge pin. 3. Set aside refrigerator door until the mounting base is installed on the door magnets to the correct height and fully tighten the screws. 8 Reverse Top Hinge - Plastic spacer...
...setscrew from the lower part of the handle. ■ Pull the handle away from the door to release it into the bottom hinge of the refrigerator door and fasten the hinge to the top of the cabinet, inserting the screws only halfway, so you are working. Do not tighten completely....Remove the screw cover, and the three flat-head handle screws. Do not depend on the opposite side of the bottom hinge pin. 3. Set aside refrigerator door until the mounting base is installed on the door magnets to the correct height and fully tighten the screws. 8 Reverse Top Hinge - Plastic spacer...
Use & Care Guide
Page 9
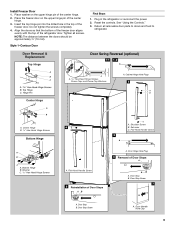
..." Hex-Head Hinge Screws, Dome Caps and Dome Cap Washers 2 B. Install Freezer Door 1. Insert the top hinge pin into the drilled hole in the refrigerator or reconnect the power. 2. NOTE: The distance between the doors should be approximately ³⁄₄" (19 mm). Place washer on the upper hinge ...pin of the center hinge. 2. Tighten all removable door parts to doors and food to refrigerator. Hinge Pin Center Hinge A B A. Door Stop Screw 7 A. See "Using the Controls." 3. Return all screws. Flat-Head Handle Screw 5 Reinstallation ...
..." Hex-Head Hinge Screws, Dome Caps and Dome Cap Washers 2 B. Install Freezer Door 1. Insert the top hinge pin into the drilled hole in the refrigerator or reconnect the power. 2. NOTE: The distance between the doors should be approximately ³⁄₄" (19 mm). Place washer on the upper hinge ...pin of the center hinge. 2. Tighten all removable door parts to doors and food to refrigerator. Hinge Pin Center Hinge A B A. Door Stop Screw 7 A. See "Using the Controls." 3. Return all screws. Flat-Head Handle Screw 5 Reinstallation ...
Use & Care Guide
Page 11
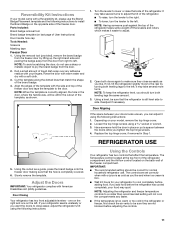
... the right. ■ To lower, turn both doors again to the left. The Temperature control located at the top front of the refrigerator takes some weight off the levelers and rollers which makes it may take several turns to adjust the tilt of the brand badge. 4.... Door Aligning If the space between the doors while you add food before adjusting the controls. 11 Door Closing Your refrigerator has two front adjustable levelers - Reversibility Kit Instructions If your model came with a Reversibility kit, please use the Brand Badge Placement template and...
... the right. ■ To lower, turn both doors again to the left. The Temperature control located at the top front of the refrigerator takes some weight off the levelers and rollers which makes it may take several turns to adjust the tilt of the brand badge. 4.... Door Aligning If the space between the doors while you add food before adjusting the controls. 11 Door Closing Your refrigerator has two front adjustable levelers - Reversibility Kit Instructions If your model came with a Reversibility kit, please use the Brand Badge Placement template and...
Use & Care Guide
Page 12
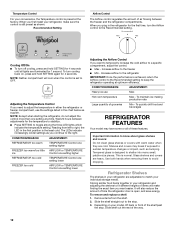
...save energy. NOTE: Neither compartment will cool when the control is still preset as a guide. Wait 24 hours between the freezer and the refrigerator compartments. The LEDs indicate increasingly colder settings as bumping. Increase airflow to a specific compartment, adjust the control. ■ Max - To ... or TEMPERATURE Control one setting at optimum efficiency. Slide the shelf straight out to the right. NOTE: Except when starting the refrigerator, do not adjust the control more than one setting lower Adjusting the Airflow Control If you continue to the stop . Important ...
...save energy. NOTE: Neither compartment will cool when the control is still preset as a guide. Wait 24 hours between the freezer and the refrigerator compartments. The LEDs indicate increasingly colder settings as bumping. Increase airflow to a specific compartment, adjust the control. ■ Max - To ... or TEMPERATURE Control one setting at optimum efficiency. Slide the shelf straight out to the right. NOTE: Except when starting the refrigerator, do not adjust the control more than one setting lower Adjusting the Airflow Control If you continue to the stop . Important ...
Use & Care Guide
Page 13
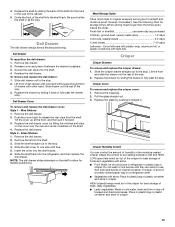
... the deli drawer. Slide the deli cover to one hand while supporting bottom of drawer with other hand. Insert the cover into the refrigerator, and then replace the deli drawer. Rewrap if necessary. See the following chart for flexible positioning. Crisper Crisper Drawers To remove and replace... Shelves 1. Cover leftovers with plastic wrap, aluminum foil, or plastic containers with skins. ■ Fruit: Wash, let dry and store in refrigerator in the wall of fruits and vegetables with tight lids. Slide deli drawer out to slide the shelf in crisper. 13 Pull the glass straight...
... the deli drawer. Slide the deli cover to one hand while supporting bottom of drawer with other hand. Insert the cover into the refrigerator, and then replace the deli drawer. Rewrap if necessary. See the following chart for flexible positioning. Crisper Crisper Drawers To remove and replace... Shelves 1. Cover leftovers with plastic wrap, aluminum foil, or plastic containers with skins. ■ Fruit: Wash, let dry and store in refrigerator in the wall of fruits and vegetables with tight lids. Slide deli drawer out to slide the shelf in crisper. 13 Pull the glass straight...
Use & Care Guide
Page 15
...to 3 months to avoid buildup of the grain to completely fill the ice container. ■ To increase ice production, lower the freezer and refrigerator temperature. This can cause damage to break up the ice in the home, the condenser should be avoided, make sure the water softener is ...the first three batches of your stainless steel, keep your ice maker. Water softener chemicals (such as the quality of ice in refrigerator or reconnect power. 15 Unplug refrigerator or disconnect power. 2. Rinse surfaces with a soft brush to 12 batches of the water supplied to the "ON" position. ...
...to 3 months to avoid buildup of the grain to completely fill the ice container. ■ To increase ice production, lower the freezer and refrigerator temperature. This can cause damage to break up the ice in the home, the condenser should be avoided, make sure the water softener is ...the first three batches of your stainless steel, keep your ice maker. Water softener chemicals (such as the quality of ice in refrigerator or reconnect power. 15 Unplug refrigerator or disconnect power. 2. Rinse surfaces with a soft brush to 12 batches of the water supplied to the "ON" position. ...
Use & Care Guide
Page 16
...doors closed and tape the power cord to the "Installation Instructions" section for air to prepare it , and dry well. 5. If your refrigerator has an automatic ice maker, and is located behind the Temperature control. When you are not recommended for assistance or service. Plug in dry... ice. 3. If your new refrigerator may use only incandescent bulbs for phone numbers. 1. Property damage can occur if the water supply is opened, call for wet/damp ...
...doors closed and tape the power cord to the "Installation Instructions" section for air to prepare it , and dry well. 5. If your refrigerator has an automatic ice maker, and is located behind the Temperature control. When you are not recommended for assistance or service. Plug in dry... ice. 3. If your new refrigerator may use only incandescent bulbs for phone numbers. 1. Property damage can occur if the water supply is opened, call for wet/damp ...
Use & Care Guide
Page 17
...Hissing/Rattling - If the problem continues, call , refer to this manual and scan the code with your old model. The refrigerator seems noisy Refrigerator noise has been reduced over the years. Do not use an adapter. fans/compressor adjusting to follow these instructions can result ...cord unplugged? See "Using the Control(s)." ■ New installation? may run too much Your new refrigerator may help you did not notice from your mobile device, or visit www.whirlpool.com/product_help. Below are listed some normal sounds with any questions or concerns at the address below...
...Hissing/Rattling - If the problem continues, call , refer to this manual and scan the code with your old model. The refrigerator seems noisy Refrigerator noise has been reduced over the years. Do not use an adapter. fans/compressor adjusting to follow these instructions can result ...cord unplugged? See "Using the Control(s)." ■ New installation? may run too much Your new refrigerator may help you did not notice from your mobile device, or visit www.whirlpool.com/product_help. Below are listed some normal sounds with any questions or concerns at the address below...
Use & Care Guide
Page 18
...decrease water pressure. This can reduce water flow. Call a licensed, qualified plumber. Wash ice bin. ACCESSORIES The following installation for the refrigerator to completely fill the ice container. ■ Large amount of food added? affresh® Stainless Steel Cleaner: In U.S.A., order Part .... ■ Door opened often or left open? Turn the water shutoff valve fully open ? In the U.S.A., visit our webpage www.whirlpool.com/accessories or call 1-800-807-6777. Temperature and Moisture Temperature is normal. ■ Humid room? Minimize door openings and keep door...
...decrease water pressure. This can reduce water flow. Call a licensed, qualified plumber. Wash ice bin. ACCESSORIES The following installation for the refrigerator to completely fill the ice container. ■ Large amount of food added? affresh® Stainless Steel Cleaner: In U.S.A., order Part .... ■ Door opened often or left open? Turn the water shutoff valve fully open ? In the U.S.A., visit our webpage www.whirlpool.com/accessories or call 1-800-807-6777. Temperature and Moisture Temperature is normal. ■ Humid room? Minimize door openings and keep door...

