
Dimension Guide
Page 1
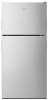
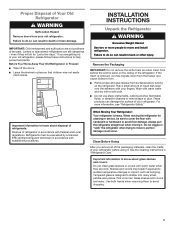
...back for your refrigerator be extension cord. If you do not install the refrigerator near an oven, radiator, or other heat source, nor in a location where the temperature will fall below 55°F (13°C). 3¹⁄₈" (8 cm) Because Whirlpool Corporation policy includes...Door Yes Height Overall "A" 65 1/2" Height - NOTE: It is required to OFF and then disconnect the refrigerator from the electrical source. Top Mount Refrigerator PRODUCT MODEL NUMBERS WRT348FME PRODUCT DIMENSIONS Electrical: A 115-volt, 60-Hz, AC-only, 15or 20-amp fused, grounded electrical supply ...
...back for your refrigerator be extension cord. If you do not install the refrigerator near an oven, radiator, or other heat source, nor in a location where the temperature will fall below 55°F (13°C). 3¹⁄₈" (8 cm) Because Whirlpool Corporation policy includes...Door Yes Height Overall "A" 65 1/2" Height - NOTE: It is required to OFF and then disconnect the refrigerator from the electrical source. Top Mount Refrigerator PRODUCT MODEL NUMBERS WRT348FME PRODUCT DIMENSIONS Electrical: A 115-volt, 60-Hz, AC-only, 15or 20-amp fused, grounded electrical supply ...
Installation Instructions
Page 1
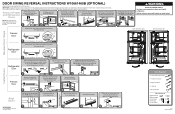
...the door, keep the screws and hinges. Failure to remove. Door Stop Screw B. Align Doors W10661460B © 2014 Whirlpool Corporation. Remove Freezer and Refrigerator Doors While holding the door, loosen the 2 screws on the door magnets to hold the doors in place while you... the opposite side of the cabinet. 3 Set the freezer door onto the Center Hinge. All rights reserved. 1 2 Align the Freezer and Refrigerator doors. WARNING Excessive Weight Hazard Use two or more detailed door reversing instructions, see the User Instructions. Completely tighten the 3 Top Hinge screws...
...the door, keep the screws and hinges. Failure to remove. Door Stop Screw B. Align Doors W10661460B © 2014 Whirlpool Corporation. Remove Freezer and Refrigerator Doors While holding the door, loosen the 2 screws on the door magnets to hold the doors in place while you... the opposite side of the cabinet. 3 Set the freezer door onto the Center Hinge. All rights reserved. 1 2 Align the Freezer and Refrigerator doors. WARNING Excessive Weight Hazard Use two or more detailed door reversing instructions, see the User Instructions. Completely tighten the 3 Top Hinge screws...
Specification Sheet
Page 1
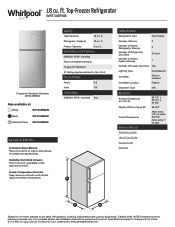
...Specifications subject to -wall shelves for planning purposes only. ft. Top-Freezer Refrigerator WRT348FME Fingerprint-Resistant Stainless WRT348FMEZ Also available in the U.S.A.* Electrical Details Amps 6.5 Volts 115 Certifications ENERGY STAR® Certified Yes Technical... Details Refrigerator Type Top-Freezer Number of Doors 2 Number of Interior Refrigerator Shelves Number of Refrigerator Door Bins Number of Interior Freezer Shelves 3 5 Fixed 1 Number of unit...
...Specifications subject to -wall shelves for planning purposes only. ft. Top-Freezer Refrigerator WRT348FME Fingerprint-Resistant Stainless WRT348FMEZ Also available in the U.S.A.* Electrical Details Amps 6.5 Volts 115 Certifications ENERGY STAR® Certified Yes Technical... Details Refrigerator Type Top-Freezer Number of Doors 2 Number of Interior Refrigerator Shelves Number of Refrigerator Door Bins Number of Interior Freezer Shelves 3 5 Fixed 1 Number of unit...
Owners Manual
Page 2
... Do not use of the appliance by a person responsible for their safety. Children should be supervised to move and install the refrigerator. Disconnect the power before servicing. Replace all safety messages. Farm houses and by persons (including children) with reduced... to be used in household and similar applications such as aerosol cans with a flammable propellant in order to persons when using the refrigerator, follow instructions. PLEASE KEEP THESE INSTRUCTIONS 2 Always read and obey all parts and panels before operating. Remove doors from...
... Do not use of the appliance by a person responsible for their safety. Children should be supervised to move and install the refrigerator. Disconnect the power before servicing. Replace all safety messages. Farm houses and by persons (including children) with reduced... to be used in household and similar applications such as aerosol cans with a flammable propellant in order to persons when using the refrigerator, follow instructions. PLEASE KEEP THESE INSTRUCTIONS 2 Always read and obey all parts and panels before operating. Remove doors from...
Owners Manual
Page 3
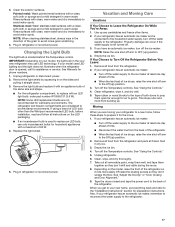
... packaging materials, clean the inside . For more people to do so can result in death or brain damage. When Moving Your Refrigerator: Your refrigerator is normal. See the cleaning instructions in accordance with Federal and Local regulations. Tempered glass is removed, ice may migrate down from... and dry with warm water when they will sit for cleaning or service, be evacuated by a licensed, EPA certified refrigerant technician in "Refrigerator Care." Important information to avoid oor damage. When moving it. Clean Before Using After you are getting rid of your old...
... packaging materials, clean the inside . For more people to do so can result in death or brain damage. When Moving Your Refrigerator: Your refrigerator is normal. See the cleaning instructions in accordance with Federal and Local regulations. Tempered glass is removed, ice may migrate down from... and dry with warm water when they will sit for cleaning or service, be evacuated by a licensed, EPA certified refrigerant technician in "Refrigerator Care." Important information to avoid oor damage. When moving it. Clean Before Using After you are getting rid of your old...
Owners Manual
Page 4
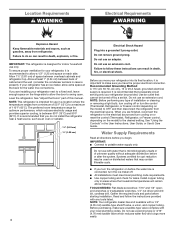
... Requirements WARNING Explosion Hazard Keep ammable materials and vapors, such as back in case is present). Failure to do not install the refrigerator near a heat source, such as an oven or radiator. 11/2" (3.81cm) 1/2" (1.25 cm) 4 Electrical Shock Hazard Plug... into its final location, it is recommended to OFF, and then disconnect the refrigerator from refrigerator. When you are finished, reconnect the refrigerator to the electrical source and turn cooling off . ■■ All installations must meet local plumbing code requirements. ...
... Requirements WARNING Explosion Hazard Keep ammable materials and vapors, such as back in case is present). Failure to do not install the refrigerator near a heat source, such as an oven or radiator. 11/2" (3.81cm) 1/2" (1.25 cm) 4 Electrical Shock Hazard Plug... into its final location, it is recommended to OFF, and then disconnect the refrigerator from refrigerator. When you are finished, reconnect the refrigerator to the electrical source and turn cooling off . ■■ All installations must meet local plumbing code requirements. ...
Owners Manual
Page 5
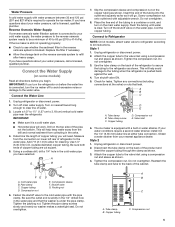
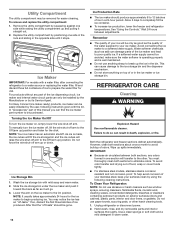
...pipe and that leak. Use the tube clamp on nearest faucet long enough to allow for leaks. Attach the copper tube to the refrigerator as shown. Pipe clamp C. Tube clamp B. Determine the length of water. 3. Flush the tubing until water is equipped with ... help keep water away from the drill and normal sediment from your water pressure, call a licensed, qualified plumber. Style 1 1. Unplug refrigerator or disconnect power. 2. Copper tubing C. Attach the copper tube to operate the ice maker. If you have questions about your nearest appliance...
...pipe and that leak. Use the tube clamp on nearest faucet long enough to allow for leaks. Attach the copper tube to the refrigerator as shown. Pipe clamp C. Tube clamp B. Determine the length of water. 3. Flush the tubing until water is equipped with ... help keep water away from the drill and normal sediment from your water pressure, call a licensed, qualified plumber. Style 1 1. Unplug refrigerator or disconnect power. 2. Copper tubing C. Attach the copper tube to operate the ice maker. If you have questions about your nearest appliance...
Owners Manual
Page 6
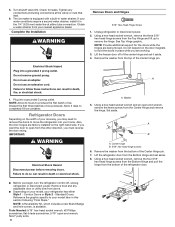
...an extension cord. If you must reverse the door swing. Contour Doors or Style 2 - Reference the graphic specific to move the refrigerator into your nearest appliance dealer. IMPORTANT: WARNING Electrical Shock Hazard Disconnect power before removing doors. The ice maker is available. Discard the... first three batches of ice. Lift the refrigerator door from the Top Hinge and lift up to produce the first batch of ice produced. Tools Needed: 5/16" hex-head socket...
...an extension cord. If you must reverse the door swing. Contour Doors or Style 2 - Reference the graphic specific to move the refrigerator into your nearest appliance dealer. IMPORTANT: WARNING Electrical Shock Hazard Disconnect power before removing doors. The ice maker is available. Discard the... first three batches of ice. Lift the refrigerator door from the Top Hinge and lift up to produce the first batch of ice produced. Tools Needed: 5/16" hex-head socket...
Owners Manual
Page 7
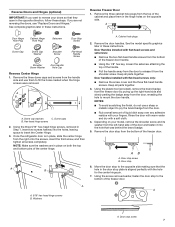
... the hole to pry the brand badge from the right onto the screws, insert the third screw, and then tighten all screws completely. Once the refrigerator door is aligned perfectly with a soft cloth. 4. A A A. 5⁄16" hex-head hinge screws B. Reverse Doors and Hinges (optional) IMPORTANT: If you are in place on...
... the hole to pry the brand badge from the right onto the screws, insert the third screw, and then tighten all screws completely. Once the refrigerator door is aligned perfectly with a soft cloth. 4. A A A. 5⁄16" hex-head hinge screws B. Reverse Doors and Hinges (optional) IMPORTANT: If you are in place on...
Owners Manual
Page 8
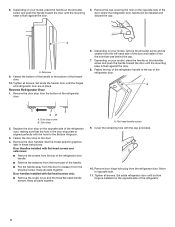
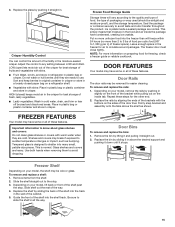
...hole in these instructions. Fasten the door stop 2. Remove door hinge hole plug from the bottom of the refrigerator door, making sure that was behind the cap. 7. Set aside refrigerator door until the mounting base is installed on the shoulder screw and push the handle toward the door until ... door until the mounting base is aligned perfectly with flat-head screws and setscrews: ■■ Remove the screws from the top of the refrigerator door handle. ■■ Remove the setscrew from the lower part of the handle. ■■ Pull the handle away from the door...
...hole in these instructions. Fasten the door stop 2. Remove door hinge hole plug from the bottom of the refrigerator door, making sure that was behind the cap. 7. Set aside refrigerator door until the mounting base is installed on the shoulder screw and push the handle toward the door until ... door until the mounting base is aligned perfectly with flat-head screws and setscrews: ■■ Remove the screws from the top of the refrigerator door handle. ■■ Remove the setscrew from the lower part of the handle. ■■ Pull the handle away from the door...
Owners Manual
Page 9
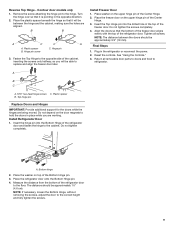
...freezer door on the door magnets to the opposite side of the freezer door. Insert the Top Hinge pin into the Bottom Hinge of the refrigerator door. Do not tighten the screws completely. 4. Tighten all removable door parts to doors and food to the cabinet. Hinge pin screw C....pin Replace Doors and Hinges IMPORTANT: Provide additional support for the doors while the hinges are aligned. Do not tighten completely. Place the refrigerator door onto the Bottom Hinge pin. 4. Contour door models only 1. Place the plastic spacer beneath the hinge so that it is pointing in ...
...freezer door on the door magnets to the opposite side of the freezer door. Insert the Top Hinge pin into the Bottom Hinge of the refrigerator door. Do not tighten the screws completely. 4. Tighten all removable door parts to doors and food to the cabinet. Hinge pin screw C....pin Replace Doors and Hinges IMPORTANT: Provide additional support for the doors while the hinges are aligned. Do not tighten completely. Place the refrigerator door onto the Bottom Hinge pin. 4. Contour door models only 1. Place the plastic spacer beneath the hinge so that it is pointing in ...
Owners Manual
Page 12
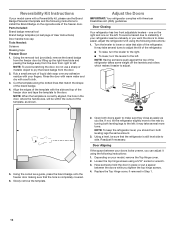
...hand side and peeling the badge away from the door from the door. 2. Open both leveling legs the same amount. 3. NOTE: To keep the refrigerator level, you should turn the leveler to the left ; Reversibility Kit Instructions If your model came with a Reversibility kit, please use a sharp or ... pry the brand badge from right to left . Rub a small amount of the template, as shown. To avoid a hazard due to instability, if your refrigerator seems unsteady or you can adjust it using a 5⁄16" socket or wrench. 3. Slowly remove the template. 2. Using a level, be within the ...
...hand side and peeling the badge away from the door from the door. 2. Open both leveling legs the same amount. 3. NOTE: To keep the refrigerator level, you should turn the leveler to the left ; Reversibility Kit Instructions If your model came with a Reversibility kit, please use a sharp or ... pry the brand badge from right to left . Rub a small amount of the template, as shown. To avoid a hazard due to instability, if your refrigerator seems unsteady or you can adjust it using a 5⁄16" socket or wrench. 3. Slowly remove the template. 2. Using a level, be within the ...
Owners Manual
Page 13
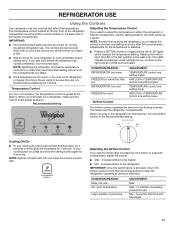
... or TEMPERATURE control one setting higher TEMPERATURE control one setting lower Airflow Control The Airflow control regulates the amount of the refrigerator compartment and the Airflow control located on , press and hold the Setting button for the temperature to stabilize. ■■... flowing between adjustments for 4 seconds until all lights are not blocked before adjusting the controls. to cool completely before the refrigerator has cooled completely, your convenience, the Temperature control is achieved, return the Airflow control to the Recommended setting to maintain ...
... or TEMPERATURE control one setting higher TEMPERATURE control one setting lower Airflow Control The Airflow control regulates the amount of the refrigerator compartment and the Airflow control located on , press and hold the Setting button for the temperature to stabilize. ■■... flowing between adjustments for 4 seconds until all lights are not blocked before adjusting the controls. to cool completely before the refrigerator has cooled completely, your convenience, the Temperature control is achieved, return the Airflow control to the Recommended setting to maintain ...

Owners Manual
Page 14
... heavy. Replace the drawer by fitting the notches and clips on the cover over the rear and center crossbars on the shelf to match your refrigerator and adjusting the shelves to the stop . 2. Replace the drawer by sliding the back of the shelf into the shelf tracks. 6. Use both hands... when removing them to shatter into the refrigerator, and then replace the deli drawer. Be sure to slide the shelf in original wrapping as long as purchased. Style 2 - Slide the deli cover ...
... heavy. Replace the drawer by fitting the notches and clips on the cover over the rear and center crossbars on the shelf to match your refrigerator and adjusting the shelves to the stop . 2. Replace the drawer by sliding the back of the shelf into the shelf tracks. 6. Use both hands... when removing them to shatter into the refrigerator, and then replace the deli drawer. Be sure to slide the shelf in original wrapping as long as purchased. Style 2 - Slide the deli cover ...
Owners Manual
Page 15
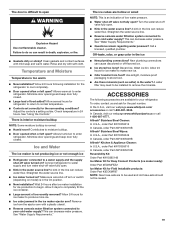
... Bins To remove and replace the bins: 1. Crisper Humidity Control You can control the amount of freezer space). HIGH (closed paper bag on a refrigerator shelf. ■■ Vegetables with the buttons on your model, remove the rails by pushing it straight out. 2. Firmly snap bracket and assembly onto... glass shelves and covers: Do not clean glass shelves or covers with skins. ■■ Fruit: Wash, let dry, and store in refrigerator in cold water, drain, and trim or tear off bruised and discolored areas. Frozen Food Storage Guide Storage times will freeze within 24 hours ...
... Bins To remove and replace the bins: 1. Crisper Humidity Control You can control the amount of freezer space). HIGH (closed paper bag on a refrigerator shelf. ■■ Vegetables with the buttons on your model, remove the rails by pushing it straight out. 2. Firmly snap bracket and assembly onto... glass shelves and covers: Do not clean glass shelves or covers with skins. ■■ Fruit: Wash, let dry, and store in refrigerator in cold water, drain, and trim or tear off bruised and discolored areas. Frozen Food Storage Guide Storage times will freeze within 24 hours ...
Owners Manual
Page 16
...cleaning waxes, concentrated detergents, bleaches or cleansers containing petroleum products on , simply lower the wire shut-off -taste." Both the refrigerator and freezer sections defrost automatically. Use a clean sponge or soft cloth and a mild detergent in the opposite side until it ... softened water supply. Failure to completely fill the ice container. ■■ To increase ice production, lower the freezer and refrigerator temperatures. See "Using the Controls." Remove the utility compartment by using the following instruction given with mild soap and warm water....
...cleaning waxes, concentrated detergents, bleaches or cleansers containing petroleum products on , simply lower the wire shut-off -taste." Both the refrigerator and freezer sections defrost automatically. Use a clean sponge or soft cloth and a mild detergent in the opposite side until it ... softened water supply. Failure to completely fill the ice container. ■■ To increase ice production, lower the freezer and refrigerator temperatures. See "Using the Controls." Remove the utility compartment by using the following instruction given with mild soap and warm water....
Owners Manual
Page 17
... and mold from the back of the refrigerator. ■■ When the last load of the refrigerator. Moving When you are not recommended for the move . 8. Turn off arm to OFF (up any perishables and freeze other than the Whirlpool recommended LED bulb, before installation, read and... follow these steps to replace with a clean, soft cloth or sponge and a mild detergent in the direction of LED bulb other items. 2. If your refrigerator has an automatic ice maker: ■&#...
... and mold from the back of the refrigerator. ■■ When the last load of the refrigerator. Moving When you are not recommended for the move . 8. Turn off arm to OFF (up any perishables and freeze other than the Whirlpool recommended LED bulb, before installation, read and... follow these steps to replace with a clean, soft cloth or sponge and a mild detergent in the direction of LED bulb other items. 2. If your refrigerator has an automatic ice maker: ■&#...
Owners Manual
Page 18
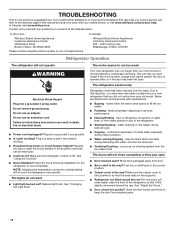
...prong outlet. The motor seems to run too much Your new refrigerator may run longer than your correspondence. contraction/expansion of the refrigerator. ■■ Sizzling/Gurgling - occurs as ice is ON. In Canada: Whirlpool Brand Home Appliances Customer eXperience Centre 200 - 6750 Century Ave....pop open ■■ Door blocked open? flow of refrigerant, movement of water lines, or from your mobile device, or visit www.whirlpool.com/product_help. water dripping on the supports. ■■ Refrigerator not tilted toward the rear. If you may hear ...
...prong outlet. The motor seems to run too much Your new refrigerator may run longer than your correspondence. contraction/expansion of the refrigerator. ■■ Sizzling/Gurgling - occurs as ice is ON. In Canada: Whirlpool Brand Home Appliances Customer eXperience Centre 200 - 6750 Century Ave....pop open ■■ Door blocked open? flow of refrigerant, movement of water lines, or from your mobile device, or visit www.whirlpool.com/product_help. water dripping on the supports. ■■ Refrigerator not tilted toward the rear. If you may hear ...
Owners Manual
Page 19
...supply and turn water shut-off -flavored ice. ■■ Ice stored too long? Allows warm air to enter refrigerator. Allow several hours for refrigerator to return to normal temperature. ■■ Controls set correctly for ice production to remove the minerals. Wait 24 hours...packaging to be reused. 19 Straighten the water source line. ■■ Ice maker turned on ? In the U.S.A., visit our webpage www.whirlpool.com/ accessories or call 1-800-807-6777. See "Using the Controls." See "Water Supply Requirements." Straighten the water source line. ■...
...supply and turn water shut-off -flavored ice. ■■ Ice stored too long? Allows warm air to enter refrigerator. Allow several hours for refrigerator to return to normal temperature. ■■ Controls set correctly for ice production to remove the minerals. Wait 24 hours...packaging to be reused. 19 Straighten the water source line. ■■ Ice maker turned on ? In the U.S.A., visit our webpage www.whirlpool.com/ accessories or call 1-800-807-6777. See "Using the Controls." See "Water Supply Requirements." Straighten the water source line. ■...
Owners Manual
Page 20
...address IF YOU NEED SERVICE: 1. CAVITY LINER AND SEALED REFRIGERATION SYSTEM 6. furnished with For one year from accident, misuse, abuse, fire, floods, acts of God, or use inconsistent with the product, Whirlpool brand will pay for factory 8. Cosmetic damage, including ... comprehensive warranty than the representations contained in which it was purchased: ■■ Refrigerator/freezer cavity liner if the part cracks due to you . WHIRLPOOL® REFRIGERATION LIMITED WARRANTY ATTACH YOUR RECEIPT HERE. to instructions attached to province. Food or medicine...
...address IF YOU NEED SERVICE: 1. CAVITY LINER AND SEALED REFRIGERATION SYSTEM 6. furnished with For one year from accident, misuse, abuse, fire, floods, acts of God, or use inconsistent with the product, Whirlpool brand will pay for factory 8. Cosmetic damage, including ... comprehensive warranty than the representations contained in which it was purchased: ■■ Refrigerator/freezer cavity liner if the part cracks due to you . WHIRLPOOL® REFRIGERATION LIMITED WARRANTY ATTACH YOUR RECEIPT HERE. to instructions attached to province. Food or medicine...

