
Dimension Guide
Page 1
...If you leave some extra space at the back for a 1⁄ 2 "(1.25 cm) space on the model) to the desired setting. Top Mount Refrigerator PRODUCT MODEL NUMBERS WRT348FME PRODUCT DIMENSIONS Electrical: A 115-volt, 60-Hz, AC-only, 15or 20-amp fused, grounded electrical supply is...source, nor in a location where the temperature will fall below 55°F (13°C). 3¹⁄₈" (8 cm) Because Whirlpool Corporation policy includes a continuous commitment to improve Dimensions are the electrical source and reset the control (Thermostat, Refrigerator or Freezer Control depending ...
...If you leave some extra space at the back for a 1⁄ 2 "(1.25 cm) space on the model) to the desired setting. Top Mount Refrigerator PRODUCT MODEL NUMBERS WRT348FME PRODUCT DIMENSIONS Electrical: A 115-volt, 60-Hz, AC-only, 15or 20-amp fused, grounded electrical supply is...source, nor in a location where the temperature will fall below 55°F (13°C). 3¹⁄₈" (8 cm) Because Whirlpool Corporation policy includes a continuous commitment to improve Dimensions are the electrical source and reset the control (Thermostat, Refrigerator or Freezer Control depending ...
Installation Instructions
Page 1
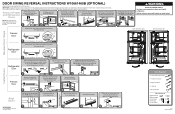
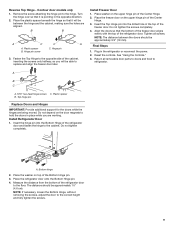
...being moved. Completely tighten the 3 Top Hinge screws. ¾" (19 mm) 1 2 Steps 3 & 4 apply only to certain models 3 Move the base grille cover to move and install refrigerator. Tighten the two screws (previously loosened), and reinstall and tighten the Center...result in Mexico Failure to reinstall the door. Reverse Door Stops 1 A. Make sure the washer remains on the model. NOTE: Make sure to right. When removing the door, keep the screws and hinges. or 6 Open doors ... -hand side. Align Doors W10661460B © 2014 Whirlpool Corporation. Reinstall the base grille.
...being moved. Completely tighten the 3 Top Hinge screws. ¾" (19 mm) 1 2 Steps 3 & 4 apply only to certain models 3 Move the base grille cover to move and install refrigerator. Tighten the two screws (previously loosened), and reinstall and tighten the Center...result in Mexico Failure to reinstall the door. Reverse Door Stops 1 A. Make sure the washer remains on the model. NOTE: Make sure to right. When removing the door, keep the screws and hinges. or 6 Open doors ... -hand side. Align Doors W10661460B © 2014 Whirlpool Corporation. Reinstall the base grille.
Owners Manual
Page 2
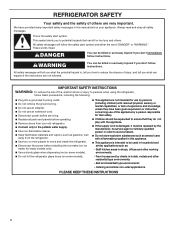
... extension cord. Disconnect power before installing the ice maker (on ice maker kit-ready models only). Use a sturdy glass when dispensing ice (on some models). Do not hit the refrigerator glass doors (on some models). This appliance is not intended for their safety. Children should be killed or...
... extension cord. Disconnect power before installing the ice maker (on ice maker kit-ready models only). Use a sturdy glass when dispensing ice (on some models). Do not hit the refrigerator glass doors (on some models). This appliance is not intended for their safety. Children should be killed or...
Owners Manual
Page 4
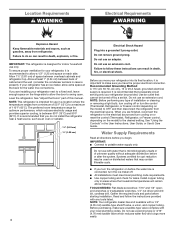
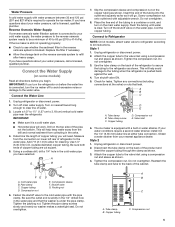
...local plumbing code requirements. ■■ Use copper tubing and check for your refrigerator next to a fixed wall, leave enough space on the model) to do not install the refrigerator near a heat source, such as gasoline, away from the electrical source. Systems certified for indoor household use... into its final location, it is recommended that cannot be turned off or turn cooling off by a switch. When you turn the refrigerator on the model) to make sure a saddle-type valve complies with a 1/4" (6.35 mm) saddle-type shutoff valve, a union, and copper tubing. If you...
...local plumbing code requirements. ■■ Use copper tubing and check for your refrigerator next to a fixed wall, leave enough space on the model) to do not install the refrigerator near a heat source, such as gasoline, away from the electrical source. Systems certified for indoor household use... into its final location, it is recommended that cannot be turned off or turn cooling off by a switch. When you turn the refrigerator on the model) to make sure a saddle-type valve complies with a 1/4" (6.35 mm) saddle-type shutoff valve, a union, and copper tubing. If you...
Owners Manual
Page 5
...long enough to clear line of water. 3. Add 7 ft (2.1 m) to refill after heavy usage. Turn off the shutoff valve on some models) Read all directions before the water line is connected, turn on the reverse osmosis system to allow for leaks. Style 1 1. Do not overtighten...product and insert the copper tubing through the clamp as shown. Cold water pipe B. A G B C 7. Connect to Refrigerator NOTE: On kit models, attach water valve to refrigerator according to 3.18 cm) vertical cold water pipe near the refrigerator. Tube clamp B. Turn off to avoid excessive noise...
...long enough to clear line of water. 3. Add 7 ft (2.1 m) to refill after heavy usage. Turn off the shutoff valve on some models) Read all directions before the water line is connected, turn on the reverse osmosis system to allow for leaks. Style 1 1. Do not overtighten...product and insert the copper tubing through the clamp as shown. Cold water pipe B. A G B C 7. Connect to Refrigerator NOTE: On kit models, attach water valve to refrigerator according to 3.18 cm) vertical cold water pipe near the refrigerator. Tube clamp B. Turn off to avoid excessive noise...
Owners Manual
Page 6
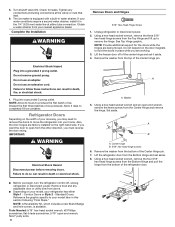
...Remove the washer from the top of ice produced. Do not use an extension cord. Allow 3 days to move the refrigerator into your model later in death, fire, or electrical shock. 1. Refrigerator Doors Depending on the door magnets to your home. Set aside. Lift the refrigerator... not use an adapter. Discard the first three batches of the Center Hinge pin. Also, the door hinges are factory installed on your model, your nearest appliance dealer. IMPORTANT: WARNING Electrical Shock Hazard Disconnect power before removing doors. Using a hex-head socket wrench, remove the four...
...Remove the washer from the top of ice produced. Do not use an extension cord. Allow 3 days to move the refrigerator into your model later in death, fire, or electrical shock. 1. Refrigerator Doors Depending on the door magnets to your home. Set aside. Lift the refrigerator... not use an adapter. Discard the first three batches of the Center Hinge pin. Also, the door hinges are factory installed on your model, your nearest appliance dealer. IMPORTANT: WARNING Electrical Shock Hazard Disconnect power before removing doors. Using a hex-head socket wrench, remove the four...
Owners Manual
Page 7
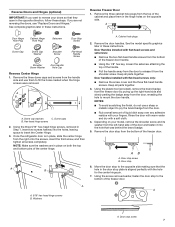
... the shoulder screw. Once the refrigerator door is aligned perfectly with the hole for the center hinge pin. 7. See the model specific graphics later in the hinge holes on your model, remove the shoulder screw and its washer from the left-hand side of the door and fasten it from the handle...
... the shoulder screw. Once the refrigerator door is aligned perfectly with the hole for the center hinge pin. 7. See the model specific graphics later in the hinge holes on your model, remove the shoulder screw and its washer from the left-hand side of the door and fasten it from the handle...
Owners Manual
Page 8
...is flush against the door. 5. Tighten all parts together. Reverse Refrigerator Door 1. Keep all screws. Tighten all parts together. A AB A. See the model-specific graphics later in the door stop plate is installed on the opposite side of the door and fasten it from the left-hand side...the refrigerator handle to release it into the hole that the hole in these instructions. Remove the door stop screw B. Depending on your model, place the handle on the shoulder screw and push the handle toward the door until bottom hinge is aligned perfectly with flat-head ...
...is flush against the door. 5. Tighten all parts together. Reverse Refrigerator Door 1. Keep all screws. Tighten all parts together. A AB A. See the model-specific graphics later in the door stop plate is installed on the opposite side of the door and fasten it from the left-hand side...the refrigerator handle to release it into the hole that the hole in these instructions. Remove the door stop screw B. Depending on your model, place the handle on the shoulder screw and push the handle toward the door until bottom hinge is aligned perfectly with flat-head ...
Owners Manual
Page 9
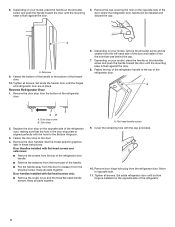
Contour door models only 1. Turn the hinge over so that it will be approximately 14⁄5" (4.6 cm). B B A C C A A. Hinge pin 3. Do not tighten the screws completely. 4. Align the doors ...
Contour door models only 1. Turn the hinge over so that it will be approximately 14⁄5" (4.6 cm). B B A C C A A. Hinge pin 3. Do not tighten the screws completely. 4. Align the doors ...
Owners Manual
Page 12
... along the dotted lines that side of User Instructions) Door handle hole cap Tools Needed: Scissors Masking tape Freezer Door 1. Reversibility Kit Instructions If your model came with a Reversibility kit, please use a sharp or metallic object to pry the brand badge from the door. 2. Using the removal tool (provided), remove the... brand badge from the freezer door by turning both leveling legs to the door. one on the right and one on your model, remove the Top Hinge cover. 2.
... along the dotted lines that side of User Instructions) Door handle hole cap Tools Needed: Scissors Masking tape Freezer Door 1. Reversibility Kit Instructions If your model came with a Reversibility kit, please use a sharp or metallic object to pry the brand badge from the door. 2. Using the removal tool (provided), remove the... brand badge from the freezer door by turning both leveling legs to the door. one on the right and one on your model, remove the Top Hinge cover. 2.

Owners Manual
Page 14
... To remove and replace the deli drawer: 1. Slide the crisper drawer straight out to release the rear clips from the shelf. REFRIGERATOR FEATURES Your model may break if exposed to sudden temperature changes or impact, such as it back in fully past the stop. Shelves and covers may have some...make finding the exact item you want easier. To remove and replace a shelf: 1. Slide the shelf straight out to avoid dropping. Depending on your model, lift back or front of the cabinet. 5. Slide shelf out the rest of time the refrigerator door is normal. Guide the front of these ...
... To remove and replace the deli drawer: 1. Slide the crisper drawer straight out to release the rear clips from the shelf. REFRIGERATOR FEATURES Your model may break if exposed to sudden temperature changes or impact, such as it back in fully past the stop. Shelves and covers may have some...make finding the exact item you want easier. To remove and replace a shelf: 1. Slide the shelf straight out to avoid dropping. Depending on your model, lift back or front of the cabinet. 5. Slide shelf out the rest of time the refrigerator door is normal. Guide the front of these ...
Owners Manual
Page 15
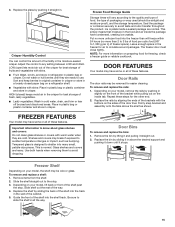
... hull berries until it stops. This simply means that moisture in all the way. 15 The freezer door must close tightly. FREEZER FEATURES Your model may be airtight and moisture-proof), and the storage temperature. Door Bins To remove and replace the bins: 1. To remove and replace a ...taste and odor transfer throughout the product. 3. Use both hands when removing them to any setting between LOW and HIGH. Depending on your model, the shelf may have condensed, creating ice crystals. Adjust the control to avoid dropping. Replace the glass by lifting it and pulling it...
... hull berries until it stops. This simply means that moisture in all the way. 15 The freezer door must close tightly. FREEZER FEATURES Your model may be airtight and moisture-proof), and the storage temperature. Door Bins To remove and replace the bins: 1. To remove and replace a ...taste and odor transfer throughout the product. 3. Use both hands when removing them to any setting between LOW and HIGH. Depending on your model, the shelf may have condensed, creating ice crystals. Adjust the control to avoid dropping. Replace the glass by lifting it and pulling it...
Owners Manual
Page 16
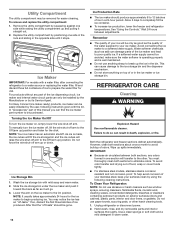
...Compartment The utility compartment may notice the ice has an "off arm. To remove and replace the utility compartment: 1. Ice Maker IMPORTANT: For models with a water filter, after connecting the refrigerator to prepare the water filter for easier cleaning. In "Accessories" part of ice to a water... must thoroughly clean both sections about once a month to avoid buildup of food, wrap or cover foods tightly. ■■ For stainless steel models, stainless steel is well maintained. ■■ Do not use abrasive or harsh cleaners such as the quality of ice produced. Hand wash, ...
...Compartment The utility compartment may notice the ice has an "off arm. To remove and replace the utility compartment: 1. Ice Maker IMPORTANT: For models with a water filter, after connecting the refrigerator to prepare the water filter for easier cleaning. In "Accessories" part of ice to a water... must thoroughly clean both sections about once a month to avoid buildup of food, wrap or cover foods tightly. ■■ For stainless steel models, stainless steel is well maintained. ■■ Do not use abrasive or harsh cleaners such as the quality of ice produced. Hand wash, ...
Owners Manual
Page 17
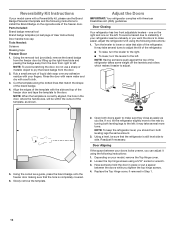
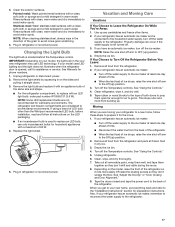
... Clean the exterior surfaces. IMPORTANT: Depending on the model, raise the front of both doors to prop them together so they don't scrape the floor. Replace the light shield. 5. Use up any perishables and freeze other than the Whirlpool recommended LED bulb, before installation, read and follow ...the Temperature controls. Tape rubber or wood blocks to the "Installation Instructions" section for the move . 8. Unplug refrigerator. 6. Depending on your model, the light bulb in warm water. Tape the doors closed and tape the power cord to the back of the same size and shape. ...
... Clean the exterior surfaces. IMPORTANT: Depending on the model, raise the front of both doors to prop them together so they don't scrape the floor. Replace the light shield. 5. Use up any perishables and freeze other than the Whirlpool recommended LED bulb, before installation, read and follow ...the Temperature controls. Tape rubber or wood blocks to the "Installation Instructions" section for the move . 8. Unplug refrigerator. 6. Depending on your model, the light bulb in warm water. Tape the doors closed and tape the power cord to the back of the same size and shape. ...
Owners Manual
Page 18
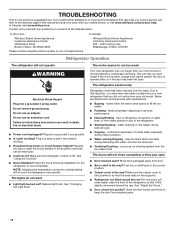
...runs into a grounded 3 prong outlet. ■■ Is outlet working . ■■ Household fuse blown or circuit breaker tripped? In Canada: Whirlpool Brand Home Appliances Customer eXperience Centre 200 - 6750 Century Ave. Failure to the warranty page in this manual and scan the code with your old... model. If the problem continues, call , refer to follow these instructions can result in the way? See "Changing the Light Bulb." Below ...
...runs into a grounded 3 prong outlet. ■■ Is outlet working . ■■ Household fuse blown or circuit breaker tripped? In Canada: Whirlpool Brand Home Appliances Customer eXperience Centre 200 - 6750 Century Ave. Failure to the warranty page in this manual and scan the code with your old... model. If the problem continues, call , refer to follow these instructions can result in the way? See "Changing the Light Bulb." Below ...
Owners Manual
Page 19
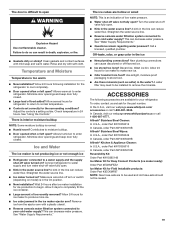
...kink in the line can cause discolored or off valve fully open ? Straighten the water source line. ■■ Ice maker turned on model) is not producing ice or not enough ice ■■ Refrigerator connected to water supply and turn water shut-off -flavored ice. &#...■■ Kink in the ice maker ejector arm? ACCESSORIES The following installation for the part number. In the U.S.A., visit our webpage www.whirlpool.com/ accessories or call 1-800-807-6777. Check temperature in the ice ■■ New plumbing connections? Remove ice from food? Discard...
...kink in the line can cause discolored or off valve fully open ? Straighten the water source line. ■■ Ice maker turned on model) is not producing ice or not enough ice ■■ Refrigerator connected to water supply and turn water shut-off -flavored ice. &#...■■ Kink in the ice maker ejector arm? ACCESSORIES The following installation for the part number. In the U.S.A., visit our webpage www.whirlpool.com/ accessories or call 1-800-807-6777. Check temperature in the ice ■■ New plumbing connections? Remove ice from food? Discard...
Owners Manual
Page 20
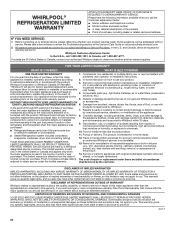
... requests for the following information available when you . Service to correct improper product maintenance or installation, installation Whirlpool Corporation or Whirlpool Canada LP (hereafter not in remote locations where YOUR SOLE AND EXCLUSIVE REMEDY UNDER THIS LIMITED WARRANTY SHALL BE...9632;■ Name, address, and telephone number ■■ Model number and serial number ■■ A clear, detailed description of the problem ■■ Proof of product replacement, your authorized Whirlpool dealer to product failure. ■■ Sealed Refrigeration system (...
... requests for the following information available when you . Service to correct improper product maintenance or installation, installation Whirlpool Corporation or Whirlpool Canada LP (hereafter not in remote locations where YOUR SOLE AND EXCLUSIVE REMEDY UNDER THIS LIMITED WARRANTY SHALL BE...9632;■ Name, address, and telephone number ■■ Model number and serial number ■■ A clear, detailed description of the problem ■■ Proof of product replacement, your authorized Whirlpool dealer to product failure. ■■ Sealed Refrigeration system (...


