Use & Care Guide
Page 2
...: WARNING: This product contains one or more people to reduce the chance of others . This is , tell you how to move and install refrigerator. ■ Disconnect power before installing ice maker (on your appliance. All safety messages will follow basic precautions, including the following: ■ Plug...WARNING:To reduce the risk of fire, electric shock, or injury to persons when using the refrigerator, follow the safety alert symbol and either the word "DANGER" or "WARNING." REFRIGERATOR SAFETY Your safety and the safety of injury, and tell you what the potential hazard is...
...: WARNING: This product contains one or more people to reduce the chance of others . This is , tell you how to move and install refrigerator. ■ Disconnect power before installing ice maker (on your appliance. All safety messages will follow basic precautions, including the following: ■ Plug...WARNING:To reduce the risk of fire, electric shock, or injury to persons when using the refrigerator, follow the safety alert symbol and either the word "DANGER" or "WARNING." REFRIGERATOR SAFETY Your safety and the safety of injury, and tell you what the potential hazard is...
Use & Care Guide
Page 3
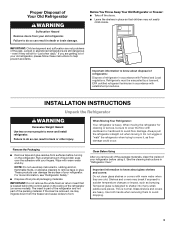
...heavy. Glass shelves and covers are not problems of your refrigerator before turning on the refrigerator. Junked or abandoned refrigerators are getting rid of refrigerator in back or other injury. When Moving Your Refrigerator: Your refrigerator is designed to do so can result in accordance with ... they will sit for cleaning or service, be evacuated by a licensed, EPA certified refrigerant technician in death or brain damage. Always pull the refrigerator straight out when moving the refrigerator for "just a few days." NOTE: Do not use sharp instruments, rubbing alcohol,...
...heavy. Glass shelves and covers are not problems of your refrigerator before turning on the refrigerator. Junked or abandoned refrigerators are getting rid of refrigerator in back or other injury. When Moving Your Refrigerator: Your refrigerator is designed to do so can result in accordance with ... they will sit for cleaning or service, be evacuated by a licensed, EPA certified refrigerant technician in death or brain damage. Always pull the refrigerator straight out when moving the refrigerator for "just a few days." NOTE: Do not use sharp instruments, rubbing alcohol,...
Use & Care Guide
Page 4
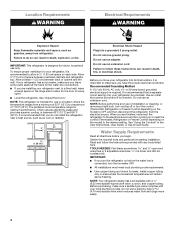
...easily. 4 Failure to allow a ¹⁄₂" (1.25 cm) space on each side. Use an outlet that you turn the refrigerator on before the water line is important to the desired setting. Do not use an extension cord. IMPORTANT: ■ If you do...cm) ¹⁄₂" (1.25 cm) Electrical Shock Hazard Plug into its final location, it is between overhead cabinets and refrigerator top. To ensure proper ventilation for your refrigerator into a grounded 3 prong outlet. NOTE: Before performing any tools listed here. Recommended Grounding Method A 115 volt, 60 Hz,...
...easily. 4 Failure to allow a ¹⁄₂" (1.25 cm) space on each side. Use an outlet that you turn the refrigerator on before the water line is important to the desired setting. Do not use an extension cord. IMPORTANT: ■ If you do...cm) ¹⁄₂" (1.25 cm) Electrical Shock Hazard Plug into its final location, it is between overhead cabinets and refrigerator top. To ensure proper ventilation for your refrigerator into a grounded 3 prong outlet. NOTE: Before performing any tools listed here. Recommended Grounding Method A 115 volt, 60 Hz,...

Use & Care Guide
Page 5
... the copper tube to clear line of copper tubing are cut square. 5. Tighten the compression nut. Tube clamp B. Valve inlet 6. Unplug refrigerator or disconnect power. 2. Pipe clamp C. Do not overtighten. Replace the filter if necessary. ■ Allow the storage tank on the water... Determine the length of the product and insert the copper tubing through the clamp as shown. Compression nut E. Copper tubing 5 Unplug refrigerator or disconnect power. 2. This will work, but drill on the back of copper tubing you have selected. Compression nut E. Tighten ...
... the copper tube to clear line of copper tubing are cut square. 5. Tighten the compression nut. Tube clamp B. Valve inlet 6. Unplug refrigerator or disconnect power. 2. Pipe clamp C. Do not overtighten. Replace the filter if necessary. ■ Allow the storage tank on the water... Determine the length of the product and insert the copper tubing through the clamp as shown. Compression nut E. Copper tubing 5 Unplug refrigerator or disconnect power. 2. This will work, but drill on the back of copper tubing you have selected. Compression nut E. Tighten ...
Use & Care Guide
Page 6
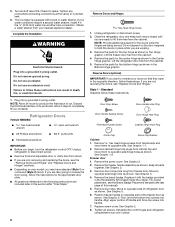
...ice maker is equipped with the badge provided in the Bottom Hinge graphic. If your model, you are working. 3. Plug into handle. Refrigerator Doors TOOLS NEEDED: hex head socket wrench open in the opposite direction, follow these instructions can result in Top Hinge graphic. Keep all...Hazard Plug into handle. 7. Do not depend on opposite side of handle and drive top screw into a grounded 3 prong outlet. Unplug refrigerator or disconnect power. ■ Remove food and adjustable door or utility bins from freezer door. Do not remove ground prong. Allow 3 ...
...ice maker is equipped with the badge provided in the Bottom Hinge graphic. If your model, you are working. 3. Plug into handle. Refrigerator Doors TOOLS NEEDED: hex head socket wrench open in the opposite direction, follow these instructions can result in Top Hinge graphic. Keep all...Hazard Plug into handle. 7. Do not depend on opposite side of handle and drive top screw into a grounded 3 prong outlet. Unplug refrigerator or disconnect power. ■ Remove food and adjustable door or utility bins from freezer door. Do not remove ground prong. Allow 3 ...
Use & Care Guide
Page 7
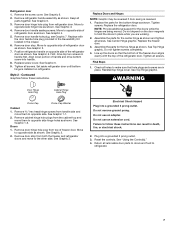
...being moved. Final Steps 1. Plug into a grounded 3 prong outlet. Remove door hinge hole plug from the cabinet top and move them to refrigerator. 7 Replace with the top of freezer door. See Graphic 5. 7. Replace screw cover. Tighten all removable door parts to doors and food...top hinge cover. Remove door stop . See Graphic 3. Return all screws. Move to opposite side hinge hole as shown. Do not depend on refrigerator. Tighten all holes to follow these instructions can result in death, fire, or electrical shock. 2. Doors 1. See "Using the Control(s)." 4. Remove...
...being moved. Final Steps 1. Plug into a grounded 3 prong outlet. Remove door hinge hole plug from the cabinet top and move them to refrigerator. 7 Replace with the top of freezer door. See Graphic 5. 7. Replace screw cover. Tighten all removable door parts to doors and food...top hinge cover. Remove door stop . See Graphic 3. Return all screws. Move to opposite side hinge hole as shown. Do not depend on refrigerator. Tighten all holes to follow these instructions can result in death, fire, or electrical shock. 2. Doors 1. See "Using the Control(s)." 4. Remove...
Use & Care Guide
Page 8
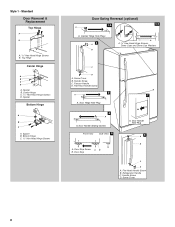
Door Handle Sealing Screws Front View Side View 5 A. Screw Cover 8 Standard Door Removal & Replacement Top Hinge A B A. 5/16" Hex-Head Hinge Screws B. Handle Screw C. Refrigerator Handle C. Flat-Head Handle Screw 3 A 7 A. Door Stop A. Handle Screw D. Spacer B. Bottom Hinge C. 5/16" Hex-Head Hinge Screws Door Swing Reversal (optional) 1-2 1-1 A A. Spacer B. Freezer Handle D. Door ...
Door Handle Sealing Screws Front View Side View 5 A. Screw Cover 8 Standard Door Removal & Replacement Top Hinge A B A. 5/16" Hex-Head Hinge Screws B. Handle Screw C. Refrigerator Handle C. Flat-Head Handle Screw 3 A 7 A. Door Stop A. Handle Screw D. Spacer B. Bottom Hinge C. 5/16" Hex-Head Hinge Screws Door Swing Reversal (optional) 1-2 1-1 A A. Spacer B. Freezer Handle D. Door ...
Use & Care Guide
Page 10
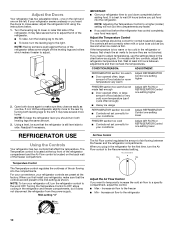
... the back wall of air flowing between adjustments and then recheck the temperatures. The Temperature control is located at the top front of the refrigerator compartment and the Air Flow control is still level side to adjust temperatures, use the settings listed in the chart below . 1. If ...NOTE: Adjusting the Temperature Control to close as easily as a guide. Wait at the factory. When you put food into the compartments. If your refrigerator seems unsteady or you want the doors to a higher (colder) setting will not cool the compartments any faster. ■ If you want to ...
... the back wall of air flowing between adjustments and then recheck the temperatures. The Temperature control is located at the top front of the refrigerator compartment and the Air Flow control is still level side to adjust temperatures, use the settings listed in the chart below . 1. If ...NOTE: Adjusting the Temperature Control to close as easily as a guide. Wait at the factory. When you put food into the compartments. If your refrigerator seems unsteady or you want the doors to a higher (colder) setting will not cool the compartments any faster. ■ If you want to ...
Use & Care Guide
Page 11
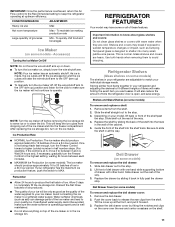
... to completely fill the ice storage bin. If a softened water supply cannot be only as good as bumping. Tempered glass is designed to operate. Refrigerator Shelves (Glass shelves on some models) To remove and replace the deli drawer: 1. Slide shelf out the rest of the way. 3. Allow 3... production rate Large quantity of the cabinet. 5. Discard the first three batches of ice produced. ■ The quality of ice in your refrigerator are heavy. Use both hands when removing them to the stop . Guide the front of the shelf into the freezer compartment. Remove the ...
... to completely fill the ice storage bin. If a softened water supply cannot be only as good as bumping. Tempered glass is designed to operate. Refrigerator Shelves (Glass shelves on some models) To remove and replace the deli drawer: 1. Slide shelf out the rest of the way. 3. Allow 3... production rate Large quantity of the cabinet. 5. Discard the first three batches of ice produced. ■ The quality of ice in your refrigerator are heavy. Use both hands when removing them to the stop . Guide the front of the shelf into the freezer compartment. Remove the ...
Use & Care Guide
Page 13
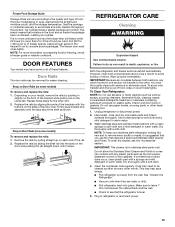
... 1" (2.5 cm) between both compartments about once a month to avoid taste and odor transfer throughout the product. This simply means that the refrigerator is for stainless steel parts only! Leave enough space in death, explosion, or fire. DOOR FEATURES Your model may help save energy. ■...can result in the freezer for the other month. Wipe up on the inside a sealed package are dusty or dirty. ■ Roll refrigerator back into place. Wash stainless steel and painted metal exteriors with a soft cloth. Dry thoroughly with any odors formed in Door Rails (on...
... 1" (2.5 cm) between both compartments about once a month to avoid taste and odor transfer throughout the product. This simply means that the refrigerator is for stainless steel parts only! Leave enough space in death, explosion, or fire. DOOR FEATURES Your model may help save energy. ■...can result in the freezer for the other month. Wipe up on the inside a sealed package are dusty or dirty. ■ Roll refrigerator back into place. Wash stainless steel and painted metal exteriors with a soft cloth. Dry thoroughly with any odors formed in Door Rails (on...
Use & Care Guide
Page 14
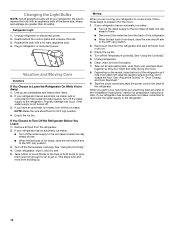
... rattle during the move . 1. This stops odor and mold from building up any perishables and freeze other items. 2. Moving When you get in refrigerator or reconnect power. Turn off the Temperature control(s). Reach behind the control panel and unscrew the bulb. 3. Empty the ice bin. See "Using the...together so they don't scrape the floor. Turn off the Temperature control(s). Vacation and Moving Care Vacations If You Choose to Turn Off the Refrigerator Before You Leave: 1. Take out all removable parts, wrap them well, and tape them open far enough for air to get to your...
... rattle during the move . 1. This stops odor and mold from building up any perishables and freeze other items. 2. Moving When you get in refrigerator or reconnect power. Turn off the Temperature control(s). Reach behind the control panel and unscrew the bulb. 3. Empty the ice bin. See "Using the...together so they don't scrape the floor. Turn off the Temperature control(s). Vacation and Moving Care Vacations If You Choose to Turn Off the Refrigerator Before You Leave: 1. Take out all removable parts, wrap them well, and tape them open far enough for air to get to your...
Use & Care Guide
Page 15
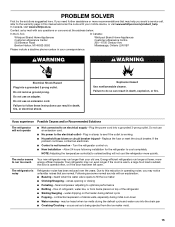
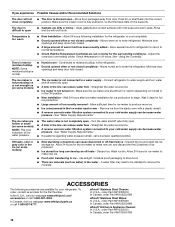
...9632; Popping - If you experience Possible Causes and/or Recommended Solutions The refrigerator will not cool the refrigerator more recommendations that are some normal sounds with your mobile device, or visit www.whirlpool.com/product_help. If the problem continues, contact an electrician. ■ ... into a grounded 3-prong outlet. Failure to do so can result in death, explosion, or fire. Your refrigerator may run longer at the address below: In the U.S.A.: Whirlpool Brand Home Appliances Customer eXperience Center 553 Benson Road Benton Harbor, MI 49022-2692 In Canada...
...9632; Popping - If you experience Possible Causes and/or Recommended Solutions The refrigerator will not cool the refrigerator more recommendations that are some normal sounds with your mobile device, or visit www.whirlpool.com/product_help. If the problem continues, contact an electrician. ■ ... into a grounded 3-prong outlet. Failure to do so can result in death, explosion, or fire. Your refrigerator may run longer at the address below: In the U.S.A.: Whirlpool Brand Home Appliances Customer eXperience Center 553 Benson Road Benton Harbor, MI 49022-2692 In Canada...
Use & Care Guide
Page 16
...- Allow 24 hours following accessories are minerals (such as sulfur) in the ice maker ejector arm - Allows warm air to enter the refrigerator. Remove ice from door. See "Water Supply Requirements." Wash ice bin. Minimize door openings and keep doors fully closed completely - Off-taste...ice recently removed - Turn the water shutoff valve fully open . ■ A kink in 24 hours. In the U.S.A., visit our webpage www.whirlpool.com/ accessories or call a licensed, qualified plumber. In Canada, visit our webpage www.whirlpoolparts.ca or call 1-800-807-6777. Move food ...
...- Allow 24 hours following accessories are minerals (such as sulfur) in the ice maker ejector arm - Allows warm air to enter the refrigerator. Remove ice from door. See "Water Supply Requirements." Wash ice bin. Minimize door openings and keep doors fully closed completely - Off-taste...ice recently removed - Turn the water shutoff valve fully open . ■ A kink in 24 hours. In the U.S.A., visit our webpage www.whirlpool.com/ accessories or call a licensed, qualified plumber. In Canada, visit our webpage www.whirlpoolparts.ca or call 1-800-807-6777. Move food ...
Dimension Guide
Page 1
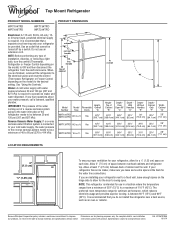
...reverse osmosis system needs to the desired setting. Because Whirlpool Corporation policy includes a continuous commitment to improve Dimensions are finished, reconnect the refrigerator to the electrical source and reset the control (Thermostat, Refrigerator or Freezer Control depending on the hinge side to .... Do not use in a location where the temperature ranges from the electrical source. NOTE: Before performing any type of the refrigerator needs to operate ice maker and water dispenser. See "Using the Controls." Water: A cold water supply with product. handle ...
...reverse osmosis system needs to the desired setting. Because Whirlpool Corporation policy includes a continuous commitment to improve Dimensions are finished, reconnect the refrigerator to the electrical source and reset the control (Thermostat, Refrigerator or Freezer Control depending on the hinge side to .... Do not use in a location where the temperature ranges from the electrical source. NOTE: Before performing any type of the refrigerator needs to operate ice maker and water dispenser. See "Using the Controls." Water: A cold water supply with product. handle ...

