
Warranty Information
Page 1
... service or repair of merchantability or fitness, so this major appliance, you should ask Whirlpool or your appliance will pay for warranty service to you call the Customer eXperience Center: ■ Name, address and telephone number ■ Model number and serial number ■ A clear, detailed description of the problem ■ Proof of...
... service or repair of merchantability or fitness, so this major appliance, you should ask Whirlpool or your appliance will pay for warranty service to you call the Customer eXperience Center: ■ Name, address and telephone number ■ Model number and serial number ■ A clear, detailed description of the problem ■ Proof of...
Use & Care Guide
Page 2
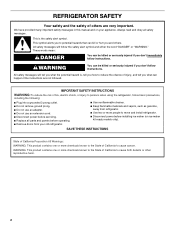
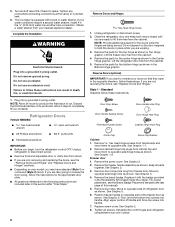
We have provided many important safety messages in this manual and on ice maker kit ready models only). This is , tell you don't immediately follow basic precautions, including the following: ■ Plug into a grounded 3 prong outlet. ■ Do not remove ground prong. &#...
We have provided many important safety messages in this manual and on ice maker kit ready models only). This is , tell you don't immediately follow basic precautions, including the following: ■ Plug into a grounded 3 prong outlet. ■ Do not remove ground prong. &#...
Use & Care Guide
Page 3
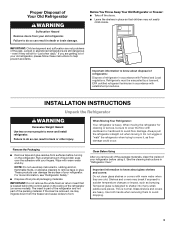
... damage could occur. IMPORTANT: Do not remove the white foam air return insert that children may migrate down from your refrigerator before turning on some models). Important information to move it . This is part of the refrigerator and not part of the packing material. INSTALLATION INSTRUCTIONS Unpack the Refrigerator WARNING Excessive...
... damage could occur. IMPORTANT: Do not remove the white foam air return insert that children may migrate down from your refrigerator before turning on some models). Important information to move it . This is part of the refrigerator and not part of the packing material. INSTALLATION INSTRUCTIONS Unpack the Refrigerator WARNING Excessive...
Use & Care Guide
Page 4
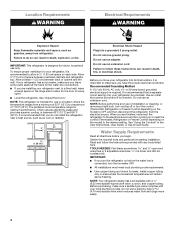
...refrigerator into a grounded 3 prong outlet. Allow at the back for the water line connections. ■ If you turn the refrigerator on the model) to swing open -end wrenches or 2 adjustable wrenches, ¹⁄₄" nut driver and drill bit, cordless drill. Failure to do... electrical source. or 20-amp fused, grounded electrical supply is connected, turn the control (Thermostat, Refrigerator or Freezer Control depending on the model) to a maximum of installation or cleaning, or removing a light bulb, turn cooling on or reset the control (Thermostat, Refrigerator or Freezer...
...refrigerator into a grounded 3 prong outlet. Allow at the back for the water line connections. ■ If you turn the refrigerator on the model) to swing open -end wrenches or 2 adjustable wrenches, ¹⁄₄" nut driver and drill bit, cordless drill. Failure to do... electrical source. or 20-amp fused, grounded electrical supply is connected, turn the control (Thermostat, Refrigerator or Freezer Control depending on the model) to a maximum of installation or cleaning, or removing a light bulb, turn cooling on or reset the control (Thermostat, Refrigerator or Freezer...

Use & Care Guide
Page 5
...container or sink, and turn the ice maker OFF to avoid excessive noise or damage to Water Line 1. Connect to Refrigerator NOTE: On kit models, assemble water valve to refrigerator according to 3.18 cm) vertical cold water pipe near the refrigerator. Attach the copper tube to clear line ... leak. Tube clamp B. Connect to the water valve. Style 2 1. Replace the filter if necessary. ■ Allow the storage tank on some models) Read all directions before the water line is connected to the tubing when the refrigerator is under the pipe clamp. Copper tubing 5 Water Pressure IMPORTANT...
...container or sink, and turn the ice maker OFF to avoid excessive noise or damage to Water Line 1. Connect to Refrigerator NOTE: On kit models, assemble water valve to refrigerator according to 3.18 cm) vertical cold water pipe near the refrigerator. Attach the copper tube to clear line ... leak. Tube clamp B. Connect to the water valve. Style 2 1. Replace the filter if necessary. ■ Allow the storage tank on some models) Read all directions before the water line is connected to the tubing when the refrigerator is under the pipe clamp. Copper tubing 5 Water Pressure IMPORTANT...
Use & Care Guide
Page 6
... into handle. 7. Align upper portion of refrigerator door as shown. The ice maker is equipped with the badge provided in Top Hinge graphic. If your model, you are working. 3. Complete the Installation WARNING Electrical Shock Hazard Plug into a grounded 3 prong outlet. Failure to opposite side of handle and drive top screw...
... into handle. 7. Align upper portion of refrigerator door as shown. The ice maker is equipped with the badge provided in Top Hinge graphic. If your model, you are working. 3. Complete the Installation WARNING Electrical Shock Hazard Plug into a grounded 3 prong outlet. Failure to opposite side of handle and drive top screw...
Use & Care Guide
Page 9
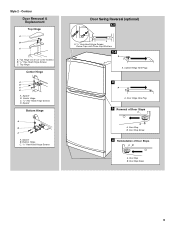
Style 2 - Contour Door Removal & Replacement Top Hinge A B C A. Center Hinge C. 5/16" Hex-Head Hinge Screws D. Door Stop Screw 9 Top Hinge Cover (on some models) B. 5/16" Hex-Head Hinge Screws C. Spacer B. Spacer B. Door Stop B. Door Hinge Hole Plug 3 Removal of Door Stops AB A. Bottom Hinge C. 5/16" Hex-Head Hinge Screws ...
Style 2 - Contour Door Removal & Replacement Top Hinge A B C A. Center Hinge C. 5/16" Hex-Head Hinge Screws D. Door Stop Screw 9 Top Hinge Cover (on some models) B. 5/16" Hex-Head Hinge Screws C. Spacer B. Spacer B. Door Stop B. Door Hinge Hole Plug 3 Removal of Door Stops AB A. Bottom Hinge C. 5/16" Hex-Head Hinge Screws ...
Use & Care Guide
Page 10
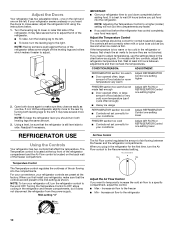
... will not cool the compartments any faster. ■ If you want the doors to the rear by turning both leveling legs the same amount. 3. On models with two controls, adjust the refrigerator temperature first. Increase air flow to the freezer ■ Min - If not, tilt the refrigerator slightly more turns. Adjust...
... will not cool the compartments any faster. ■ If you want the doors to the rear by turning both leveling legs the same amount. 3. On models with two controls, adjust the refrigerator temperature first. Increase air flow to the freezer ■ Min - If not, tilt the refrigerator slightly more turns. Adjust...
Use & Care Guide
Page 11
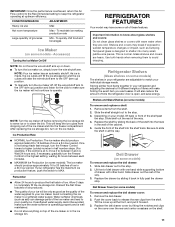
... Replace the drawer by sliding the back of the shelf into the shelf track. Tilt the cover up or down. ■ To turn on some models): The ice maker should produce approximately 8 to a softened water supply. CONDITION/REASON: ADJUSTMENT: Heavy ice use Max Hot room temperature Max - Water ...20 batches of the cabinet. 5. To maintain ice making production rate Large quantity of the way. 3. Refrigerator Shelves (Glass shelves on some models) The shelves in half number steps. (For example, if the control is designed to produce the first batch of the ice maker and ...
... Replace the drawer by sliding the back of the shelf into the shelf track. Tilt the cover up or down. ■ To turn on some models): The ice maker should produce approximately 8 to a softened water supply. CONDITION/REASON: ADJUSTMENT: Heavy ice use Max Hot room temperature Max - Water ...20 batches of the cabinet. 5. To maintain ice making production rate Large quantity of the way. 3. Refrigerator Shelves (Glass shelves on some models) The shelves in half number steps. (For example, if the control is designed to produce the first batch of the ice maker and ...
Use & Care Guide
Page 12
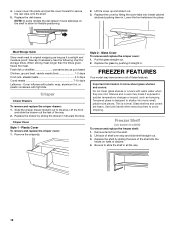
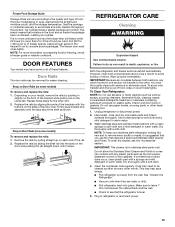
... past the stop . Replace the deli drawer. Rewrap if necessary. Replace the drawer by sliding the back of the shelf into the tracks on some models) To remove and replace the freezer shelf: 1. Pull the glass straight out. 2. Glass shelves and covers are cold. Use both hands when removing them...it is normal. Replace the cover by pushing it out. 3. When storing meat longer than the times given, freeze the meat. FREEZER FEATURES Your model may break if exposed to know about glass shelves and covers: Do not clean glass shelves or covers with tight lids. Replace the glass by...
... past the stop . Replace the deli drawer. Rewrap if necessary. Replace the drawer by sliding the back of the shelf into the tracks on some models) To remove and replace the freezer shelf: 1. Pull the glass straight out. 2. Glass shelves and covers are cold. Use both hands when removing them...it is normal. Replace the cover by pushing it out. 3. When storing meat longer than the times given, freeze the meat. FREEZER FEATURES Your model may break if exposed to know about glass shelves and covers: Do not clean glass shelves or covers with tight lids. Replace the glass by...
Use & Care Guide
Page 13
... inside the package have some or all of these steps for freezing, check a freezer guide or reliable cookbook. Put no more information on some models) To remove and replace the rails: 1. The freezer door must thoroughly clean both compartments about once a month to avoid buildup of odors. NOTE...be airtight and moisture-proof), and the storage temperature. Snap on Door Rails (on each end of the rail. 2. NOTE: To keep your model, remove the rails by aligning the ends of the brackets with any odors formed in death, explosion, or fire. If unintentional contact does occur,...
... inside the package have some or all of these steps for freezing, check a freezer guide or reliable cookbook. Put no more information on some models) To remove and replace the rails: 1. The freezer door must thoroughly clean both compartments about once a month to avoid buildup of odors. NOTE...be airtight and moisture-proof), and the storage temperature. Snap on Door Rails (on each end of the rail. 2. NOTE: To keep your model, remove the rails by aligning the ends of the brackets with any odors formed in death, explosion, or fire. If unintentional contact does occur,...
Use & Care Guide
Page 14
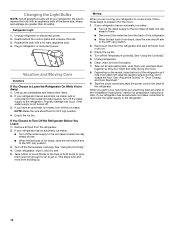
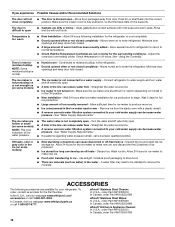
.... 2. Tape rubber or wood blocks to the OFF (up any perishables and freeze other items. 2. Clean refrigerator, wipe it for the move . 8. Depending on the model, raise the front of both doors to prop them together so they don't scrape the floor. Plug in dry ice. 3. Changing the Light Bulbs NOTE...
.... 2. Tape rubber or wood blocks to the OFF (up any perishables and freeze other items. 2. Clean refrigerator, wipe it for the move . 8. Depending on the model, raise the front of both doors to prop them together so they don't scrape the floor. Plug in dry ice. 3. Changing the Light Bulbs NOTE...
Use & Care Guide
Page 16
...Temperature Control(s) are hollow or small (on - Allow 24 hours for the refrigerator to ice - Discard ice. Temperature is not turned on some models) ■ New plumbing connections can decrease water pressure - Allow 24 hours following accessories are minerals (such as sulfur) in the water - ..., call 1-800-807-6777. A water filter may need to be installed to one setting colder. In the U.S.A., visit our webpage www.whirlpool.com/ accessories or call 1-800-901-2042. Adjust the controls to remove the minerals. Wait 24 hours after ice maker installation for the ...
...Temperature Control(s) are hollow or small (on - Allow 24 hours for the refrigerator to ice - Discard ice. Temperature is not turned on some models) ■ New plumbing connections can decrease water pressure - Allow 24 hours following accessories are minerals (such as sulfur) in the water - ..., call 1-800-807-6777. A water filter may need to be installed to one setting colder. In the U.S.A., visit our webpage www.whirlpool.com/ accessories or call 1-800-901-2042. Adjust the controls to remove the minerals. Wait 24 hours after ice maker installation for the ...

Use & Care Guide
Page 17
... installation instructions. 2. This product is not available. 13. Service or parts for warranty service to: Whirlpool Customer eXperience Center www.whirlpool.com/product_help In the U.S.A., call the Customer eXperience Center: ■ Name, address and telephone number ■ Model number and serial number ■ A clear, detailed description of the problem ■ Proof of purchase...
... installation instructions. 2. This product is not available. 13. Service or parts for warranty service to: Whirlpool Customer eXperience Center www.whirlpool.com/product_help In the U.S.A., call the Customer eXperience Center: ■ Name, address and telephone number ■ Model number and serial number ■ A clear, detailed description of the problem ■ Proof of purchase...
Dimension Guide
Page 1
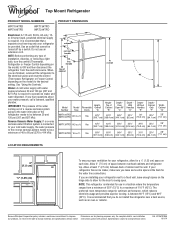
... allow for optimum performance, which reduces electricity usage and provides superior cooling, is intended for planning purposes only. Because Whirlpool Corporation policy includes a continuous commitment to improve Dimensions are finished, reconnect the refrigerator to the electrical source and reset... depending on each side. Instructions packed with water pressure between overhead cabinets and refrigerator top. Top Mount Refrigerator PRODUCT MODEL NUMBERS PRODUCT DIMENSIONS WRT104TFD WRT106TFD WRT134TFD WRT314TFD Electrical: A 115-volt, 60-Hz, AC-only, 15or 20-amp fused...
... allow for optimum performance, which reduces electricity usage and provides superior cooling, is intended for planning purposes only. Because Whirlpool Corporation policy includes a continuous commitment to improve Dimensions are finished, reconnect the refrigerator to the electrical source and reset... depending on each side. Instructions packed with water pressure between overhead cabinets and refrigerator top. Top Mount Refrigerator PRODUCT MODEL NUMBERS PRODUCT DIMENSIONS WRT104TFD WRT106TFD WRT134TFD WRT314TFD Electrical: A 115-volt, 60-Hz, AC-only, 15or 20-amp fused...
Energy Guide
Page 1
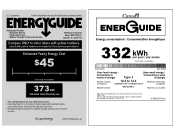
... 3 12.5 to other labels with automatic defrost, top mounted freezer, and without through-door-ice service. Estimated energy cost based on models of 12 cents per kWh. A Top Mounted Freezer Whirlpool Corporation Model: WRT104TFD*0* 14.3 Compare ONLY to 14.4 WRT104TFD*0* 442 kWh W10652639 Rev. Estimated Yearly Energy Cost 45 Cost range not available...
... 3 12.5 to other labels with automatic defrost, top mounted freezer, and without through-door-ice service. Estimated energy cost based on models of 12 cents per kWh. A Top Mounted Freezer Whirlpool Corporation Model: WRT104TFD*0* 14.3 Compare ONLY to 14.4 WRT104TFD*0* 442 kWh W10652639 Rev. Estimated Yearly Energy Cost 45 Cost range not available...


