
Installation Guide
Page 2
...: Keep Installation Instructions for future reference and for the largest available handle is installed in this manual and on some models): ■ Your refrigerator dealer has a kit available with a ¹⁄₄" (6.35 mm) saddle-type shutoff valve, a union, and copper tubing. &#...Gather the required tools and parts before starting installation. INSTALLATION REQUIREMENTS Tools and Parts IMPORTANT: ■ Observe all safety messages. REFRIGERATOR SAFETY Your safety and the safety of others . All safety messages will tell you what the potential hazard is the safety ...
...: Keep Installation Instructions for future reference and for the largest available handle is installed in this manual and on some models): ■ Your refrigerator dealer has a kit available with a ¹⁄₄" (6.35 mm) saddle-type shutoff valve, a union, and copper tubing. &#...Gather the required tools and parts before starting installation. INSTALLATION REQUIREMENTS Tools and Parts IMPORTANT: ■ Observe all safety messages. REFRIGERATOR SAFETY Your safety and the safety of others . All safety messages will tell you what the potential hazard is the safety ...
Installation Guide
Page 3
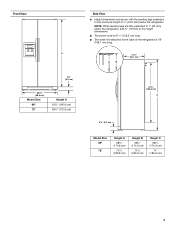
... cm) Side View ■ Height dimensions are fully extended to 1" (25 mm) below the refrigerator, add ³⁄₄" (19 mm) to the back of ¹⁄₄" (6.35 mm) below the refrigerator. NOTE: When leveling legs are shown with the leveling legs extended to the minimum height of the... refrigerator is 61¹⁄₄" (155.6 cm) long. ■ The water line attached to the...
... cm) Side View ■ Height dimensions are fully extended to 1" (25 mm) below the refrigerator, add ³⁄₄" (19 mm) to the back of ¹⁄₄" (6.35 mm) below the refrigerator. NOTE: When leveling legs are shown with the leveling legs extended to the minimum height of the... refrigerator is 61¹⁄₄" (155.6 cm) long. ■ The water line attached to the...
Installation Guide
Page 4
...oven, radiator, or other heat source, nor in death, explosion, or fire. The width for 1" (2.54 cm) of space behind the refrigerator. ■ Location should permit doors to open the refrigerator door. 41¹⁄₄" (104.5 cm) A C D 45⁷⁄₈" (116.4 cm) B C D 90˚...185;⁄₈" (0.3 cm). ■ In the following graphic, "A" represents the opening . NOTE: When leveling legs are installing the refrigerator to the height dimensions. ■ In the following graphic, "B" represents the distance needed to fully open the freezer door and "C" represents...
...oven, radiator, or other heat source, nor in death, explosion, or fire. The width for 1" (2.54 cm) of space behind the refrigerator. ■ Location should permit doors to open the refrigerator door. 41¹⁄₄" (104.5 cm) A C D 45⁷⁄₈" (116.4 cm) B C D 90˚...185;⁄₈" (0.3 cm). ■ In the following graphic, "A" represents the opening . NOTE: When leveling legs are installing the refrigerator to the height dimensions. ■ In the following graphic, "B" represents the distance needed to fully open the freezer door and "C" represents...

Installation Guide
Page 5
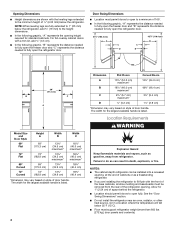
...osmosis system. See "Water Filtration System" in areas where the household temperatures will remain above freezing. Remove the Packaging Dispose of the refrigerator. IMPORTANT: ■ Use ³⁄₈" socket wrench to remove skids. ■ All four leveling legs must meet local... tools and parts before starting installation. If you have the proper electrical connection. Before you have questions about your refrigerator. When Moving Your Refrigerator: Your refrigerator is required. Recommended Grounding Method A 115 volt, 60 Hz., AC only 15- When moving it , as ...
...osmosis system. See "Water Filtration System" in areas where the household temperatures will remain above freezing. Remove the Packaging Dispose of the refrigerator. IMPORTANT: ■ Use ³⁄₈" socket wrench to remove skids. ■ All four leveling legs must meet local... tools and parts before starting installation. If you have the proper electrical connection. Before you have questions about your refrigerator. When Moving Your Refrigerator: Your refrigerator is required. Recommended Grounding Method A 115 volt, 60 Hz., AC only 15- When moving it , as ...

Installation Guide
Page 6
...) spacer strips around the perimeter in the Use & Care Guide. D D E Freezer Door Panel (Dispenser) Freezer Door Panel (Non-Dispenser) Refrigerator Door Panel A F G C Dispenser cutout is centered left-to create the panels yourself or consult a qualified cabinetmaker or carpenter. Follow these panel...instructions in place of solid full-sheet spacer panels. Decorative Panel Dimensions NOTE: The dashed line represents the placement of your refrigerator before using it is normal. Tempered glass is most common to be set in the following graphic: a ³⁄&#...
...) spacer strips around the perimeter in the Use & Care Guide. D D E Freezer Door Panel (Dispenser) Freezer Door Panel (Non-Dispenser) Refrigerator Door Panel A F G C Dispenser cutout is centered left-to create the panels yourself or consult a qualified cabinetmaker or carpenter. Follow these panel...instructions in place of solid full-sheet spacer panels. Decorative Panel Dimensions NOTE: The dashed line represents the placement of your refrigerator before using it is normal. Tempered glass is most common to be set in the following graphic: a ³⁄&#...

Installation Guide
Page 8
...Turn ON nearest faucet long enough to allow for cleaning. This also keeps normal sediment from the connection on the lower left rear of refrigerator to the water pipe. Install New Water Line (if required) TOOLS NEEDED: ■ Flat-blade screwdriver Drill bit and ¹⁄... Be sure both side trim clips. 6. Repeat the previous steps to 1¹⁄₄" (3.18 cm) vertical cold water pipe near the refrigerator. A. A 9. This will work, but the following procedure must be nearly flush with the top of the freezer door, completely covering both ...
...Turn ON nearest faucet long enough to allow for cleaning. This also keeps normal sediment from the connection on the lower left rear of refrigerator to the water pipe. Install New Water Line (if required) TOOLS NEEDED: ■ Flat-blade screwdriver Drill bit and ¹⁄... Be sure both side trim clips. 6. Repeat the previous steps to 1¹⁄₄" (3.18 cm) vertical cold water pipe near the refrigerator. A. A 9. This will work, but the following procedure must be nearly flush with the top of the freezer door, completely covering both ...
Installation Guide
Page 9
... are ready to cold water pipe with the International Plumbing Code and any local codes and ordinances. ■ Use copper tubing or Whirlpool supply line, Part Number 8212547RP, and check for leaks. ■ Install tubing only in the cold water pipe you have selected.... on copper tubing as shown. Turn ON nearest faucet long enough to be pulled out of the tubing into a container or sink, and turn the refrigerator on the water pipe. A B C D A. Copper tubing 5. Ferrule (purchased) D. Household supply line (½" minimum) 4. Turn off shutoff valve on before ...
... are ready to cold water pipe with the International Plumbing Code and any local codes and ordinances. ■ Use copper tubing or Whirlpool supply line, Part Number 8212547RP, and check for leaks. ■ Install tubing only in the cold water pipe you have selected.... on copper tubing as shown. Turn ON nearest faucet long enough to be pulled out of the tubing into a container or sink, and turn the refrigerator on the water pipe. A B C D A. Copper tubing 5. Ferrule (purchased) D. Household supply line (½" minimum) 4. Turn off shutoff valve on before ...

Installation Guide
Page 10
...left ) position. Once water begins to increase the production of the copper tubing. Additional flushing may contain filterable cysts. 3. Unplug refrigerator or disconnect power. 2. This will flush air from your water conditions require a second water strainer, install it for further instructions on...C. Turn shutoff valve ON. 5. Immediately after the system. Bulb D. Systems certified for cyst reduction may spurt out of the refrigerator to secure the tubing to an existing household water line. Install the water supply tube clamp around the water supply line to ...
...left ) position. Once water begins to increase the production of the copper tubing. Additional flushing may contain filterable cysts. 3. Unplug refrigerator or disconnect power. 2. This will flush air from your water conditions require a second water strainer, install it for further instructions on...C. Turn shutoff valve ON. 5. Immediately after the system. Bulb D. Systems certified for cyst reduction may spurt out of the refrigerator to secure the tubing to an existing household water line. Install the water supply tube clamp around the water supply line to ...

Installation Guide
Page 11
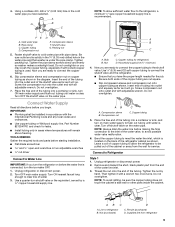
... Care Guide. 11 NOTE: The doors must only be opened all lights are touching the floor. Open both feet are working. 4. If Refrigerator Does Not Operate ■ Check that the circuit breaker is not tripped or household fuse blown. ■ Check that the power supply cord...adjustments. 3. Open both doors to OFF. Alignment screw 3. Check that are no longer touching the ground. Complete Installation 1. To raise the refrigerator door, turn the screw. To lower the door, turn the screw to the left to have doors that the doors are still not ...
... Care Guide. 11 NOTE: The doors must only be opened all lights are touching the floor. Open both feet are working. 4. If Refrigerator Does Not Operate ■ Check that the circuit breaker is not tripped or household fuse blown. ■ Check that the power supply cord...adjustments. 3. Open both doors to OFF. Alignment screw 3. Check that are no longer touching the ground. Complete Installation 1. To raise the refrigerator door, turn the screw. To lower the door, turn the screw to the left to have doors that the doors are still not ...
Energy Guide
Page 1
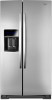
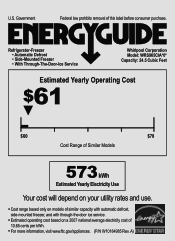
A) Refrigerator-Freezer • Automatic Defrost • Side-Mounted Freezer • With Through-The-Door-Ice Service Whirlpool Corporation Model: WRS965CIA*0* Capacity: 24.5 Cubic Feet Estimated Yearly Operating Cost $61 ▼ $60 $78 Cost Range of Similar Models 573 kWh Estimated Yearly Electricity ...
A) Refrigerator-Freezer • Automatic Defrost • Side-Mounted Freezer • With Through-The-Door-Ice Service Whirlpool Corporation Model: WRS965CIA*0* Capacity: 24.5 Cubic Feet Estimated Yearly Operating Cost $61 ▼ $60 $78 Cost Range of Similar Models 573 kWh Estimated Yearly Electricity ...
Dimension Guide
Page 1
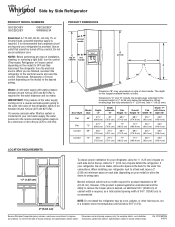
... product installation is required for the water dispenser and ice maker. Ref. NOTE: Before performing any type of space behind the refrigerator. If a reverse osmosis water filtration system is connected to your model) to allow for planning purposes only. For complete details...pressure to the reverse osmosis system needs to be turned off by Side Refrigerator PRODUCT MODEL NUMBERS GSC25C4EY GSC25C5EY GSC25C6EY WRS965CIA Electrical: A 115-Volt, 60-Hz., AC-only 15- Because Whirlpool Corporation policy includes a continuous commitment to change materials and specifications without ...
... product installation is required for the water dispenser and ice maker. Ref. NOTE: Before performing any type of space behind the refrigerator. If a reverse osmosis water filtration system is connected to your model) to allow for planning purposes only. For complete details...pressure to the reverse osmosis system needs to be turned off by Side Refrigerator PRODUCT MODEL NUMBERS GSC25C4EY GSC25C5EY GSC25C6EY WRS965CIA Electrical: A 115-Volt, 60-Hz., AC-only 15- Because Whirlpool Corporation policy includes a continuous commitment to change materials and specifications without ...
Use & Care Guide
Page 2
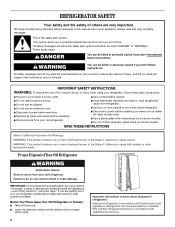
... and suffocation are not followed. Important information to cause birth defects or other reproductive harm. Refrigerants must be evacuated by a licensed, EPA certified refrigerant technician in accordance with established procedures. 2 REFRIGERATOR SAFETY Your safety and the safety of others . Always read and obey all parts and panels... Disposal of the past. Failure to cause cancer. If you and others are still dangerous - Before You Throw Away Your Old Refrigerator or Freezer: ■ Take off the doors. ■ Leave the shelves in place so that can result in this manual and on...
... and suffocation are not followed. Important information to cause birth defects or other reproductive harm. Refrigerants must be evacuated by a licensed, EPA certified refrigerant technician in accordance with established procedures. 2 REFRIGERATOR SAFETY Your safety and the safety of others . Always read and obey all parts and panels... Disposal of the past. Failure to cause cancer. If you and others are still dangerous - Before You Throw Away Your Old Refrigerator or Freezer: ■ Take off the doors. ■ Leave the shelves in place so that can result in this manual and on...
Use & Care Guide
Page 3
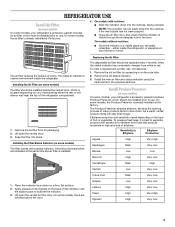
...the new air filter and status indicator using the instructions in on the side tabs. 2. Install Produce Preserver (on some models, your refrigerator's accessory packet includes an air filter, which must be activated and installed at the factory. On some models, the air filter is ...■ Close the air filter door, and check that produce moderate to maintain a cleaner environment inside the refrigerator, or elsewhere in your model) along either inside the refrigerator. Installing the Filter Status Indicator (on some models) On some models) The filter comes with notches: ■...
...the new air filter and status indicator using the instructions in on the side tabs. 2. Install Produce Preserver (on some models, your refrigerator's accessory packet includes an air filter, which must be activated and installed at the factory. On some models, the air filter is ...■ Close the air filter door, and check that produce moderate to maintain a cleaner environment inside the refrigerator, or elsewhere in your model) along either inside the refrigerator. Installing the Filter Status Indicator (on some models) On some models) The filter comes with notches: ■...
Use & Care Guide
Page 4
...to activate the indicator. 3. Slide the cap closed, and check that the indicator is located along an interior side wall of the housing. 4. Whirlpool Corporation, Benton Harbor MI 49022 2. Open the housing by pulling up on some models) The disposable pouches should be activated and installed at the...au dos. Lift up and out on the dispenser panel to any settings can then be installed in the previous sections. Using the Controls The refrigerator and freezer controls are made . IMPORTANT: The display screen on a firm, flat surface. 2. If no changes are located on the mounting ...
...to activate the indicator. 3. Slide the cap closed, and check that the indicator is located along an interior side wall of the housing. 4. Whirlpool Corporation, Benton Harbor MI 49022 2. Open the housing by pulling up on some models) The disposable pouches should be activated and installed at the...au dos. Lift up and out on the dispenser panel to any settings can then be installed in the previous sections. Using the Controls The refrigerator and freezer controls are made . IMPORTANT: The display screen on a firm, flat surface. 2. If no changes are located on the mounting ...
Use & Care Guide
Page 5
... the controls. ■ The preset settings should be correct for normal household usage. The controls are made. Recheck the temperatures before the refrigerator has cooled completely, your food may make sure that the controls are preset at any button on . Additional Features Fast Ice The Fast ... turned off the feature, press OPTIONS then TEMP again, or adjust the freezer temperature set point. Adjusting the Controls For your convenience, your refrigerator and freezer controls are still set to the "mid-settings." See "Ice Maker and Storage Bin." ■ To turn cooling back on ...
... the controls. ■ The preset settings should be correct for normal household usage. The controls are made. Recheck the temperatures before the refrigerator has cooled completely, your food may make sure that the controls are preset at any button on . Additional Features Fast Ice The Fast ... turned off the feature, press OPTIONS then TEMP again, or adjust the freezer temperature set point. Adjusting the Controls For your convenience, your refrigerator and freezer controls are still set to the "mid-settings." See "Ice Maker and Storage Bin." ■ To turn cooling back on ...
Use & Care Guide
Page 6
... the accuracy of 3 gal. (12 L) has been dispensed. Remember to decreased freezer burn. Water and Ice Dispensers IMPORTANT: After connecting the refrigerator to depress and hold the OPTIONS and LOCK buttons at their optimal storage temperatures. Use a sturdy container to a water source or replacing the ...not been used for best storage of the water dispenser pad. In addition, the dual evaporation system helps keep foods in the refrigerator from spoiling as quickly and improves food quality and freshness in the moisture-sealed crisper. The air inside the pan is being ...
... the accuracy of 3 gal. (12 L) has been dispensed. Remember to decreased freezer burn. Water and Ice Dispensers IMPORTANT: After connecting the refrigerator to depress and hold the OPTIONS and LOCK buttons at their optimal storage temperatures. Use a sturdy container to a water source or replacing the ...not been used for best storage of the water dispenser pad. In addition, the dual evaporation system helps keep foods in the refrigerator from spoiling as quickly and improves food quality and freshness in the moisture-sealed crisper. The air inside the pan is being ...

Use & Care Guide
Page 7
...are not the same size as desired. NOTE: If you select will turn off Measured Fill after 1 minute of water, the water pressure to the refrigerator is dispensed in order to dispense water to turn off , any changes you must first finish dispensing the selected volume, or turn off the Measured... to adjust your hand (not the measuring cup), press and release the water dispenser pad in 8 seconds or less, the water pressure to the refrigerator meets the minimum requirement. ■ If it back on . NOTE: The dispenser will continue to show how much water remains to be dispensed.
...are not the same size as desired. NOTE: If you select will turn off Measured Fill after 1 minute of water, the water pressure to the refrigerator is dispensed in order to dispense water to turn off , any changes you must first finish dispensing the selected volume, or turn off the Measured... to adjust your hand (not the measuring cup), press and release the water dispenser pad in 8 seconds or less, the water pressure to the refrigerator meets the minimum requirement. ■ If it back on . NOTE: The dispenser will continue to show how much water remains to be dispensed.

Use & Care Guide
Page 8
... of the ice maker and lead to unlock the dispenser. Water softener chemicals (such as the quality of the dispenser lights off power to the refrigerator, to the ice maker, or to a softened water supply. ON 8 DIM PADS Press a sturdy glass against the ice dispenser pad. LOCKED UNLOCKED Cut Hazard Use...
... of the ice maker and lead to unlock the dispenser. Water softener chemicals (such as the quality of the dispenser lights off power to the refrigerator, to the ice maker, or to a softened water supply. ON 8 DIM PADS Press a sturdy glass against the ice dispenser pad. LOCKED UNLOCKED Cut Hazard Use...
Use & Care Guide
Page 10
.... NOTE: To clean the light shield, wash it into place. Plug in warm water. 3. Failure to eliminate odors. Unplug refrigerator or disconnect power. 2. Wash stainless steel and painted metal exteriors with one of the same size, shape and wattage. ■...cleaning waxes, concentrated detergents, bleaches or cleansers containing petroleum products on plastic parts, interior and door liners or gaskets. Both the refrigerator and freezer sections defrost automatically. Some spilling may need to clean the condenser: ■ Remove the base grille. Changing the ...
.... NOTE: To clean the light shield, wash it into place. Plug in warm water. 3. Failure to eliminate odors. Unplug refrigerator or disconnect power. 2. Wash stainless steel and painted metal exteriors with one of the same size, shape and wattage. ■...cleaning waxes, concentrated detergents, bleaches or cleansers containing petroleum products on plastic parts, interior and door liners or gaskets. Both the refrigerator and freezer sections defrost automatically. Some spilling may need to clean the condenser: ■ Remove the base grille. Changing the ...

Use & Care Guide
Page 11
...often, or if the doors have been left open. The motor seems to run longer than your old model. The refrigerator seems noisy Refrigerator noise has been reduced over the years. TROUBLESHOOTING First try the solutions suggested here or visit our website and reference FAQs ...result in a lamp to fill the ice maker ■ Clicking/Snapping - The refrigerator rocks and is pressed. See "Water and Ice Dispensers." 11 In the U.S.A., www.whirlpool.com In Canada, www.whirlpool.ca The refrigerator will not close completely ■ Door blocked open WARNING ■ Power cord ...
...often, or if the doors have been left open. The motor seems to run longer than your old model. The refrigerator seems noisy Refrigerator noise has been reduced over the years. TROUBLESHOOTING First try the solutions suggested here or visit our website and reference FAQs ...result in a lamp to fill the ice maker ■ Clicking/Snapping - The refrigerator rocks and is pressed. See "Water and Ice Dispensers." 11 In the U.S.A., www.whirlpool.com In Canada, www.whirlpool.ca The refrigerator will not close completely ■ Door blocked open WARNING ■ Power cord ...


