
Use & Care Guide
Page 2
... cancer. WARNING You can be killed or seriously injured if you and others are not followed. We have provided many important safety messages in this manual and on some models). ■ Do not hit the refrigerator glass doors (on your old refrigerator. ■ Keep flammable materials and vapors, such as gasoline...
... cancer. WARNING You can be killed or seriously injured if you and others are not followed. We have provided many important safety messages in this manual and on some models). ■ Do not hit the refrigerator glass doors (on your old refrigerator. ■ Keep flammable materials and vapors, such as gasoline...
Use & Care Guide
Page 14
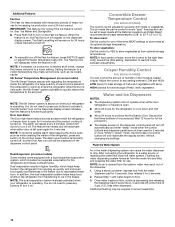
... pan is off automatically and enter "sleep" mode when the control buttons and dispenser pads have not been used for 24 hours unless manually turned off. ■ To manually turn off . The Fast Ice setting will disappear when the feature is cooled to avoid "spot" freezing and can control the amount of...
... pan is off automatically and enter "sleep" mode when the control buttons and dispenser pads have not been used for 24 hours unless manually turned off. ■ To manually turn off . The Fast Ice setting will disappear when the feature is cooled to avoid "spot" freezing and can control the amount of...
Use & Care Guide
Page 16
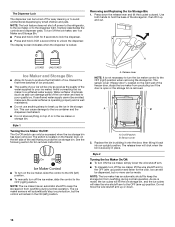
... the bucket outward. Style 2 Turning the Ice Maker On/Off: ■ To turn ON the ice maker, simply lower the wire shutoff arm. ■ To manually turn off the ice maker, see "Ice Maker and Storage Bin." ■ Press and hold LOCK for easy cleaning or to avoid unintentional dispensing by... LOCK a second time to unlock the dispenser. Avoid connecting the ice maker to hold the base of or in the ON (left ) position. ■ To manually turn the ice maker control to the OFF (right) position when removing the storage bin. Press down . 16 Use both hands to a softened water supply...
... the bucket outward. Style 2 Turning the Ice Maker On/Off: ■ To turn ON the ice maker, simply lower the wire shutoff arm. ■ To manually turn off the ice maker, see "Ice Maker and Storage Bin." ■ Press and hold LOCK for easy cleaning or to avoid unintentional dispensing by... LOCK a second time to unlock the dispenser. Avoid connecting the ice maker to hold the base of or in the ON (left ) position. ■ To manually turn the ice maker control to the OFF (right) position when removing the storage bin. Press down . 16 Use both hands to a softened water supply...
Use & Care Guide
Page 18
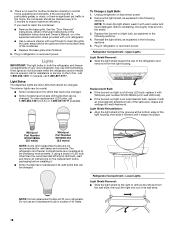
...incandescent 40-watt bulbs that can be changed . Remove the light shield, as explained in normal home operating environments. Whirlpool Part Number W10574850A (2.0 watts) Whirlpool Part Number W10565137A (3.6 watts) NOTE: Some LED replacement bulbs are considered to remove the left end from the ...bulb of its wall slots. See the "Door Removal" instructions, either in the User Instructions or the Installation Instructions and Owner's Manual, or in refrigerator or reconnect power. Unplug refrigerator or disconnect power. 2. Replacement Bulb: ■ If the burned-out light is...
...incandescent 40-watt bulbs that can be changed . Remove the light shield, as explained in normal home operating environments. Whirlpool Part Number W10574850A (2.0 watts) Whirlpool Part Number W10565137A (3.6 watts) NOTE: Some LED replacement bulbs are considered to remove the left end from the ...bulb of its wall slots. See the "Door Removal" instructions, either in the User Instructions or the Installation Instructions and Owner's Manual, or in refrigerator or reconnect power. Unplug refrigerator or disconnect power. 2. Replacement Bulb: ■ If the burned-out light is...
Installation Guide
Page 2
We have provided many important safety messages in this manual and on some models). All safety messages will follow instructions. IMPORTANT SAFETY INSTRUCTIONS WARNING: To reduce the risk of fire, electric shock, or injury when ...
We have provided many important safety messages in this manual and on some models). All safety messages will follow instructions. IMPORTANT SAFETY INSTRUCTIONS WARNING: To reduce the risk of fire, electric shock, or injury when ...
Installation Guide
Page 13
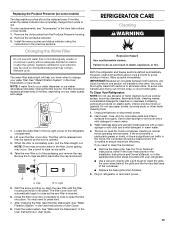
... the condenser. ■ Replace the base grille when finished. 5. See the "Door Removal" instructions, either in the User Instructions or the Installation Instructions and Owner's Manual, or in normal home operating environments. Replacing the Produce Preserver (on your water quality and usage. 1. Install the new pouches and status indicator using the...
... the condenser. ■ Replace the base grille when finished. 5. See the "Door Removal" instructions, either in the User Instructions or the Installation Instructions and Owner's Manual, or in normal home operating environments. Replacing the Produce Preserver (on your water quality and usage. 1. Install the new pouches and status indicator using the...

