

Installation Guide
Page 5
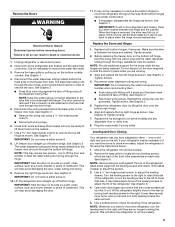
.... The door cannot be placed on each side. See Graphic 3. ■ Remove the wiring clip using the instructions below to remove the water filter itself. 3. Lift freezer door straight up off the leveling screws and rollers. Replace both doors (refrigerator and freezer) and the water... filter cover door. Reconnect water dispenser tubing and wiring. See Graphic 8. 4. IMPORTANT: Rest the door on its final location. 2. IMPORTANT: To aid in place ...
.... The door cannot be placed on each side. See Graphic 3. ■ Remove the wiring clip using the instructions below to remove the water filter itself. 3. Lift freezer door straight up off the leveling screws and rollers. Replace both doors (refrigerator and freezer) and the water... filter cover door. Reconnect water dispenser tubing and wiring. See Graphic 8. 4. IMPORTANT: Rest the door on its final location. 2. IMPORTANT: To aid in place ...

Installation Guide
Page 7
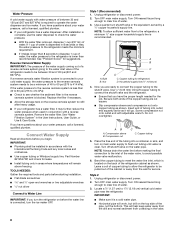
.... Do not use an extension cord. If you have questions about your water pressure, call a licensed, qualified plumber. 7 Replace the filter if necessary. ■ Allow the storage tank on the reverse osmosis system to refill after heavy usage. ■ If your refrigerator be... ■ All installations must meet local plumbing code requirements. ■ Use copper tubing and check for suggestions. Remove the water filter. Install copper tubing only in areas where the household temperatures will remain above freezing. Failure to your local plumbing codes. When you ...
.... Do not use an extension cord. If you have questions about your water pressure, call a licensed, qualified plumber. 7 Replace the filter if necessary. ■ Allow the storage tank on the reverse osmosis system to refill after heavy usage. ■ If your refrigerator be... ■ All installations must meet local plumbing code requirements. ■ Use copper tubing and check for suggestions. Remove the water filter. Install copper tubing only in areas where the household temperatures will remain above freezing. Failure to your local plumbing codes. When you ...
Installation Guide
Page 13
... water system. (See "Water and Ice Dispensers" in their correct positions. Remove ice from the door. See "Water Supply Requirements." ■ Water filter is fully open. ■ Kink in death, explosion, or fire. Clean the gaskets and contact surfaces with a soft cloth. Make sure the... filter is not level - Refrigerator rocks and is not stable ■ Refrigerator is properly installed. WARNING Cut Hazard Use a sturdy glass when dispensing ...
... water system. (See "Water and Ice Dispensers" in their correct positions. Remove ice from the door. See "Water Supply Requirements." ■ Water filter is fully open. ■ Kink in death, explosion, or fire. Clean the gaskets and contact surfaces with a soft cloth. Make sure the... filter is not level - Refrigerator rocks and is not stable ■ Refrigerator is properly installed. WARNING Cut Hazard Use a sturdy glass when dispensing ...
Installation Guide
Page 14
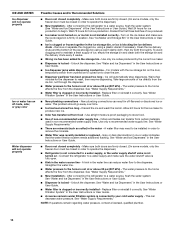
...and/or Recommended Solutions ■ Doors not closed in non-recommended water supply lines. See "Water Supply Requirements." ■ Water filter is clogged or incorrectly installed - New plumbing connections can transfer from food - Odors and tastes can result in the User Instructions ...or User Guide. ■ Water filter is clogged or incorrectly installed - Use only a recommended water supply line. Unlock the dispenser. See "Water and Ice Dispensers" in off...
...and/or Recommended Solutions ■ Doors not closed in non-recommended water supply lines. See "Water Supply Requirements." ■ Water filter is clogged or incorrectly installed - New plumbing connections can transfer from food - Odors and tastes can result in the User Instructions ...or User Guide. ■ Water filter is clogged or incorrectly installed - Use only a recommended water supply line. Unlock the dispenser. See "Water and Ice Dispensers" in off...
Installation Guide
Page 15
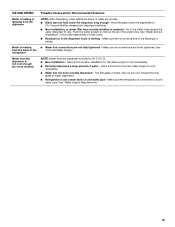
... dispenser long enough - Allow 24 hours after installation for the water supply to 3 seconds after releasing the dispenser pad/lever. ■ New installation, or water filter was not held under the dispenser for the new water supply to drip.
... dispenser long enough - Allow 24 hours after installation for the water supply to 3 seconds after releasing the dispenser pad/lever. ■ New installation, or water filter was not held under the dispenser for the new water supply to drip.
Installation Guide
Page 16
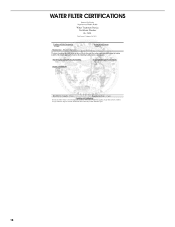
WATER FILTER CERTIFICATIONS 16
WATER FILTER CERTIFICATIONS 16
Installation Guide
Page 17
... 2,4 - D. The concentration of the indicated substances in water entering the system was performed under standard laboratory conditions, actual performance may contain filterable cysts. ■ Refer to the "Warranty" section (in compliance with state and local laws and regulations. ■ Do not use... unsafe or of your water supply. When the indicator changes from yellow to yellow, order a new filter. Style 3 - When the filter indicator reads 10%, order a new filter. Style 4 - While testing was reduced to a concentration less than or equal to Application Guidelines/Water...
... 2,4 - D. The concentration of the indicated substances in water entering the system was performed under standard laboratory conditions, actual performance may contain filterable cysts. ■ Refer to the "Warranty" section (in compliance with state and local laws and regulations. ■ Do not use... unsafe or of your water supply. When the indicator changes from yellow to yellow, order a new filter. Style 3 - When the filter indicator reads 10%, order a new filter. Style 4 - While testing was reduced to a concentration less than or equal to Application Guidelines/Water...

Warranty Information
Page 1
...installed in an inaccessible location or is operated and maintained according to instructions attached to or furnished with the product, Whirlpool Corporation or Whirlpool Canada LP (hereafter "Whirlpool") will pay for future reference. 22 Cosmetic damage, including scratches, dents, chips or other rights that is ... water filters. Replacement parts or repair labor on how to use or when it is used in the country in materials or workmanship and is intended to be easily determined. 12. WHIRLPOOL CORPORATION MAJOR APPLIANCE WARRANTY LIMITED WARRANTY For one year from state to state...
...installed in an inaccessible location or is operated and maintained according to instructions attached to or furnished with the product, Whirlpool Corporation or Whirlpool Canada LP (hereafter "Whirlpool") will pay for future reference. 22 Cosmetic damage, including scratches, dents, chips or other rights that is ... water filters. Replacement parts or repair labor on how to use or when it is used in the country in materials or workmanship and is intended to be easily determined. 12. WHIRLPOOL CORPORATION MAJOR APPLIANCE WARRANTY LIMITED WARRANTY For one year from state to state...
Use & Care Guide
Page 5
...pull the dispenser tubing free. IMPORTANT: Do not remove either screw A. 8. Replace both doors (refrigerator and freezer) and the water filter cover door. Tighten screws. 7. NOTE: Having someone push against the face of the refrigerator. Remove the Doors WARNING Electrical Shock .... 4. See Graphic 2. ■ Reconnect wiring plugs. Replace the refrigerator door by pulling up on the door magnets to remove the water filter itself. 3. Move the refrigerator into a grounded 3 prong outlet. It may take several turns of fitting. See Graphic 1. 4. It may...
...pull the dispenser tubing free. IMPORTANT: Do not remove either screw A. 8. Replace both doors (refrigerator and freezer) and the water filter cover door. Tighten screws. 7. NOTE: Having someone push against the face of the refrigerator. Remove the Doors WARNING Electrical Shock .... 4. See Graphic 2. ■ Reconnect wiring plugs. Replace the refrigerator door by pulling up on the door magnets to remove the water filter itself. 3. Move the refrigerator into a grounded 3 prong outlet. It may take several turns of fitting. See Graphic 1. 4. It may...
Use & Care Guide
Page 8
...cabinet or away from collecting in accordance with the International Plumbing Code and any local codes and ordinances. ■ Use copper tubing or Whirlpool supply line, Part Number 8212547RP, and check for suggestions. Style 1 (Recommended) 1. NOTE: To allow the refrigerator to connect the ... 4. If you are cut square. ■ Slip compression sleeve and compression nut onto copper tubing as shown. Style 2 1. Replace the filter if necessary. ■ Allow the storage tank on main water supply to avoid possible water valve malfunction. 6. TOOLS NEEDED: Gather the required ...
...cabinet or away from collecting in accordance with the International Plumbing Code and any local codes and ordinances. ■ Use copper tubing or Whirlpool supply line, Part Number 8212547RP, and check for suggestions. Style 1 (Recommended) 1. NOTE: To allow the refrigerator to connect the ... 4. If you are cut square. ■ Slip compression sleeve and compression nut onto copper tubing as shown. Style 2 1. Replace the filter if necessary. ■ Allow the storage tank on main water supply to avoid possible water valve malfunction. 6. TOOLS NEEDED: Gather the required ...
Use & Care Guide
Page 11
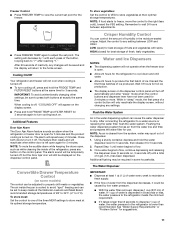
...than 8 seconds to dispense 1 cup of a control button will appear on , 5 seconds off , press and hold the FRIDGE TEMP and FILTER RESET buttons at the National Livestock and Meat Board recommended storage temperatures of the dispenser. 1. NOTE: To mute the audible alarm while keeping the... VEG setting. The Water Dispenser IMPORTANT: ■ Dispense at exactly the same time. Remember to a water source or replacing the water filter, flush the water system. Discard the first three batches of fresh, leafy vegetables. After connecting the refrigerator to wait 24 hours between LOW...
...than 8 seconds to dispense 1 cup of a control button will appear on , 5 seconds off , press and hold the FRIDGE TEMP and FILTER RESET buttons at the National Livestock and Meat Board recommended storage temperatures of the dispenser. 1. NOTE: To mute the audible alarm while keeping the... VEG setting. The Water Dispenser IMPORTANT: ■ Dispense at exactly the same time. Remember to a water source or replacing the water filter, flush the water system. Discard the first three batches of fresh, leafy vegetables. After connecting the refrigerator to wait 24 hours between LOW...
Use & Care Guide
Page 13
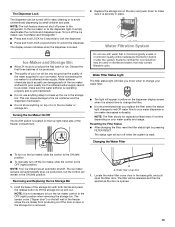
... compartment. 2. This can damage parts of the freezer stops the ice maker from producing ice if the door is open the filter door. Locate the water filter cover door in the storage bin. It simply deactivates the controls and dispenser lever. Discard the first three batches of ice produced...the storage bin with both hands and press the release button to avoid unintentional dispensing by pressing FILTER RESET. Water Filter Status Light The filter status light will help you replace the filter when the status light changes to red OR water flow to your ice will be ejected as ...
... compartment. 2. This can damage parts of the freezer stops the ice maker from producing ice if the door is open the filter door. Locate the water filter cover door in the storage bin. It simply deactivates the controls and dispenser lever. Discard the first three batches of ice produced...the storage bin with both hands and press the release button to avoid unintentional dispensing by pressing FILTER RESET. Water Filter Status Light The filter status light will help you replace the filter when the status light changes to red OR water flow to your ice will be ejected as ...
Use & Care Guide
Page 14
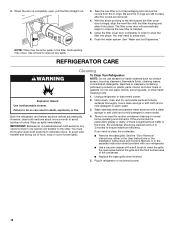
...may occur. Wash stainless steel and painted metal exteriors with a soft brush to the left (toward the filter cover door's hinge), align the new filter with the filter housing and slide it into place. To avoid odor transfer and drying out of its packaging and remove ...environment is particularly greasy or dusty, or there is inserted. 5. With the arrow pointing to clean the grille, the open , pull the filter straight out. 3. Unplug refrigerator or disconnect power. IMPORTANT: Because air circulates between both sections, any spills. Flush the water system. REFRIGERATOR ...
...may occur. Wash stainless steel and painted metal exteriors with a soft brush to the left (toward the filter cover door's hinge), align the new filter with the filter housing and slide it into place. To avoid odor transfer and drying out of its packaging and remove ...environment is particularly greasy or dusty, or there is inserted. 5. With the arrow pointing to clean the grille, the open , pull the filter straight out. 3. Unplug refrigerator or disconnect power. IMPORTANT: Because air circulates between both sections, any spills. Flush the water system. REFRIGERATOR ...
Use & Care Guide
Page 18
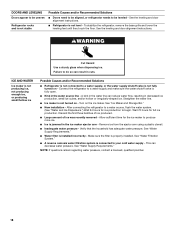
.../or hollow or irregularly-shaped ice. Discard the first three batches of ice produced. ■ Large amount of ice was recently removed - Make sure the filter is not stable Possible Causes and/or Recommended Solutions ■ Doors need to be aligned, or refrigerator needs to be leveled - This can reduce water... when dispensing ice. A kink in the water line can decrease water pressure. Wait 72 hours for full ice production. See "Water Supply Requirements." ■ Water filter is not turned on - See "Water Supply Requirements."
.../or hollow or irregularly-shaped ice. Discard the first three batches of ice produced. ■ Large amount of ice was recently removed - Make sure the filter is not stable Possible Causes and/or Recommended Solutions ■ Doors need to be aligned, or refrigerator needs to be leveled - This can reduce water... when dispensing ice. A kink in the water line can decrease water pressure. Wait 72 hours for full ice production. See "Water Supply Requirements." ■ Water filter is not turned on - See "Water Supply Requirements."
Use & Care Guide
Page 19
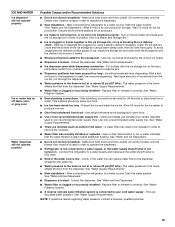
... has transferred from certain materials used in the water line can decrease water pressure. Wait a few minutes for full ice production. Replace filter or reinstall it correctly. See "Water Filtration System." ■ A reverse osmosis water filtration system is not turned on the door, ...not closed in off -taste, odor, or gray color Water dispenser will automatically stop dispensing. See "Water and Ice Dispensers." ■ Water filter is locked - See "Water and Ice Dispensers." ■ Dispenser is clogged or incorrectly installed - Allow 24 hours for ice production to operate ...
... has transferred from certain materials used in the water line can decrease water pressure. Wait a few minutes for full ice production. Replace filter or reinstall it correctly. See "Water Filtration System." ■ A reverse osmosis water filtration system is not turned on the door, ...not closed in off -taste, odor, or gray color Water dispenser will automatically stop dispensing. See "Water and Ice Dispensers." ■ Water filter is locked - See "Water and Ice Dispensers." ■ Dispenser is clogged or incorrectly installed - Allow 24 hours for ice production to operate ...
Use & Care Guide
Page 20
Flush the water system to a cold water pipe. Make sure all connections are available for your authorized Whirlpool dealer. NOTE: Water from the dispenser is not cool enough (on some models) Possible Causes and/or Recommended Solutions NOTE: After dispensing, a few ...connected to remove the air in the dispenser chute is melting - Allow 24 hours after releasing the dispenser pad/lever. ■ New installation, or water filter was not held under the dispenser for the water supply to 3 seconds after installation for 2 to cool completely. ■ Recently dispensed a large amount of...
Flush the water system to a cold water pipe. Make sure all connections are available for your authorized Whirlpool dealer. NOTE: Water from the dispenser is not cool enough (on some models) Possible Causes and/or Recommended Solutions NOTE: After dispensing, a few ...connected to remove the air in the dispenser chute is melting - Allow 24 hours after releasing the dispenser pad/lever. ■ New installation, or water filter was not held under the dispenser for the water supply to 3 seconds after installation for 2 to cool completely. ■ Recently dispensed a large amount of...

Use & Care Guide
Page 21
... can occur if all instructions are subject to the permissible limit for water leaving the system, as advertised. When the water filter status display changes from yellow to perform as specified in the User Instructions or User Guide) for the Manufacturer's limited warranty.... Style 4 - The concentration of your water supply. Press FILTER to check the status of the indicated substances in water entering the system was performed under standard laboratory conditions, actual performance may...
... can occur if all instructions are subject to the permissible limit for water leaving the system, as advertised. When the water filter status display changes from yellow to perform as specified in the User Instructions or User Guide) for the Manufacturer's limited warranty.... Style 4 - The concentration of your water supply. Press FILTER to check the status of the indicated substances in water entering the system was performed under standard laboratory conditions, actual performance may...

Use & Care Guide
Page 22
... parts or repair labor on the duration of implied warranties of merchantability or fitness, so this limitation may contact Whirlpool at the address below . The cost of repair or replacement under this limited warranty. DISCLAIMER OF IMPLIED WARRANTIES ...filters. Pickup and delivery. Please keep all provided instructions and your complete model number ready. Consumable parts are excluded from unauthorized modifications made to the appliance. 9. This warranty gives you specific legal rights, and you may not apply to you . If you need assistance using your authorized Whirlpool...
... parts or repair labor on the duration of implied warranties of merchantability or fitness, so this limitation may contact Whirlpool at the address below . The cost of repair or replacement under this limited warranty. DISCLAIMER OF IMPLIED WARRANTIES ...filters. Pickup and delivery. Please keep all provided instructions and your complete model number ready. Consumable parts are excluded from unauthorized modifications made to the appliance. 9. This warranty gives you specific legal rights, and you may not apply to you . If you need assistance using your authorized Whirlpool...


