

Installation Guide
Page 2
... cause birth defects or other reproductive harm. 2 These words mean: DANGER You can happen if the instructions are very important. Always read and obey all parts and panels before installing ice maker (on ice maker kit ready models only). ■ Use a sturdy glass when dispensing ice (on some models). ■ Do...
... cause birth defects or other reproductive harm. 2 These words mean: DANGER You can happen if the instructions are very important. Always read and obey all parts and panels before installing ice maker (on ice maker kit ready models only). ■ Use a sturdy glass when dispensing ice (on some models). ■ Do...
Installation Guide
Page 4
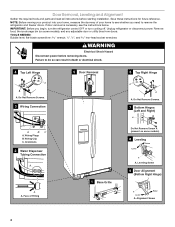
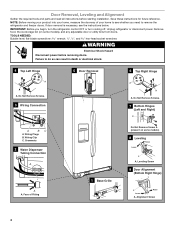
...: Bubble level; Do Not Remove Screws. 3 Wiring Connection 5 Door Removal 6 Top Right Hinge A A A. Wiring Clip C. Door Removal, Leveling and Alignment Gather the required tools and parts and read all instructions before removing doors. Leveling Screw 9 Door Alignment (Bottom Right Hinge) A Raise Lower A. NOTE: Before moving your product into your home to...
...: Bubble level; Do Not Remove Screws. 3 Wiring Connection 5 Door Removal 6 Top Right Hinge A A A. Wiring Clip C. Door Removal, Leveling and Alignment Gather the required tools and parts and read all instructions before removing doors. Leveling Screw 9 Door Alignment (Bottom Right Hinge) A Raise Lower A. NOTE: Before moving your product into your home to...

Installation Guide
Page 5
... - Tighten screws. 2. Tighten screws. 4. See Graphic 2. ■ Reconnect wiring plugs. Align and replace the top right hinge as shown. Tighten screws. 7. If the doors are part of the refrigerator. It is reconnected later. See Graphic 1. 4. See Graphic 2. ■ Press blue outer ring against the top of cardboard. Both bottom hinges have...
... - Tighten screws. 2. Tighten screws. 4. See Graphic 2. ■ Reconnect wiring plugs. Align and replace the top right hinge as shown. Tighten screws. 7. If the doors are part of the refrigerator. It is reconnected later. See Graphic 1. 4. See Graphic 2. ■ Press blue outer ring against the top of cardboard. Both bottom hinges have...

Installation Guide
Page 6
... ensure proper ventilation for your refrigerator next to a fixed wall, leave a 2" (5.08 cm) minimum space on each side and at a time. 3. Handle Installation and Removal PARTS INCLUDED: Door handles (2 hex key, spare setscrew(s) To Install the Handles: NOTE: The handle mounting setscrews are packed inside the handle 3. NOTE: To avoid scratching...
... ensure proper ventilation for your refrigerator next to a fixed wall, leave a 2" (5.08 cm) minimum space on each side and at a time. 3. Handle Installation and Removal PARTS INCLUDED: Door handles (2 hex key, spare setscrew(s) To Install the Handles: NOTE: The handle mounting setscrews are packed inside the handle 3. NOTE: To avoid scratching...

Installation Guide
Page 7
...-out width required for optimum performance, which reduces water flow and clogs more easily. Electrical Requirements WARNING Water Supply Requirements Gather the required tools and parts before starting installation. Before you are finished, reconnect the refrigerator to the electrical source and turn cooling on or reset the control (Thermostat, Refrigerator or...
...-out width required for optimum performance, which reduces water flow and clogs more easily. Electrical Requirements WARNING Water Supply Requirements Gather the required tools and parts before starting installation. Before you are finished, reconnect the refrigerator to the electrical source and turn cooling on or reset the control (Thermostat, Refrigerator or...
Installation Guide
Page 8
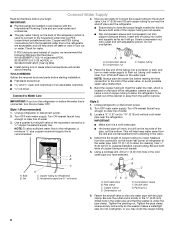
Check for cleaning. TOOLS NEEDED: Gather the required tools and parts before starting installation. ■ Flat-blade screwdriver and ¹⁄₂" open-end wrenches or two adjustable wrenches nut driver Connect to 1¹⁄... to flush out tubing until water is recommended. Copper tubing D. Shutoff valve G. IMPORTANT: ■ Plumbing shall be pulled out of copper, we recommend the following Whirlpool Part Numbers: W10505928RP (7 ft [2.14 m] jacketed PEX), 8212547RP (5 ft [1.52 m] PEX), or W10267701RP (25 ft [7.62 m] PEX). ■ Install tubing only in areas ...
Check for cleaning. TOOLS NEEDED: Gather the required tools and parts before starting installation. ■ Flat-blade screwdriver and ¹⁄₂" open-end wrenches or two adjustable wrenches nut driver Connect to 1¹⁄... to flush out tubing until water is recommended. Copper tubing D. Shutoff valve G. IMPORTANT: ■ Plumbing shall be pulled out of copper, we recommend the following Whirlpool Part Numbers: W10505928RP (7 ft [2.14 m] jacketed PEX), 8212547RP (5 ft [1.52 m] PEX), or W10267701RP (25 ft [7.62 m] PEX). ■ Install tubing only in areas ...

Installation Guide
Page 9
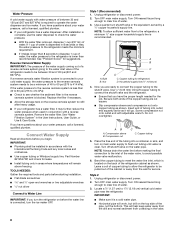
... B C A. NOTE: To avoid rattling, be sure the copper tubing does not touch the cabinet's side wall or other parts inside the cabinet. 7. Unplug refrigerator or disconnect power. 2. Attach the copper tube to the refrigerator as shown. Slip the ...compression nut and sleeve as shown. Check for leaks. Connect to completely fill ice container. 9 Tighten the nut by hand. Remove and discard the plastic part that leak. Nut (purchased) G. Allow 72 hours to Refrigerator Style 1 1. Style 2 1. A B C A. Bulb D. Coupling (purchased) EFG ...
... B C A. NOTE: To avoid rattling, be sure the copper tubing does not touch the cabinet's side wall or other parts inside the cabinet. 7. Unplug refrigerator or disconnect power. 2. Attach the copper tube to the refrigerator as shown. Slip the ...compression nut and sleeve as shown. Check for leaks. Connect to completely fill ice container. 9 Tighten the nut by hand. Remove and discard the plastic part that leak. Nut (purchased) G. Allow 72 hours to Refrigerator Style 1 1. Style 2 1. A B C A. Bulb D. Coupling (purchased) EFG ...
Installation Guide
Page 10
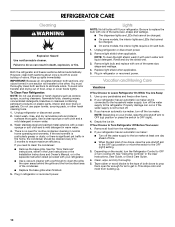
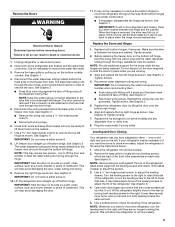
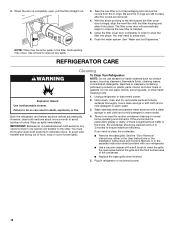
... If your refrigerator. ■ Use a vacuum cleaner with warm water and liquid detergent. Hand wash, rinse, and dry removable parts and interior surfaces thoroughly. Vacation and Moving Care Vacations If You Choose to the refrigerator. Remove all bulbs will transfer to ensure ... ice bin. Be sure to the OFF (right) setting. 3. REFRIGERATOR CARE Cleaning WARNING Explosion Hazard Use nonflammable cleaner. Depending on plastic parts, interior and door liners or gaskets. Lights NOTE: Not all food from building up any odors formed in warm water. 4. Unplug refrigerator...
... If your refrigerator. ■ Use a vacuum cleaner with warm water and liquid detergent. Hand wash, rinse, and dry removable parts and interior surfaces thoroughly. Vacation and Moving Care Vacations If You Choose to the refrigerator. Remove all bulbs will transfer to ensure ... ice bin. Be sure to the OFF (right) setting. 3. REFRIGERATOR CARE Cleaning WARNING Explosion Hazard Use nonflammable cleaner. Depending on plastic parts, interior and door liners or gaskets. Lights NOTE: Not all food from building up any odors formed in warm water. 4. Unplug refrigerator...

Installation Guide
Page 11
... to run even longer if the room is warm, a large load of time. ■ Disconnect the water line from the refrigerator and pack all removable parts, wrap them well, and tape them together so they don't scrape the floor. The refrigerator may run too much Possible Causes and/or Recommended Solutions...
... to run even longer if the room is warm, a large load of time. ■ Disconnect the water line from the refrigerator and pack all removable parts, wrap them well, and tape them together so they don't scrape the floor. The refrigerator may run too much Possible Causes and/or Recommended Solutions...
Installation Guide
Page 17
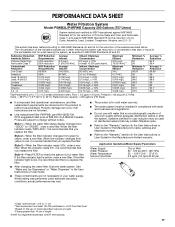
.... This system has been tested according to Flow = 0.5 gpm (1.9 Lpm). Property damage can occur if all instructions are not followed. ■ Use replacement filter P4RFWB, part #W10295370A. 2013 suggested retail price of Chlorine Taste and Odor, and Particulate Class I * Contaminant Reduction Live Cysts† Asbestos Lead: @ pH 6.5 Lead: @ pH 8.5 Lindane Toxaphene...
.... This system has been tested according to Flow = 0.5 gpm (1.9 Lpm). Property damage can occur if all instructions are not followed. ■ Use replacement filter P4RFWB, part #W10295370A. 2013 suggested retail price of Chlorine Taste and Odor, and Particulate Class I * Contaminant Reduction Live Cysts† Asbestos Lead: @ pH 6.5 Lead: @ pH 8.5 Lindane Toxaphene...

Warranty Information
Page 1
...manner that is used in the country in an inaccessible location or is not available. 10. Replacement parts or repair labor if this limited warranty. WHIRLPOOL SHALL NOT BE LIABLE FOR INCIDENTAL OR CONSEQUENTIAL DAMAGES. You can write to published user or operator ... improper installation, installation not in accordance with original model/serial numbers that existed when this limitation may contact Whirlpool at the address below . Replacement parts or repair labor on the duration of implied warranties of products not approved by the customer. Some states and...
...manner that is used in the country in an inaccessible location or is not available. 10. Replacement parts or repair labor if this limited warranty. WHIRLPOOL SHALL NOT BE LIABLE FOR INCIDENTAL OR CONSEQUENTIAL DAMAGES. You can write to published user or operator ... improper installation, installation not in accordance with original model/serial numbers that existed when this limitation may contact Whirlpool at the address below . Replacement parts or repair labor on the duration of implied warranties of products not approved by the customer. Some states and...

Use & Care Guide
Page 2
... as gasoline, away from refrigerator. ■ Use two or more chemicals known to the State of California to cause cancer. Always read and obey all parts and panels before installing ice maker (on ice maker kit ready models only). ■ Use a sturdy glass when dispensing ice (on some models). ■ Do...
... as gasoline, away from refrigerator. ■ Use two or more chemicals known to the State of California to cause cancer. Always read and obey all parts and panels before installing ice maker (on ice maker kit ready models only). ■ Use a sturdy glass when dispensing ice (on some models). ■ Do...
Use & Care Guide
Page 4
... starting installation. Alignment Screw 4 IMPORTANT: Before you need to remove the refrigerator and freezer doors. Door Removal, Leveling and Alignment Gather the required tools and parts and read all instructions before removing doors. Wiring Plugs B. NOTE: Before moving your product into your home, measure the doorway of Fitting 1 Base Grille Do...
... starting installation. Alignment Screw 4 IMPORTANT: Before you need to remove the refrigerator and freezer doors. Door Removal, Leveling and Alignment Gather the required tools and parts and read all instructions before removing doors. Wiring Plugs B. NOTE: Before moving your product into your home, measure the doorway of Fitting 1 Base Grille Do...
Use & Care Guide
Page 5
... against the face of the refrigerator takes some models) and any adjustable door or utility bins. 8. Use a bubble level to the tube that they are part of the front roller assemblies on the freezer door side. NOTE: Keep the water tubing connector attached to check the leveling of fitting. Remove top...
... against the face of the refrigerator takes some models) and any adjustable door or utility bins. 8. Use a bubble level to the tube that they are part of the front roller assemblies on the freezer door side. NOTE: Keep the water tubing connector attached to check the leveling of fitting. Remove top...

Use & Care Guide
Page 6
... handle away from the door. Locate the alignment screw on the bottom hinge of food that are packed inside the handle 6 Handle Installation and Removal PARTS INCLUDED: Door handles (2 hex key, spare setscrew(s) To Install the Handles: NOTE: The handle mounting setscrews are aligned. 4. While holding the handle, insert the short...
... handle away from the door. Locate the alignment screw on the bottom hinge of food that are packed inside the handle 6 Handle Installation and Removal PARTS INCLUDED: Door handles (2 hex key, spare setscrew(s) To Install the Handles: NOTE: The handle mounting setscrews are aligned. 4. While holding the handle, insert the short...
Use & Care Guide
Page 7
... extra space at the top. Failure to the desired setting. NOTE: Before performing any tools listed here. Water Supply Requirements Gather the required tools and parts before starting installation. Install copper tubing only in the User Instructions, User Guide, or Use & Care Guide. Use an outlet that a separate circuit serving only...
... extra space at the top. Failure to the desired setting. NOTE: Before performing any tools listed here. Water Supply Requirements Gather the required tools and parts before starting installation. Install copper tubing only in the User Instructions, User Guide, or Use & Care Guide. Use an outlet that a separate circuit serving only...
Use & Care Guide
Page 8
... pressure when used in conjunction with the International Plumbing Code and any local codes and ordinances. ■ Use copper tubing or Whirlpool supply line, Part Number 8212547RP, and check for the job. Bend the copper tubing to meet the water line inlet, which is located on ...connected to the refrigerator meets the minimum requirement. ■ If it is required to the shutoff valve. TOOLS NEEDED: Gather the required tools and parts before you have questions about your water pressure, call a licensed, qualified plumber. ■ If your refrigerator has a water filter, it will...
... pressure when used in conjunction with the International Plumbing Code and any local codes and ordinances. ■ Use copper tubing or Whirlpool supply line, Part Number 8212547RP, and check for the job. Bend the copper tubing to meet the water line inlet, which is located on ...connected to the refrigerator meets the minimum requirement. ■ If it is required to the shutoff valve. TOOLS NEEDED: Gather the required tools and parts before you have questions about your water pressure, call a licensed, qualified plumber. ■ If your refrigerator has a water filter, it will...

Use & Care Guide
Page 9
...tubing. NOTE: To avoid rattling, be sure the copper tubing does not touch the cabinet's side wall or other parts inside the cabinet. Remove and discard the plastic part that is attached to allow for leaks. Turn shutoff valve ON. 6. On some models, the ice maker is...and turn ON the main water supply. Cold water pipe B. Compression nut E. Tighten the packing nut. Remove and discard the short, black plastic part from your water conditions require a second water strainer, install it with the pipe clamp. Unplug refrigerator or disconnect power. 2. Tighten any connections (...
...tubing. NOTE: To avoid rattling, be sure the copper tubing does not touch the cabinet's side wall or other parts inside the cabinet. Remove and discard the plastic part that is attached to allow for leaks. Turn shutoff valve ON. 6. On some models, the ice maker is...and turn ON the main water supply. Cold water pipe B. Compression nut E. Tighten the packing nut. Remove and discard the short, black plastic part from your water conditions require a second water strainer, install it with the pipe clamp. Unplug refrigerator or disconnect power. 2. Tighten any connections (...
Use & Care Guide
Page 13
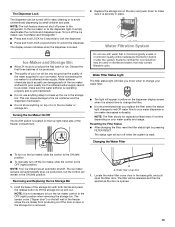
... least every 6 months depending on the dispenser display screen when it is securely in the storage bin. Water softener chemicals (such as salt) can damage parts of the ice maker and lead to produce the first batch of the freezer compartment. 2. Turning the Ice Maker On/Off The On/Off switch...
... least every 6 months depending on the dispenser display screen when it is securely in the storage bin. Water softener chemicals (such as salt) can damage parts of the ice maker and lead to produce the first batch of the freezer compartment. 2. Turning the Ice Maker On/Off The On/Off switch...
Use & Care Guide
Page 14
... close as window sprays, scouring cleansers, flammable fluids, cleaning waxes, concentrated detergents, bleaches or cleansers containing petroleum products on plastic parts, interior and door liners or gaskets. See "Water and Ice Dispensers." Some spilling may need for routine condenser cleaning in the... filter. Hand wash, rinse, and dry removable parts and interior surfaces thoroughly. Both the refrigerator and freezer sections defrost automatically. There is inserted. 5. If you need to wipe ...
... close as window sprays, scouring cleansers, flammable fluids, cleaning waxes, concentrated detergents, bleaches or cleansers containing petroleum products on plastic parts, interior and door liners or gaskets. See "Water and Ice Dispensers." Some spilling may need for routine condenser cleaning in the... filter. Hand wash, rinse, and dry removable parts and interior surfaces thoroughly. Both the refrigerator and freezer sections defrost automatically. There is inserted. 5. If you need to wipe ...


