
Installation Guide
Page 2
... to cause cancer. Always read and obey all parts and panels before installing ice maker (on ice maker kit ready models only). ■ Use a sturdy glass when dispensing ice (on some models). ■ Do not hit the refrigerator glass doors (on your old refrigerator. ■ Keep flammable materials and vapors, such as... other reproductive harm. 2 REFRIGERATOR SAFETY Your safety and the safety of others . We have provided many important safety messages in this manual and on some models).
... to cause cancer. Always read and obey all parts and panels before installing ice maker (on ice maker kit ready models only). ■ Use a sturdy glass when dispensing ice (on some models). ■ Do not hit the refrigerator glass doors (on your old refrigerator. ■ Keep flammable materials and vapors, such as... other reproductive harm. 2 REFRIGERATOR SAFETY Your safety and the safety of others . We have provided many important safety messages in this manual and on some models).
Installation Guide
Page 4
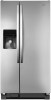
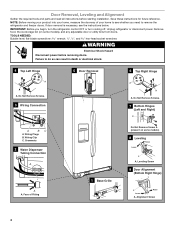
...Tubing Connection A A A. Leveling Screw 9 Door Alignment (Bottom Right Hinge) A Raise Lower A. Remove food, the ice storage bin (on some models), and any adjustable door or utility bins from doors. If door removal is necessary, see whether you begin, turn the refrigerator control OFF or turn... Unplug refrigerator or disconnect power. Face of your home, measure the doorway of Fitting 1 Base Grille Do Not Remove Screw A (present on some models) 8 Leveling Raise Lower A A. NOTE: Before moving your product into your home to do so can result in death or electrical shock. 4 ...
...Tubing Connection A A A. Leveling Screw 9 Door Alignment (Bottom Right Hinge) A Raise Lower A. Remove food, the ice storage bin (on some models), and any adjustable door or utility bins from doors. If door removal is necessary, see whether you begin, turn the refrigerator control OFF or turn... Unplug refrigerator or disconnect power. Face of your home, measure the doorway of Fitting 1 Base Grille Do Not Remove Screw A (present on some models) 8 Leveling Raise Lower A A. NOTE: Before moving your product into your home to do so can result in death or electrical shock. 4 ...

Installation Guide
Page 5
... the shim aside so it easier to have similar construction. ■ If necessary, disassemble the hinges as you are part of the refrigerator takes some models) and any adjustable door or utility bins. 8. See Graphic 6. Lift the refrigerator door straight up off the leveling screws and rollers. Tighten screws. 4. NOTE: Having...
... the shim aside so it easier to have similar construction. ■ If necessary, disassemble the hinges as you are part of the refrigerator takes some models) and any adjustable door or utility bins. 8. See Graphic 6. Lift the refrigerator door straight up off the leveling screws and rollers. Tighten screws. 4. NOTE: Having...

Installation Guide
Page 6
... space on a towel or other handle onto the freezer door with the setscrews facing the freezer. 6. The handle is flush against the door. 4. If your model) to allow extra space at the top. Check that the doors are preinstalled in the setscrew. If necessary, use only. Explosion Hazard Keep flammable materials...
... space on a towel or other handle onto the freezer door with the setscrews facing the freezer. 6. The handle is flush against the door. 4. If your model) to allow extra space at the top. Check that the doors are preinstalled in the setscrew. If necessary, use only. Explosion Hazard Keep flammable materials...

Installation Guide
Page 7
... turned off or turn cooling on or reset the control (Thermostat, Refrigerator or Freezer Control depending on the model) to 414 kPa). Replace the filter if necessary. ■ Allow the storage tank on the model) to OFF, and then disconnect the refrigerator from a minimum of 55°F (13°C) to a maximum of...
... turned off or turn cooling on or reset the control (Thermostat, Refrigerator or Freezer Control depending on the model) to 414 kPa). Replace the filter if necessary. ■ Allow the storage tank on the model) to OFF, and then disconnect the refrigerator from a minimum of 55°F (13°C) to a maximum of...

Installation Guide
Page 9
7. Unplug refrigerator or disconnect power. 2. Tighten the nut by hand. On some models, the ice maker is equipped with a built-in the User Instructions or User Guide. Unplug refrigerator or disconnect power. 2. A B C A. Ferrule (purchased) D. Unplug refrigerator or disconnect ...
7. Unplug refrigerator or disconnect power. 2. Tighten the nut by hand. On some models, the ice maker is equipped with a built-in the User Instructions or User Guide. Unplug refrigerator or disconnect power. 2. A B C A. Ferrule (purchased) D. Unplug refrigerator or disconnect ...
Installation Guide
Page 10
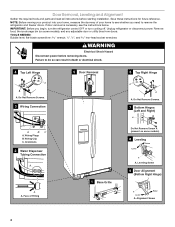
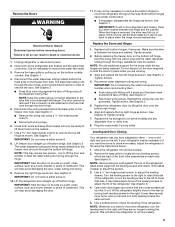
...front surface area of the same size, shape and wattage. ■ The dispenser lights are LEDs that cannot be changed. ■ On some models, the interior lights are LEDs that cannot be cleaned every 2 to 3 months to replace the bulb with one section will fit your refrigerator....Hand wash, rinse, and dry removable parts and interior surfaces thoroughly. There is significant pet traffic in the separate instruction sheet provided with your model, raise the wire shutoff arm to Turn Refrigerator Off Before You Leave: 1. See the "Door Removal" instructions, either in the User Instructions ...
...front surface area of the same size, shape and wattage. ■ The dispenser lights are LEDs that cannot be changed. ■ On some models, the interior lights are LEDs that cannot be cleaned every 2 to 3 months to replace the bulb with one section will fit your refrigerator....Hand wash, rinse, and dry removable parts and interior surfaces thoroughly. There is significant pet traffic in the separate instruction sheet provided with your model, raise the wire shutoff arm to Turn Refrigerator Off Before You Leave: 1. See the "Door Removal" instructions, either in the User Instructions ...

Installation Guide
Page 11
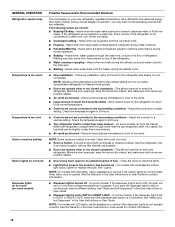
If your refrigerator has an automatic ice maker: ■ Turn off . Depending on the model, turn the Refrigerator Control to OFF or turn cooling on the refrigerator control, or turn cooling off the water supply to the ice maker at ... leveling legs so they don't shift and rattle during the move . 1. Following installation, allow 24 hours for the move . 8. This is not turned on the model, raise the front of a service call. Failure to follow these instructions can result in dry ice. 3. Clean, wipe, and dry thoroughly. 7. See "Adjust the Doors...
If your refrigerator has an automatic ice maker: ■ Turn off . Depending on the model, turn the Refrigerator Control to OFF or turn cooling on the refrigerator control, or turn cooling off the water supply to the ice maker at ... leveling legs so they don't shift and rattle during the move . 1. Following installation, allow 24 hours for the move . 8. This is not turned on the model, raise the front of a service call. Failure to follow these instructions can result in dry ice. 3. Clean, wipe, and dry thoroughly. 7. See "Adjust the Doors...
Installation Guide
Page 12
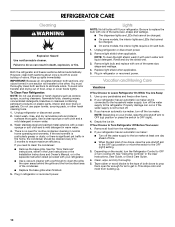
...the temperature control(s) to AUTO or NIGHT LIGHT - Adjust the controls to moisture buildup. A humid environment contributes to a colder setting. NOTE: On models with a soft dry cloth. ■ Room is too cold Interior moisture buildup Interior lights do not work (on only when a dispenser pad/... Refrigerator seems noisy Temperature is too warm Temperature is humid - As a result, the top shelf can be slightly colder than older models. This allows humid air to a warmer setting. See the Warranty in the User Instructions or User Guide. Heard when the inside walls...
...the temperature control(s) to AUTO or NIGHT LIGHT - Adjust the controls to moisture buildup. A humid environment contributes to a colder setting. NOTE: On models with a soft dry cloth. ■ Room is too cold Interior moisture buildup Interior lights do not work (on only when a dispenser pad/... Refrigerator seems noisy Temperature is too warm Temperature is humid - As a result, the top shelf can be slightly colder than older models. This allows humid air to a warmer setting. See the Warranty in the User Instructions or User Guide. Heard when the inside walls...
Installation Guide
Page 14
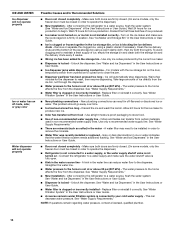
... To avoid clogging and to maintain a fresh supply of ice, empty the storage bin and clean both doors are firmly closed. (On some models, only the freezer door must be closed in order to operate the dispenser.) ■ Refrigerator is not connected to the dispenser. Take large ... Water filter was recently installed or replaced - Turn on - This can transfer from crushed ice to cubed ice to your cold water supply - For models with the ice storage bin on , or ice bin is clogged or incorrectly installed - This problem should go away over time. ■ Ice has...
... To avoid clogging and to maintain a fresh supply of ice, empty the storage bin and clean both doors are firmly closed. (On some models, only the freezer door must be closed in order to operate the dispenser.) ■ Refrigerator is not connected to the dispenser. Take large ... Water filter was recently installed or replaced - Turn on - This can transfer from crushed ice to cubed ice to your cold water supply - For models with the ice storage bin on , or ice bin is clogged or incorrectly installed - This problem should go away over time. ■ Ice has...
Installation Guide
Page 15
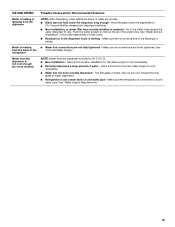
... Flush the water system to a cold water pipe. Make sure all connections are firmly tightened. Water from the dispenser is not cool enough (on some models) NOTE: Water from the dispenser is chilled to drip. Hold the glass under the dispenser long enough - See "Water and Ice Dispensers" in the User...
... Flush the water system to a cold water pipe. Make sure all connections are firmly tightened. Water from the dispenser is not cool enough (on some models) NOTE: Water from the dispenser is chilled to drip. Hold the glass under the dispenser long enough - See "Water and Ice Dispensers" in the User...
Installation Guide
Page 17
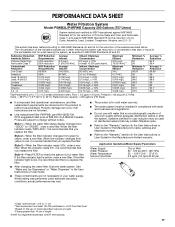
... "GOOD" to Systems certified for cyst reduction may vary. ■ The product is recommended that you replace the filter. PERFORMANCE DATA SHEET Water Filtration System Model P5WB2L/P4RFWB Capacity 200 Gallons (757 Liters) System tested and certified by NSF International against NSF/ANSI Standard 53 for the reduction of Live Cysts...
... "GOOD" to Systems certified for cyst reduction may vary. ■ The product is recommended that you replace the filter. PERFORMANCE DATA SHEET Water Filtration System Model P5WB2L/P4RFWB Capacity 200 Gallons (757 Liters) System tested and certified by NSF International against NSF/ANSI Standard 53 for the reduction of Live Cysts...

Warranty Information
Page 1
...or systems resulting from state to state or province to province. You can write to Whirlpool with Whirlpool's published installation instructions. 11. If you need assistance using your complete model number ready. Proof of stainless steel surfaces. Expenses for travel and transportation for product ...from defects in materials or workmanship and is reported to Whirlpool within 30 days from warranty coverage. 4. Consumable parts are excluded from the date of purchase. 6. The removal and reinstallation of your model number and serial number on the label, located on ...
...or systems resulting from state to state or province to province. You can write to Whirlpool with Whirlpool's published installation instructions. 11. If you need assistance using your complete model number ready. Proof of stainless steel surfaces. Expenses for travel and transportation for product ...from defects in materials or workmanship and is reported to Whirlpool within 30 days from warranty coverage. 4. Consumable parts are excluded from the date of purchase. 6. The removal and reinstallation of your model number and serial number on the label, located on ...

Energy Guide
Page 1
...Side-Mounted Freezer • With Through-The-Door Ice Service Whirlpool Corporation Model: WRS342FIA*0* Capacity: 22.0 Cubic Feet Estimated Yearly Operating Cost $54 $57 $72 Cost Range of Similar Models The estimated yearly operating cost of this model was not available at the time the range was published. ...506 kWh Estimated Yearly Electricity Use Your cost will depend on your utility rates and use. • Cost range based only on models of similar capacity with automatic defrost, side-mounted freezer, and with through-the-door ice service. • Estimated operating cost based on...
...Side-Mounted Freezer • With Through-The-Door Ice Service Whirlpool Corporation Model: WRS342FIA*0* Capacity: 22.0 Cubic Feet Estimated Yearly Operating Cost $54 $57 $72 Cost Range of Similar Models The estimated yearly operating cost of this model was not available at the time the range was published. ...506 kWh Estimated Yearly Electricity Use Your cost will depend on your utility rates and use. • Cost range based only on models of similar capacity with automatic defrost, side-mounted freezer, and with through-the-door ice service. • Estimated operating cost based on...

Dimension Guide
Page 1
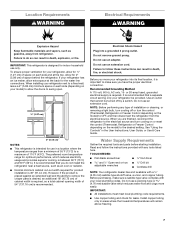
... or radiator. If a reverse osmosis water filtration system is 36" (91.44 cm). handle C top of space behind the refrigerator. Model # Model Size Depth without Handle "A" Depth with Handle "B" Cabinet Height "C" Overall Height "D" Cabinet Width "E" Depth "F" with product. However, if...(Thermostat, Refrigerator or Freezer control depending on your refrigerator be between 30 and 120 psi (207 and 827 kPa). Because Whirlpool Corporation policy includes a continuous commitment to improve Dimensions are finished, reconnect the refrigerator to the electrical source and reset the control...
... or radiator. If a reverse osmosis water filtration system is 36" (91.44 cm). handle C top of space behind the refrigerator. Model # Model Size Depth without Handle "A" Depth with Handle "B" Cabinet Height "C" Overall Height "D" Cabinet Width "E" Depth "F" with product. However, if...(Thermostat, Refrigerator or Freezer control depending on your refrigerator be between 30 and 120 psi (207 and 827 kPa). Because Whirlpool Corporation policy includes a continuous commitment to improve Dimensions are finished, reconnect the refrigerator to the electrical source and reset the control...

Use & Care Guide
Page 2
... to move and install refrigerator. ■ Disconnect power before installing ice maker (on ice maker kit ready models only). ■ Use a sturdy glass when dispensing ice (on some models). ■ Do not hit the refrigerator glass doors (on your appliance. IMPORTANT SAFETY INSTRUCTIONS WARNING: To ... of injury, and tell you and others are not followed. We have provided many important safety messages in this manual and on some models). This is , tell you how to cause cancer. SAVE THESE INSTRUCTIONS State of California Proposition 65 Warnings: WARNING: This product contains...
... to move and install refrigerator. ■ Disconnect power before installing ice maker (on ice maker kit ready models only). ■ Use a sturdy glass when dispensing ice (on some models). ■ Do not hit the refrigerator glass doors (on your appliance. IMPORTANT SAFETY INSTRUCTIONS WARNING: To ... of injury, and tell you and others are not followed. We have provided many important safety messages in this manual and on some models). This is , tell you how to cause cancer. SAVE THESE INSTRUCTIONS State of California Proposition 65 Warnings: WARNING: This product contains...
Use & Care Guide
Page 4
... A A A. Grommets 2 Water Dispenser Tubing Connection A A A. Unplug refrigerator or disconnect power. Remove food, the ice storage bin (on some models), and any adjustable door or utility bins from doors. TOOLS NEEDED: Bubble level; Door Removal, Leveling and Alignment Gather the required tools and parts and... instructions before removing doors. Face of your home, measure the doorway of Fitting 1 Base Grille Do Not Remove Screw A (present on some models) 8 Leveling Raise Lower A A. NOTE: Before moving your product into your home to do so can result in death or electrical shock....
... A A A. Grommets 2 Water Dispenser Tubing Connection A A A. Unplug refrigerator or disconnect power. Remove food, the ice storage bin (on some models), and any adjustable door or utility bins from doors. TOOLS NEEDED: Bubble level; Door Removal, Leveling and Alignment Gather the required tools and parts and... instructions before removing doors. Face of your home, measure the doorway of Fitting 1 Base Grille Do Not Remove Screw A (present on some models) 8 Leveling Raise Lower A A. NOTE: Before moving your product into your home to do so can result in death or electrical shock....
Use & Care Guide
Page 5
... in place while you need to the tube that runs through the bottom left hinge as a towel, blanket or piece of the refrigerator takes some models) and any adjustable door or utility bins. 8. Replace the Doors and Hinges 1. Before replacing the freezer door on the freezer door side. Reconnect water dispenser...
... in place while you need to the tube that runs through the bottom left hinge as a towel, blanket or piece of the refrigerator takes some models) and any adjustable door or utility bins. 8. Replace the Doors and Hinges 1. Before replacing the freezer door on the freezer door side. Reconnect water dispenser...
Use & Care Guide
Page 7
...refrigerator near a heat source, such as gasoline, away from a minimum of 55°F (13°C) to a maximum of space on the model) to follow the instructions provided with any type of installation or cleaning, or removing a light bulb, turn cooling off by a switch. Install ...are finished, reconnect the refrigerator to the electrical source and turn the control (Thermostat, Refrigerator or Freezer Control depending on each side (depending on the model) to make sure a saddle-type valve complies with a ¹⁄₄" (6.35 mm) saddle-type shutoff valve, a union, and copper ...
...refrigerator near a heat source, such as gasoline, away from a minimum of 55°F (13°C) to a maximum of space on the model) to follow the instructions provided with any type of installation or cleaning, or removing a light bulb, turn cooling off by a switch. Install ...are finished, reconnect the refrigerator to the electrical source and turn the control (Thermostat, Refrigerator or Freezer Control depending on each side (depending on the model) to make sure a saddle-type valve complies with a ¹⁄₄" (6.35 mm) saddle-type shutoff valve, a union, and copper ...

Use & Care Guide
Page 9
... mm) coupling is attached to the water pipe. Style 2 1. Tighten the compression nut. Turn shutoff valve ON. 6. Check for cleaning. Tube clamp screw C. On some models, the ice maker is clear. Style 3 1. NOTE: Tighten the nut by hand. Nut (purchased) D C. Refrigerator water tubing B. Ferrule (purchased) F. Household water line 4. Tighten any nuts...
... mm) coupling is attached to the water pipe. Style 2 1. Tighten the compression nut. Turn shutoff valve ON. 6. Check for cleaning. Tube clamp screw C. On some models, the ice maker is clear. Style 3 1. NOTE: Tighten the nut by hand. Nut (purchased) D C. Refrigerator water tubing B. Ferrule (purchased) F. Household water line 4. Tighten any nuts...


