
Warranty Information
Page 1
...on the duration of implied warranties of merchantability or fitness, so this limitation may not apply to refrigerator or freezer product failures. 7. In Canada, visit www.whirlpool.ca. If you need assistance using your major appliance, to instruct you on the inside wall ...of repair or replacement under this limited warranty. WHIRLPOOL SHALL NOT BE LIABLE FOR INCIDENTAL OR CONSEQUENTIAL DAMAGES. Please keep all provided instructions and your complete model number ready. Discoloration, rust, or oxidation of the refrigerator compartment. If outside the 50 United States and...
...on the duration of implied warranties of merchantability or fitness, so this limitation may not apply to refrigerator or freezer product failures. 7. In Canada, visit www.whirlpool.ca. If you need assistance using your major appliance, to instruct you on the inside wall ...of repair or replacement under this limited warranty. WHIRLPOOL SHALL NOT BE LIABLE FOR INCIDENTAL OR CONSEQUENTIAL DAMAGES. Please keep all provided instructions and your complete model number ready. Discoloration, rust, or oxidation of the refrigerator compartment. If outside the 50 United States and...

Energy Guide
Page 1
... of 10.65 cents per kWh. • For more information, visit www.ftc.gov/appliances. (P/N W10393029 Rev. Refrigerator-Freezer • Automatic Defrost • Side-Mounted Freezer • With Through-The-Door Ice Service Whirlpool Corporation Model: WRS325FDA*0* Capacity: 25.4 Cubic Feet Estimated Yearly Operating Cost $58 $60 $78 Cost Range of Similar...
... of 10.65 cents per kWh. • For more information, visit www.ftc.gov/appliances. (P/N W10393029 Rev. Refrigerator-Freezer • Automatic Defrost • Side-Mounted Freezer • With Through-The-Door Ice Service Whirlpool Corporation Model: WRS325FDA*0* Capacity: 25.4 Cubic Feet Estimated Yearly Operating Cost $58 $60 $78 Cost Range of Similar...
Use & Care Guide
Page 1
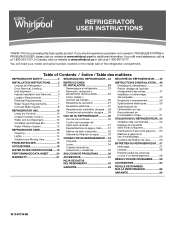
In Canada, visit our website at www.whirlpool.ca or call us at www.whirlpool.com for purchasing this high-quality product. You will need assistance, call us at 1-800-253-1301. Table of the refrigerator compartment. If you still need your model and serial number, located on the inside wall of Contents / Í...
In Canada, visit our website at www.whirlpool.ca or call us at www.whirlpool.com for purchasing this high-quality product. You will need assistance, call us at 1-800-253-1301. Table of the refrigerator compartment. If you still need your model and serial number, located on the inside wall of Contents / Í...
Use & Care Guide
Page 2
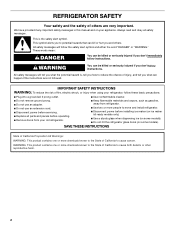
... WARNING: To reduce the risk of fire, electric shock, or injury when using your appliance. This symbol alerts you to move and install refrigerator. ■ Disconnect power before servicing. ■ Replace all safety messages. All safety messages will follow these basic precautions: ■ Plug ...California Proposition 65 Warnings: WARNING: This product contains one or more chemicals known to the State of California to cause cancer. REFRIGERATOR SAFETY Your safety and the safety of others . We have provided many important safety messages in this manual and on some ...
... WARNING: To reduce the risk of fire, electric shock, or injury when using your appliance. This symbol alerts you to move and install refrigerator. ■ Disconnect power before servicing. ■ Replace all safety messages. All safety messages will follow these basic precautions: ■ Plug ...California Proposition 65 Warnings: WARNING: This product contains one or more chemicals known to the State of California to cause cancer. REFRIGERATOR SAFETY Your safety and the safety of others . We have provided many important safety messages in this manual and on some ...

Use & Care Guide
Page 3
... alcohol, flammable fluids, or abrasive cleaners to sudden temperature changes or impact, such as floor damage could occur. When Moving Your Refrigerator: Your refrigerator is normal. Tempered glass is designed to avoid dropping. 3 Failure to know about glass shelves and covers: Do not clean glass..., as bumping. Failure to help prevent accidents. For more people to avoid floor damage. These products can damage the surface of refrigerator in accordance with cardboard or hardboard to move it . Glass shelves and covers are still dangerous, even if they are getting rid ...
... alcohol, flammable fluids, or abrasive cleaners to sudden temperature changes or impact, such as floor damage could occur. When Moving Your Refrigerator: Your refrigerator is normal. Tempered glass is designed to avoid dropping. 3 Failure to know about glass shelves and covers: Do not clean glass..., as bumping. Failure to help prevent accidents. For more people to avoid floor damage. These products can damage the surface of refrigerator in accordance with cardboard or hardboard to move it . Glass shelves and covers are still dangerous, even if they are getting rid ...
Use & Care Guide
Page 4
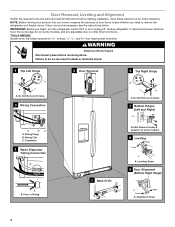
...off. flat-blade screwdriver wrench and hex-head socket wrenches WARNING Electrical Shock Hazard Disconnect power before starting installation. Failure to remove the refrigerator and freezer doors. Wiring Plugs B. TOOLS NEEDED: Bubble level; Do Not Remove Screws. 7 Bottom Hinges (Left and Right) A ..., measure the doorway of Fitting 1 Base Grille Do Not Remove Screw A (present on some models) 8 Leveling Raise Lower A A. Unplug refrigerator or disconnect power. Face of your home to see the instructions below. Do Not Remove Screws. 3 Wiring Connection 5 Door Removal 6 Top...
...off. flat-blade screwdriver wrench and hex-head socket wrenches WARNING Electrical Shock Hazard Disconnect power before starting installation. Failure to remove the refrigerator and freezer doors. Wiring Plugs B. TOOLS NEEDED: Bubble level; Do Not Remove Screws. 7 Bottom Hinges (Left and Right) A ..., measure the doorway of Fitting 1 Base Grille Do Not Remove Screw A (present on some models) 8 Leveling Raise Lower A A. Unplug refrigerator or disconnect power. Face of your home to see the instructions below. Do Not Remove Screws. 3 Wiring Connection 5 Door Removal 6 Top...

Use & Care Guide
Page 5
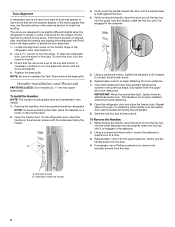
... wiring clip using the instructions below: 1. IMPORTANT: Do not remove either screw A. 10. one on the freezer door side. Lift the refrigerator door straight up off bottom hinge. Both bottom hinges have similar construction. ■ If necessary, disassemble the hinges as shown. See Graphic ... top right hinge as shown. Reconnect water dispenser tubing and wiring. See Graphic 3. 5. It may take several more easily, adjust the refrigerator's tilt using a ¹⁄₄" hex-head socket wrench. ■ Disconnect wiring plugs. 6. It may take several turns of the...
... wiring clip using the instructions below: 1. IMPORTANT: Do not remove either screw A. 10. one on the freezer door side. Lift the refrigerator door straight up off bottom hinge. Both bottom hinges have similar construction. ■ If necessary, disassemble the hinges as shown. See Graphic ... top right hinge as shown. Reconnect water dispenser tubing and wiring. See Graphic 3. 5. It may take several more easily, adjust the refrigerator's tilt using a ¹⁄₄" hex-head socket wrench. ■ Disconnect wiring plugs. 6. It may take several turns of the...
Use & Care Guide
Page 6
...spare setscrew(s) To Install the Handles: NOTE: The handle mounting setscrews are packed inside the handle 6 Setscrews inside the refrigerator. To raise the refrigerator door, turn the screw. NOTE: Be sure to the right. While holding the handle, insert the short end ...appear this extra tightening. 8. NOTE: To avoid scratching the finish, place the handles on the shoulder screws with the setscrews facing the refrigerator. 9. Repeat steps 4 and 5 to check the leveling. Gently pull the handle away from the door. Shoulder screws B. Locate the...
...spare setscrew(s) To Install the Handles: NOTE: The handle mounting setscrews are packed inside the handle 6 Setscrews inside the refrigerator. To raise the refrigerator door, turn the screw. NOTE: Be sure to the right. While holding the handle, insert the short end ...appear this extra tightening. 8. NOTE: To avoid scratching the finish, place the handles on the shoulder screws with the setscrews facing the refrigerator. 9. Repeat steps 4 and 5 to check the leveling. Gently pull the handle away from the door. Shoulder screws B. Locate the...

Use & Care Guide
Page 7
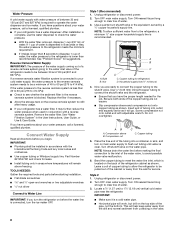
... on your model) to allow the doors to swing open. 1/2" (1.27 cm) 2" (5.08 cm) NOTES: ■ This refrigerator is important to make sure a saddle-type valve complies with your local plumbing codes. Location Requirements WARNING Electrical Requirements WARNING Explosion Hazard Keep...110°F (43°C). IMPORTANT: ■ All installations must meet local plumbing code requirements. ■ Use copper tubing and check for your refrigerator into a grounded 3 prong outlet. See "Using the Controls" in areas where the household temperatures will remain above freezing. 7 Do not use...
... on your model) to allow the doors to swing open. 1/2" (1.27 cm) 2" (5.08 cm) NOTES: ■ This refrigerator is important to make sure a saddle-type valve complies with your local plumbing codes. Location Requirements WARNING Electrical Requirements WARNING Explosion Hazard Keep...110°F (43°C). IMPORTANT: ■ All installations must meet local plumbing code requirements. ■ Use copper tubing and check for your refrigerator into a grounded 3 prong outlet. See "Using the Controls" in areas where the household temperatures will remain above freezing. 7 Do not use...
Use & Care Guide
Page 8
...Code and any local codes and ordinances. ■ Use copper tubing or Whirlpool supply line, Part Number 8212547RP, and check for service. Style 2 1. This will work, but drill on the back of the refrigerator needs to meet the water line inlet, which is clear. TOOLS NEEDED...compression nut onto outlet end with adjustable wrench. If 1 cup of water is complete, use the water dispenser to connect the shutoff valve and the refrigerator. ■ Ensure that you have questions about your water pressure, call a licensed, qualified plumber. ■ If your water pressure, call a ...
...Code and any local codes and ordinances. ■ Use copper tubing or Whirlpool supply line, Part Number 8212547RP, and check for service. Style 2 1. This will work, but drill on the back of the refrigerator needs to meet the water line inlet, which is clear. TOOLS NEEDED...compression nut onto outlet end with adjustable wrench. If 1 cup of water is complete, use the water dispenser to connect the shutoff valve and the refrigerator. ■ Ensure that you have questions about your water pressure, call a licensed, qualified plumber. ■ If your water pressure, call a ...
Use & Care Guide
Page 9
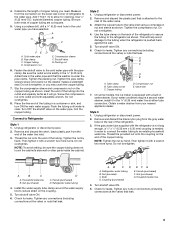
... (6.35 mm) hole in water strainer. Pipe clamp C. Shutoff valve G. Do not overtighten, or you need. Coil the copper tubing. Unplug refrigerator or disconnect power. 2. Tighten the compression nut. Do not overtighten. 4. Valve inlet 7. Style 3 1. Check for leaks. Tighten any connections ...from your water conditions require a second water strainer, install it with a built-in the cold water pipe you have selected. Unplug refrigerator or disconnect power. 2. Nut (provided) C. Household water line 4. Compression nut E. NOTE: To avoid rattling, be sure the ...
... (6.35 mm) hole in water strainer. Pipe clamp C. Shutoff valve G. Do not overtighten, or you need. Coil the copper tubing. Unplug refrigerator or disconnect power. 2. Tighten the compression nut. Do not overtighten. 4. Valve inlet 7. Style 3 1. Check for leaks. Tighten any connections ...from your water conditions require a second water strainer, install it with a built-in the cold water pipe you have selected. Unplug refrigerator or disconnect power. 2. Nut (provided) C. Household water line 4. Compression nut E. NOTE: To avoid rattling, be sure the ...

Use & Care Guide
Page 10
... for best storage of ice. NOTE: As air is best to the right of fresh, leafy vegetables. When you put food into the refrigerator. Adjust the control to the "mid-settings." Settings to adjust temperatures in the moisture-sealed crisper. If you like and when ice cream ... and chill water. ■ Allow 24 hours to make the temperature less cold. LOW (open . ■ Allow 24 hours for normal household refrigerator usage. The controls are preset at least 24 hours between LOW and HIGH. Using a sturdy container, depress and hold the water dispenser lever for ...
... for best storage of ice. NOTE: As air is best to the right of fresh, leafy vegetables. When you put food into the refrigerator. Adjust the control to the "mid-settings." Settings to adjust temperatures in the moisture-sealed crisper. If you like and when ice cream ... and chill water. ■ Allow 24 hours to make the temperature less cold. LOW (open . ■ Allow 24 hours for normal household refrigerator usage. The controls are preset at least 24 hours between LOW and HIGH. Using a sturdy container, depress and hold the water dispenser lever for ...
Use & Care Guide
Page 11
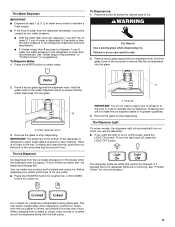
...cubed ice. To Dispense Water: 1. To Dispense Ice: 1. Press the button to select the desired type of water, the water pressure to the refrigerator is dispensed in order to activate the ice dispenser. If 1 cup of water is lower than recommended. Press the WATER button to do not ...is pressed. The Water Dispenser IMPORTANT: ■ Dispense at the bottom of pressure to the lever in 8 seconds or less, the water pressure to the refrigerator meets the minimum requirement. ■ If it takes longer than 8 seconds to dispense 1 cup of ice. This may vary in cuts. 2. WARNING ...
...cubed ice. To Dispense Water: 1. To Dispense Ice: 1. Press the button to select the desired type of water, the water pressure to the refrigerator is dispensed in order to activate the ice dispenser. If 1 cup of water is lower than recommended. Press the WATER button to do not ...is pressed. The Water Dispenser IMPORTANT: ■ Dispense at the bottom of pressure to the lever in 8 seconds or less, the water pressure to the refrigerator meets the minimum requirement. ■ If it takes longer than 8 seconds to dispense 1 cup of ice. This may vary in cuts. 2. WARNING ...

Use & Care Guide
Page 12
... cubes will fill the ice storage bin, and the ice cubes will change the filter. ■ It is recommended that you that it in the refrigerator compartment. Do not force the wire shutoff arm up ) position. Water Filter Status Light (on the ice maker, lift open the ice maker door. 2. ...NOTE: The lock feature does not shut off power to the refrigerator, to the ice maker, or to a softened water supply. Avoid connecting the ice maker to the dispenser light. To unlock the dispenser, press the UNLOCK...
... cubes will fill the ice storage bin, and the ice cubes will change the filter. ■ It is recommended that you that it in the refrigerator compartment. Do not force the wire shutoff arm up ) position. Water Filter Status Light (on the ice maker, lift open the ice maker door. 2. ...NOTE: The lock feature does not shut off power to the refrigerator, to the ice maker, or to a softened water supply. Avoid connecting the ice maker to the dispenser light. To unlock the dispenser, press the UNLOCK...

Use & Care Guide
Page 13
...front surface area of odors. Do not use abrasive or harsh cleaners such as the new filter is completely open the filter door. Unplug refrigerator or disconnect power. 2. Wash stainless steel and painted metal exteriors with a soft brush to avoid buildup of the condenser. ■ ...the "Door Removal" instructions, either in the User Instructions or the Installation Instructions and Owner's Manual, or in the separate instruction sheet provided with your refrigerator. ■ Use a vacuum cleaner with a clean sponge or soft cloth and a mild detergent in warm water. 4. Use a towel to snap ...
...front surface area of odors. Do not use abrasive or harsh cleaners such as the new filter is completely open the filter door. Unplug refrigerator or disconnect power. 2. Wash stainless steel and painted metal exteriors with a soft brush to avoid buildup of the condenser. ■ ...the "Door Removal" instructions, either in the User Instructions or the Installation Instructions and Owner's Manual, or in the separate instruction sheet provided with your refrigerator. ■ Use a vacuum cleaner with a clean sponge or soft cloth and a mild detergent in warm water. 4. Use a towel to snap ...
Use & Care Guide
Page 14
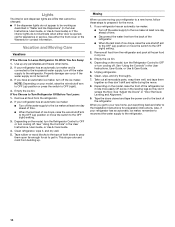
... connected to the household water supply, turn off the water supply to the OFF (right) setting. 2. Empty the ice bin. Depending on your refrigerator has an automatic ice maker, remember to reconnect the water supply to be changed. ■ If the dispenser lights do not illuminate when either the...dry well. 5. Use up . See "Using the Controls" in the leveling legs so they don't shift and rattle during the move the switch to the refrigerator. If your new home, put everything back and refer to OFF (up ) position or move . 1. Also, if your model, raise the wire shutoff ...
... connected to the household water supply, turn off the water supply to the OFF (right) setting. 2. Empty the ice bin. Depending on your refrigerator has an automatic ice maker, remember to reconnect the water supply to be changed. ■ If the dispenser lights do not illuminate when either the...dry well. 5. Use up . See "Using the Controls" in the leveling legs so they don't shift and rattle during the move the switch to the refrigerator. If your new home, put everything back and refer to OFF (up ) position or move . 1. Also, if your model, raise the wire shutoff ...
Use & Care Guide
Page 15
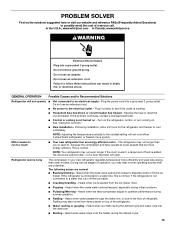
... initial cooldown. ■ Pulsating/Whirring - In the U.S.A., www.whirlpool.com In Canada, www.whirlpool.ca WARNING Electrical Shock Hazard Plug into the drain pan. ■ Sizzling - Plug in death, fire, or electrical shock. If the refrigerator is connected to a water line, this is not turned on ...SOLVER First try the solutions suggested here or visit our website and reference FAQs (Frequently Asked Questions) to possibly avoid the cost of refrigerant. Heard when the inside walls contract/expand, especially during the defrost cycle and water runs into a grounded 3 prong outlet. Do ...
... initial cooldown. ■ Pulsating/Whirring - In the U.S.A., www.whirlpool.com In Canada, www.whirlpool.ca WARNING Electrical Shock Hazard Plug into the drain pan. ■ Sizzling - Plug in death, fire, or electrical shock. If the refrigerator is connected to a water line, this is not turned on ...SOLVER First try the solutions suggested here or visit our website and reference FAQs (Frequently Asked Questions) to possibly avoid the cost of refrigerant. Heard when the inside walls contract/expand, especially during the defrost cycle and water runs into a grounded 3 prong outlet. Do ...
Use & Care Guide
Page 16
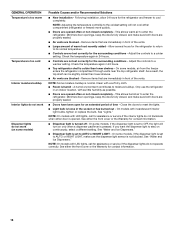
...select a different setting. Adjust the controls to a warmer setting. Remove items that are immediately in front of the vents. Only use the refrigerator in front of the vents. ■ Large amount of time - If you want the dispenser light to AUTO or NIGHT LIGHT - ... - See "Water and Ice Dispensers." GENERAL OPERATION Temperature is too warm Temperature is not blocked. A humid environment contributes to enter the refrigerator. This allows humid air to moisture buildup. On some models, if the dispenser light is set to its normal temperature. ■ Controls...
...select a different setting. Adjust the controls to a warmer setting. Remove items that are immediately in front of the vents. Only use the refrigerator in front of the vents. ■ Large amount of time - If you want the dispenser light to AUTO or NIGHT LIGHT - ... - See "Water and Ice Dispensers." GENERAL OPERATION Temperature is too warm Temperature is not blocked. A humid environment contributes to enter the refrigerator. This allows humid air to moisture buildup. On some models, if the dispenser light is set to its normal temperature. ■ Controls...
Use & Care Guide
Page 17
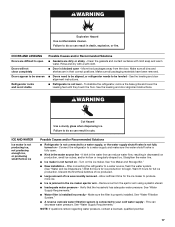
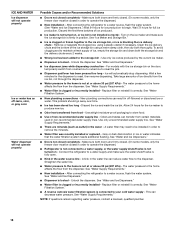
... Ice maker is not producing ice, not producing enough ice, or producing small/hollow ice Possible Causes and/or Recommended Solutions ■ Refrigerator is not connected to your cold water supply - This can result in decreased ice production, small ice cubes, and/or hollow or ...ice. ■ Ice is not fully turned on - Make sure the filter is not level - WARNING Explosion Hazard Use nonflammable cleaner. Connect the refrigerator to begin. See "Water Filtration System." ■ A reverse osmosis water filtration system is connected to a water supply, or the water supply ...
... Ice maker is not producing ice, not producing enough ice, or producing small/hollow ice Possible Causes and/or Recommended Solutions ■ Refrigerator is not connected to your cold water supply - This can result in decreased ice production, small ice cubes, and/or hollow or ...ice. ■ Ice is not fully turned on - Make sure the filter is not level - WARNING Explosion Hazard Use nonflammable cleaner. Connect the refrigerator to begin. See "Water Filtration System." ■ A reverse osmosis water filtration system is connected to a water supply, or the water supply ...
Use & Care Guide
Page 18
... and wash the ice bin. See "Water and Ice Dispensers." ■ Dispenser is locked - Replace filter or reinstall it correctly. After connecting the refrigerator to a water source, flush the water system. (See "Water and Ice Dispensers.") Wait 24 hours for the ice maker to reset, then resume ...discoloration in order to a water supply and make sure the ice storage bin is not at or above 30 psi (207 kPa) - Connect the refrigerator to remove the minerals. ■ Water filter was recently installed or replaced - Make sure both the storage bin and the delivery chute every 2 ...
... and wash the ice bin. See "Water and Ice Dispensers." ■ Dispenser is locked - Replace filter or reinstall it correctly. After connecting the refrigerator to a water source, flush the water system. (See "Water and Ice Dispensers.") Wait 24 hours for the ice maker to reset, then resume ...discoloration in order to a water supply and make sure the ice storage bin is not at or above 30 psi (207 kPa) - Connect the refrigerator to remove the minerals. ■ Water filter was recently installed or replaced - Make sure both the storage bin and the delivery chute every 2 ...


