
Warranty Information
Page 1
... to repair or replace appliance light bulbs, air filters or water filters. Repairs to parts or systems resulting from unauthorized modifications made to be borne by an authorized Whirlpool servicer is not available. 10. Discoloration, rust, or oxidation of your complete model number... appliance is operated and maintained according to instructions attached to or furnished with the product, Whirlpool Corporation or Whirlpool Canada LP (hereafter "Whirlpool") will pay for Factory Specified Parts and repair labor to correct defects in materials or workmanship that vary from state to state...
... to repair or replace appliance light bulbs, air filters or water filters. Repairs to parts or systems resulting from unauthorized modifications made to be borne by an authorized Whirlpool servicer is not available. 10. Discoloration, rust, or oxidation of your complete model number... appliance is operated and maintained according to instructions attached to or furnished with the product, Whirlpool Corporation or Whirlpool Canada LP (hereafter "Whirlpool") will pay for Factory Specified Parts and repair labor to correct defects in materials or workmanship that vary from state to state...
Use & Care Guide
Page 2
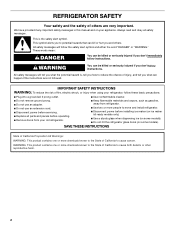
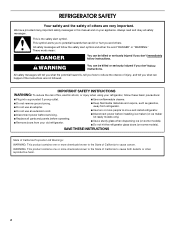
...). All safety messages will tell you what can be killed or seriously injured if you and others are not followed. Always read and obey all parts and panels before operating. ■ Remove doors from your old refrigerator. ■ Keep flammable materials and vapors, such as gasoline, away from refrigerator. ■ Use...
...). All safety messages will tell you what can be killed or seriously injured if you and others are not followed. Always read and obey all parts and panels before operating. ■ Remove doors from your old refrigerator. ■ Keep flammable materials and vapors, such as gasoline, away from refrigerator. ■ Use...
Use & Care Guide
Page 4
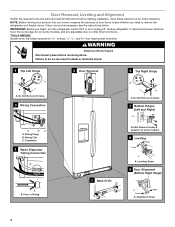
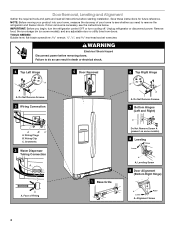
.... 4 Top Left Hinge A A A. TOOLS NEEDED: Bubble level; Failure to remove the refrigerator and freezer doors. Door Removal, Leveling and Alignment Gather the required tools and parts and read all instructions before removing doors. NOTE: Before moving your product into your home, measure the doorway of Fitting 1 Base Grille Do Not Remove...
.... 4 Top Left Hinge A A A. TOOLS NEEDED: Bubble level; Failure to remove the refrigerator and freezer doors. Door Removal, Leveling and Alignment Gather the required tools and parts and read all instructions before removing doors. NOTE: Before moving your product into your home, measure the doorway of Fitting 1 Base Grille Do Not Remove...

Use & Care Guide
Page 5
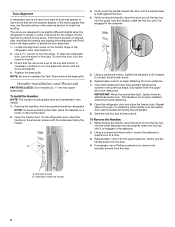
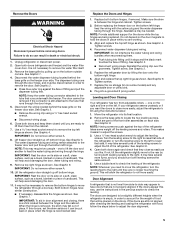
... the two leveling screws, which are being replaced. Replace the Doors and Hinges 1. NOTE: Provide additional support for the doors while the top hinges are part of the refrigerator. Do not depend on each side. Align and replace the top left hinge, feed the wiring with the yellow plug and the...
... the two leveling screws, which are being replaced. Replace the Doors and Hinges 1. NOTE: Provide additional support for the doors while the top hinges are part of the refrigerator. Do not depend on each side. Align and replace the top left hinge, feed the wiring with the yellow plug and the...
Use & Care Guide
Page 6
... avoid scratching the finish, place the handles on the shoulder screws with the setscrews facing the freezer. Use a wrench to turn . Handle Installation and Removal PARTS INCLUDED: Door handles (2 hex key, spare setscrew(s) To Install the Handles: NOTE: The handle mounting setscrews are packed inside the handle 6 A B 3. Save the hex key...
... avoid scratching the finish, place the handles on the shoulder screws with the setscrews facing the freezer. Use a wrench to turn . Handle Installation and Removal PARTS INCLUDED: Door handles (2 hex key, spare setscrew(s) To Install the Handles: NOTE: The handle mounting setscrews are packed inside the handle 6 A B 3. Save the hex key...

Use & Care Guide
Page 7
... to do not install the refrigerator near a heat source, such as gasoline, away from the electrical source. Water Supply Requirements Gather the required tools and parts before starting installation. Before purchasing, make sure you do so can result in death, explosion, or fire. TOOLS NEEDED: ■ Flat-blade screwdriver Nut driver...
... to do not install the refrigerator near a heat source, such as gasoline, away from the electrical source. Water Supply Requirements Gather the required tools and parts before starting installation. Before purchasing, make sure you do so can result in death, explosion, or fire. TOOLS NEEDED: ■ Flat-blade screwdriver Nut driver...
Use & Care Guide
Page 8
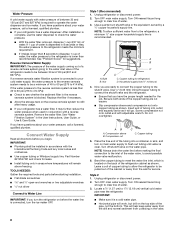
... be installed in accordance with the International Plumbing Code and any local codes and ordinances. ■ Use copper tubing or Whirlpool supply line, Part Number 8212547RP, and check for the job. Copper tubing (to clear line of water. 3. Replace the filter if necessary... than recommended. See "Water Filtration System" in conjunction with a reverse osmosis system. Style 2 1. TOOLS NEEDED: Gather the required tools and parts before the water line is connected to operate the water dispenser and ice maker. A B C A. Turn OFF main water supply. Use ¹...
... be installed in accordance with the International Plumbing Code and any local codes and ordinances. ■ Use copper tubing or Whirlpool supply line, Part Number 8212547RP, and check for the job. Copper tubing (to clear line of water. 3. Replace the filter if necessary... than recommended. See "Water Filtration System" in conjunction with a reverse osmosis system. Style 2 1. TOOLS NEEDED: Gather the required tools and parts before the water line is connected to operate the water dispenser and ice maker. A B C A. Turn OFF main water supply. Use ¹...
Use & Care Guide
Page 9
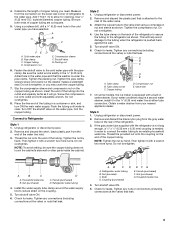
... overtighten. NOTE: To avoid rattling, be sure the copper tubing does not touch the cabinet's side wall or other parts inside the cabinet. Remove and discard the plastic part that leak. 9 Tighten any nuts or connections (including connections at either tube connection. Tube clamp screw C. Obtain ... line 4. Copper tubing D. Slip the compression sleeve and compression nut on the rear of the tubing. Remove and discard the short, black plastic part from the connection on the water pipe. Nut (provided) C. Tighten the packing nut. Do not overtighten. 4. NOTE: Tighten the nut by ...
... overtighten. NOTE: To avoid rattling, be sure the copper tubing does not touch the cabinet's side wall or other parts inside the cabinet. Remove and discard the plastic part that leak. 9 Tighten any nuts or connections (including connections at either tube connection. Tube clamp screw C. Obtain ... line 4. Copper tubing D. Slip the compression sleeve and compression nut on the rear of the tubing. Remove and discard the short, black plastic part from the connection on the water pipe. Nut (provided) C. Tighten the packing nut. Do not overtighten. 4. NOTE: Tighten the nut by ...

Use & Care Guide
Page 12
... Storage Bin 1. Lift up ) position. Water Filtration System Do not use anything on disinfected waters that may be only as good as salt) can damage parts of ice. Systems certified for cyst reduction may contain filterable cysts. Resetting the Filter Status ■ The reset button is reset. 12 To turn off...
... Storage Bin 1. Lift up ) position. Water Filtration System Do not use anything on disinfected waters that may be only as good as salt) can damage parts of ice. Systems certified for cyst reduction may contain filterable cysts. Resetting the Filter Status ■ The reset button is reset. 12 To turn off...

Use & Care Guide
Page 13
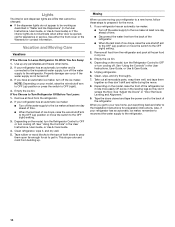
... use abrasive or harsh cleaners such as window sprays, scouring cleansers, flammable fluids, cleaning waxes, concentrated detergents, bleaches or cleansers containing petroleum products on plastic parts, interior and door liners or gaskets. If the environment is particularly greasy or dusty, or there is opened. 2. Plug in warm water. 4. Take the new... filter. Explosion Hazard Use nonflammable cleaner. Failure to clean the condenser: ■ Remove the base grille. There is inserted. 5. Hand wash, rinse, and dry removable parts and interior surfaces thoroughly.
... use abrasive or harsh cleaners such as window sprays, scouring cleansers, flammable fluids, cleaning waxes, concentrated detergents, bleaches or cleansers containing petroleum products on plastic parts, interior and door liners or gaskets. If the environment is particularly greasy or dusty, or there is opened. 2. Plug in warm water. 4. Take the new... filter. Explosion Hazard Use nonflammable cleaner. Failure to clean the condenser: ■ Remove the base grille. There is inserted. 5. Hand wash, rinse, and dry removable parts and interior surfaces thoroughly.
Use & Care Guide
Page 14
... appear to be working as described in "Water and Ice Dispensers" (in the User Instructions, User Guide, or Use & Care Guide. 5. Take out all removable parts, wrap them well, and tape them open far enough for preparation instructions. Empty the ice bin. See "Using the Controls" in . Moving When you are...
... appear to be working as described in "Water and Ice Dispensers" (in the User Instructions, User Guide, or Use & Care Guide. 5. Take out all removable parts, wrap them well, and tape them open far enough for preparation instructions. Empty the ice bin. See "Using the Controls" in . Moving When you are...
Use & Care Guide
Page 19
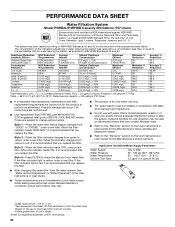
... Cleaner: Order Part #W10355010 In Canada, order Part #W10355010B Water Filter: Order Part #W10295370A (P4RFWB) WATER FILTER CERTIFICATIONS 19 NOTE: Water from the dispenser is not cool enough (on some models) Possible Causes and/or Recommended Solutions NOTE: After dispensing, a few additional drops of water are available for your authorized Whirlpool dealer. Allow 24...
... Cleaner: Order Part #W10355010 In Canada, order Part #W10355010B Water Filter: Order Part #W10295370A (P4RFWB) WATER FILTER CERTIFICATIONS 19 NOTE: Water from the dispenser is not cool enough (on some models) Possible Causes and/or Recommended Solutions NOTE: After dispensing, a few additional drops of water are available for your authorized Whirlpool dealer. Allow 24...
Use & Care Guide
Page 20
... occur if all instructions are not necessarily in the User Instructions or User Guide. ■ These contaminants are not followed. ■ Use replacement filter P4RFWB, part #W10295370A. 2013 suggested retail price of unknown quality without notice. See "Water and Ice Dispensers" or "Water Dispenser" in your water filter. Style 1 - When the...
... occur if all instructions are not necessarily in the User Instructions or User Guide. ■ These contaminants are not followed. ■ Use replacement filter P4RFWB, part #W10295370A. 2013 suggested retail price of unknown quality without notice. See "Water and Ice Dispensers" or "Water Dispenser" in your water filter. Style 1 - When the...

Use & Care Guide
Page 21
...is located in a remote area where service by the customer. Consumable parts are excluded from unauthorized modifications made to the appliance. 9. Repairs to parts or systems resulting from warranty coverage. 4. You can write to Whirlpool with original model/serial numbers that vary from state to state or ...to the Internet and you need further assistance, you may contact Whirlpool at the address below . This major appliance is not available. 10. Expenses for travel and transportation for future reference. 21 Replacement parts or repair labor on how to use or when it is used...
...is located in a remote area where service by the customer. Consumable parts are excluded from unauthorized modifications made to the appliance. 9. Repairs to parts or systems resulting from warranty coverage. 4. You can write to Whirlpool with original model/serial numbers that vary from state to state or ...to the Internet and you need further assistance, you may contact Whirlpool at the address below . This major appliance is not available. 10. Expenses for travel and transportation for future reference. 21 Replacement parts or repair labor on how to use or when it is used...
Installation Guide
Page 2
... hit the refrigerator glass doors (on your refrigerator, follow the safety alert symbol and either the word "DANGER" or "WARNING." Always read and obey all parts and panels before operating. ■ Remove doors from your old refrigerator. ■ Keep flammable materials and vapors, such as gasoline, away from refrigerator. ■ Use...
... hit the refrigerator glass doors (on your refrigerator, follow the safety alert symbol and either the word "DANGER" or "WARNING." Always read and obey all parts and panels before operating. ■ Remove doors from your old refrigerator. ■ Keep flammable materials and vapors, such as gasoline, away from refrigerator. ■ Use...
Installation Guide
Page 4
... your home to do so can result in death or electrical shock. 4 Top Left Hinge A A A. Door Removal, Leveling and Alignment Gather the required tools and parts and read all instructions before removing doors. Unplug refrigerator or disconnect power. NOTE: Before moving your product into your home, measure the doorway of Fitting...
... your home to do so can result in death or electrical shock. 4 Top Left Hinge A A A. Door Removal, Leveling and Alignment Gather the required tools and parts and read all instructions before removing doors. Unplug refrigerator or disconnect power. NOTE: Before moving your product into your home, measure the doorway of Fitting...
Installation Guide
Page 5
... up off the leveling screws and rollers. Use a hex-head socket wrench to have similar construction. ■ If necessary, disassemble the hinges as you are part of cardboard. NOTE: This may appear to remove the top left hinge. Reconnect water dispenser tubing and wiring. Tighten screw. Replace the ice storage bin...
... up off the leveling screws and rollers. Use a hex-head socket wrench to have similar construction. ■ If necessary, disassemble the hinges as you are part of cardboard. NOTE: This may appear to remove the top left hinge. Reconnect water dispenser tubing and wiring. Tighten screw. Replace the ice storage bin...

Installation Guide
Page 6
... the top and bottom. To ensure proper ventilation for your refrigerator next to the right. To raise the refrigerator door, turn . Handle Installation and Removal PARTS INCLUDED: Door handles (2 hex key, spare setscrew(s) To Install the Handles: NOTE: The handle mounting setscrews are even at the top. Repeat steps 2 through 7 to...
... the top and bottom. To ensure proper ventilation for your refrigerator next to the right. To raise the refrigerator door, turn . Handle Installation and Removal PARTS INCLUDED: Door handles (2 hex key, spare setscrew(s) To Install the Handles: NOTE: The handle mounting setscrews are even at the top. Repeat steps 2 through 7 to...

Installation Guide
Page 7
... the model) to a maximum of between 30 and 120 psi (207 and 827 kPa). Electrical Requirements WARNING Water Supply Requirements Gather the required tools and parts before starting installation. NOTE: Before performing any tools listed here. See "Using the Controls" in the reverse osmosis system is connected to your refrigerator has...
... the model) to a maximum of between 30 and 120 psi (207 and 827 kPa). Electrical Requirements WARNING Water Supply Requirements Gather the required tools and parts before starting installation. NOTE: Before performing any tools listed here. See "Using the Controls" in the reverse osmosis system is connected to your refrigerator has...

Installation Guide
Page 8
...NOTE: Always drain the water line before the water line is connected, turn the ice maker OFF. TOOLS NEEDED: Gather the required tools and parts before you begin. Style 1 (Recommended) 1. Turn ON nearest faucet long enough to clear line of the water valve, to flush out tubing... Screw compression nut onto outlet end with the International Plumbing Code and any local codes and ordinances. ■ Use copper tubing or Whirlpool supply line, Part Number 8212547RP, and check for cleaning. Compression nut E. Packing nut 6. Tighten the packing nut. Turn OFF the shutoff valve on ...
...NOTE: Always drain the water line before the water line is connected, turn the ice maker OFF. TOOLS NEEDED: Gather the required tools and parts before you begin. Style 1 (Recommended) 1. Turn ON nearest faucet long enough to clear line of the water valve, to flush out tubing... Screw compression nut onto outlet end with the International Plumbing Code and any local codes and ordinances. ■ Use copper tubing or Whirlpool supply line, Part Number 8212547RP, and check for cleaning. Compression nut E. Packing nut 6. Tighten the packing nut. Turn OFF the shutoff valve on ...


