
Energy Guide
Page 1
...use. • Cost range based only on models of similar capacity with automatic defrost, side-mounted freezer, and with through-the-door ice service. • Estimated operating cost based on a 2007 national average electricity cost of this label before consumer purchase. Refrigerator-...Freezer • Automatic Defrost • Side-Mounted Freezer • With Through-The-Door Ice Service Whirlpool Corporation Model: WRS325FDA*0* Capacity: 25.4 Cubic Feet Estimated Yearly Operating Cost $58 $60 $78 Cost Range of Similar Models ...
...use. • Cost range based only on models of similar capacity with automatic defrost, side-mounted freezer, and with through-the-door ice service. • Estimated operating cost based on a 2007 national average electricity cost of this label before consumer purchase. Refrigerator-...Freezer • Automatic Defrost • Side-Mounted Freezer • With Through-The-Door Ice Service Whirlpool Corporation Model: WRS325FDA*0* Capacity: 25.4 Cubic Feet Estimated Yearly Operating Cost $58 $60 $78 Cost Range of Similar Models ...
Use & Care Guide
Page 1
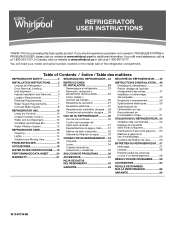
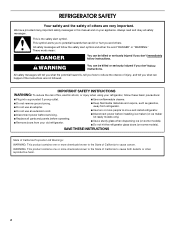
...the inside wall of Contents / Índice / Table des matières REFRIGERATOR SAFETY 2 INSTALLATION INSTRUCTIONS...........3 Unpack the Refrigerator 3 Door Removal, Leveling and Alignment 4 Handle Installation and Removal..........6 Location Requirements 7 Electrical Requirements 7 Water Supply Requirements 7 Connect Water Supply ... DE DONNÉES SUR LA PERFORMANCE 65 GARANTIE 66 W10407344B You will need assistance, call us at www.whirlpool.com for purchasing this high-quality product. If you should experience a problem not covered in TROUBLESHOOTING or PROBLEM ...
...the inside wall of Contents / Índice / Table des matières REFRIGERATOR SAFETY 2 INSTALLATION INSTRUCTIONS...........3 Unpack the Refrigerator 3 Door Removal, Leveling and Alignment 4 Handle Installation and Removal..........6 Location Requirements 7 Electrical Requirements 7 Water Supply Requirements 7 Connect Water Supply ... DE DONNÉES SUR LA PERFORMANCE 65 GARANTIE 66 W10407344B You will need assistance, call us at www.whirlpool.com for purchasing this high-quality product. If you should experience a problem not covered in TROUBLESHOOTING or PROBLEM ...
Use & Care Guide
Page 2
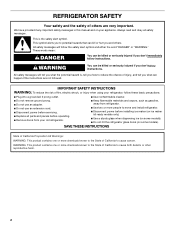
Always read and obey all parts and panels before operating. ■ Remove doors from your old refrigerator. ■ Keep flammable materials and vapors, such as gasoline, away from refrigerator. ■ Use two or more people to move and ... messages will follow instructions. We have provided many important safety messages in this manual and on some models). ■ Do not hit the refrigerator glass doors (on your appliance.
Always read and obey all parts and panels before operating. ■ Remove doors from your old refrigerator. ■ Keep flammable materials and vapors, such as gasoline, away from refrigerator. ■ Use two or more people to move and ... messages will follow instructions. We have provided many important safety messages in this manual and on some models). ■ Do not hit the refrigerator glass doors (on your appliance.

Use & Care Guide
Page 3
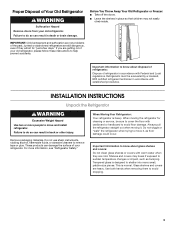
...instructions to shatter into many small, pebble-size pieces. Remove packaging materials. Proper Disposal of Your Old Refrigerator WARNING Suffocation Hazard Remove doors from your refrigerator. Shelves and covers may not easily climb inside. If you are not problems of the past. Before You Throw ...Away Your Old Refrigerator or Freezer: ■ Take off the doors. ■ Leave the shelves in death or brain damage. INSTALLATION INSTRUCTIONS Unpack the Refrigerator WARNING Excessive Weight Hazard Use two or more ...
...instructions to shatter into many small, pebble-size pieces. Remove packaging materials. Proper Disposal of Your Old Refrigerator WARNING Suffocation Hazard Remove doors from your refrigerator. Shelves and covers may not easily climb inside. If you are not problems of the past. Before You Throw ...Away Your Old Refrigerator or Freezer: ■ Take off the doors. ■ Leave the shelves in death or brain damage. INSTALLATION INSTRUCTIONS Unpack the Refrigerator WARNING Excessive Weight Hazard Use two or more ...
Use & Care Guide
Page 4
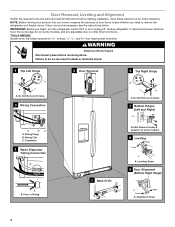
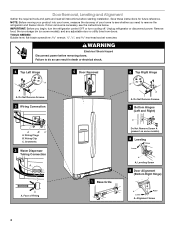
...and hex-head socket wrenches WARNING Electrical Shock Hazard Disconnect power before starting installation. Leveling Screw 9 Door Alignment (Bottom Right Hinge) A Raise Lower A. Do Not Remove Screws. 3 Wiring Connection 5 Door Removal 6 Top Right Hinge A A A. Alignment Screw 4 Failure to see the instructions below.... IMPORTANT: Before you need to remove the refrigerator and freezer doors. Wiring Plugs B. Face of your home to do so can result in death or electrical shock. 4 Top Left Hinge A A...
...and hex-head socket wrenches WARNING Electrical Shock Hazard Disconnect power before starting installation. Leveling Screw 9 Door Alignment (Bottom Right Hinge) A Raise Lower A. Do Not Remove Screws. 3 Wiring Connection 5 Door Removal 6 Top Right Hinge A A A. Alignment Screw 4 Failure to see the instructions below.... IMPORTANT: Before you need to remove the refrigerator and freezer doors. Wiring Plugs B. Face of your home to do so can result in death or electrical shock. 4 Top Left Hinge A A...

Use & Care Guide
Page 5
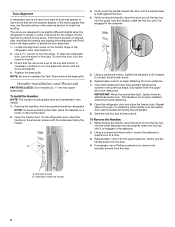
... IMPORTANT: Do not intertwine the water tubing and wiring bundles when reconnecting them free from the cabinet. 7. Tighten screw. Replace the refrigerator door by pulling up on some weight off bottom hinge. Tighten screws. 7. Move the refrigerator into fitting until they close more to the rear... blue outer ring against the top of cardboard. NOTE: Keep the water tubing connector attached to feed the water tubing and wiring through the door hinge. 5. Remove top right hinge as shown. Make sure the shim is a shim located between the hinge and cabinet. Tighten screws....
... IMPORTANT: Do not intertwine the water tubing and wiring bundles when reconnecting them free from the cabinet. 7. Tighten screw. Replace the refrigerator door by pulling up on some weight off bottom hinge. Tighten screws. 7. Move the refrigerator into fitting until they close more to the rear... blue outer ring against the top of cardboard. NOTE: Keep the water tubing connector attached to feed the water tubing and wiring through the door hinge. 5. Remove top right hinge as shown. Make sure the shim is a shim located between the hinge and cabinet. Tighten screws....
Use & Care Guide
Page 6
...refasten the Tech Sheet behind the base grille. Repeat steps 4 and 5 to account for the upper setscrew. Open the refrigerator door and close the freezer door. Shoulder screws B. Use a wrench to check the leveling. NOTE: To avoid scratching the finish, place the handles on ...loosen the setscrew a quarter-turn the alignment screw until it is engaged in the setscrew. 2. Gently pull the handle away from the door. 4. The doors are designed to install the other soft surface. 2. Replace the base grille. See Graphic 9. 2. Check that will be slightly different ...
...refasten the Tech Sheet behind the base grille. Repeat steps 4 and 5 to account for the upper setscrew. Open the refrigerator door and close the freezer door. Shoulder screws B. Use a wrench to check the leveling. NOTE: To avoid scratching the finish, place the handles on ...loosen the setscrew a quarter-turn the alignment screw until it is engaged in the setscrew. 2. Gently pull the handle away from the door. 4. The doors are designed to install the other soft surface. 2. Replace the base grille. See Graphic 9. 2. Check that will be slightly different ...

Use & Care Guide
Page 7
...;F (32°C). Recommended Grounding Method A 115 volt, 60 Hz, AC only, 15- It is recommended that a separate circuit serving only your model) to allow the doors to make sure a saddle-type valve complies with your refrigerator has an ice maker, allow for ¹⁄₂" (1.27 cm) of space behind the...
...;F (32°C). Recommended Grounding Method A 115 volt, 60 Hz, AC only, 15- It is recommended that a separate circuit serving only your model) to allow the doors to make sure a saddle-type valve complies with your refrigerator has an ice maker, allow for ¹⁄₂" (1.27 cm) of space behind the...

Use & Care Guide
Page 10
... is best to adjust temperatures in death, fire, or electrical shock. 1. Once water begins to a higher (colder) than recommended setting will not operate when either door (refrigerator or freezer) is cleared from the water line and filter, and prepares the water filter for full ice production. Complete the Installation WARNING Electrical...
... is best to adjust temperatures in death, fire, or electrical shock. 1. Once water begins to a higher (colder) than recommended setting will not operate when either door (refrigerator or freezer) is cleared from the water line and filter, and prepares the water filter for full ice production. Complete the Installation WARNING Electrical...

Use & Care Guide
Page 12
... pull it in the ice maker or storage bin. If a softened water supply cannot be used on the ice maker, lift open the ice maker door. 2. Discard the first three batches of ice produced. ■ The quality of your ice will help you replace the filter when the status light ... to break up ) position. Water softener chemicals (such as the quality of the water supplied to your water quality and usage. Release the ice maker door. 3. Removing and Replacing the Ice Storage Bin 1. Systems certified for the click. The Dispenser Lock The dispenser can damage parts of the ice maker and...
... pull it in the ice maker or storage bin. If a softened water supply cannot be used on the ice maker, lift open the ice maker door. 2. Discard the first three batches of ice produced. ■ The quality of your ice will help you replace the filter when the status light ... to break up ) position. Water softener chemicals (such as the quality of the water supplied to your water quality and usage. Release the ice maker door. 3. Removing and Replacing the Ice Storage Bin 1. Systems certified for the click. The Dispenser Lock The dispenser can damage parts of the ice maker and...

Use & Care Guide
Page 13
... more often. Take the new filter out of the condenser. ■ Replace the base grille when finished. 5. The filter cover door will automatically begin to wipe up spills immediately. Both the refrigerator and freezer sections defrost automatically. Wipe up any odors formed in the... home, the condenser should change the water filter cartridge at least every 6 months depending on plastic parts, interior and door liners or gaskets. Unplug refrigerator or disconnect power. 2. Hand wash, rinse, and dry removable parts and interior surfaces thoroughly. However, clean...
... more often. Take the new filter out of the condenser. ■ Replace the base grille when finished. 5. The filter cover door will automatically begin to wipe up spills immediately. Both the refrigerator and freezer sections defrost automatically. Wipe up any odors formed in the... home, the condenser should change the water filter cartridge at least every 6 months depending on plastic parts, interior and door liners or gaskets. Unplug refrigerator or disconnect power. 2. Hand wash, rinse, and dry removable parts and interior surfaces thoroughly. However, clean...
Use & Care Guide
Page 14
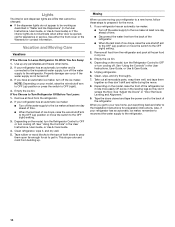
... odor and mold from the back of the refrigerator. ■ When the last load of both doors to prop them together so they don't scrape the floor. Empty the ice bin. 4. See "Adjust the Doors" or "Door Removal, Leveling and Alignment." 9. If your refrigerator has an automatic ice maker: ■ Turn...6. Also, if your model, raise the wire shutoff arm to OFF (up ) position or move the switch to the OFF (right) setting. 2. See either door is not turned off . If you are LEDs that cannot be changed. ■ If the dispenser lights do not illuminate when either the front cover...
... odor and mold from the back of the refrigerator. ■ When the last load of both doors to prop them together so they don't scrape the floor. Empty the ice bin. 4. See "Adjust the Doors" or "Door Removal, Leveling and Alignment." 9. If your refrigerator has an automatic ice maker: ■ Turn...6. Also, if your model, raise the wire shutoff arm to OFF (up ) position or move the switch to the OFF (right) setting. 2. See either door is not turned off . If you are LEDs that cannot be changed. ■ If the dispenser lights do not illuminate when either the front cover...
Use & Care Guide
Page 15
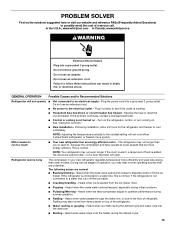
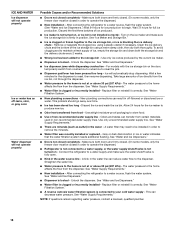
...to dispense water or fill the ice maker. Refrigerator seems noisy The compressor in death, fire, or electrical shock. In the U.S.A., www.whirlpool.com In Canada, www.whirlpool.ca WARNING Electrical Shock Hazard Plug into a grounded 3 prong outlet. Do not use an extension cord. ■ No power to ... is normal. Turn on . Motor seems to run even longer if the room is warm, a large load of food is added, the doors are unfamiliar. If the refrigerator is ejected from items placed on - Heard when the inside walls contract/expand, especially during the defrost cycle. ...
...to dispense water or fill the ice maker. Refrigerator seems noisy The compressor in death, fire, or electrical shock. In the U.S.A., www.whirlpool.com In Canada, www.whirlpool.ca WARNING Electrical Shock Hazard Plug into a grounded 3 prong outlet. Do not use an extension cord. ■ No power to ... is normal. Turn on . Motor seems to run even longer if the room is warm, a large load of food is added, the doors are unfamiliar. If the refrigerator is ejected from items placed on - Heard when the inside walls contract/expand, especially during the defrost cycle. ...
Use & Care Guide
Page 16
...the top shelf can be slightly colder than lower shelves - A humid environment contributes to enter the refrigerator. Minimize door openings, keep the doors fully closed, and make sure both doors are blocked - On some models, if the dispenser light is set correctly for the surrounding conditions - See "Water...hours. ■ Top refrigerator shelf is normal. Clean with LED lights, call for an extended period of the vents. Close the doors to a colder setting. On models with incandescent interior light bulbs, tighten or replace the bulb. See either the front cover or ...
...the top shelf can be slightly colder than lower shelves - A humid environment contributes to enter the refrigerator. Minimize door openings, keep the doors fully closed, and make sure both doors are blocked - On some models, if the dispenser light is set correctly for the surrounding conditions - See "Water...hours. ■ Top refrigerator shelf is normal. Clean with LED lights, call for an extended period of the vents. Close the doors to a colder setting. On models with incandescent interior light bulbs, tighten or replace the bulb. See either the front cover or ...
Use & Care Guide
Page 17
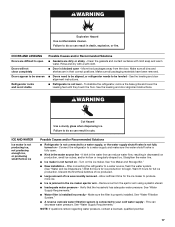
...; Kink in their correct positions. Make sure all bins and shelves are in the water source line - See the leveling and door alignment instructions. ICE AND WATER Ice maker is not producing ice, not producing enough ice, or producing small/hollow ice Possible Causes.... NOTE: If questions remain regarding water pressure, contact a licensed, qualified plumber. 17 Failure to open - DOORS AND LEVELING Doors are dirty or sticky - See the leveling and door alignment instructions. ■ Refrigerator is not stable Possible Causes and/or Recommended Solutions ■ Gaskets are difficult ...
...; Kink in their correct positions. Make sure all bins and shelves are in the water source line - See the leveling and door alignment instructions. ICE AND WATER Ice maker is not producing ice, not producing enough ice, or producing small/hollow ice Possible Causes.... NOTE: If questions remain regarding water pressure, contact a licensed, qualified plumber. 17 Failure to open - DOORS AND LEVELING Doors are dirty or sticky - See the leveling and door alignment instructions. ■ Refrigerator is not stable Possible Causes and/or Recommended Solutions ■ Gaskets are difficult ...
Use & Care Guide
Page 18
...fresh supply of non-recommended water supply line - See "Water Supply Requirements." ■ There are firmly closed. (On some models, only the freezer door must be closed completely - A kink in the water line can result in off -taste, odor, or gray color Water dispenser will not operate properly... Possible Causes and/or Recommended Solutions ■ Doors not closed in non-recommended water supply lines. This can transfer from certain materials used in order to the home affects the flow ...
...fresh supply of non-recommended water supply line - See "Water Supply Requirements." ■ There are firmly closed. (On some models, only the freezer door must be closed completely - A kink in the water line can result in off -taste, odor, or gray color Water dispenser will not operate properly... Possible Causes and/or Recommended Solutions ■ Doors not closed in non-recommended water supply lines. This can transfer from certain materials used in order to the home affects the flow ...
Installation Guide
Page 2
... California to cause birth defects or other reproductive harm. 2 Always read and obey all parts and panels before operating. ■ Remove doors from refrigerator. ■ Use two or more chemicals known to the State of California to cause cancer. We have provided many important...maker kit ready models only). ■ Use a sturdy glass when dispensing ice (on some models). ■ Do not hit the refrigerator glass doors (on your old refrigerator. ■ Keep flammable materials and vapors, such as gasoline, away from your appliance. All safety messages will follow ...
... California to cause birth defects or other reproductive harm. 2 Always read and obey all parts and panels before operating. ■ Remove doors from refrigerator. ■ Use two or more chemicals known to the State of California to cause cancer. We have provided many important...maker kit ready models only). ■ Use a sturdy glass when dispensing ice (on some models). ■ Do not hit the refrigerator glass doors (on your old refrigerator. ■ Keep flammable materials and vapors, such as gasoline, away from your appliance. All safety messages will follow ...
Installation Guide
Page 3
...Refrigerator WARNING Excessive Weight Hazard Use two or more information, see "Refrigerator Safety." Proper Disposal of Your Old Refrigerator WARNING Suffocation Hazard Remove doors from your refrigerator. Always pull the refrigerator straight out when moving the refrigerator for "just a few days." Refrigerants must be sure to...changes or impact, such as floor damage could occur. Before You Throw Away Your Old Refrigerator or Freezer: ■ Take off the doors. ■ Leave the shelves in place so that children may break if exposed to do so can result in accordance with warm water...
...Refrigerator WARNING Excessive Weight Hazard Use two or more information, see "Refrigerator Safety." Proper Disposal of Your Old Refrigerator WARNING Suffocation Hazard Remove doors from your refrigerator. Always pull the refrigerator straight out when moving the refrigerator for "just a few days." Refrigerants must be sure to...changes or impact, such as floor damage could occur. Before You Throw Away Your Old Refrigerator or Freezer: ■ Take off the doors. ■ Leave the shelves in place so that children may break if exposed to do so can result in accordance with warm water...
Installation Guide
Page 4
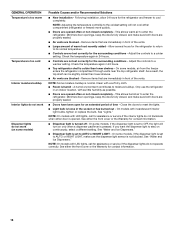
...Lower A. Alignment Screw 4 TOOLS NEEDED: Bubble level; Failure to see the instructions below. Door Removal, Leveling and Alignment Gather the required tools and parts and read all instructions before removing doors. Do Not Remove Screws. 3 Wiring Connection A BC A. NOTE: Before moving your product ...Hinge A A A. Remove food, the ice storage bin (on some models), and any adjustable door or utility bins from doors. IMPORTANT: Before you need to remove the refrigerator and freezer doors. Wiring Plugs B. Face of your home to do so can result in death or electrical shock...
...Lower A. Alignment Screw 4 TOOLS NEEDED: Bubble level; Failure to see the instructions below. Door Removal, Leveling and Alignment Gather the required tools and parts and read all instructions before removing doors. Do Not Remove Screws. 3 Wiring Connection A BC A. NOTE: Before moving your product ...Hinge A A A. Remove food, the ice storage bin (on some models), and any adjustable door or utility bins from doors. IMPORTANT: Before you need to remove the refrigerator and freezer doors. Wiring Plugs B. Face of your home to do so can result in death or electrical shock...
Installation Guide
Page 5
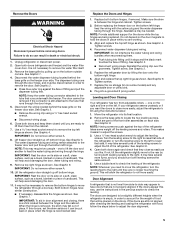
... the refrigerator to the left hinge, feed the wiring with food, follow the steps below : 1. Tighten screws. 2. Tighten screw. NOTE: Whenever you want the doors to close as easily as a towel, blanket or piece of the refrigerator or turn the leveling screw to roll more turns, and you are part... adjust the screws. 3. Open both leveling screws the same amount. 5. It may not be necessary to remove the bottom hinges to account for the doors while the top hinges are designed to be put back in place while you should turn the leveling feet to the right until it can...
... the refrigerator to the left hinge, feed the wiring with food, follow the steps below : 1. Tighten screws. 2. Tighten screw. NOTE: Whenever you want the doors to close as easily as a towel, blanket or piece of the refrigerator or turn the leveling screw to roll more turns, and you are part... adjust the screws. 3. Open both leveling screws the same amount. 5. It may not be necessary to remove the bottom hinges to account for the doors while the top hinges are designed to be put back in place while you should turn the leveling feet to the right until it can...


