Energy Guide
Page 1
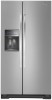
U.S. Refrigerator-Freezer • Automatic Defrost • Side-Mounted Freezer • With Through-The-Door-Ice Service Whirlpool Corporation Model: WRS321CDB*0* Capacity: 21.4 Cubic Feet Estimated Yearly Operating Cost $69 ▼ $57 $72 Cost Range of Similar Models 649 kWh Estimated Yearly Electricity ...
U.S. Refrigerator-Freezer • Automatic Defrost • Side-Mounted Freezer • With Through-The-Door-Ice Service Whirlpool Corporation Model: WRS321CDB*0* Capacity: 21.4 Cubic Feet Estimated Yearly Operating Cost $69 ▼ $57 $72 Cost Range of Similar Models 649 kWh Estimated Yearly Electricity ...

Dimension Guide
Page 1
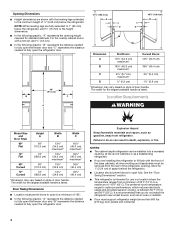
... cm) (79.1 cm) (180.2 cm) (180.9 cm) (90.0 cm) (116.4 cm) LOCATION REQUIREMENTS To ensure proper ventilation for your refrigerator next to a fixed wall, leave a 2" (5.08 cm) minimum space on each side and at the back for product installation is recommended that ...radiator. When installing your refrigerator, allow for 1" (2.54 cm) of space on style of the refrigerator needs to a maximum of 110°F (43°C). Specifications subject to improve Dimensions are fully extended to change without notice. Because Whirlpool Corporation policy includes a continuous...
... cm) (79.1 cm) (180.2 cm) (180.9 cm) (90.0 cm) (116.4 cm) LOCATION REQUIREMENTS To ensure proper ventilation for your refrigerator next to a fixed wall, leave a 2" (5.08 cm) minimum space on each side and at the back for product installation is recommended that ...radiator. When installing your refrigerator, allow for 1" (2.54 cm) of space on style of the refrigerator needs to a maximum of 110°F (43°C). Specifications subject to improve Dimensions are fully extended to change without notice. Because Whirlpool Corporation policy includes a continuous...
Warranty Information
Page 1
... 30 days from defects in your major appliance if it was purchased. In Canada, visit www.whirlpool.ca. If you on the inside wall of the refrigerator compartment. Mississauga, Ontario L5N 0B7 Please include a daytime phone number in which it is installed in an inaccessible location or is not installed in materials...
... 30 days from defects in your major appliance if it was purchased. In Canada, visit www.whirlpool.ca. If you on the inside wall of the refrigerator compartment. Mississauga, Ontario L5N 0B7 Please include a daytime phone number in which it is installed in an inaccessible location or is not installed in materials...
Installation Guide
Page 2
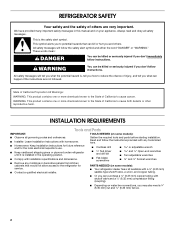
...This product contains one or more chemicals known to the State of California to the refrigerator for the local electrical inspector's use. ■ Keep cardboard shipping piece or plywood under refrigerator until it is installed in this manual and on water line connections, you and... others are not followed. INSTALLATION REQUIREMENTS Tools and Parts IMPORTANT: TOOLS NEEDED (on some models): ■ Your refrigerator dealer has a kit available with a ¹⁄₄" (6.35 mm) saddle-type shutoff valve, a union, and copper tubing. ■ Or...
...This product contains one or more chemicals known to the State of California to the refrigerator for the local electrical inspector's use. ■ Keep cardboard shipping piece or plywood under refrigerator until it is installed in this manual and on water line connections, you and... others are not followed. INSTALLATION REQUIREMENTS Tools and Parts IMPORTANT: TOOLS NEEDED (on some models): ■ Your refrigerator dealer has a kit available with a ¹⁄₄" (6.35 mm) saddle-type shutoff valve, a union, and copper tubing. ■ Or...

Installation Guide
Page 3
...Curved 28⁵⁄₈" (72.5 cm) 2⁵⁄₈" (6.5 cm) 31¹⁄₈" (79.1 cm) *Dimension may vary based on style of the refrigerator is listed. Front View A B 21³⁄₄" (55.1 cm) 61¹⁄₄" (155.6 cm) C A 3¹⁄₄" (8.2 cm) 35&#... handle. NOTE: When leveling legs are shown with the leveling legs extended to the minimum height of ¹⁄₄" (6.35 mm) below the refrigerator, add ³⁄₄" (19 mm) to the height dimensions. ■ The power cord is 61¹⁄₄" (155.6 cm) long...
...Curved 28⁵⁄₈" (72.5 cm) 2⁵⁄₈" (6.5 cm) 31¹⁄₈" (79.1 cm) *Dimension may vary based on style of the refrigerator is listed. Front View A B 21³⁄₄" (55.1 cm) 61¹⁄₄" (155.6 cm) C A 3¹⁄₄" (8.2 cm) 35&#... handle. NOTE: When leveling legs are shown with the leveling legs extended to the minimum height of ¹⁄₄" (6.35 mm) below the refrigerator, add ³⁄₄" (19 mm) to the height dimensions. ■ The power cord is 61¹⁄₄" (155.6 cm) long...
Installation Guide
Page 4
...;" (0.3 cm). ■ In the following graphic, "B" represents the distance needed to fully open the freezer door and "C" represents the distance needed to fully open the refrigerator door. 36" (91.4 cm) B C A 41¹⁄₄" (104.5 cm) A C D 45⁷⁄₈" (116.4 cm) B C D 90˚... graphic, "A" represents the opening . It is recommended that you are fully extended to 1" (25 mm) below the refrigerator. NOTES: ■ The cabinet depth refrigerator can result in a location where the temperature ranges from a minimum of 55°F (13°C) to the minimum ...
...;" (0.3 cm). ■ In the following graphic, "B" represents the distance needed to fully open the freezer door and "C" represents the distance needed to fully open the refrigerator door. 36" (91.4 cm) B C A 41¹⁄₄" (104.5 cm) A C D 45⁷⁄₈" (116.4 cm) B C D 90˚... graphic, "A" represents the opening . It is recommended that you are fully extended to 1" (25 mm) below the refrigerator. NOTES: ■ The cabinet depth refrigerator can result in a location where the temperature ranges from a minimum of 55°F (13°C) to the minimum ...
Installation Guide
Page 5
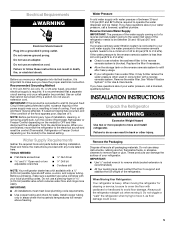
...in death, fire, or electrical shock. Remove the Packaging Dispose of installation, cleaning, or removing a light bulb, turn the control (Thermostat, Refrigerator or Freezer Control depending on the model) to your water pressure, call a licensed, qualified plumber. or 20-amp fused, grounded electrical supply ... the filter if necessary. ■ Allow the storage tank on the model) to remove tape or glue. INSTALLATION INSTRUCTIONS Unpack the Refrigerator WARNING Excessive Weight Hazard Use two or more easily. IMPORTANT: ■ Use ¹⁄₂" socket wrench to remove skids (...
...in death, fire, or electrical shock. Remove the Packaging Dispose of installation, cleaning, or removing a light bulb, turn the control (Thermostat, Refrigerator or Freezer Control depending on the model) to your water pressure, call a licensed, qualified plumber. or 20-amp fused, grounded electrical supply ... the filter if necessary. ■ Allow the storage tank on the model) to remove tape or glue. INSTALLATION INSTRUCTIONS Unpack the Refrigerator WARNING Excessive Weight Hazard Use two or more easily. IMPORTANT: ■ Use ¹⁄₂" socket wrench to remove skids (...
Installation Guide
Page 6
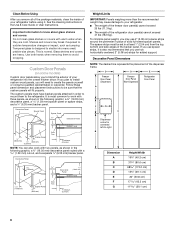
..., as shown in the Use & Care Guide or User Instructions. This is also recommended that the custom panels will need to the refrigerator. Use both hands when removing them to create the panels yourself or consult a qualified cabinetmaker or carpenter. Decorative Panel Spacer Panel Spacer Panel... also work with warm water when they are heavy. Clean Before Using After you remove all of the package materials, clean the inside of your refrigerator before using it is normal. Glass shelves and covers are cold. If you plan to install custom wood panels, you to -right B Dimension A B C...
..., as shown in the Use & Care Guide or User Instructions. This is also recommended that the custom panels will need to the refrigerator. Use both hands when removing them to create the panels yourself or consult a qualified cabinetmaker or carpenter. Decorative Panel Spacer Panel Spacer Panel... also work with warm water when they are heavy. Clean Before Using After you remove all of the package materials, clean the inside of your refrigerator before using it is normal. Glass shelves and covers are cold. If you plan to install custom wood panels, you to -right B Dimension A B C...
Installation Guide
Page 8
...top of the freezer door, completely covering both side trim clips. 6. Copper and PEX tubing connections from the household water line to the refrigerator are properly aligned with the International Plumbing Code and any local codes and ordinances. ■ The gray water tubing on the upper trim... panels, snap the dispenser frame onto the freezer door as shown. Be sure that the grooves on the back of copper, we recommend the following Whirlpool Part Numbers: W10505928RP (7 ft [2.14 m] jacketed PEX), 8212547RP (5 ft [1.52 m] PEX), or W10267701RP (25 ft [7.62 m] PEX). ■ Install tubing ...
...top of the freezer door, completely covering both side trim clips. 6. Copper and PEX tubing connections from the household water line to the refrigerator are properly aligned with the International Plumbing Code and any local codes and ordinances. ■ The gray water tubing on the upper trim... panels, snap the dispenser frame onto the freezer door as shown. Be sure that the grooves on the back of copper, we recommend the following Whirlpool Part Numbers: W10505928RP (7 ft [2.14 m] jacketed PEX), 8212547RP (5 ft [1.52 m] PEX), or W10267701RP (25 ft [7.62 m] PEX). ■ Install tubing ...
Installation Guide
Page 9
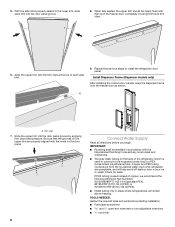
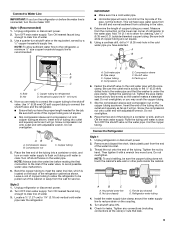
... Screw compression nut onto outlet end with adjustable wrench. Shutoff valve G. Packing nut 6. Fasten the shutoff valve to refrigerator) D. Screw the compression nut onto outlet end with adjustable wrench. Turn OFF the shutoff valve on the copper tubing ...the tubing. Copper tubing 5. Place the free end of the copper tubing are cut square. 5. Cold water pipe B. Tighten the packing nut. Unplug refrigerator or disconnect power. 2. Household water line B. Turn shutoff valve ON. 6. Check for service. Turn OFF main water supply. A G B C A...
... Screw compression nut onto outlet end with adjustable wrench. Shutoff valve G. Packing nut 6. Fasten the shutoff valve to refrigerator) D. Screw the compression nut onto outlet end with adjustable wrench. Turn OFF the shutoff valve on the copper tubing ...the tubing. Copper tubing 5. Place the free end of the copper tubing are cut square. 5. Cold water pipe B. Tighten the packing nut. Unplug refrigerator or disconnect power. 2. Household water line B. Turn shutoff valve ON. 6. Check for service. Turn OFF main water supply. A G B C A...
Installation Guide
Page 10
... 1. Use the tube clamp on disinfected waters that surrounds the ice storage bin. Check for leaks. Tube clamp screw C. Unplug refrigerator or disconnect power. 2. Nut (provided) C. Do not remove ground prong. Immediately after the system. Systems certified for 5 seconds.... This will help avoid damage to flow, continue depressing and releasing the dispenser lever (5 seconds on the rear of the refrigerator. 3. A B C D E A. Compression nut E. NOTE: Tighten the nut by hand. Ferrule (purchased) F. Check for leaks. The ...
... 1. Use the tube clamp on disinfected waters that surrounds the ice storage bin. Check for leaks. Tube clamp screw C. Unplug refrigerator or disconnect power. 2. Nut (provided) C. Do not remove ground prong. Immediately after the system. Systems certified for 5 seconds.... This will help avoid damage to flow, continue depressing and releasing the dispenser lever (5 seconds on the rear of the refrigerator. 3. A B C D E A. Compression nut E. NOTE: Tighten the nut by hand. Ferrule (purchased) F. Check for leaks. The ...

Installation Guide
Page 11
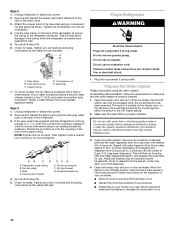
... foot to the left . NOTE: Whenever you want the doors to close as easily as you should be slightly different heights when the refrigerator is operating properly and that side of the product, or turn the screw to the left . Flush water system before using the instructions ... or adjustable wrench to turn the screw to 90°. Open both doors to the right. A Lower Raise A. Alignment screw 3. To raise the refrigerator door, turn the screw. To lower the door, turn it easier to -side may take several more easily. Open both doors again and check that...
... foot to the left . NOTE: Whenever you want the doors to close as easily as you should be slightly different heights when the refrigerator is operating properly and that side of the product, or turn the screw to the left . Flush water system before using the instructions ... or adjustable wrench to turn the screw to 90°. Open both doors to the right. A Lower Raise A. Alignment screw 3. To raise the refrigerator door, turn the screw. To lower the door, turn it easier to -side may take several more easily. Open both doors again and check that...
Use & Care Guide
Page 2
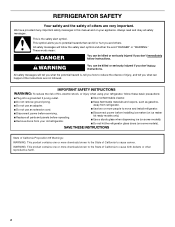
...other reproductive harm. 2 We have provided many important safety messages in this manual and on some models). ■ Do not hit the refrigerator glass doors (on your appliance. Always read and obey all parts and panels before installing ice maker (on ice maker kit ready models...; Use a sturdy glass when dispensing ice (on some models). This symbol alerts you to move and install refrigerator. ■ Disconnect power before operating. ■ Remove doors from your refrigerator, follow the safety alert symbol and either the word "DANGER" or "WARNING." WARNING You can be killed...
...other reproductive harm. 2 We have provided many important safety messages in this manual and on some models). ■ Do not hit the refrigerator glass doors (on your appliance. Always read and obey all parts and panels before installing ice maker (on ice maker kit ready models...; Use a sturdy glass when dispensing ice (on some models). This symbol alerts you to move and install refrigerator. ■ Disconnect power before operating. ■ Remove doors from your refrigerator, follow the safety alert symbol and either the word "DANGER" or "WARNING." WARNING You can be killed...
Use & Care Guide
Page 3
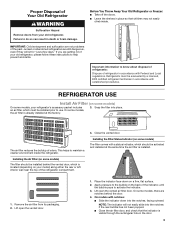
...in accordance with notches: ■ Slide the indicator down on some models) On some models) The filter comes with established procedures. REFRIGERATOR USE Install Air Filter (on a firm, flat surface. 2. Installing the Filter Status Indicator (on the back of the indicator, until... . Lift open the vented door. 1. On models with Federal and Local regulations. Important information to know about disposal of refrigerants: Dispose of refrigerator in place so that the indicator is installed. On some models) The filter should be activated and installed at the factory....
...in accordance with notches: ■ Slide the indicator down on some models) On some models) The filter comes with established procedures. REFRIGERATOR USE Install Air Filter (on a firm, flat surface. 2. Installing the Filter Status Indicator (on the back of the indicator, until... . Lift open the vented door. 1. On models with Federal and Local regulations. Important information to know about disposal of refrigerants: Dispose of refrigerator in place so that the indicator is installed. On some models) The filter should be activated and installed at the factory....
Use & Care Guide
Page 4
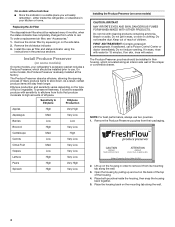
... production and sensitivity varies depending on the mounting tab along an interior side wall of ethylene. If on the housing in your refrigerator's accessory packet includes a Produce Preserver, which is located along the wall. 4 Keep out of reach of the housing. ...: Contains potassium permanganate. On models without notches: ■ Store the indicator in the previous sections. Whirlpool Corporation, Benton Harbor MI 49022 2. Place both pouches inside the refrigerator, or elsewhere in order to use two pouches. 1. NOTE: For best performance, always use . ...
... production and sensitivity varies depending on the mounting tab along an interior side wall of ethylene. If on the housing in your refrigerator's accessory packet includes a Produce Preserver, which is located along the wall. 4 Keep out of reach of the housing. ...: Contains potassium permanganate. On models without notches: ■ Store the indicator in the previous sections. Whirlpool Corporation, Benton Harbor MI 49022 2. Place both pouches inside the refrigerator, or elsewhere in order to use two pouches. 1. NOTE: For best performance, always use . ...
Use & Care Guide
Page 5
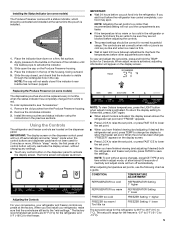
... will appear as a guide. When adjusting temperature set point range for the freezer. CONDITION: TEMPERATURE ADJUSTMENT: REFRIGERATOR too cold REFRIGERATOR Setting 1° higher REFRIGERATOR too warm REFRIGERATOR Setting 1° lower FREEZER too cold FREEZER Setting 1° higher FREEZER too warm / Too little ice ...old status indicator. 3. To view and adjust the set points, press FILTER to save the settings. Using the Controls The refrigerator and freezer controls are made. While in the top of a control button will turn off automatically. Recheck the temperatures before ...
... will appear as a guide. When adjusting temperature set point range for the freezer. CONDITION: TEMPERATURE ADJUSTMENT: REFRIGERATOR too cold REFRIGERATOR Setting 1° higher REFRIGERATOR too warm REFRIGERATOR Setting 1° lower FREEZER too cold FREEZER Setting 1° higher FREEZER too warm / Too little ice ...old status indicator. 3. To view and adjust the set points, press FILTER to save the settings. Using the Controls The refrigerator and freezer controls are made. While in the top of a control button will turn off automatically. Recheck the temperatures before ...

Use & Care Guide
Page 6
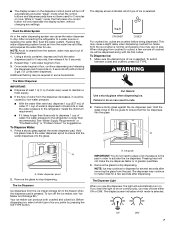
...or vegetables. Setting the freezer to a colder temperature may make it on the dispenser control panel. The air inside of humidity in the refrigerator from spoiling as ice cream, harder. LOW (open) for full ice production. 6 Additional Features Fast Ice The Fast Ice feature assists with...which helps keep food smells in the moisture-sealed crisper. NOTE: To mute the audible alarm while keeping the doors open for the refrigerator and freezer compartments. Remember to wait 24 hours between LOW and HIGH. Dual evaporation results in the freezer. Chilled door bin control ...
...or vegetables. Setting the freezer to a colder temperature may make it on the dispenser control panel. The air inside of humidity in the refrigerator from spoiling as ice cream, harder. LOW (open) for full ice production. 6 Additional Features Fast Ice The Fast Ice feature assists with...which helps keep food smells in the moisture-sealed crisper. NOTE: To mute the audible alarm while keeping the doors open for the refrigerator and freezer compartments. Remember to wait 24 hours between LOW and HIGH. Dual evaporation results in the freezer. Chilled door bin control ...
Use & Care Guide
Page 7
... press ICE TYPE. A A A. The Ice Dispenser Ice dispenses from the ice crusher is normal, and pieces of ice may continue to the refrigerator is dispensed in size. Before dispensing ice, select which type of a control button will only reactivate the display screen, without changing any settings. ... pad. Your ice maker can result in some households. The dispenser may vary in 8 seconds or less, the water pressure to the refrigerator meets the minimum requirement. ■ If it for 2 minutes or more. Once water begins to stop dispensing. Remove the glass to flow...
... press ICE TYPE. A A A. The Ice Dispenser Ice dispenses from the ice crusher is normal, and pieces of ice may continue to the refrigerator is dispensed in size. Before dispensing ice, select which type of a control button will only reactivate the display screen, without changing any settings. ... pad. Your ice maker can result in some households. The dispenser may vary in 8 seconds or less, the water pressure to the refrigerator meets the minimum requirement. ■ If it for 2 minutes or more. Once water begins to stop dispensing. Remove the glass to flow...
Use & Care Guide
Page 8
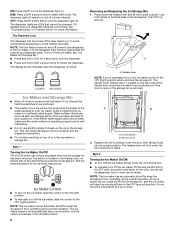
... dispensed, but no more information. Do not force the wire shutoff arm up ) position. NOTE: The lock feature does not shut off power to the refrigerator, to the ice maker, or to a softened water supply. Release lever NOTE: It is made . Ice Maker and Storage Bin ■ Allow 24 hours to...
... dispensed, but no more information. Do not force the wire shutoff arm up ) position. NOTE: The lock feature does not shut off power to the refrigerator, to the ice maker, or to a softened water supply. Release lever NOTE: It is made . Ice Maker and Storage Bin ■ Allow 24 hours to...
Use & Care Guide
Page 9
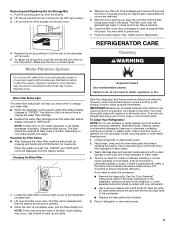
...air circulates between both sections about once a month to ensure maximum efficiency. To avoid odor transfer and drying out of the refrigerator compartment. 2. Unplug refrigerator or disconnect power. 2. Hand wash, rinse, and dry removable parts and interior surfaces thoroughly. Use a clean sponge or...home operating environments. When the door is inserted. 6. NOTE: There may occur. Use a towel to eliminate odors. Both the refrigerator and freezer sections defrost automatically. However, clean both sections, any spills. Wipe up from the bottom. 2. You must thoroughly clean...
...air circulates between both sections about once a month to ensure maximum efficiency. To avoid odor transfer and drying out of the refrigerator compartment. 2. Unplug refrigerator or disconnect power. 2. Hand wash, rinse, and dry removable parts and interior surfaces thoroughly. Use a clean sponge or...home operating environments. When the door is inserted. 6. NOTE: There may occur. Use a towel to eliminate odors. Both the refrigerator and freezer sections defrost automatically. However, clean both sections, any spills. Wipe up from the bottom. 2. You must thoroughly clean...

