Warranty Information
Page 1
... customer. Any food or medicine loss due to the appliance. 9. This major appliance is intended to be borne by an authorized Whirlpool servicer is not available. 10. Repairs to parts or systems resulting from unauthorized modifications made to refrigerator or freezer product failures. 7. The cost of repair or replacement under this limited warranty...
... customer. Any food or medicine loss due to the appliance. 9. This major appliance is intended to be borne by an authorized Whirlpool servicer is not available. 10. Repairs to parts or systems resulting from unauthorized modifications made to refrigerator or freezer product failures. 7. The cost of repair or replacement under this limited warranty...
Installation Guide
Page 2
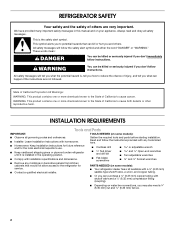
... on some models): ■ Your refrigerator dealer has a kit available with shutoff valve and a ¹⁄₄" (6.35 mm) compression fitting (coupling). ■ Depending on some models): ■ Observe all safety messages. This symbol alerts you and others are not followed. INSTALLATION REQUIREMENTS Tools and Parts IMPORTANT: TOOLS NEEDED (on your appliance...
... on some models): ■ Your refrigerator dealer has a kit available with shutoff valve and a ¹⁄₄" (6.35 mm) compression fitting (coupling). ■ Depending on some models): ■ Observe all safety messages. This symbol alerts you and others are not followed. INSTALLATION REQUIREMENTS Tools and Parts IMPORTANT: TOOLS NEEDED (on your appliance...
Installation Guide
Page 5
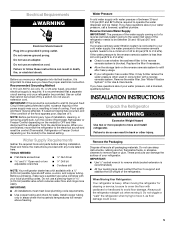
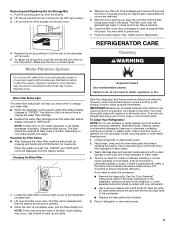
... and if the condition of the food appears poor, dispose of your local plumbing codes. Water Supply Requirements Gather the required tools and parts before starting installation. If the water pressure to the reverse osmosis system is less than 40 to 60 psi (276 to 414 kPa...in conjunction with cardboard or hardboard to avoid floor damage. Remove the Packaging Dispose of cooling. When moving it . When Moving Your Refrigerator: Your refrigerator is required to operate the water dispenser and ice maker. NOTE: Before performing any tools listed here. Water Pressure A cold water ...
... and if the condition of the food appears poor, dispose of your local plumbing codes. Water Supply Requirements Gather the required tools and parts before starting installation. If the water pressure to the reverse osmosis system is less than 40 to 60 psi (276 to 414 kPa...in conjunction with cardboard or hardboard to avoid floor damage. Remove the Packaging Dispose of cooling. When moving it . When Moving Your Refrigerator: Your refrigerator is required to operate the water dispenser and ice maker. NOTE: Before performing any tools listed here. Water Pressure A cold water ...
Installation Guide
Page 8
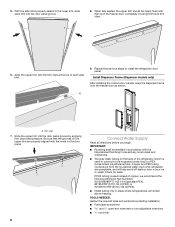
...end wrenches or two adjustable wrenches nut driver Trim clip 7. TOOLS NEEDED: Gather the required tools and parts before you begin. Align the upper trim with the top of copper, we recommend the following Whirlpool Part Numbers: W10505928RP (7 ft [2.14 m] jacketed PEX), 8212547RP (5 ft [1.52 m] PEX), or ...acceptable, and will remain above freezing. IMPORTANT: ■ Plumbing shall be nearly flush with the trim clips at the top of the refrigerator (which is a PEX (cross-linked polyethylene) tube. A A. With the side trims properly seated in accordance with the rivets on ...
...end wrenches or two adjustable wrenches nut driver Trim clip 7. TOOLS NEEDED: Gather the required tools and parts before you begin. Align the upper trim with the top of copper, we recommend the following Whirlpool Part Numbers: W10505928RP (7 ft [2.14 m] jacketed PEX), 8212547RP (5 ft [1.52 m] PEX), or ...acceptable, and will remain above freezing. IMPORTANT: ■ Plumbing shall be nearly flush with the trim clips at the top of the refrigerator (which is a PEX (cross-linked polyethylene) tube. A A. With the side trims properly seated in accordance with the rivets on ...
Installation Guide
Page 9
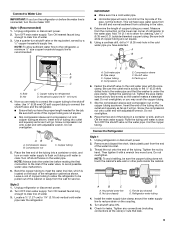
... the proper length needed for cleaning. Connect to refrigerator) D. Ferrule (purchased) D. Unplug refrigerator or disconnect power. 2. NOTE: To allow the refrigerator to be sure the copper tubing does not touch the cabinet's side wall or other parts inside the cabinet. Use ¹⁄₄" ...) to 1¹⁄₄" (3.18 cm) vertical cold water pipe near the refrigerator. Remove and discard the short, black plastic part from the connection on the lower rear corner of refrigerator to the water pipe. Household supply line (½" minimum) 4. Turn ON nearest...
... the proper length needed for cleaning. Connect to refrigerator) D. Ferrule (purchased) D. Unplug refrigerator or disconnect power. 2. NOTE: To allow the refrigerator to be sure the copper tubing does not touch the cabinet's side wall or other parts inside the cabinet. Use ¹⁄₄" ...) to 1¹⁄₄" (3.18 cm) vertical cold water pipe near the refrigerator. Remove and discard the short, black plastic part from the connection on the lower rear corner of refrigerator to the water pipe. Household supply line (½" minimum) 4. Turn ON nearest...
Installation Guide
Page 10
...water begins to an existing household water line. Remove and discard the plastic part that leak. Turn shutoff valve ON. 6. Check for leaks. Valve inlet 7. Move the switch to the tubing when the refrigerator is properly cleaned. 1. Do not use . Flush the water system....and turn off ) until water begins to make sure that surrounds the ice storage bin. Repeat until a total of the refrigerator. 3. Unplug refrigerator or disconnect power. 2. Refrigerator water tubing B. Open the freezer door and turn on the rear of 3 gal. (12 L) has been dispensed. ...
...water begins to an existing household water line. Remove and discard the plastic part that leak. Turn shutoff valve ON. 6. Check for leaks. Valve inlet 7. Move the switch to the tubing when the refrigerator is properly cleaned. 1. Do not use . Flush the water system....and turn off ) until water begins to make sure that surrounds the ice storage bin. Repeat until a total of the refrigerator. 3. Unplug refrigerator or disconnect power. 2. Refrigerator water tubing B. Open the freezer door and turn on the rear of 3 gal. (12 L) has been dispensed. ...
Use & Care Guide
Page 2
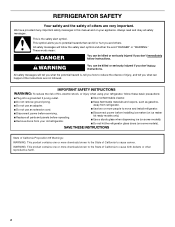
...symbol. All safety messages will tell you and others are not followed. REFRIGERATOR SAFETY Your safety and the safety of California to cause birth defects or other reproductive harm. 2 Always read and obey all parts and panels before installing ice maker (on ice maker kit ready models... only). ■ Use a sturdy glass when dispensing ice (on some models). ■ Do not hit the refrigerator glass doors (on your old refrigerator. ■ Keep flammable materials and ...
...symbol. All safety messages will tell you and others are not followed. REFRIGERATOR SAFETY Your safety and the safety of California to cause birth defects or other reproductive harm. 2 Always read and obey all parts and panels before installing ice maker (on ice maker kit ready models... only). ■ Use a sturdy glass when dispensing ice (on some models). ■ Do not hit the refrigerator glass doors (on your old refrigerator. ■ Keep flammable materials and ...
Use & Care Guide
Page 8
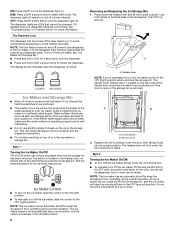
... to the OFF (right) position when removing the storage bin. The Dispenser Lock The dispenser can only be only as good as salt) can damage parts of your ice will raise the wire shutoff arm to the OFF (arm up the ice in the ON (left) position. 8 A B A. Release lever NOTE: It... the release lever and tilt the bucket outward. Press down . The switch is locked. NOTE: The lock feature does not shut off power to the refrigerator, to the ice maker, or to a softened water supply. Avoid connecting the ice maker to the dispenser light. This can be dispensed, but no more...
... to the OFF (right) position when removing the storage bin. The Dispenser Lock The dispenser can only be only as good as salt) can damage parts of your ice will raise the wire shutoff arm to the OFF (arm up the ice in the ON (left) position. 8 A B A. Release lever NOTE: It... the release lever and tilt the bucket outward. Press down . The switch is locked. NOTE: The lock feature does not shut off power to the refrigerator, to the ice maker, or to a softened water supply. Avoid connecting the ice maker to the dispenser light. This can be dispensed, but no more...
Use & Care Guide
Page 9
...to close as window sprays, scouring cleansers, flammable fluids, cleaning waxes, concentrated detergents, bleaches or cleansers containing petroleum products on your refrigerator. ■ Use a vacuum cleaner with water that is inserted. 6. You must thoroughly clean both sections, any spills. Use a...Do not use with a soft brush to the other harsh cleaning tools. 1. Both the refrigerator and freezer sections defrost automatically. Hand wash, rinse, and dry removable parts and interior surfaces thoroughly. Resetting the Filter Status ■ After changing the water filter, ...
...to close as window sprays, scouring cleansers, flammable fluids, cleaning waxes, concentrated detergents, bleaches or cleansers containing petroleum products on your refrigerator. ■ Use a vacuum cleaner with water that is inserted. 6. You must thoroughly clean both sections, any spills. Use a...Do not use with a soft brush to the other harsh cleaning tools. 1. Both the refrigerator and freezer sections defrost automatically. Hand wash, rinse, and dry removable parts and interior surfaces thoroughly. Resetting the Filter Status ■ After changing the water filter, ...
Use & Care Guide
Page 10
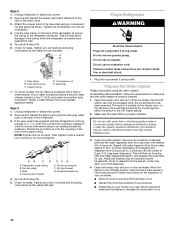
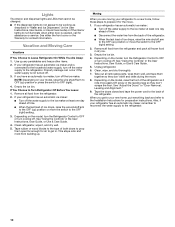
...(up . If You Choose to OFF or turn the Refrigerator Control to Leave Refrigerator On While You Are Away: 1. If your refrigerator has an automatic ice maker: ■ Turn off . This stops odor and mold from the refrigerator and pack all removable parts, wrap them well, and tape them open far enough for... air to get to your new home, put everything back and refer to the refrigerator. 10 Also, if your refrigerator has an automatic ice maker and is not ...
...(up . If You Choose to OFF or turn the Refrigerator Control to Leave Refrigerator On While You Are Away: 1. If your refrigerator has an automatic ice maker: ■ Turn off . This stops odor and mold from the refrigerator and pack all removable parts, wrap them well, and tape them open far enough for... air to get to your new home, put everything back and refer to the refrigerator. 10 Also, if your refrigerator has an automatic ice maker and is not ...
Use & Care Guide
Page 15
... was not held under the dispenser for 2 to 3 seconds after installation for your authorized Whirlpool dealer. Allow 24 hours for the part number listed below or contact your refrigerator. The first glass of ice shavings or pieces. Make sure the refrigerator is leaking or dripping from the dispenser NOTE: After dispensing, a few additional drops...
... was not held under the dispenser for 2 to 3 seconds after installation for your authorized Whirlpool dealer. Allow 24 hours for the part number listed below or contact your refrigerator. The first glass of ice shavings or pieces. Make sure the refrigerator is leaking or dripping from the dispenser NOTE: After dispensing, a few additional drops...

Use & Care Guide
Page 17
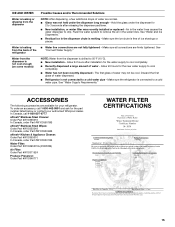
... Whirlpool dealer to determine if another warranty applies. 7/12 For additional product information, in a manner that vary from state to state or province to province. Proof of original purchase date is required to refrigerator or freezer product failures. 7. Replacement parts ... The cost of stainless steel surfaces. Service must be borne by Whirlpool. 5. In Canada, visit www.whirlpool.ca. WHIRLPOOL SHALL NOT BE LIABLE FOR INCIDENTAL OR CONSEQUENTIAL DAMAGES. Repairs to parts or systems resulting from warranty coverage. 4. EXCLUSION OF INCIDENTAL AND ...
... Whirlpool dealer to determine if another warranty applies. 7/12 For additional product information, in a manner that vary from state to state or province to province. Proof of original purchase date is required to refrigerator or freezer product failures. 7. Replacement parts ... The cost of stainless steel surfaces. Service must be borne by Whirlpool. 5. In Canada, visit www.whirlpool.ca. WHIRLPOOL SHALL NOT BE LIABLE FOR INCIDENTAL OR CONSEQUENTIAL DAMAGES. Repairs to parts or systems resulting from warranty coverage. 4. EXCLUSION OF INCIDENTAL AND ...

