Warranty Information
Page 1
... labor to correct product damage or defects caused by Whirlpool. 7. In the U.S. Repairs to parts or systems to correct defects in remote locations where an authorized Whirlpool servicer is provided exclusively by the customer. Service or parts for the remaining term of original purchase date is ... TO ONE YEAR OR THE SHORTEST PERIOD ALLOWED BY LAW. Before contacting us to arrange service, please determine whether your authorized Whirlpool dealer to Whirlpool within 30 days. 9. Please take a few minutes to review the Troubleshooting or Problem Solver section of the Use and Care...
... labor to correct product damage or defects caused by Whirlpool. 7. In the U.S. Repairs to parts or systems to correct defects in remote locations where an authorized Whirlpool servicer is provided exclusively by the customer. Service or parts for the remaining term of original purchase date is ... TO ONE YEAR OR THE SHORTEST PERIOD ALLOWED BY LAW. Before contacting us to arrange service, please determine whether your authorized Whirlpool dealer to Whirlpool within 30 days. 9. Please take a few minutes to review the Troubleshooting or Problem Solver section of the Use and Care...
Use & Care Guide
Page 2
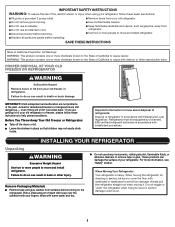
... or abandoned freezers or refrigerators are not problems of the past. Wipe with cardboard or hardboard to cause birth defects or other injury. Replace all parts and panels before operating. Refrigerants must be sure to cover the floor with warm water and dry. PROPER DISPOSAL OF YOUR OLD FREEZER OR REFRIGERATOR...
... or abandoned freezers or refrigerators are not problems of the past. Wipe with cardboard or hardboard to cause birth defects or other injury. Replace all parts and panels before operating. Refrigerants must be sure to cover the floor with warm water and dry. PROPER DISPOSAL OF YOUR OLD FREEZER OR REFRIGERATOR...

Use & Care Guide
Page 4
... of the opening, you may be reversed if door swing is reversed. 1. Do not remove ground prong. Failure to refrigerator. 4 Remove the parts for the bottom hinge as shown and tighten screws. See "Using the Control." 3. Before you are ready to move the refrigerator into the handle...lower hinge and cabinet and set aside. 5. To Replace the Handle: 1. Tighten the upper and lower setscrews with the hex key provided. Replace the parts for the top hinge as shown in death, fire, or electrical shock. Final Steps WARNING Electrical Shock Hazard Plug into a grounded 3 prong outlet. ...
... of the opening, you may be reversed if door swing is reversed. 1. Do not remove ground prong. Failure to refrigerator. 4 Remove the parts for the bottom hinge as shown and tighten screws. See "Using the Control." 3. Before you are ready to move the refrigerator into the handle...lower hinge and cabinet and set aside. 5. To Replace the Handle: 1. Tighten the upper and lower setscrews with the hex key provided. Replace the parts for the top hinge as shown in death, fire, or electrical shock. Final Steps WARNING Electrical Shock Hazard Plug into a grounded 3 prong outlet. ...
Use & Care Guide
Page 8
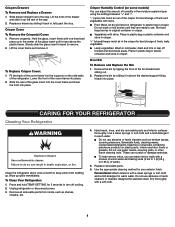
...the glass insert forward to keep berries in original container in the moisture-sealed crisper using the settings between "+" and "-". Remove all removable parts from building up spills immediately. Do not use abrasive or harsh cleaners such as shelves, crispers, etc. 4. Hold the glass, insert..., drain and trim or tear off cooling. 2. Lift the cover frame and remove it out the rest of water). 5. Replace removable parts. 6. Unplug refrigerator or disconnect power. 3. Do not use paper towels, scouring pads, or other harsh cleaning tools. Remove crisper(s). Sort...
...the glass insert forward to keep berries in original container in the moisture-sealed crisper using the settings between "+" and "-". Remove all removable parts from building up spills immediately. Do not use abrasive or harsh cleaners such as shelves, crispers, etc. 4. Hold the glass, insert..., drain and trim or tear off cooling. 2. Lift the cover frame and remove it out the rest of water). 5. Replace removable parts. 6. Unplug refrigerator or disconnect power. 3. Do not use paper towels, scouring pads, or other harsh cleaning tools. Remove crisper(s). Sort...
Use & Care Guide
Page 9
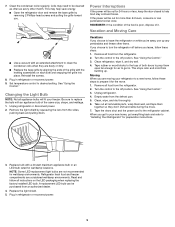
... home, put everything back and refer to the refrigerator cabinet. Turn the control to desired setting. See "Using the Control." 3. Read and follow all removable parts, wrap them well, and tape them open far enough for wet/damp locations. Replace the light shield. 5. See "Using the Control." 3. Set temperature control to...
... home, put everything back and refer to the refrigerator cabinet. Turn the control to desired setting. See "Using the Control." 3. Read and follow all removable parts, wrap them well, and tape them open far enough for wet/damp locations. Replace the light shield. 5. See "Using the Control." 3. Set temperature control to...

Use & Care Guide
Page 12
... your product requires repair. and Canada, direct all requests for in materials and workmanship and is provided exclusively by a Whirlpool designated service company. YOUR SOLE AND EXCLUSIVE REMEDY UNDER THIS LIMITED WARRANTY SHALL BE PRODUCT REPAIR AS PROVIDED HEREIN. light bulbs... from natural gas or L.P. Consumable parts (i.e. Repairs to parts or systems to province. 1/14 12 Service or parts for Factory Specified Replacement Parts and repair labor to determine whether another warranty applies. If you call 1-800-807-6777. WHIRLPOOL SHALL NOT BE LIABLE FOR INCIDENTAL...
... your product requires repair. and Canada, direct all requests for in materials and workmanship and is provided exclusively by a Whirlpool designated service company. YOUR SOLE AND EXCLUSIVE REMEDY UNDER THIS LIMITED WARRANTY SHALL BE PRODUCT REPAIR AS PROVIDED HEREIN. light bulbs... from natural gas or L.P. Consumable parts (i.e. Repairs to parts or systems to province. 1/14 12 Service or parts for Factory Specified Replacement Parts and repair labor to determine whether another warranty applies. If you call 1-800-807-6777. WHIRLPOOL SHALL NOT BE LIABLE FOR INCIDENTAL...


