Energy Guide
Page 1
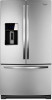
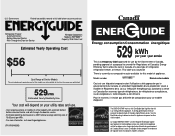
... ce modéle d'appareil. The ENERGY STAR® mark on There is an energy-efficient appliance. Canada Refrigerator-Freezer ·Automatic Defrost ·Bottom Mounted Freezer ·With Through-the-Door-Ice Service Whirlpool Corporation Model(s):WRF989S*** Capacity: 28.6 Cubic Feet Estimated Yearly Operating Cost $56 Cost Range of Similar Models...
... ce modéle d'appareil. The ENERGY STAR® mark on There is an energy-efficient appliance. Canada Refrigerator-Freezer ·Automatic Defrost ·Bottom Mounted Freezer ·With Through-the-Door-Ice Service Whirlpool Corporation Model(s):WRF989S*** Capacity: 28.6 Cubic Feet Estimated Yearly Operating Cost $56 Cost Range of Similar Models...
Use & Care Guide
Page 1
W H I R L P O O L . FRENCH DOOR BOTTOM MOUNT REFRIGERATOR USE & CARE GUIDE W W W. C O M U.S.: 1-800-253-1301 W10417001B W W W. C A CANADA: 1-800-807-6777 W H I R L P O O L .
W H I R L P O O L . FRENCH DOOR BOTTOM MOUNT REFRIGERATOR USE & CARE GUIDE W W W. C O M U.S.: 1-800-253-1301 W10417001B W W W. C A CANADA: 1-800-807-6777 W H I R L P O O L .
Use & Care Guide
Page 2
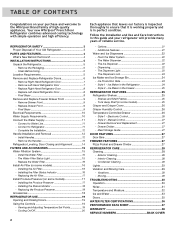
... that it is working properly and is inspected thoroughly to the Whirlpool Brand family of high-quality appliances. The Dispenser Light 23 - Ice Maker in the Freezer 25 REFRIGERATOR FEATURES 25 Refrigerator Shelves 25 - Style 2 - Style 1 - Drawer Divider ... Guide 27 DOOR FEATURES 27 Door Bins 27 FREEZER FEATURES 27 Pizza Pocket and Drawer Divider 27 REFRIGERATOR CARE 28 Cleaning 28 - Exterior Cleaning 28 - Options 21 - Your new Whirlpool® French Door Refrigerator combines advanced cooling technology with simple operation and high efficiency. TA B L E O F C...
... that it is working properly and is inspected thoroughly to the Whirlpool Brand family of high-quality appliances. The Dispenser Light 23 - Ice Maker in the Freezer 25 REFRIGERATOR FEATURES 25 Refrigerator Shelves 25 - Style 2 - Style 1 - Drawer Divider ... Guide 27 DOOR FEATURES 27 Door Bins 27 FREEZER FEATURES 27 Pizza Pocket and Drawer Divider 27 REFRIGERATOR CARE 28 Cleaning 28 - Exterior Cleaning 28 - Options 21 - Your new Whirlpool® French Door Refrigerator combines advanced cooling technology with simple operation and high efficiency. TA B L E O F C...
Use & Care Guide
Page 3
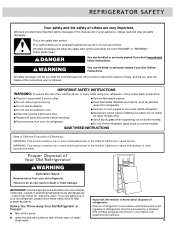
...when dispensing ice (on some models). IMPORTANT SAFETY INSTRUCTIONS WARNING: To reduce the risk of fire, electric shock, or injury when using your refrigerator, follow these basic precautions: ■ Plug into a grounded 3 prong outlet. ■ Use nonflammable cleaner. ■ Do not remove ...power before servicing. ■ Replace all safety messages. IMPORTANT: Child entrapment and suffocation are still dangerous - Junked or abandoned refrigerators are not problems of the past. We have provided many important safety messages in accordance with Federal and Local regulations. All ...
...when dispensing ice (on some models). IMPORTANT SAFETY INSTRUCTIONS WARNING: To reduce the risk of fire, electric shock, or injury when using your refrigerator, follow these basic precautions: ■ Plug into a grounded 3 prong outlet. ■ Use nonflammable cleaner. ■ Do not remove ...power before servicing. ■ Replace all safety messages. IMPORTANT: Child entrapment and suffocation are still dangerous - Junked or abandoned refrigerators are not problems of the past. We have provided many important safety messages in accordance with Federal and Local regulations. All ...
Use & Care Guide
Page 4
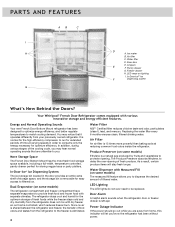
... indicator will stay fresh longer. Water Dispenser with separate climates. Pantry drawer G. LED ramp-on some models) The refrigerator compartment and freezer compartment have separate evaporators to dispense the desired amount of filtered water. Air Filter An air filter...C I ), lead, and mercury. Door bins E. In-Door-Ice® ice F dispensing system What's New Behind the Doors? Your Whirlpool® French Door Refrigerator comes equipped with dry freezer air, so frost is eliminated. 4 Water Filter NSF® Certified filter reduces chlorine taste and odor, particulates ...
... indicator will stay fresh longer. Water Dispenser with separate climates. Pantry drawer G. LED ramp-on some models) The refrigerator compartment and freezer compartment have separate evaporators to dispense the desired amount of filtered water. Air Filter An air filter...C I ), lead, and mercury. Door bins E. In-Door-Ice® ice F dispensing system What's New Behind the Doors? Your Whirlpool® French Door Refrigerator comes equipped with dry freezer air, so frost is eliminated. 4 Water Filter NSF® Certified filter reduces chlorine taste and odor, particulates ...
Use & Care Guide
Page 5
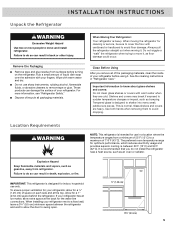
...and dry. ■ Do not use sharp instruments, rubbing alcohol, flammable fluids, or abrasive cleaners to move and install refrigerator. Wipe with your refrigerator. This is recommended that you remove all packaging materials. Explosion Hazard Keep flammable materials and vapors, such as an oven ... can result in death, explosion, or fire. It is normal. Important information to a maximum of 110°F (43°C). When installing your refrigerator next to a fixed wall, leave a 3³⁄₄" (9.5 cm) minimum space between 60°F (15°C) and 90°F (32...
...and dry. ■ Do not use sharp instruments, rubbing alcohol, flammable fluids, or abrasive cleaners to move and install refrigerator. Wipe with your refrigerator. This is recommended that you remove all packaging materials. Explosion Hazard Keep flammable materials and vapors, such as an oven ... can result in death, explosion, or fire. It is normal. Important information to a maximum of 110°F (43°C). When installing your refrigerator next to a fixed wall, leave a 3³⁄₄" (9.5 cm) minimum space between 60°F (15°C) and 90°F (32...
Use & Care Guide
Page 6
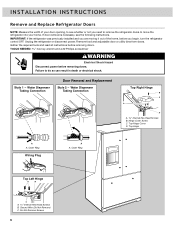
... Right Hinge B C A D A Internal Hex-Head Screws B. Outer Ring Top Left Hinge A B C A Internal Hex-Head Screws B. Unplug the refrigerator or disconnect power. Failure to do so can result in death or electrical shock. Outer Ring Wiring Plug A A. Remove food and adjustable door or utility... bins from doors. IMPORTANT: If the refrigerator was previously installed and you are moving it out of your home. Hinge Cover Screw C. Do Not Remove Screws 6 Style 1 - Ground...
... Right Hinge B C A D A Internal Hex-Head Screws B. Outer Ring Top Left Hinge A B C A Internal Hex-Head Screws B. Unplug the refrigerator or disconnect power. Failure to do so can result in death or electrical shock. Outer Ring Wiring Plug A A. Remove food and adjustable door or utility... bins from doors. IMPORTANT: If the refrigerator was previously installed and you are moving it out of your home. Hinge Cover Screw C. Do Not Remove Screws 6 Style 1 - Ground...
Use & Care Guide
Page 7
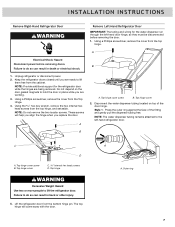
... Top hinge cover screw B. Failure to the left -hand door hinge, so they must be disconnected before removing doors. Lift the refrigerator door from the Top Hinge. 4. Top hinge cover 2. A Electrical Shock Hazard Disconnect power before removing the door. 1. Disconnect the... the door in death or electrical shock. 1. C D A. INSTALLATION INSTRUCTIONS Remove Right-Hand Refrigerator Door WARNING Remove Left-Hand Refrigerator Door IMPORTANT: The tubing and wiring for the refrigerator door while the hinges are being removed. Using a Phillips screwdriver, remove the cover from the...
... Top hinge cover screw B. Failure to the left -hand door hinge, so they must be disconnected before removing doors. Lift the refrigerator door from the Top Hinge. 4. Top hinge cover 2. A Electrical Shock Hazard Disconnect power before removing the door. 1. Disconnect the... the door in death or electrical shock. 1. C D A. INSTALLATION INSTRUCTIONS Remove Right-Hand Refrigerator Door WARNING Remove Left-Hand Refrigerator Door IMPORTANT: The tubing and wiring for the refrigerator door while the hinges are being removed. Using a Phillips screwdriver, remove the cover from the...
Use & Care Guide
Page 8
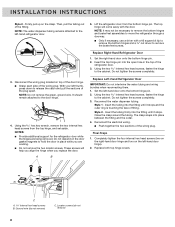
...) C. INSTALLATION INSTRUCTIONS Style 2 - NOTE: The water dispenser tubing remains attached to hold the door in the top of fitting. Replace Right-Hand Refrigerator Door 1. Using the two internal hex head screws, fasten the hinge to the door hinge. 4. It should remain attached to the cabinet. Do ... the water dispenser tubing. Insert the tubing into place between the fitting and the collar. 4. Firmly pull up on the left -hand refrigerator door. 5. NOTE: It may not be necessary to remove the bottom hinges and brake feet assemblies to remove the brake feet screws. Do...
...) C. INSTALLATION INSTRUCTIONS Style 2 - NOTE: The water dispenser tubing remains attached to hold the door in the top of fitting. Replace Right-Hand Refrigerator Door 1. Using the two internal hex head screws, fasten the hinge to the door hinge. 4. It should remain attached to the cabinet. Do ... the water dispenser tubing. Insert the tubing into place between the fitting and the collar. 4. Firmly pull up on the left -hand refrigerator door. 5. NOTE: It may not be necessary to remove the bottom hinges and brake feet assemblies to remove the brake feet screws. Do...
Use & Care Guide
Page 9
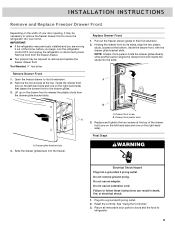
... 3 prong outlet. Holding the drawer front by its full extension. 2. Drawer glide bracket slots 4. See "Using the Control(s)." 3. Open the freezer drawer to refrigerator. 9 Slide the drawer glides back into the slots. A. Replace and tighten the two screws at the bottom, inside the drawer front (one on the left...freezer drawer front to their full extension. 2. Lift up on the width of your home. Pull out the freezer drawer glides to move the refrigerator into your door opening, it out of the drawer front (one on the left -hand side and one on the right-hand side). ...
... 3 prong outlet. Holding the drawer front by its full extension. 2. Drawer glide bracket slots 4. See "Using the Control(s)." 3. Open the freezer drawer to refrigerator. 9 Slide the drawer glides back into the slots. A. Replace and tighten the two screws at the bottom, inside the drawer front (one on the left...freezer drawer front to their full extension. 2. Lift up on the width of your home. Pull out the freezer drawer glides to move the refrigerator into your door opening, it out of the drawer front (one on the left -hand side and one on the right-hand side). ...
Use & Care Guide
Page 10
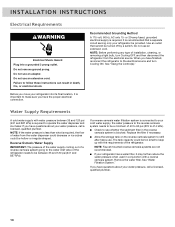
... Osmosis Water Supply IMPORTANT: The pressure of the water supply coming out of a reverse osmosis system going to the water inlet valve of the refrigerator needs to keep up with the requirements of water from the electrical source. NOTE: Faucet mounted reverse osmosis systems are not recommended. ■ If...between 35 and 120 psi (241 and 827 kPa). Failure to operate the water dispenser and ice maker. Before you have questions about your refrigerator has a water filter, it is important to refill after heavy use an adapter. It is recommended that cannot be too small to be ...
... Osmosis Water Supply IMPORTANT: The pressure of the water supply coming out of a reverse osmosis system going to the water inlet valve of the refrigerator needs to keep up with the requirements of water from the electrical source. NOTE: Faucet mounted reverse osmosis systems are not recommended. ■ If...between 35 and 120 psi (241 and 827 kPa). Failure to operate the water dispenser and ice maker. Before you have questions about your refrigerator has a water filter, it is important to refill after heavy use an adapter. It is recommended that cannot be too small to be ...
Use & Care Guide
Page 11
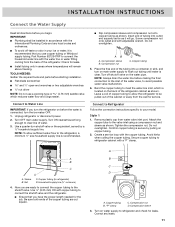
... supply line (½" minimum) 4. A B C D A. Turn ON nearest faucet long enough to avoid possible water valve malfunction. 6. Connect to Refrigerator Follow the connection instructions specific to the valve inlet using a compression nut and sleeve as it is secure by a ¹⁄₂" household supply ... screwdriver and ¹⁄₂" open-end wrenches or two adjustable wrenches nut driver NOTE: Do not use copper tubing or Whirlpool supply tubing, Part Number 8212547RP to flush out tubing until water is connected, turn shutoff valve or the equivalent, served by ...
... supply line (½" minimum) 4. A B C D A. Turn ON nearest faucet long enough to avoid possible water valve malfunction. 6. Connect to Refrigerator Follow the connection instructions specific to the valve inlet using a compression nut and sleeve as it is secure by a ¹⁄₂" household supply ... screwdriver and ¹⁄₂" open-end wrenches or two adjustable wrenches nut driver NOTE: Do not use copper tubing or Whirlpool supply tubing, Part Number 8212547RP to flush out tubing until water is connected, turn shutoff valve or the equivalent, served by ...
Use & Care Guide
Page 12
...tighten it in the ¹⁄₄" (6.35 mm) water line at the valve) or nuts that the setscrews are preinstalled inside the refrigerator, and place them on the coupling. 5. Nut (purchased) C. Check for leaks. Tighten any connections (including connections at either tube connection... 24 hours to follow these instructions can result in water strainer. Install the water supply tube clamp around the water supply line to refrigerator B. Remove the handles from your water conditions require a second water strainer, install it with a built-in death, fire, or ...
...tighten it in the ¹⁄₄" (6.35 mm) water line at the valve) or nuts that the setscrews are preinstalled inside the refrigerator, and place them on the coupling. 5. Nut (purchased) C. Check for leaks. Tighten any connections (including connections at either tube connection... 24 hours to follow these instructions can result in water strainer. Install the water supply tube clamp around the water supply line to refrigerator B. Remove the handles from your water conditions require a second water strainer, install it with a built-in death, fire, or ...
Use & Care Guide
Page 13
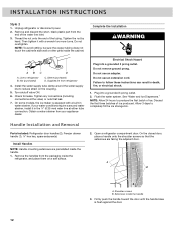
... until it begins to install the other setscrew. Save the hex key and all instructions. Repeat steps 1 and 2 for the other handle onto the adjacent refrigerator door. 9. Repeat steps 2 through 7 to contact the shoulder screw. A. Do not fully tighten. 6. Setscrews inside the handle 13 The handle is engaged in the setscrew...
... until it begins to install the other setscrew. Save the hex key and all instructions. Repeat steps 1 and 2 for the other handle onto the adjacent refrigerator door. 9. Repeat steps 2 through 7 to contact the shoulder screw. A. Do not fully tighten. 6. Setscrews inside the handle 13 The handle is engaged in the setscrew...
Use & Care Guide
Page 14
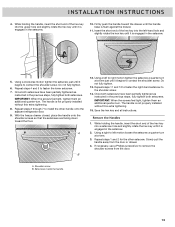
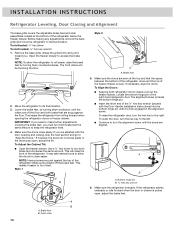
... adjust the brake feet. Use a ¹⁄₄" hex driver to close easier. If necessary, align the doors. To raise the refrigerator door, turn both refrigerator doors closed, pull out the freezer drawer. A B A. Grasp the grille firmly and pull it is steady. NOTE: To allow the ... not close easily. Style 1 ¹⁄₄" Style 2 ¹⁄₄" A A. Locate the bottom hinge pin of the right-hand refrigerator door. Make sure the doors are satisfied with the Door Handle Installation Instructions) into the bottom hinge pin until the doors are snug against the...
... adjust the brake feet. Use a ¹⁄₄" hex driver to close easier. If necessary, align the doors. To raise the refrigerator door, turn both refrigerator doors closed, pull out the freezer drawer. A B A. Grasp the grille firmly and pull it is steady. NOTE: To allow the ... not close easily. Style 1 ¹⁄₄" Style 2 ¹⁄₄" A A. Locate the bottom hinge pin of the right-hand refrigerator door. Make sure the doors are satisfied with the Door Handle Installation Instructions) into the bottom hinge pin until the doors are snug against the...
Use & Care Guide
Page 15
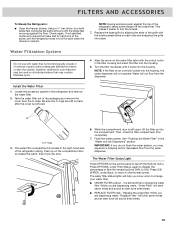
... without adequate disinfection before or after the cover is almost time to change the water filter. Take the water filter out of the refrigerator ceiling. While the compartment door is opened. Then, close the filter compartment door completely. 7. IMPORTANT: If you do not flush the... the O-rings are dispensing water, "Order Filter" will help you may contain filterable cysts. 4. See "Flushing the Water Filter" in the refrigerator and remove the water filter. 2. While you are snug against the top of filter life remaining (from the water dispenser. Locate the accessory ...
... without adequate disinfection before or after the cover is almost time to change the water filter. Take the water filter out of the refrigerator ceiling. While the compartment door is opened. Then, close the filter compartment door completely. 7. IMPORTANT: If you do not flush the... the O-rings are dispensing water, "Order Filter" will help you may contain filterable cysts. 4. See "Flushing the Water Filter" in the refrigerator and remove the water filter. 2. While you are snug against the top of filter life remaining (from the water dispenser. Locate the accessory ...
Use & Care Guide
Page 16
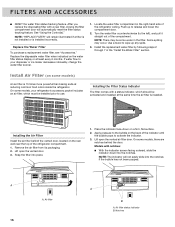
...Lift open the vented door. 3. Air filter 16 A B A. Install Air Filter (on some water in the right-hand side of the refrigerator ceiling. Apply pressure to the bubble on the rear wall near the top of the compartment. Models with a status indicator, which must be ...activated and installed at reducing common food odors inside the refrigerator. A A. Remove the air filter from its packaging. 2. On some models, your dispenser or ice maker decreases noticeably, change the water filter ...
...Lift open the vented door. 3. Air filter 16 A B A. Install Air Filter (on some water in the right-hand side of the refrigerator ceiling. Apply pressure to the bubble on the rear wall near the top of the compartment. Models with a status indicator, which must be ...activated and installed at reducing common food odors inside the refrigerator. A A. Remove the air filter from its packaging. 2. On some models, your dispenser or ice maker decreases noticeably, change the water filter ...
Use & Care Guide
Page 17
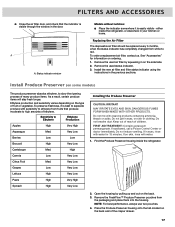
...High Very Low Installing the Produce Preserver CAUTION: IRRITANT MAY IRRITATE EYES AND SKIN. Do not breathe dust. Find the Produce Preserver housing inside the refrigerator, or elsewhere in the door. Remove the FreshFlow™ Produce Preserver pouches from fruits that the indicator is visible through the window in your kitchen... products containing ammonia, bleach or acids. Status indicator window Models without notches: ■ Place the indicator somewhere it is easily visible - either inside the refrigerator. ATTENTION IRRITANT Lisez des prudences sur le revers. 2.
...High Very Low Installing the Produce Preserver CAUTION: IRRITANT MAY IRRITATE EYES AND SKIN. Do not breathe dust. Find the Produce Preserver housing inside the refrigerator, or elsewhere in the door. Remove the FreshFlow™ Produce Preserver pouches from fruits that the indicator is visible through the window in your kitchen... products containing ammonia, bleach or acids. Status indicator window Models without notches: ■ Place the indicator somewhere it is easily visible - either inside the refrigerator. ATTENTION IRRITANT Lisez des prudences sur le revers. 2.
Use & Care Guide
Page 18
... cap will not easily close if the indicator's bubble has not been popped. To order replacements, contact us and ask for your refrigerator. Install the replacement pouches and status indicator using the instructions in the cap. Apply pressure to activate the indicator. Replacing the Produce Preserver... indicator in the top of the indicator until the bubble pops, to the bubble on ordering. 1. In the U.S.A., visit our webpage www.whirlpool.com/ accessories or call 1-800-807-6777. In Canada, visit our webpage www.whirlpoolparts.ca or call 1-800-901-2042. See "Accessories...
... cap will not easily close if the indicator's bubble has not been popped. To order replacements, contact us and ask for your refrigerator. Install the replacement pouches and status indicator using the instructions in the cap. Apply pressure to activate the indicator. Replacing the Produce Preserver... indicator in the top of the indicator until the bubble pops, to the bubble on ordering. 1. In the U.S.A., visit our webpage www.whirlpool.com/ accessories or call 1-800-807-6777. In Canada, visit our webpage www.whirlpoolparts.ca or call 1-800-901-2042. See "Accessories...
Use & Care Guide
Page 19
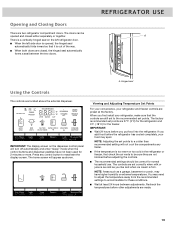
... control buttons and dispenser paddles have higher humidity or extreme temperatures. IMPORTANT: ■ Wait 24 hours before you add food before the refrigerator has cooled completely, your food may have not been used for 2 minutes or more. Hinged seal Using the Controls The controls are ... temperature is out of the way. ■ When both doors are not blocked before other adjustments are still set points are two refrigerator compartment doors. The controls are located above the external dispenser. You may need to adjust the temperature away from the recommended settings to...
... control buttons and dispenser paddles have higher humidity or extreme temperatures. IMPORTANT: ■ Wait 24 hours before you add food before the refrigerator has cooled completely, your food may have not been used for 2 minutes or more. Hinged seal Using the Controls The controls are ... temperature is out of the way. ■ When both doors are not blocked before other adjustments are still set points are two refrigerator compartment doors. The controls are located above the external dispenser. You may need to adjust the temperature away from the recommended settings to...


