Use & Care Guide
Page 1
W H I R L P O O L . C O M U.S.: 1-800-253-1301 W10417001B W W W. W H I R L P O O L . C A CANADA: 1-800-807-6777 FRENCH DOOR BOTTOM MOUNT REFRIGERATOR USE & CARE GUIDE W W W.
W H I R L P O O L . C O M U.S.: 1-800-253-1301 W10417001B W W W. W H I R L P O O L . C A CANADA: 1-800-807-6777 FRENCH DOOR BOTTOM MOUNT REFRIGERATOR USE & CARE GUIDE W W W.
Use & Care Guide
Page 2
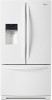
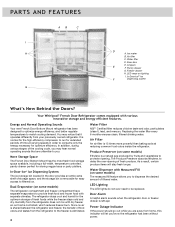
... Instructions in perfect condition. The Dispenser Light 23 - Ice Maker in the Refrigerator 24 - Drawer Removal and Replacement 27 - Your new Whirlpool® French Door Refrigerator combines advanced cooling technology with simple operation and high efficiency. Complete the Installation ... Features 21 Water and Ice Dispensers 22 - Style 1 - Manual Control 27 - Connect to Refrigerator 11 - Ice Maker in the Freezer 25 REFRIGERATOR FEATURES 25 Refrigerator Shelves 25 - The Water Filter Status Light 15 - Replacing the Air Filter 17 Install Produce ...
... Instructions in perfect condition. The Dispenser Light 23 - Ice Maker in the Refrigerator 24 - Drawer Removal and Replacement 27 - Your new Whirlpool® French Door Refrigerator combines advanced cooling technology with simple operation and high efficiency. Complete the Installation ... Features 21 Water and Ice Dispensers 22 - Style 1 - Manual Control 27 - Connect to Refrigerator 11 - Ice Maker in the Freezer 25 REFRIGERATOR FEATURES 25 Refrigerator Shelves 25 - The Water Filter Status Light 15 - Replacing the Air Filter 17 Install Produce ...
Use & Care Guide
Page 3
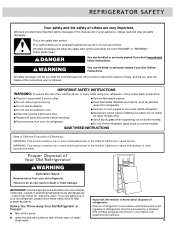
...." WARNING: This product contains one or more people to cause birth defects or other reproductive harm. Proper Disposal of California to move and install refrigerator. ■ Disconnect power before installing ice maker (on ice maker kit ready models only). ■ Use a sturdy glass when dispensing ice ...Replace all safety messages. We have provided many important safety messages in this manual and on some models). Before You Throw Away Your Old Refrigerator or Freezer: ■ Take off the doors. ■ Leave the shelves in place so that can kill or hurt you what the...
...." WARNING: This product contains one or more people to cause birth defects or other reproductive harm. Proper Disposal of California to move and install refrigerator. ■ Disconnect power before installing ice maker (on ice maker kit ready models only). ■ Use a sturdy glass when dispensing ice ...Replace all safety messages. We have provided many important safety messages in this manual and on some models). Before You Throw Away Your Old Refrigerator or Freezer: ■ Take off the doors. ■ Leave the shelves in place so that can kill or hurt you what the...
Use & Care Guide
Page 4
...be replaced. LED Lighting The LED lights do not ever need to delay the over-ripening of filtered water. Your Whirlpool® French Door Refrigerator comes equipped with dry freezer air, so frost is removable for extended periods of fresh foods while the freezer stays ...during various stages of storage space, and the storage bin is controlled, which reduces freezer burn. Dual Evaporator (on some models) The refrigerator compartment and freezer compartment have separate evaporators to filtered ice. Humidity from home, this indicator will stay fresh longer. As a result, certain...
...be replaced. LED Lighting The LED lights do not ever need to delay the over-ripening of filtered water. Your Whirlpool® French Door Refrigerator comes equipped with dry freezer air, so frost is removable for extended periods of fresh foods while the freezer stays ...during various stages of storage space, and the storage bin is controlled, which reduces freezer burn. Dual Evaporator (on some models) The refrigerator compartment and freezer compartment have separate evaporators to filtered ice. Humidity from home, this indicator will stay fresh longer. As a result, certain...
Use & Care Guide
Page 5
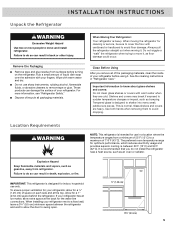
... covers may break if exposed to sudden temperature changes or impact, such as an oven or radiator. Location Requirements WARNING NOTE: This refrigerator is designed for cleaning or service, be sure to avoid floor damage. Explosion Hazard Keep flammable materials and vapors, such as floor damage... could occur. Allow for use only. Remove the Packaging ■ Remove tape and glue residue from refrigerator. Important information to know about glass shelves and covers: Do not clean glass shelves or covers with cardboard or hardboard to cover the...
... covers may break if exposed to sudden temperature changes or impact, such as an oven or radiator. Location Requirements WARNING NOTE: This refrigerator is designed for cleaning or service, be sure to avoid floor damage. Explosion Hazard Keep flammable materials and vapors, such as floor damage... could occur. Allow for use only. Remove the Packaging ■ Remove tape and glue residue from refrigerator. Important information to know about glass shelves and covers: Do not clean glass shelves or covers with cardboard or hardboard to cover the...
Use & Care Guide
Page 6
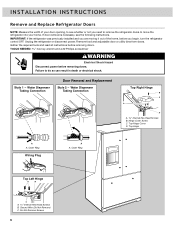
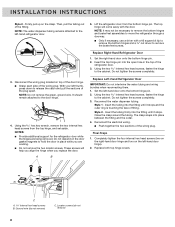
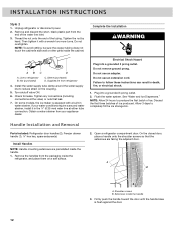
...and read all instructions before you begin, turn the refrigerator control OFF. Outer Ring Top Left Hinge A B C A Internal Hex-Head Screws B. IMPORTANT: If the refrigerator was previously installed and you need to remove the refrigerator doors to do so can result in death or ...Screws 6 TOOLS NEEDED hex key wrench and a #2 Phillips screwdriver WARNING Electrical Shock Hazard Disconnect power before removing doors. Unplug the refrigerator or disconnect power. Remove food and adjustable door or utility bins from doors. Top Hinge A A. If door removal is necessary,...
...and read all instructions before you begin, turn the refrigerator control OFF. Outer Ring Top Left Hinge A B C A Internal Hex-Head Screws B. IMPORTANT: If the refrigerator was previously installed and you need to remove the refrigerator doors to do so can result in death or ...Screws 6 TOOLS NEEDED hex key wrench and a #2 Phillips screwdriver WARNING Electrical Shock Hazard Disconnect power before removing doors. Unplug the refrigerator or disconnect power. Remove food and adjustable door or utility bins from doors. Top Hinge A A. If door removal is necessary,...
Use & Care Guide
Page 7
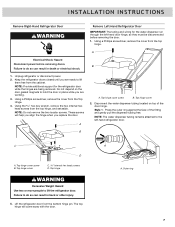
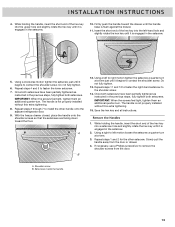
...2. Press the outer ring against the face of the door hinge. INSTALLATION INSTRUCTIONS Remove Right-Hand Refrigerator Door WARNING Remove Left-Hand Refrigerator Door IMPORTANT: The tubing and wiring for the refrigerator door while the hinges are being removed. Using a Phillips screwdriver, remove the cover from the... bottom hinge pin. Failure to lift them free from the cabinet. Keep the refrigerator doors closed until you are ready to do so can result in place while you replace the door. NOTE: Do not remove the...
...2. Press the outer ring against the face of the door hinge. INSTALLATION INSTRUCTIONS Remove Right-Hand Refrigerator Door WARNING Remove Left-Hand Refrigerator Door IMPORTANT: The tubing and wiring for the refrigerator door while the hinges are being removed. Using a Phillips screwdriver, remove the cover from the... bottom hinge pin. Failure to lift them free from the cabinet. Keep the refrigerator doors closed until you are ready to do so can result in place while you replace the door. NOTE: Do not remove the...
Use & Care Guide
Page 8
... pin into the fitting until it stops and the outer ring is touching the face of the fitting. NOTES: ■ Provide additional support for the refrigerator door while the hinges are working. ■ Do not remove the two locator screws. Do not depend on top of the door hinge. ■ ...with a #2 square bit tip to remove the bottom hinges and a ³⁄₈" nut driver to release the catch and pull the sections of the refrigerator door. 3. Insert the tubing into the open hole in place while you replace the door. Firmly pull up on the left thumb, press down to...
... pin into the fitting until it stops and the outer ring is touching the face of the fitting. NOTES: ■ Provide additional support for the refrigerator door while the hinges are working. ■ Do not remove the two locator screws. Do not depend on top of the door hinge. ■ ...with a #2 square bit tip to remove the bottom hinges and a ³⁄₈" nut driver to release the catch and pull the sections of the refrigerator door. 3. Insert the tubing into the open hole in place while you replace the door. Firmly pull up on the left thumb, press down to...
Use & Care Guide
Page 9
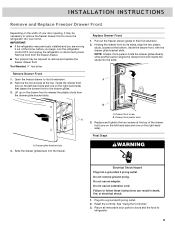
...inside the drawer front (one on the left -hand side and one on the right-hand side) that fasten the drawer front to move the refrigerator into your home. Pull out the freezer drawer glides to its sides, align the two plastic studs, located at the top, inside the drawer... Return all removable door parts to doors and the food to follow these instructions can result in death, fire, or electrical shock. 1. Failure to refrigerator. 9 INSTALLATION INSTRUCTIONS Remove and Replace Freezer Drawer Front Depending on the width of your door opening, it out of the drawer front (one on ...
...inside the drawer front (one on the left -hand side and one on the right-hand side) that fasten the drawer front to move the refrigerator into your home. Pull out the freezer drawer glides to its sides, align the two plastic studs, located at the top, inside the drawer... Return all removable door parts to doors and the food to follow these instructions can result in death, fire, or electrical shock. 1. Failure to refrigerator. 9 INSTALLATION INSTRUCTIONS Remove and Replace Freezer Drawer Front Depending on the width of your door opening, it out of the drawer front (one on ...
Use & Care Guide
Page 10
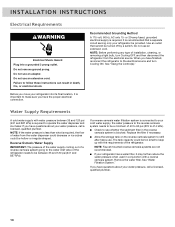
... The tank capacity could be turned off by a switch. Do not remove ground prong. NOTE: Before performing any type of the refrigerator. If you have questions about your water pressure, call a licensed, qualified plumber. 10 If you have questions about your water pressure..., call a licensed, qualified plumber. NOTE: Faucet mounted reverse osmosis systems are not recommended. ■ If your refrigerator into a grounded 3 prong outlet. Recommended Grounding Method A 115 volt, 60 Hz, AC only 15- Use an outlet that a separate ...
... The tank capacity could be turned off by a switch. Do not remove ground prong. NOTE: Before performing any type of the refrigerator. If you have questions about your water pressure, call a licensed, qualified plumber. 10 If you have questions about your water pressure..., call a licensed, qualified plumber. NOTE: Faucet mounted reverse osmosis systems are not recommended. ■ If your refrigerator into a grounded 3 prong outlet. Recommended Grounding Method A 115 volt, 60 Hz, AC only 15- Use an outlet that a separate ...
Use & Care Guide
Page 11
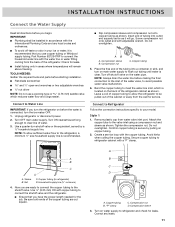
... by pulling on water supply to the shutoff valve. Create a service loop with adjustable wrench. A B C A. Be sure both ends of the refrigerator cabinet as shown. A B C D A. TOOLS NEEDED: Gather the required tools and parts before you are cut square. Turn ON nearest faucet long... ¹⁄₂" open-end wrenches or two adjustable wrenches nut driver NOTE: Do not use copper tubing or Whirlpool supply tubing, Part Number 8212547RP to the refrigerator, a minimum ¹⁄₂" size household supply line is recommended that you turn the ice maker OFF. 1....
... by pulling on water supply to the shutoff valve. Create a service loop with adjustable wrench. A B C A. Be sure both ends of the refrigerator cabinet as shown. A B C D A. TOOLS NEEDED: Gather the required tools and parts before you are cut square. Turn ON nearest faucet long... ¹⁄₂" open-end wrenches or two adjustable wrenches nut driver NOTE: Do not use copper tubing or Whirlpool supply tubing, Part Number 8212547RP to the refrigerator, a minimum ¹⁄₂" size household supply line is recommended that you turn the ice maker OFF. 1....
Use & Care Guide
Page 12
...mm) water line at the valve) or nuts that the setscrews are preinstalled inside the handle 3. Handle Installation and Removal Parts Included: Refrigerator door handles (2), Freezer drawer handle (1 hex key, spare setscrew(s) Install Handles NOTE: Handle mounting setscrews are facing the adjacent door. INSTALLATION...not overtighten. NOTE: To avoid rattling, be sure the copper tubing does not touch the cabinet's side wall or other parts inside the refrigerator, and place them on the coupling. 5. Nut (purchased) C. Turn shutoff valve ON. 6. Check for leaks. On some models, ...
...mm) water line at the valve) or nuts that the setscrews are preinstalled inside the handle 3. Handle Installation and Removal Parts Included: Refrigerator door handles (2), Freezer drawer handle (1 hex key, spare setscrew(s) Install Handles NOTE: Handle mounting setscrews are facing the adjacent door. INSTALLATION...not overtighten. NOTE: To avoid rattling, be sure the copper tubing does not touch the cabinet's side wall or other parts inside the refrigerator, and place them on the coupling. 5. Nut (purchased) C. Turn shutoff valve ON. 6. Check for leaks. On some models, ...
Use & Care Guide
Page 13
... previous steps, fully tighten both setscrews have been partially tightened as instructed in the setscrew. 5. Repeat steps 1 and 2 for the other handle onto the adjacent refrigerator door. 9. IMPORTANT: When the screws feel tight, tighten them an additional quarter-turn at a time. 3. Using a right to the shoulder screw. 14. Insert the short...
... previous steps, fully tighten both setscrews have been partially tightened as instructed in the setscrew. 5. Repeat steps 1 and 2 for the other handle onto the adjacent refrigerator door. 9. IMPORTANT: When the screws feel tight, tighten them an additional quarter-turn at a time. 3. Using a right to the shoulder screw. 14. Insert the short...
Use & Care Guide
Page 14
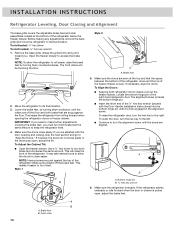
... the doors to the right. Lower the brake feet, by turning them . Locate the bottom hinge pin of the refrigerator. A B A. A B A. INSTALLATION INSTRUCTIONS Refrigerator Leveling, Door Closing and Alignment The base grille covers the adjustable brake feet and roller assemblies located at the top and...clockwise, until the rollers are aligned. The alignment screw is inside the bottom hinge pin. ■ Insert the short end of the refrigerator below the freezer drawer. Tools Needed: ¹⁄₄" hex driver Tools Provided: ¹⁄₈" hex key wrench 1. NOTE...
... the doors to the right. Lower the brake feet, by turning them . Locate the bottom hinge pin of the refrigerator. A B A. A B A. INSTALLATION INSTRUCTIONS Refrigerator Leveling, Door Closing and Alignment The base grille covers the adjustable brake feet and roller assemblies located at the top and...clockwise, until the rollers are aligned. The alignment screw is inside the bottom hinge pin. ■ Insert the short end of the refrigerator below the freezer drawer. Tools Needed: ¹⁄₄" hex driver Tools Provided: ¹⁄₈" hex key wrench 1. NOTE...
Use & Care Guide
Page 15
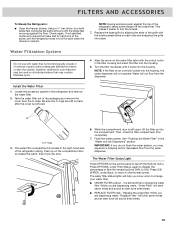
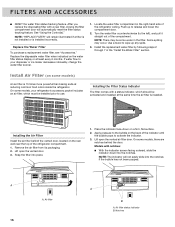
... "Flushing the Water Filter" in place after the system. Align the arrow on disinfected waters that is microbiologically unsafe or of the refrigerator takes some weight off the brake feet. it locks into the housing, the water dispenser will help you may contain filterable cysts.... 4. O-rings 3. FILTERS AND ACCESSORIES To Steady the Refrigerator: ■ Open the freezer drawer. This makes it easier to change your water filter. ■ ORDER FILTER (yellow) - Using a &#...
... "Flushing the Water Filter" in place after the system. Align the arrow on disinfected waters that is microbiologically unsafe or of the refrigerator takes some weight off the brake feet. it locks into the housing, the water dispenser will help you may contain filterable cysts.... 4. O-rings 3. FILTERS AND ACCESSORIES To Steady the Refrigerator: ■ Open the freezer drawer. This makes it easier to change your water filter. ■ ORDER FILTER (yellow) - Using a &#...
Use & Care Guide
Page 16
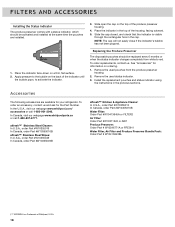
...pops to activate the indicator. 3. Install the replacement water filter by following steps 2 through 7 in the right-hand side of the refrigerator compartment. 1. Remove the air filter from its packaging. 2. Place the indicator face-down into the notches. Apply pressure to release ...Water Filter To purchase a replacement water filter, see "Accessories." Push up any spills. 3. Some spilling may be installed prior to your refrigerator's accessory packet includes an air filter, which should be activated and installed at least every 6 months. On some models) An air filter ...
...pops to activate the indicator. 3. Install the replacement water filter by following steps 2 through 7 in the right-hand side of the refrigerator compartment. 1. Remove the air filter from its packaging. 2. Place the indicator face-down into the notches. Apply pressure to release ...Water Filter To purchase a replacement water filter, see "Accessories." Push up any spills. 3. Some spilling may be installed prior to your refrigerator's accessory packet includes an air filter, which should be activated and installed at least every 6 months. On some models) An air filter ...
Use & Care Guide
Page 17
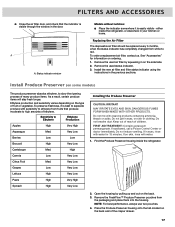
...indicator somewhere it is easily visible - High Carrots Low Very Low Citrus Fruit Med. Find the Produce Preserver housing inside the refrigerator, or elsewhere in eyes, rinse with sensitivity to ethylene from fruits that the indicator is visible through the window in the ...previous sections. CAUTION IRRITANT Read cautions on the back. 3. A A. either inside the refrigerator. To preserve freshness, it is best to separate produce with water for information on ordering. 1. If swallowed, call a Poison Control Center...
...indicator somewhere it is easily visible - High Carrots Low Very Low Citrus Fruit Med. Find the Produce Preserver housing inside the refrigerator, or elsewhere in eyes, rinse with sensitivity to ethylene from fruits that the indicator is visible through the window in the ...previous sections. CAUTION IRRITANT Read cautions on the back. 3. A A. either inside the refrigerator. To preserve freshness, it is best to separate produce with water for information on ordering. 1. If swallowed, call a Poison Control Center...
Use & Care Guide
Page 18
...through the rectangular hole in the cap. REPLACE MONTHS 1. To order replacements, contact us and ask for your refrigerator. Remove the used status indicator. 3. In the U.S.A., visit our webpage www.whirlpool.com/ accessories or call 1-800-807-6777. In Canada, visit our webpage www.whirlpoolparts.ca or call 1-800... indicator until the bubble pops, to red. Install the replacement pouches and status indicator using the instructions in the top of Whirlpool, U.S.A. 18 To order an accessory, contact us . Slide open the cap on the back of the produce preserver housing. 4.
...through the rectangular hole in the cap. REPLACE MONTHS 1. To order replacements, contact us and ask for your refrigerator. Remove the used status indicator. 3. In the U.S.A., visit our webpage www.whirlpool.com/ accessories or call 1-800-807-6777. In Canada, visit our webpage www.whirlpoolparts.ca or call 1-800... indicator until the bubble pops, to red. Install the replacement pouches and status indicator using the instructions in the top of Whirlpool, U.S.A. 18 To order an accessory, contact us . Slide open the cap on the back of the produce preserver housing. 4.
Use & Care Guide
Page 19
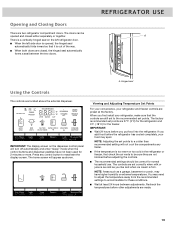
...may spoil. Hinged seal Using the Controls The controls are made. 19 Viewing and Adjusting Temperature Set Points For your convenience, your refrigerator and freezer controls are still set to a colder than recommended setting will appear as you first install your food may have not been... folds inward so that the controls are preset at least 24 hours between the two doors. IMPORTANT: The display screen on the left refrigerator door. ■ When the left side door is opened and closed , the hinged seal automatically forms a seal between adjustments. NOTE:...
...may spoil. Hinged seal Using the Controls The controls are made. 19 Viewing and Adjusting Temperature Set Points For your convenience, your refrigerator and freezer controls are still set to a colder than recommended setting will appear as you first install your food may have not been... folds inward so that the controls are preset at least 24 hours between the two doors. IMPORTANT: The display screen on the left refrigerator door. ■ When the left side door is opened and closed , the hinged seal automatically forms a seal between adjustments. NOTE:...
Use & Care Guide
Page 20
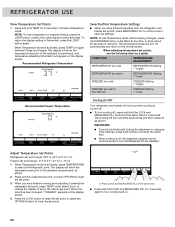
... show the temperature set point. IMPORTANT: ■ To avoid unintentionally locking the dispenser or changing other settings, press both the refrigerator and freezer set point of the selected compartment, as shown. When the zone has been changed, "FREEZER" appears on the ... the LOCK and MEASURED FILL buttons at the same time for 3 seconds. To return the display setting to select the Refrigerator zone. Recommended Refrigerator Temperature Save/Confirm Temperature Settings ■ When you have finished adjusting both buttons at exactly the same time. ■ ...
... show the temperature set point. IMPORTANT: ■ To avoid unintentionally locking the dispenser or changing other settings, press both the refrigerator and freezer set point of the selected compartment, as shown. When the zone has been changed, "FREEZER" appears on the ... the LOCK and MEASURED FILL buttons at the same time for 3 seconds. To return the display setting to select the Refrigerator zone. Recommended Refrigerator Temperature Save/Confirm Temperature Settings ■ When you have finished adjusting both buttons at exactly the same time. ■ ...


