Use & Care Guide
Page 2
... Humidity Control 26 Temperature-Controlled Drawer 26 - Remove the Handles 13 Refrigerator Leveling, Door Closing and Alignment 14 FILTERS AND ACCESSORIES 15 Water Filtration System 15 - Remove Right-Hand Refrigerator Door 7 - Connect to the Whirlpool Brand family of high-quality appliances. Dispensing 22 - Interior Cleaning... perfect condition. The Ice Dispenser 22 - Style 2 - Manual Control 27 - Installing the Status Indicator 18 - Your new Whirlpool® French Door Refrigerator combines advanced cooling technology with simple operation and high efficiency.
... Humidity Control 26 Temperature-Controlled Drawer 26 - Remove the Handles 13 Refrigerator Leveling, Door Closing and Alignment 14 FILTERS AND ACCESSORIES 15 Water Filtration System 15 - Remove Right-Hand Refrigerator Door 7 - Connect to the Whirlpool Brand family of high-quality appliances. Dispensing 22 - Interior Cleaning... perfect condition. The Ice Dispenser 22 - Style 2 - Manual Control 27 - Installing the Status Indicator 18 - Your new Whirlpool® French Door Refrigerator combines advanced cooling technology with simple operation and high efficiency.
Use & Care Guide
Page 5
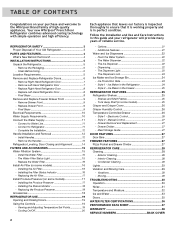
... cold. Explosion Hazard Keep flammable materials and vapors, such as bumping. Remove the Packaging ■ Remove tape and glue residue from a minimum of 55°F (13°C) to a maximum of space on the refrigerator. These products can result in back or other injury. If your refrigerator. Rub a small amount of liquid...
... cold. Explosion Hazard Keep flammable materials and vapors, such as bumping. Remove the Packaging ■ Remove tape and glue residue from a minimum of 55°F (13°C) to a maximum of space on the refrigerator. These products can result in back or other injury. If your refrigerator. Rub a small amount of liquid...
Use & Care Guide
Page 13
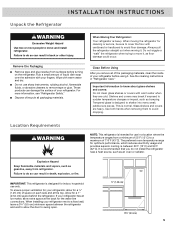
... an additional quarter-turn at a time just until the handle base is engaged in the previous steps, fully tighten both setscrews. Do not fully tighten. 13. Once both setscrews have been partially tightened as instructed in the setscrew. 2. While holding the handle, insert the short end of the hex key into... slightly rotate the hex key until it begins to contact the shoulder screw. Repeat steps 2 through 7 to install the other setscrew. Setscrews inside the handle 13
... an additional quarter-turn at a time just until the handle base is engaged in the previous steps, fully tighten both setscrews. Do not fully tighten. 13. Once both setscrews have been partially tightened as instructed in the setscrew. 2. While holding the handle, insert the short end of the hex key into... slightly rotate the hex key until it begins to contact the shoulder screw. Repeat steps 2 through 7 to install the other setscrew. Setscrews inside the handle 13
Dimension Guide
Page 1
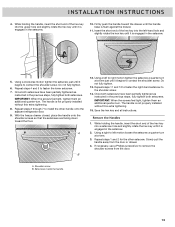
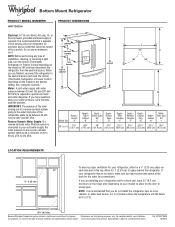
... install the refrigerator near an oven, radiator, or other heat source, nor in a location where the temperature will fall below 55°F (13°C). 3³⁄₄" (9.5 cm) Because Whirlpool Corporation policy includes a continuous commitment to swing open. For complete details, see Installation our products, we reserve the right to the desired...
... install the refrigerator near an oven, radiator, or other heat source, nor in a location where the temperature will fall below 55°F (13°C). 3³⁄₄" (9.5 cm) Because Whirlpool Corporation policy includes a continuous commitment to swing open. For complete details, see Installation our products, we reserve the right to the desired...
