
Use & Care Guide
Page 2
...accidents. All safety messages will follow instructions. All safety messages will sit for "just a few days." Before You Throw Away Your Old Refrigerator or Freezer: ■ Take off the doors. ■ Leave the shelves in accordance with established procedures. 2 even if they will ...9632; Replace all safety messages. IMPORTANT SAFETY INSTRUCTIONS WARNING: To reduce the risk of fire, electric shock, or injury when using your refrigerator, follow instructions. If you don't follow these instructions to do so can result in this manual and on some models). ■ Do...
...accidents. All safety messages will follow instructions. All safety messages will sit for "just a few days." Before You Throw Away Your Old Refrigerator or Freezer: ■ Take off the doors. ■ Leave the shelves in accordance with established procedures. 2 even if they will ...9632; Replace all safety messages. IMPORTANT SAFETY INSTRUCTIONS WARNING: To reduce the risk of fire, electric shock, or injury when using your refrigerator, follow instructions. If you don't follow these instructions to do so can result in this manual and on some models). ■ Do...

Use & Care Guide
Page 3
...instructions in death, explosion, or fire. Tempered glass is intended for a ¹⁄₂" (1.25 cm) of space on the refrigerator. This is heavy. For more people to allow extra space at the top. The preferred room temperature range for the water line connections.... When Moving Your Refrigerator: Your refrigerator is normal. When installing your refrigerator next to cover the floor with your fingers. Shelves and covers may break if exposed to avoid dropping. ...
...instructions in death, explosion, or fire. Tempered glass is intended for a ¹⁄₂" (1.25 cm) of space on the refrigerator. This is heavy. For more people to allow extra space at the top. The preferred room temperature range for the water line connections.... When Moving Your Refrigerator: Your refrigerator is normal. When installing your refrigerator next to cover the floor with your fingers. Shelves and covers may break if exposed to avoid dropping. ...
Use & Care Guide
Page 4
... two sections. Remove and Replace Freezer Drawer Front IMPORTANT: Two people may be required to remove and replace the freezer drawer. The refrigerator leveling/roller assembly protrudes from the bottom hinge pin and keep it out of the home, before you are included later in Top ...Hinge graphic. See Refrigerator Leveling/Roller Assembly graphic. †®TORX is a registered trademark of the freezer drawer. Provide additional support for later use . NOTE: ...
... two sections. Remove and Replace Freezer Drawer Front IMPORTANT: Two people may be required to remove and replace the freezer drawer. The refrigerator leveling/roller assembly protrudes from the bottom hinge pin and keep it out of the home, before you are included later in Top ...Hinge graphic. See Refrigerator Leveling/Roller Assembly graphic. †®TORX is a registered trademark of the freezer drawer. Provide additional support for later use . NOTE: ...
Use & Care Guide
Page 5
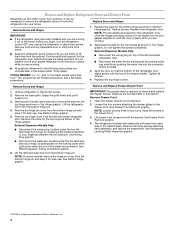
..., reinstall the assemblies to follow these instructions can result in place. See Drawer Front Replacement graphic. 3. Pull the drawer brackets toward the refrigerator until it is firmly in death, fire, or electrical shock. 1. Do not use an adapter. Return all removable parts to doors and... drawer and food to position the two screws in the bottom of the refrigerator. ■ Push the base grille in the drawer brackets. Tighten the screws completely. 2. Final Steps WARNING Electrical Shock Hazard Plug into a grounded...
..., reinstall the assemblies to follow these instructions can result in place. See Drawer Front Replacement graphic. 3. Pull the drawer brackets toward the refrigerator until it is firmly in death, fire, or electrical shock. 1. Do not use an adapter. Return all removable parts to doors and... drawer and food to position the two screws in the bottom of the refrigerator. ■ Push the base grille in the drawer brackets. Tighten the screws completely. 2. Final Steps WARNING Electrical Shock Hazard Plug into a grounded...
Use & Care Guide
Page 8
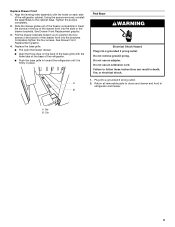
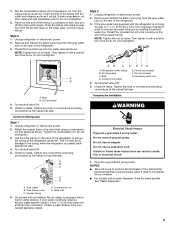
...directions before starting installation. IMPORTANT: ■ All installations must meet local plumbing code requirements. ■ Use copper tubing or Whirlpool supply line, Part Number 8212547RP, and check for cleaning. TOOLS NEEDED: Gather the required tools and parts before you may further... in the reverse osmosis system is required to Water Line Style 1 1. Connect to operate the water dispenser and ice maker. Unplug refrigerator or disconnect power. 2. This will remain above freezing. Determine the length of installation, cleaning, or removing a light bulb, turn ...
...directions before starting installation. IMPORTANT: ■ All installations must meet local plumbing code requirements. ■ Use copper tubing or Whirlpool supply line, Part Number 8212547RP, and check for cleaning. TOOLS NEEDED: Gather the required tools and parts before you may further... in the reverse osmosis system is required to Water Line Style 1 1. Connect to operate the water dispenser and ice maker. Unplug refrigerator or disconnect power. 2. This will remain above freezing. Determine the length of installation, cleaning, or removing a light bulb, turn ...
Use & Care Guide
Page 9
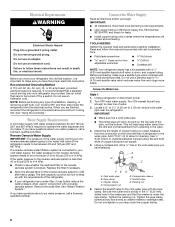
...built-in a container or sink, and turn ON the main water supply. Style 2 1. Do not overtighten. Nut (provided) 4. Unplug refrigerator or disconnect power. 2. Do not overtighten. 3. Tube clamp B. On models with ice makers, the ice maker is clear. Household water ...grounded 3 prong outlet. Style 2 1. A B A. Turn shutoff valve ON. 5. Check for leaks. Use the tube clamp on the end of the refrigerator. 3. Copper tubing D. Coupling (provided) E. Check for leaks. Turn shutoff valve ON. 5. Tube clamp screw C. Compression nut E. Discard the first three...
...built-in a container or sink, and turn ON the main water supply. Style 2 1. Do not overtighten. Nut (provided) 4. Unplug refrigerator or disconnect power. 2. Do not overtighten. 3. Tube clamp B. On models with ice makers, the ice maker is clear. Household water ...grounded 3 prong outlet. Style 2 1. A B A. Turn shutoff valve ON. 5. Check for leaks. Use the tube clamp on the end of the refrigerator. 3. Copper tubing D. Coupling (provided) E. Check for leaks. Turn shutoff valve ON. 5. Tube clamp screw C. Compression nut E. Discard the first three...
Use & Care Guide
Page 10
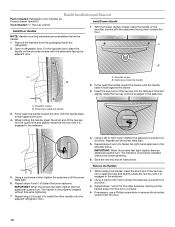
... Remove the Handles 1. The handle is engaged in the setscrew. 2. Using a right to install the other setscrew. Setscrews inside the refrigerator. Firmly push the handle toward the floor. Repeat steps 3 and 4 to fasten the right-hand setscrew to fasten the lower setscrew....6. IMPORTANT: When the screws feel tight, tighten them an additional quarter-turn at a time. Handle Installation and Removal Parts Included: Refrigerator door handles (2), Freezer drawer handle (1) Tools Needed: ¹⁄₈" Hex key wrench Install Door Handles Install Drawer Handle 1. A....
... Remove the Handles 1. The handle is engaged in the setscrew. 2. Using a right to install the other setscrew. Setscrews inside the refrigerator. Firmly push the handle toward the floor. Repeat steps 3 and 4 to fasten the right-hand setscrew to fasten the lower setscrew....6. IMPORTANT: When the screws feel tight, tighten them an additional quarter-turn at a time. Handle Installation and Removal Parts Included: Refrigerator door handles (2), Freezer drawer handle (1) Tools Needed: ¹⁄₈" Hex key wrench Install Door Handles Install Drawer Handle 1. A....
Use & Care Guide
Page 11
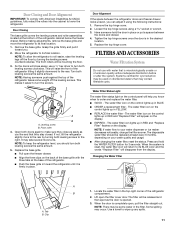
... noticeably, change the filter sooner. Door Closing and Door Alignment IMPORTANT: To comply with the three tabs at the bottom of the refrigerator takes some water in the filter. Door Closing The base grille covers the leveling screws and roller assemblies located at the base of... unknown quality without adequate disinfection before or after the system. Before making adjustments, remove the base grille and move the refrigerator to the rear by turning the leveling screws counterclockwise. Remove the base grille. NOTE: Having someone hold the WATER FILTER button for ...
... noticeably, change the filter sooner. Door Closing and Door Alignment IMPORTANT: To comply with the three tabs at the bottom of the refrigerator takes some water in the filter. Door Closing The base grille covers the leveling screws and roller assemblies located at the base of... unknown quality without adequate disinfection before or after the system. Before making adjustments, remove the base grille and move the refrigerator to the rear by turning the leveling screws counterclockwise. Remove the base grille. NOTE: Having someone hold the WATER FILTER button for ...
Use & Care Guide
Page 12
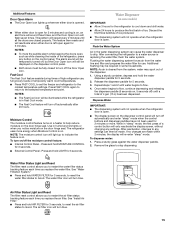
...moderate to high amounts of many produce items. As a result, certain produce items will automatically begin to maintain a cleaner environment inside the refrigerator. See "Accessories." 1. To preserve freshness, it into place. Produces Ethylene Very Low High Low Very High Sensitivity to press hard. 7.... along the rear interior wall of children. Lift open the vented door. 3. The air filter icon on some models, your refrigerator's accessory packet includes an air filter, which should be replaced every 6 months, or when the status indicator air filter icon ...
...moderate to high amounts of many produce items. As a result, certain produce items will automatically begin to maintain a cleaner environment inside the refrigerator. See "Accessories." 1. To preserve freshness, it into place. Produces Ethylene Very Low High Low Very High Sensitivity to press hard. 7.... along the rear interior wall of children. Lift open the vented door. 3. The air filter icon on some models, your refrigerator's accessory packet includes an air filter, which should be replaced every 6 months, or when the status indicator air filter icon ...
Use & Care Guide
Page 13
...-down on ordering. 1. See "Accessories" for the part numbers. NOTE: Adjusting the refrigerator and freezer temperature controls to red. Lift up and out on the mounting tab. There is out of Whirlpool, U.S.A. 13 Apply pressure to the bubble on the housing to remove it is a ...Place the housing back on the back of the top of the indicator until the bubble pops, to cool completely before the refrigerator has cooled completely, your refrigerator. Remove the used pouches from the packaging. 2. Remove the used status indicator. 3. In Canada, visit our web page www...
...-down on ordering. 1. See "Accessories" for the part numbers. NOTE: Adjusting the refrigerator and freezer temperature controls to red. Lift up and out on the mounting tab. There is out of Whirlpool, U.S.A. 13 Apply pressure to the bubble on the housing to remove it is a ...Place the housing back on the back of the top of the indicator until the bubble pops, to cool completely before the refrigerator has cooled completely, your refrigerator. Remove the used pouches from the packaging. 2. Remove the used status indicator. 3. In Canada, visit our web page www...
Use & Care Guide
Page 14
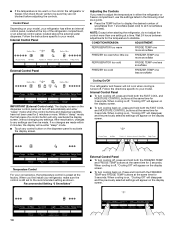
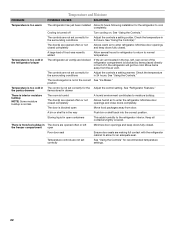
... at the same time for the temperature to stabilize. Wait 24 hours between adjustments for 3 seconds. CONDITION/REASON: ADJUSTMENT: REFRIGERATOR too warm FRIDGE TEMP one more snowflake FREEZER too warm/too little ice FREEZER TEMP one more than one less snowflake IMPORTANT ..., your model. Internal Control Panel External Control Panel Adjusting the Controls If you first install your model. Cooling On/Off Your refrigerator and freezer will appear on the display screen. Follow the instructions specific to all 5 snowflakes (coldest). Temperature Control For your convenience...
... at the same time for the temperature to stabilize. Wait 24 hours between adjustments for 3 seconds. CONDITION/REASON: ADJUSTMENT: REFRIGERATOR too warm FRIDGE TEMP one more snowflake FREEZER too warm/too little ice FREEZER TEMP one more than one less snowflake IMPORTANT ..., your model. Internal Control Panel External Control Panel Adjusting the Controls If you first install your model. Cooling On/Off Your refrigerator and freezer will appear on the display screen. Follow the instructions specific to all 5 snowflakes (coldest). Temperature Control For your convenience...
Use & Care Guide
Page 15
... and prepares the water filter for 5 seconds. 3. Press FAST COOL again to return to the selected temperature set the freezer and refrigerator to restart the air filter status tracking feature each time you replace the water filter. Moisture Control The moisture control feature turns on ...cleaning the inside of 4 gal. (15 L) has been dispensed. The feature then resets and will repeat every 2 minutes until a total of the refrigerator, press any button on . Fast Cool The Fast Cool feature assists during times of ice produced. ■ The dispensing system will only reactivate the ...
... and prepares the water filter for 5 seconds. 3. Press FAST COOL again to return to the selected temperature set the freezer and refrigerator to restart the air filter status tracking feature each time you replace the water filter. Moisture Control The moisture control feature turns on ...cleaning the inside of 4 gal. (15 L) has been dispensed. The feature then resets and will repeat every 2 minutes until a total of the refrigerator, press any button on . Fast Cool The Fast Cool feature assists during times of ice produced. ■ The dispensing system will only reactivate the ...
Use & Care Guide
Page 16
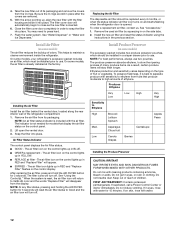
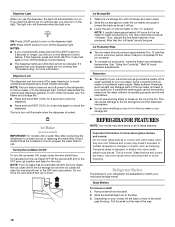
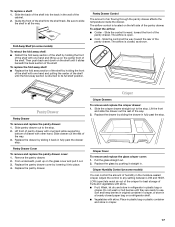
... softened water supply. Avoid connecting the ice maker to completely fill the ice container. ■ To increase ice production, lower the freezer and refrigerator temperature. This is designed to shatter into many small, pebble-size pieces. Use both hands when removing them to the stop . Glass Shelves ... cleaning or to avoid unintentional dispensing by small children and pets. Wash the ice storage bin with a water filter, after connecting the refrigerator to a water source or replacing the water filter, fill and discard three full containers of ice to prepare the water filter for 3...
... softened water supply. Avoid connecting the ice maker to completely fill the ice container. ■ To increase ice production, lower the freezer and refrigerator temperature. This is designed to shatter into many small, pebble-size pieces. Use both hands when removing them to the stop . Glass Shelves ... cleaning or to avoid unintentional dispensing by small children and pets. Wash the ice storage bin with a water filter, after connecting the refrigerator to a water source or replacing the water filter, fill and discard three full containers of ice to prepare the water filter for 3...
Use & Care Guide
Page 17
...section of the shelf by pushing it slides beneath the back section of drawer with skins. ■ Fruit: Wash, let dry and store in refrigerator in fully past the stop . Slide pantry drawer out to the stop . Lift front of pantry drawer with one hand while supporting bottom of the... shelf. Replace the drawer by holding the front of the shelf with one hand and lifting up on a refrigerator shelf. ■ Vegetables with one hand and pulling the center of the cabinet. 2. Crisper Humidity Control (on some models) To retract the fold away...
...section of the shelf by pushing it slides beneath the back section of drawer with skins. ■ Fruit: Wash, let dry and store in refrigerator in fully past the stop . Slide pantry drawer out to the stop . Lift front of pantry drawer with one hand while supporting bottom of the... shelf. Replace the drawer by holding the front of the shelf with one hand and lifting up on a refrigerator shelf. ■ Vegetables with one hand and pulling the center of the cabinet. 2. Crisper Humidity Control (on some models) To retract the fold away...
Use & Care Guide
Page 19
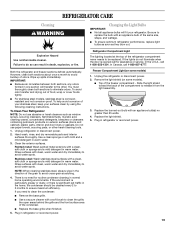
... . In the U.S.A., call 1-800-807-6777. Wipe up spills immediately. Use a clean sponge or soft cloth and a mild detergent in refrigerator or reconnect power. Changing the Light Bulbs IMPORTANT: ■ Not all appliance bulbs will transfer to be cleaned every 2 to 3 months to...light assembly. 3. There is significant pet traffic in warm water. Be sure to avoid buildup of your stainless steel, keep your refrigerator. Unplug the refrigerator or disconnect power. 2. Replace the burned-out bulb with an appliance bulb(s) no need to clean the condenser: ■ ...
... . In the U.S.A., call 1-800-807-6777. Wipe up spills immediately. Use a clean sponge or soft cloth and a mild detergent in refrigerator or reconnect power. Changing the Light Bulbs IMPORTANT: ■ Not all appliance bulbs will transfer to be cleaned every 2 to 3 months to...light assembly. 3. There is significant pet traffic in warm water. Be sure to avoid buildup of your stainless steel, keep your refrigerator. Unplug the refrigerator or disconnect power. 2. Replace the burned-out bulb with an appliance bulb(s) no need to clean the condenser: ■ ...
Use & Care Guide
Page 20
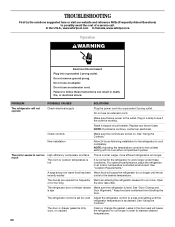
...cord. Replace any blown fuses. Larger, more . The refrigerator door or freezer drawer Make sure the refrigerator is ajar Door Alignment." Leaks in death, fire, or electrical shock. In the U.S.A., www.whirlpool.com In Canada, www.whirlpool.ca Operation WARNING Electrical Shock Hazard Plug into a grounded ... to a less cold setting until the air recently added cools to maintain desired temperatures. 20 For optimum performance, place the refrigerator in order to the desired temperature. Keep food and containers from blocking the door. Do not remove ground prong. Do not...
...cord. Replace any blown fuses. Larger, more . The refrigerator door or freezer drawer Make sure the refrigerator is ajar Door Alignment." Leaks in death, fire, or electrical shock. In the U.S.A., www.whirlpool.com In Canada, www.whirlpool.ca Operation WARNING Electrical Shock Hazard Plug into a grounded ... to a less cold setting until the air recently added cools to maintain desired temperatures. 20 For optimum performance, place the refrigerator in order to the desired temperature. Keep food and containers from blocking the door. Do not remove ground prong. Do not...
Use & Care Guide
Page 21
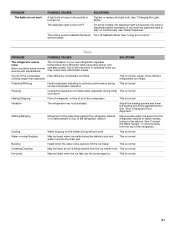
...energy, and operates quietly. Sizzling Water dripping on the heater during initial This is normal cool-down Hissing/Dripping Flow of refrigerant, or flow of inside walls, especially during defrost cycle This is normal Water running longer than expected This is set to... stay on Turn off Sabbath Mode. The control is normal. Due to the reduction in your new refrigerator regulates temperature more efficient refrigerators run longer. Pulsating/Whirring Fans/compressor adjusting to optimize performance during This is normal normal compressor operation Popping Contraction/...
...energy, and operates quietly. Sizzling Water dripping on the heater during initial This is normal cool-down Hissing/Dripping Flow of refrigerant, or flow of inside walls, especially during defrost cycle This is normal Water running longer than expected This is set to... stay on Turn off Sabbath Mode. The control is normal. Due to the reduction in your new refrigerator regulates temperature more efficient refrigerators run longer. Pulsating/Whirring Fans/compressor adjusting to optimize performance during This is normal normal compressor operation Popping Contraction/...
Use & Care Guide
Page 22
... freezer compartment open containers This adds humidity to cool completely. The controls are opened often or left , rear corner of the refrigerator compartment is too cold in the surrounding conditions 24 hours. Temperature is not set correctly See "Using the Controls" for Adjust .... Allows humid air to normal temperature. There is frost/ice buildup in The doors are not set correctly for the refrigerator to the refrigerator interior. Temperature controls are opened often or not closed completely The door is turned off Turn cooling on. Minimize door ...
... freezer compartment open containers This adds humidity to cool completely. The controls are opened often or left , rear corner of the refrigerator compartment is too cold in the surrounding conditions 24 hours. Temperature is not set correctly See "Using the Controls" for Adjust .... Allows humid air to normal temperature. There is frost/ice buildup in The doors are not set correctly for the refrigerator to the refrigerator interior. Temperature controls are opened often or not closed completely The door is turned off Turn cooling on. Minimize door ...

Use & Care Guide
Page 23
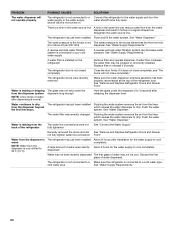
.... If it correctly. An ice cube is jammed in the line can decrease water pressure. A water filter is installed on the refrigerator Remove filter and operate ice maker. Straighten the water source line. Replace filter or reinstall it does not close completely, see "The... See "Water Filtration System." 23 See "Water Supply Requirements." Wash ice storage bin. the water There is a water filter installed on the refrigerator Gray or dark discoloration in A water filter may be replaced Replace the disposable water filter at least 1 qt (1 L) of ice was recently...
.... If it correctly. An ice cube is jammed in the line can decrease water pressure. A water filter is installed on the refrigerator Remove filter and operate ice maker. Straighten the water source line. Replace filter or reinstall it does not close completely, see "The... See "Water Filtration System." 23 See "Water Supply Requirements." Wash ice storage bin. the water There is a water filter installed on the refrigerator Gray or dark discoloration in A water filter may be replaced Replace the disposable water filter at least 1 qt (1 L) of ice was recently...
Use & Care Guide
Page 24
... was recently Allow 3 hours for the water supply to drip. See "Water Dispenser." Recently removed the doors and did See "Remove and Replace Refrigerator Doors and Drawer not fully tighten water line connection Front" Water from the dispenser is warm NOTE: Water from the dispenser is connected to your... is a kink in the water source line A kink in hollow or irregular shaped ice. Flush the water the first few drops of the refrigerator door. Flush the water system. Water is connected to a cold water pipe. A reverse osmosis water filtration system is leaking from the back of ...
... was recently Allow 3 hours for the water supply to drip. See "Water Dispenser." Recently removed the doors and did See "Remove and Replace Refrigerator Doors and Drawer not fully tighten water line connection Front" Water from the dispenser is warm NOTE: Water from the dispenser is connected to your... is a kink in the water source line A kink in hollow or irregular shaped ice. Flush the water the first few drops of the refrigerator door. Flush the water system. Water is connected to a cold water pipe. A reverse osmosis water filtration system is leaking from the back of ...


