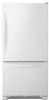
Dimension Guide
Page 1
...a reverse osmosis water filtration system is connected to your refrigerator has an ice maker, make sure you do not install the refrigerator near a heat source, such as an oven or radiator. 212/ " (6.3 cm) Because Whirlpool Corporation policy includes a continuous commitment to improve Dimensions are... for the door to OFF and then disconnect the refrigerator from a minimum of 55°F...
...a reverse osmosis water filtration system is connected to your refrigerator has an ice maker, make sure you do not install the refrigerator near a heat source, such as an oven or radiator. 212/ " (6.3 cm) Because Whirlpool Corporation policy includes a continuous commitment to improve Dimensions are... for the door to OFF and then disconnect the refrigerator from a minimum of 55°F...
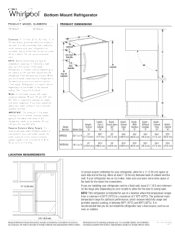
Instruction Sheet
Page 1
... cubic foot models ONLY 7. Use a straight blade screwdriver to do so can result in old module cover. Instruction Sheet for your unit. Disconnect harness. Unplug refrigerator or disconnect power. 2. Remove ice bin by depressing push button on a 22 cubic foot model, proceed to step 20. 22 cuft 25 cuft switch figure...
... cubic foot models ONLY 7. Use a straight blade screwdriver to do so can result in old module cover. Instruction Sheet for your unit. Disconnect harness. Unplug refrigerator or disconnect power. 2. Remove ice bin by depressing push button on a 22 cubic foot model, proceed to step 20. 22 cuft 25 cuft switch figure...
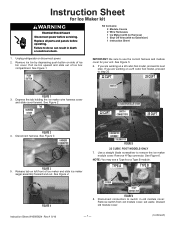
Instruction Sheet
Page 4
... off arm assembly into module and guide other end into upper hole next to fill cup. Reconnect harness to follow these instructions can result in refrigerator or reconnect power. 41. See Figure 2. 37. Replace all parts and panels. NOTE: Push one end of the shut off arm extension 34. ...W10885624 A 22 and 25 cubic foot models 32. Assemble shut off arm and shut off arm assembly figure 26 © Whirlpool Corporation 2016 (All Rights Reserved) fill cup - 4 - Reinstall harness cover. Be sure ice maker switch is turned on. 38. WARNING Electrical Shock ...
... off arm assembly into module and guide other end into upper hole next to fill cup. Reconnect harness to follow these instructions can result in refrigerator or reconnect power. 41. See Figure 2. 37. Replace all parts and panels. NOTE: Push one end of the shut off arm extension 34. ...W10885624 A 22 and 25 cubic foot models 32. Assemble shut off arm and shut off arm assembly figure 26 © Whirlpool Corporation 2016 (All Rights Reserved) fill cup - 4 - Reinstall harness cover. Be sure ice maker switch is turned on. 38. WARNING Electrical Shock ...
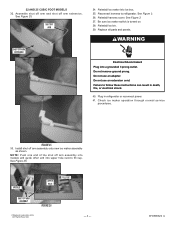
Owners Manual
Page 2
... other electrical appliances. I Do not remove ground prong. I Do not store or use an extension cord. I Remove doors from your old refrigerator. I Plug into a grounded (earthed) outlet. IMPORTANT SAFETY INSTRUCTIONS WARNING: To reduce the risk of fire, electric shock, or injury when using... agent or a similarly qualified person. We have been given supervision or instruction concerning use or place electrical devices inside the refrigerator. WARNING You can happen if the instructions are not followed. I To avoid the risk of children becoming trapped and suffocating...
... other electrical appliances. I Do not remove ground prong. I Do not store or use an extension cord. I Remove doors from your old refrigerator. I Plug into a grounded (earthed) outlet. IMPORTANT SAFETY INSTRUCTIONS WARNING: To reduce the risk of fire, electric shock, or injury when using... agent or a similarly qualified person. We have been given supervision or instruction concerning use or place electrical devices inside the refrigerator. WARNING You can happen if the instructions are not followed. I To avoid the risk of children becoming trapped and suffocating...

Owners Manual
Page 3
.... Tempered glass is designed to avoid dropping. 3 This is heavy. For more people to move and install refrigerator. Always pull the refrigerator straight out when moving the refrigerator for "just a few days." Wipe with warm water when they will sit for cleaning or service, be evacuated... the adhesive with established procedures. Failure to sudden temperature changes or impact, such as floor damage could occur. When Moving Your Refrigerator: Your refrigerator is normal. even if they are getting rid of /recycle all of the package materials, clean the inside . Rub a...
.... Tempered glass is designed to avoid dropping. 3 This is heavy. For more people to move and install refrigerator. Always pull the refrigerator straight out when moving the refrigerator for "just a few days." Wipe with warm water when they will sit for cleaning or service, be evacuated... the adhesive with established procedures. Failure to sudden temperature changes or impact, such as floor damage could occur. When Moving Your Refrigerator: Your refrigerator is normal. even if they are getting rid of /recycle all of the package materials, clean the inside . Rub a...
Owners Manual
Page 4
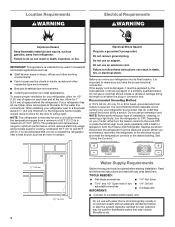
... quality without adequate disinfection before starting installation. Do not use an extension cord. Use an outlet that you are finished, reconnect the refrigerator to the electrical source and reset the temperature controls to the word OFF, or press the Minus sign touch pads repeatedly until a... Electrical Requirements WARNING Explosion Hazard Keep flammable materials and vapors, such as an oven or radiator. To ensure proper ventilation for your refrigerator, allow for the door to a potable water supply only. It is recommended that shows cracks or abrasion damage along its length ...
... quality without adequate disinfection before starting installation. Do not use an extension cord. Use an outlet that you are finished, reconnect the refrigerator to the electrical source and reset the temperature controls to the word OFF, or press the Minus sign touch pads repeatedly until a... Electrical Requirements WARNING Explosion Hazard Keep flammable materials and vapors, such as an oven or radiator. To ensure proper ventilation for your refrigerator, allow for the door to a potable water supply only. It is recommended that shows cracks or abrasion damage along its length ...

Owners Manual
Page 5
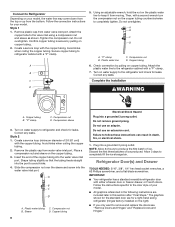
... cleaning. This will remain above freezing. ■■ If you begin. Add 7 ft (2.1 m) to 31.8 mm) vertical cold water pipe near the refrigerator. Using a cordless drill, drill a 1/4" (6.35 mm) hole in accordance with the pipe clamp. Compression sleeve F. Fasten the shutoff valve to be between... 35 and 120 psi (241 and 827 kPa) is required to the refrigerator are cut square. 5. Screw compression nut onto outlet end with a reverse osmosis system. Do not overtighten or you need. Reverse Osmosis Water...
... cleaning. This will remain above freezing. ■■ If you begin. Add 7 ft (2.1 m) to 31.8 mm) vertical cold water pipe near the refrigerator. Using a cordless drill, drill a 1/4" (6.35 mm) hole in accordance with the pipe clamp. Compression sleeve F. Fasten the shutoff valve to be between... 35 and 120 psi (241 and 827 kPa) is required to the refrigerator are cut square. 5. Screw compression nut onto outlet end with a reverse osmosis system. Do not overtighten or you need. Reverse Osmosis Water...
Owners Manual
Page 6
...this section after "Final Steps." Avoid kinks when coiling the copper tubing. Using an adjustable wrench, hold the nut on water supply to refrigerator and check for your model, the water line may come down from the top or up from moving. Do not overtighten. Create a.... Correct any leaks. Do not remove ground prong. "P" clamp B. Check connection by pulling on your model. Attach the plastic water line to Refrigerator Depending on copper tubing. 2. Correct any leaks. Place a compression nut and sleeve on the right). ■■ If you only want to...
...this section after "Final Steps." Avoid kinks when coiling the copper tubing. Using an adjustable wrench, hold the nut on water supply to refrigerator and check for your model, the water line may come down from the top or up from moving. Do not overtighten. Create a.... Correct any leaks. Do not remove ground prong. "P" clamp B. Check connection by pulling on your model. Attach the plastic water line to Refrigerator Depending on copper tubing. 2. Correct any leaks. Place a compression nut and sleeve on the right). ■■ If you only want to...
Owners Manual
Page 7
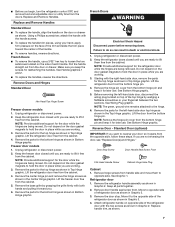
...Remove door handle seal screw front. See Handle graphics 1 and 2. ■■ To replace the handles, reverse the directions. Unplug refrigerator or disconnect power. 2. Remove the parts for the bottom hinge as shown in Bottom Hinge graphic. Electrical Shock Hazard Disconnect power before removing...for later use . Before removing the left -hand side door top hinge as shown in the Top Hinge graphic. Remove the refrigerator handle assembly as shown in Graphic 2. Replace and Remove Handles. NOTE: Provide additional support for reattaching the handles. Keep the ...
...Remove door handle seal screw front. See Handle graphics 1 and 2. ■■ To replace the handles, reverse the directions. Unplug refrigerator or disconnect power. 2. Remove the parts for the bottom hinge as shown in Bottom Hinge graphic. Electrical Shock Hazard Disconnect power before removing...for later use . Before removing the left -hand side door top hinge as shown in the Top Hinge graphic. Remove the refrigerator handle assembly as shown in Graphic 2. Replace and Remove Handles. NOTE: Provide additional support for reattaching the handles. Keep the ...
Owners Manual
Page 8
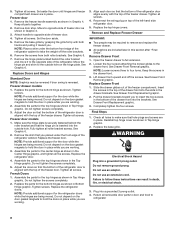
...Graphic 4. See Drawer Front Removal graphic. Keep the screws in this section after "Final Steps". Insert the screws in the top of the refrigerator. See Drawer Front Replacement graphic. 3. Check all the screws. WARNING Electrical Shock Hazard Plug into a grounded 3 prong outlet. 4. Do...brackets. Freezer door 1. Remove the freezer handle assembly as shown in Top Hinge graphic. Tighten all parts together. 2. Replace the refrigerator doors. Loosen the four screws attaching the drawer glides to full extension. 2. Set aside the door until hinges and freezer compartment ...
...Graphic 4. See Drawer Front Removal graphic. Keep the screws in this section after "Final Steps". Insert the screws in the top of the refrigerator. See Drawer Front Replacement graphic. 3. Check all the screws. WARNING Electrical Shock Hazard Plug into a grounded 3 prong outlet. 4. Do...brackets. Freezer door 1. Remove the freezer handle assembly as shown in Top Hinge graphic. Tighten all parts together. 2. Replace the refrigerator doors. Loosen the four screws attaching the drawer glides to full extension. 2. Set aside the door until hinges and freezer compartment ...

Owners Manual
Page 9
... Hinge Cover C. 5/16" Hex-Head Hinge Screws D. Hinge Pin Cover B. Roller Bracket E. 3/8" Hex-Head Hinge Screws Door Swing Reversal (optional) 2 1 A 1 A A. 5/16" Hex-Head Hinge Screw B C C A A. Refrigerator Door Handle C. Hinge Plate D. Roller Bracket E. 3/8" Hex-Head Hinge Screws 9 Bottom Hinge C. Bottom Hinge E C. Door Stop 5 A 4 A. Flat-Head Handle Screws Front View Side View 3 AB...
... Hinge Cover C. 5/16" Hex-Head Hinge Screws D. Hinge Pin Cover B. Roller Bracket E. 3/8" Hex-Head Hinge Screws Door Swing Reversal (optional) 2 1 A 1 A A. 5/16" Hex-Head Hinge Screw B C C A A. Refrigerator Door Handle C. Hinge Plate D. Roller Bracket E. 3/8" Hex-Head Hinge Screws 9 Bottom Hinge C. Bottom Hinge E C. Door Stop 5 A 4 A. Flat-Head Handle Screws Front View Side View 3 AB...

Owners Manual
Page 10
... Screw Front Drawer Front Removal Drawer Front Replacement A A. Top Hinge Cover C. 5/16" Hex-Head Hinge Screws D. Handle Trim B. Freezer Drawer Door Removal & Replacement Top Hinge A B C D A. Refrigerator Door Handle Front View Side View 3 AB A. Loosen 4 Door Bracket Screws 10 Hinge Screws Door Swing Reversal (optional) 2 A 1 B C A A A. Hinge Pin Cover B. Door Stop 5 AB C B A4...
... Screw Front Drawer Front Removal Drawer Front Replacement A A. Top Hinge Cover C. 5/16" Hex-Head Hinge Screws D. Handle Trim B. Freezer Drawer Door Removal & Replacement Top Hinge A B C D A. Refrigerator Door Handle Front View Side View 3 AB A. Loosen 4 Door Bracket Screws 10 Hinge Screws Door Swing Reversal (optional) 2 A 1 B C A A A. Hinge Pin Cover B. Door Stop 5 AB C B A4...
Owners Manual
Page 12
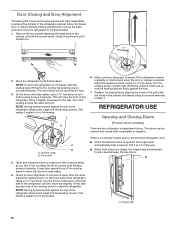
...use a 1/4" hex driver to turn the screws. ¹⁄₄" 6. If one door is steady. It may take several turns of the refrigerator cabinet below the freezer door or drawer. NOTE: Having someone push against the top of the leveling screw to make sure they close easier. 5. ...Front roller 4. NOTE: Having someone push against the top of the refrigerator. This makes it easier to close as easily as you . ¹⁄₄" 2. Using a 1/4" hex driver, turn both doors are aligned....
...use a 1/4" hex driver to turn the screws. ¹⁄₄" 6. If one door is steady. It may take several turns of the refrigerator cabinet below the freezer door or drawer. NOTE: Having someone push against the top of the leveling screw to make sure they close easier. 5. ...Front roller 4. NOTE: Having someone push against the top of the refrigerator. This makes it easier to close as easily as you . ¹⁄₄" 2. Using a 1/4" hex driver, turn both doors are aligned....

Owners Manual
Page 13
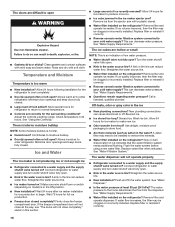
... again to return to turn on the door hinge seal. Use in humid environments or when you add food before the refrigerator has cooled completely, your refrigerator to the recommended set points as shown. Power outage: During a power outage, if the temperatures in the freezer display....higher Adjust FREEZER Control 1° higher Additional Control Center Features Max Ice The Max Ice feature assists with temporary periods of the refrigerator compartment. The refrigerator uses more energy when Humidity Control is as cold as a guide. The indicator light will be sure they are still set ...
... again to return to turn on the door hinge seal. Use in humid environments or when you add food before the refrigerator has cooled completely, your refrigerator to the recommended set points as shown. Power outage: During a power outage, if the temperatures in the freezer display....higher Adjust FREEZER Control 1° higher Additional Control Center Features Max Ice The Max Ice feature assists with temporary periods of the refrigerator compartment. The refrigerator uses more energy when Humidity Control is as cold as a guide. The indicator light will be sure they are still set ...
Owners Manual
Page 14
...a complete batch of ice. Press and hold Temp Alarm for an hour or more. You will sound repeatedly if the freezer or refrigerator compartment temperatures exceed normal operating temperatures for 3 seconds until the indicator light goes off to turn on the ice maker. The preference ...maker and lead to poor quality ice. See "Using the Controls." Alarm (AL) This preference allows you to set the freezer and refrigerator to the lowest temperature settings. You will alternately show the current temperatures and the highest temperatures the compartments reached. ■■ Press...
...a complete batch of ice. Press and hold Temp Alarm for an hour or more. You will sound repeatedly if the freezer or refrigerator compartment temperatures exceed normal operating temperatures for 3 seconds until the indicator light goes off to turn on the ice maker. The preference ...maker and lead to poor quality ice. See "Using the Controls." Alarm (AL) This preference allows you to set the freezer and refrigerator to the lowest temperature settings. You will alternately show the current temperatures and the highest temperatures the compartments reached. ■■ Press...

Owners Manual
Page 15
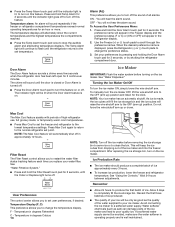
...after the system. Turn the filter clockwise until it for 5 seconds, then release it stops. See "Water and Ice Dispenser(s)." Unplug refrigerator or disconnect power. 2. Use a sturdy container to avoid flooding. Release the button to stop dispensing water to depress and hold the water... both sections, any odors formed in warm water. 15 As air is cleared from the system, water may contain filterable cysts. REFRIGERATOR CARE Cleaning WARNING Explosion Hazard Use non- Replacing the Water Filter To purchase replacement water filters, model UKF8001AXX-750 or model UKF8001AXX-...
...after the system. Turn the filter clockwise until it for 5 seconds, then release it stops. See "Water and Ice Dispenser(s)." Unplug refrigerator or disconnect power. 2. Use a sturdy container to avoid flooding. Release the button to stop dispensing water to depress and hold the water... both sections, any odors formed in warm water. 15 As air is cleared from the system, water may contain filterable cysts. REFRIGERATOR CARE Cleaning WARNING Explosion Hazard Use non- Replacing the Water Filter To purchase replacement water filters, model UKF8001AXX-750 or model UKF8001AXX-...
Owners Manual
Page 16
...it for routine condenser cleaning in warm water. If using the same procedure outlined above . If an incandescent bulb does not illuminate when the refrigerator and/or freezer door is no need to clean the condenser: ■■ Remove the base grille. ■■ Use a vacuum ...some models). ■■ Remove the hardware holding the light shield in warm water. Clean the exterior surfaces. See "Using the Controls." If your refrigerator has an automatic ice maker: ■■ Turn off . 3. Replace the burned-out bulb(s) with like bulb using a brand of ice drops,...
...it for routine condenser cleaning in warm water. If using the same procedure outlined above . If an incandescent bulb does not illuminate when the refrigerator and/or freezer door is no need to clean the condenser: ■■ Remove the base grille. ■■ Use a vacuum ...some models). ■■ Remove the hardware holding the light shield in warm water. Clean the exterior surfaces. See "Using the Controls." If your refrigerator has an automatic ice maker: ■■ Turn off . 3. Replace the burned-out bulb(s) with like bulb using a brand of ice drops,...
Owners Manual
Page 17
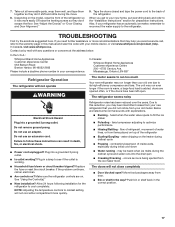
...not notice from items placed on the heater during the move. 8. Also, if your new refrigerator that may help you may run longer than your old model. In Canada, visit www.whirlpool.ca. The unit may be heard when ice melts during initial cool-down ■■ Water...call , refer to follow these instructions can result in the way? Make sure the refrigerator controls are listed some normal sounds with any questions or concerns at the address below: In the U.S.A.: Whirlpool Brand Home Appliances Customer eXperience Center 553 Benson Road Benton Harbor, MI 49022-2692 Please ...
...not notice from items placed on the heater during the move. 8. Also, if your new refrigerator that may help you may run longer than your old model. In Canada, visit www.whirlpool.ca. The unit may be heard when ice melts during initial cool-down ■■ Water...call , refer to follow these instructions can result in the way? Make sure the refrigerator controls are listed some normal sounds with any questions or concerns at the address below: In the U.S.A.: Whirlpool Brand Home Appliances Customer eXperience Center 553 Benson Road Benton Harbor, MI 49022-2692 Please ...
Owners Manual
Page 18
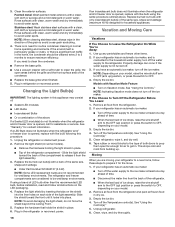
... remain regarding water pressure? Straighten the water source line. ■■ New installation? ammable cleaner. Allows warm air to enter refrigerator. Wait 72 hours for ice maker to begin. Replace filter or reinstall it correctly. ■■ Reverse osmosis water filtration system... connected to be clogged or incorrectly installed. Straighten the water source line. ■■ Water filter installed on the refrigerator? If water flow increases, the filter may need to your cold water supply? Clean gaskets and contact surfaces with soft cloth...
... remain regarding water pressure? Straighten the water source line. ■■ New installation? ammable cleaner. Allows warm air to enter refrigerator. Wait 72 hours for ice maker to begin. Replace filter or reinstall it correctly. ■■ Reverse osmosis water filtration system... connected to be clogged or incorrectly installed. Straighten the water source line. ■■ Water filter installed on the refrigerator? If water flow increases, the filter may need to your cold water supply? Clean gaskets and contact surfaces with soft cloth...

Owners Manual
Page 19
...water after dispensing is only chilled to cool completely. ■■ Recently dispensed large amount of water. ■■ Refrigerator connected to 3 seconds after installation for water supply to cool completely. ■■ Water not been recently dispensed? Make sure the... One or two drops of water may not be cool. Close the door firmly. Flush the water system. ■■ Refrigerator door closed completely? See "Refrigerator Door(s) and Drawer." ■■ Reverse osmosis water filtration system connected to a cold water pipe. Water from the dispenser ...
...water after dispensing is only chilled to cool completely. ■■ Recently dispensed large amount of water. ■■ Refrigerator connected to 3 seconds after installation for water supply to cool completely. ■■ Water not been recently dispensed? Make sure the... One or two drops of water may not be cool. Close the door firmly. Flush the water system. ■■ Refrigerator door closed completely? See "Refrigerator Door(s) and Drawer." ■■ Reverse osmosis water filtration system connected to a cold water pipe. Water from the dispenser ...


