
Installation Guide
Page 1
... important. Always read and obey all safety messages. This is , tell you how to reduce the chance of Contents RANGE SAFETY 1 INSTALLATION REQUIREMENTS 2 Tools and Parts 2 Location Requirements 2 Electrical Requirements - W10575959A All safety messages will tell you what the potential hazard is the safety alert symbol. WARNING You can be killed...
... important. Always read and obey all safety messages. This is , tell you how to reduce the chance of Contents RANGE SAFETY 1 INSTALLATION REQUIREMENTS 2 Tools and Parts 2 Location Requirements 2 Electrical Requirements - W10575959A All safety messages will tell you what the potential hazard is the safety alert symbol. WARNING You can be killed...

Installation Guide
Page 2
...using a power supply cord: ■ A UL listed power supply cord kit marked for Mobile Home Construction and Safety, Title 24, HUD Part 280). Parts needed ■ Tape measure ■ Wrench or pliers ■ Level nut driver ■ Phillips screwdriver ■ Hand or electric drill ...■ Flat-blade screwdriver 3.2 mm) drill bit Parts supplied Check that all parts are available from your builder or cabinet supplier to make sure that the materials used will need to be installed. Additional...
...using a power supply cord: ■ A UL listed power supply cord kit marked for Mobile Home Construction and Safety, Title 24, HUD Part 280). Parts needed ■ Tape measure ■ Wrench or pliers ■ Level nut driver ■ Phillips screwdriver ■ Hand or electric drill ...■ Flat-blade screwdriver 3.2 mm) drill bit Parts supplied Check that all parts are available from your builder or cabinet supplier to make sure that the materials used will need to be installed. Additional...

Installation Guide
Page 5
.... Keep cardboard bottom under the range and onto the rear leveling leg prior to be obtained from the range. Remove oven racks and parts package from the carton. Repeat with the other injury. 1. Use an adjustable wrench to do so can be plugged into a standard ... or more people, stand range back up onto cardboard or hardboard. Canada Only WARNING ■ Check with CSA Standard C22.1, Canadian Electrical Code, Part 1 - Remove shipping materials, tape and film from : Canadian Standards Association 178 Rexdale Blvd. Stack one cardboard corner on its final location, check...
.... Keep cardboard bottom under the range and onto the rear leveling leg prior to be obtained from the range. Remove oven racks and parts package from the carton. Repeat with the other injury. 1. Use an adjustable wrench to do so can be plugged into a standard ... or more people, stand range back up onto cardboard or hardboard. Canada Only WARNING ■ Check with CSA Standard C22.1, Canadian Electrical Code, Part 1 - Remove shipping materials, tape and film from : Canadian Standards Association 178 Rexdale Blvd. Stack one cardboard corner on its final location, check...

Installation Guide
Page 9
... Phillips screwdriver to connect the green ground wire from the back of the range. The ground wire must be attached first. B C D A. Power supply cord wires 9 Part of power supply cord. 1. Discard C. Save the ground-link screw and the end of range. Ground-link screw C. Ground-link screw C. Metal ground strap B. Line...
... Phillips screwdriver to connect the green ground wire from the back of the range. The ground wire must be attached first. B C D A. Power supply cord wires 9 Part of power supply cord. 1. Discard C. Save the ground-link screw and the end of range. Ground-link screw C. Ground-link screw C. Metal ground strap B. Line...

Installation Guide
Page 10
2. Neutral (white) wire E. Replace terminal block access cover. Strip the insulation back 1" (2.5 cm) from the back of electrical supply (4-wire or 3-wire connection). Part of each wire. 1" (2.5 cm) 4-wire Connection: Direct Wire Use this method for use with nominal 1³⁄₈" (3.5 cm) diameter connection opening, with ring terminals ...
2. Neutral (white) wire E. Replace terminal block access cover. Strip the insulation back 1" (2.5 cm) from the back of electrical supply (4-wire or 3-wire connection). Part of each wire. 1" (2.5 cm) 4-wire Connection: Direct Wire Use this method for use with nominal 1³⁄₈" (3.5 cm) diameter connection opening, with ring terminals ...
Installation Guide
Page 13
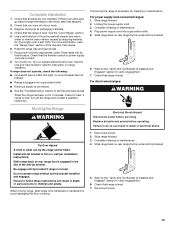
...power supply cord into its final location. Failure to follow these instructions can result in the Use and Care Guide. Check that all parts and panels before servicing. Slide range into a grounded outlet. 5. Turn on . When the range has been on range operation.... Slide range forward. 2. Install anti-tip bracket to verify engagement. 7. Replace all parts are not bent. 8. Slide range forward. 3. Complete Installation 1. For direct-wired ranges: WARNING Moving the Range WARNING Electrical Shock Hazard Disconnect...
...power supply cord into its final location. Failure to follow these instructions can result in the Use and Care Guide. Check that all parts and panels before servicing. Slide range into a grounded outlet. 5. Turn on . When the range has been on range operation.... Slide range forward. 2. Install anti-tip bracket to verify engagement. 7. Replace all parts are not bent. 8. Slide range forward. 3. Complete Installation 1. For direct-wired ranges: WARNING Moving the Range WARNING Electrical Shock Hazard Disconnect...

Use & Care Guide
Page 4
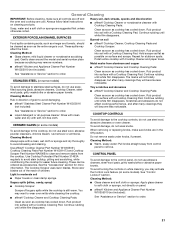
... or foam-type extinguisher. ■ Use Only Dry Potholders - Boilover causes smoking and greasy spillovers that it is used in or around any part of the range unless specifically recommended in area where the range is cool. Absence of these openings, oven doors, and windows of oven doors....shock, or fire. ■ Glazed Cooking Utensils - Care should never be hot even though they are dark in cabinets above a range or on any part of the range. ■ Wear Proper Apparel - children climbing on hot surfaces may become hot enough to cause burns. During and after use , ...
... or foam-type extinguisher. ■ Use Only Dry Potholders - Boilover causes smoking and greasy spillovers that it is used in or around any part of the range unless specifically recommended in area where the range is cool. Absence of these openings, oven doors, and windows of oven doors....shock, or fire. ■ Glazed Cooking Utensils - Care should never be hot even though they are dark in cabinets above a range or on any part of the range. ■ Wear Proper Apparel - children climbing on hot surfaces may become hot enough to cause burns. During and after use , ...

Use & Care Guide
Page 7
... could melt, such as the surface cooking area. Dropping a heavy or hard object onto the cooktop could break when the lid is normal operation. Some parts of the entire cooktop. ■ To avoid damage to heat cold foods. B A C To Use: 1. To turn off the cooktop before or after...between it and the cookware. ■ Cookware designed with a lid or aluminum foil. This is removed. ■ For foods containing sugar in any part of the surface cooking area may require more information, see "General Cleaning" section. As the glass cools, it to the cooktop, do not cook foods...
... could melt, such as the surface cooking area. Dropping a heavy or hard object onto the cooktop could break when the lid is normal operation. Some parts of the entire cooktop. ■ To avoid damage to heat cold foods. B A C To Use: 1. To turn off the cooktop before or after...between it and the cookware. ■ Cookware designed with a lid or aluminum foil. This is removed. ■ For foods containing sugar in any part of the surface cooking area may require more information, see "General Cleaning" section. As the glass cools, it to the cooktop, do not cook foods...

Use & Care Guide
Page 14
... the baking pan or casserole and the top element in the upper oven. Drippings will not glow red during the bake cycle. ■ The back part of longer cooking foods such as poultry to avoid overbrowning. ■ Pull out oven rack to stop position (about 4" [10.0 cm]) to drain juices and...
... the baking pan or casserole and the top element in the upper oven. Drippings will not glow red during the bake cycle. ■ The back part of longer cooking foods such as poultry to avoid overbrowning. ■ Pull out oven rack to stop position (about 4" [10.0 cm]) to drain juices and...

Use & Care Guide
Page 15
... have rare interiors and seared exteriors, use the broiler pan available for the oven to preheat, unless recommended in 2 or 3 different places, including the thickest part. ■ Before convection cooking, position the rack(s) according to the "Positioning Racks and Bakeware" section. ■ When using more than one rack, position bakeware/ cookware...
... have rare interiors and seared exteriors, use the broiler pan available for the oven to preheat, unless recommended in 2 or 3 different places, including the thickest part. ■ Before convection cooking, position the rack(s) according to the "Positioning Racks and Bakeware" section. ■ When using more than one rack, position bakeware/ cookware...
Use & Care Guide
Page 21
... should be ordered as the entire range is still warm. These spills may remove numbers. ■ affresh® Kitchen and Appliance Cleaner Part Number W10355010 (not included): See "Assistance or Service" section to avoid streaking and staining. Cleaning Method: ■ Glass cleaner, mild ... suggested first unless otherwise noted. You may activate the Control Lock feature (on panel. ■ affresh® Kitchen and Appliance Cleaner Part Number W10355010 (not included): See "Assistance or Service" section to remove. Do not remove seals under knobs, if present. CONTROL PANEL...
... should be ordered as the entire range is still warm. These spills may remove numbers. ■ affresh® Kitchen and Appliance Cleaner Part Number W10355010 (not included): See "Assistance or Service" section to avoid streaking and staining. Cleaning Method: ■ Glass cleaner, mild ... suggested first unless otherwise noted. You may activate the Control Lock feature (on panel. ■ affresh® Kitchen and Appliance Cleaner Part Number W10355010 (not included): See "Assistance or Service" section to remove. Do not remove seals under knobs, if present. CONTROL PANEL...

Use & Care Guide
Page 22
... towels or nonabrasive plastic scrubbing pad: Apply glass cleaner to soft cloth or sponge, not directly on panel. ■ affresh® Kitchen and Appliance Cleaner Part Number W10355010 (not included): See "Assistance or Service" section to the fully open and close. Unplug range or disconnect power. 2. The oven door is free...
... towels or nonabrasive plastic scrubbing pad: Apply glass cleaner to soft cloth or sponge, not directly on panel. ■ affresh® Kitchen and Appliance Cleaner Part Number W10355010 (not included): See "Assistance or Service" section to the fully open and close. Unplug range or disconnect power. 2. The oven door is free...
Use & Care Guide
Page 25
... assistance If you need further assistance, you can write to Whirlpool Canada LP with the same precision used to local dealers, repair parts distributors and service companies. If you use only FSP® replacement parts. Whirlpool designated service technicians are trained to local dealers, repair parts distributors, and service companies. Our consultants provide assistance with...
... assistance If you need further assistance, you can write to Whirlpool Canada LP with the same precision used to local dealers, repair parts distributors and service companies. If you use only FSP® replacement parts. Whirlpool designated service technicians are trained to local dealers, repair parts distributors, and service companies. Our consultants provide assistance with...

Use & Care Guide
Page 26
...these excluded circumstances shall be provided by the customer. Repairs to parts or systems resulting from unauthorized modifications made to correct defects in -home service is covered by an authorized Whirlpool servicer is not available. 10. Major appliances with original model/..., when this major appliance is operated and maintained according to instructions attached to or furnished with the product, Whirlpool Corporation or Whirlpool Canada LP (hereafter "Whirlpool") will need to be easily determined. Outside the 50 United States and Canada, this limited warranty. Cosmetic ...
...these excluded circumstances shall be provided by the customer. Repairs to parts or systems resulting from unauthorized modifications made to correct defects in -home service is covered by an authorized Whirlpool servicer is not available. 10. Major appliances with original model/..., when this major appliance is operated and maintained according to instructions attached to or furnished with the product, Whirlpool Corporation or Whirlpool Canada LP (hereafter "Whirlpool") will need to be easily determined. Outside the 50 United States and Canada, this limited warranty. Cosmetic ...

Warranty Information
Page 1
... this book and your sales slip together for repairs. You will pay for Factory Specified Parts and repair labor to correct defects in a remote area where service by an authorized Whirlpool servicer is not available. 10. Service calls to correct the installation of your major appliance...purchase, when this major appliance is operated and maintained according to instructions attached to or furnished with the product, Whirlpool Corporation or Whirlpool Canada LP (hereafter "Whirlpool") will need to know your complete model number and serial number. This limited warranty is valid only in the...
... this book and your sales slip together for repairs. You will pay for Factory Specified Parts and repair labor to correct defects in a remote area where service by an authorized Whirlpool servicer is not available. 10. Service calls to correct the installation of your major appliance...purchase, when this major appliance is operated and maintained according to instructions attached to or furnished with the product, Whirlpool Corporation or Whirlpool Canada LP (hereafter "Whirlpool") will need to know your complete model number and serial number. This limited warranty is valid only in the...


