
Use & Care Guide
Page 14
... cools down . If additional soils remain, leave a small amount of the empty oven and close the oven door. AquaLift® Technology is covered by ordering Part Number W10423113RP. Pour 13/4 cups (14 oz [414 mL]) of distilled or filtered water onto the bottom of water in the oven after the Clean...
... cools down . If additional soils remain, leave a small amount of the empty oven and close the oven door. AquaLift® Technology is covered by ordering Part Number W10423113RP. Pour 13/4 cups (14 oz [414 mL]) of distilled or filtered water onto the bottom of water in the oven after the Clean...

Use & Care Guide
Page 15
... and cooktop are suggested first unless otherwise noted. These spills may remove numbers. ■■ affresh® Kitchen and Appliance Cleaner Part Number W10355010 (not included): See the "Accessories" section for more information. General Cleaning IMPORTANT: Before cleaning, make sure knobs are ... with clean water and dry with porcelain and staining, etching, pitting or faint white spots can visit our website at www.whirlpool.ca. Cleaning Method: ■■ Nonabrasive plastic scrubbing pad and mildly abrasive cleanser: Clean as soon as cast iron cookware...
... and cooktop are suggested first unless otherwise noted. These spills may remove numbers. ■■ affresh® Kitchen and Appliance Cleaner Part Number W10355010 (not included): See the "Accessories" section for more information. General Cleaning IMPORTANT: Before cleaning, make sure knobs are ... with clean water and dry with porcelain and staining, etching, pitting or faint white spots can visit our website at www.whirlpool.ca. Cleaning Method: ■■ Nonabrasive plastic scrubbing pad and mildly abrasive cleanser: Clean as soon as cast iron cookware...

Use & Care Guide
Page 19
... W10179196 Split Oven Rack Order Part Number W10205524 Max Capacity Rack Oven Rack Order Part Number W10289145 Porcelain Broiler Pan and Grid Order Part Number 4396923 Premium Broiler Pan and Roasting Rack Order Part Number W10123240 19 ACCESSORIES For accessories in the U.S.A., you can visit our website at www.whirlpool.com or call us at...
... W10179196 Split Oven Rack Order Part Number W10205524 Max Capacity Rack Oven Rack Order Part Number W10289145 Porcelain Broiler Pan and Grid Order Part Number 4396923 Premium Broiler Pan and Roasting Rack Order Part Number W10123240 19 ACCESSORIES For accessories in the U.S.A., you can visit our website at www.whirlpool.com or call us at...
Use & Care Guide
Page 20
... circumstances shall be warranted for Factory Specified Replacement Parts and repair labor to correct defects in which it was purchased, or at its sole discretion replace the product. Service to : Whirlpool Customer eXperience Center www.whirlpool.com/product_help In the U.S.A., call 1-800-253... filters, preservation solutions, etc.). 5. Defects or damage caused by unauthorized service, alteration or modification of non-genuine Whirlpool parts or accessories. 6. Repairs to parts or systems to you also may not apply to correct product damage or defects caused by the use with this ...
... circumstances shall be warranted for Factory Specified Replacement Parts and repair labor to correct defects in which it was purchased, or at its sole discretion replace the product. Service to : Whirlpool Customer eXperience Center www.whirlpool.com/product_help In the U.S.A., call 1-800-253... filters, preservation solutions, etc.). 5. Defects or damage caused by unauthorized service, alteration or modification of non-genuine Whirlpool parts or accessories. 6. Repairs to parts or systems to you also may not apply to correct product damage or defects caused by the use with this ...

Warranty Information
Page 1
... or fitness, so this limitation may not apply to correct product damage or defects caused by a Whirlpool designated service company. Consumable parts (i.e. Repairs to parts or systems to you want a longer or more comprehensive warranty than the representations contained in the United...9632; Model number and serial number ■■ A clear, detailed description of the problem ■■ Proof of non-genuine Whirlpool parts or accessories. 6. Service must be warranted for appliances with published user, operator or installation instructions. 2. This limited warranty is valid ...
... or fitness, so this limitation may not apply to correct product damage or defects caused by a Whirlpool designated service company. Consumable parts (i.e. Repairs to parts or systems to you want a longer or more comprehensive warranty than the representations contained in the United...9632; Model number and serial number ■■ A clear, detailed description of the problem ■■ Proof of non-genuine Whirlpool parts or accessories. 6. Service must be warranted for appliances with published user, operator or installation instructions. 2. This limited warranty is valid ...
Installation Guide
Page 3
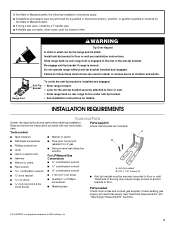
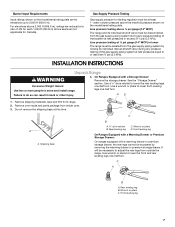
... included. Do not operate range without anti-tip bracket installed and engaged. INSTALLATION REQUIREMENTS Tools and Parts Gather the required tools and parts before starting installation. Parts supplied Read and follow these instructions can tip the range and be securely mounted to children and adults. ...Masking tape B A. Re-engage anti-tip bracket if range is engaged in death or serious burns to floor or wall. Failure to floor. Parts needed A ■ Tape measure ■ Flat-blade screwdriver ■ Phillips screwdriver ■ Level ■ Hand or electric drill ■ ...
... included. Do not operate range without anti-tip bracket installed and engaged. INSTALLATION REQUIREMENTS Tools and Parts Gather the required tools and parts before starting installation. Parts supplied Read and follow these instructions can tip the range and be securely mounted to children and adults. ...Masking tape B A. Re-engage anti-tip bracket if range is engaged in death or serious burns to floor or wall. Failure to floor. Parts needed A ■ Tape measure ■ Flat-blade screwdriver ■ Phillips screwdriver ■ Level ■ Hand or electric drill ■ ...
Installation Guide
Page 4
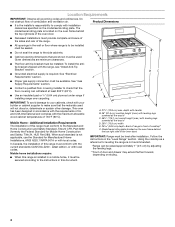
.... Using the cooktop as a reference for leveling the range is not applicable, use the Standard for Mobile Home Construction and Safety, Title 24, HUD Part 280). Location Requirements IMPORTANT: Observe all the way in* D. 29⁷⁄₈" (75.9 cm) width E. 25 64.6 cm) depth....4 D IMPORTANT: To avoid damage to your builder or cabinet supplier to the Manufactured Home Construction and Safety Standard, Title 24 CFR, Part 3280 (formerly the Federal Standard for Manufactured Home Installations, ANSI A225.1/NFPA 501A or with local codes. When such standard is not recommended....
.... Using the cooktop as a reference for leveling the range is not applicable, use the Standard for Mobile Home Construction and Safety, Title 24, HUD Part 280). Location Requirements IMPORTANT: Observe all the way in* D. 29⁷⁄₈" (75.9 cm) width E. 25 64.6 cm) depth....4 D IMPORTANT: To avoid damage to your builder or cabinet supplier to the Manufactured Home Construction and Safety Standard, Title 24 CFR, Part 3280 (formerly the Federal Standard for Manufactured Home Installations, ANSI A225.1/NFPA 501A or with local codes. When such standard is not recommended....
Installation Guide
Page 7
...; psi (3.5 kPa). It will be isolated from the gas supply piping system by removing the warming drawer or premium storage drawer. Remove oven racks and parts package from the gas supply piping system during any pressure testing of that system at ½ psi gauge (14" WCP) or lower The range must...
...; psi (3.5 kPa). It will be isolated from the gas supply piping system by removing the warming drawer or premium storage drawer. Remove oven racks and parts package from the gas supply piping system during any pressure testing of that system at ½ psi gauge (14" WCP) or lower The range must...

Installation Guide
Page 9
... the flexible connector to the gas shutoff valve. Gas pressure regulator shutoff valve shown in the "on " position. Remove cooktop burner caps and grates from parts package. B A C A. Gas pressure regulator B. C. Do not remove ground prong. Check that connector is in the following illustration). 2. A BC D E A A. Burner caps should be level when properly...
... the flexible connector to the gas shutoff valve. Gas pressure regulator shutoff valve shown in the "on " position. Remove cooktop burner caps and grates from parts package. B A C A. Gas pressure regulator B. C. Do not remove ground prong. Check that connector is in the following illustration). 2. A BC D E A A. Burner caps should be level when properly...
Installation Guide
Page 13
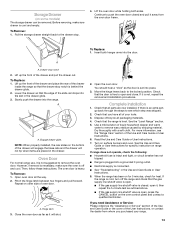
... the oven door while holding both hanger arms into a grounded 3 prong outlet. ■ Electrical supply is an extra part, go back through the steps to see the "Range Care" section of /recycle all parts are placed in the Use and Care Guide or User Instructions. 8. Open the oven door. Dispose of the...
... the oven door while holding both hanger arms into a grounded 3 prong outlet. ■ Electrical supply is an extra part, go back through the steps to see the "Range Care" section of /recycle all parts are placed in the Use and Care Guide or User Instructions. 8. Open the oven door. Dispose of the...
Installation Guide
Page 18
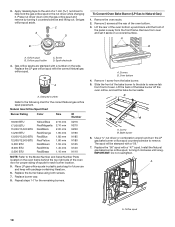
... stamped with a "56." 7. Set gas orifice spud aside. Remove from the bake burner. 5. 3. Apply masking tape to help hold the gas orifice spud in plastic parts bag for the correct Natural gas orifice spud placement. Spark electrode 4. The spud will be stamped with a number on the oven frame behind the top...
... stamped with a "56." 7. Set gas orifice spud aside. Remove from the bake burner. 5. 3. Apply masking tape to help hold the gas orifice spud in plastic parts bag for the correct Natural gas orifice spud placement. Spark electrode 4. The spud will be stamped with a number on the oven frame behind the top...


