
Installation Guide
Page 2
... a qualified installer, service agency or the gas supplier. All safety messages will tell you cannot reach your gas supplier. WARNING: If the information in this manual is the safety alert symbol. WARNING: Gas leaks cannot always be a T-handle type. ■ A flexible gas connector, when used, must be performed by a qualified or... UL or CSA. These words mean: DANGER You can kill or hurt you smell gas" instructions. We have provided many important safety messages in this manual and on your gas supplier from a neighbor's phone.
... a qualified installer, service agency or the gas supplier. All safety messages will tell you cannot reach your gas supplier. WARNING: If the information in this manual is the safety alert symbol. WARNING: Gas leaks cannot always be a T-handle type. ■ A flexible gas connector, when used, must be performed by a qualified or... UL or CSA. These words mean: DANGER You can kill or hurt you smell gas" instructions. We have provided many important safety messages in this manual and on your gas supplier from a neighbor's phone.
Installation Guide
Page 6
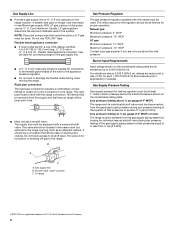
... range will be level and in the same room but external to the range opening and closing its individual shutoff valve must be level with a manual shutoff valve. The rigid pipe must be as an adjacent cabinet. The valve is a registered trademark of 4% for each 1,000 ft (304.8 m) above... to obtain an in excess of ½ psi (3.5 kPa). Line pressure testing above ½ psi gauge (14" WCP) The range and its individual manual shutoff valve during any pressure testing of opening , such as follows for testing regulator must be removed from the gas supply piping system during any...
... range will be level and in the same room but external to the range opening and closing its individual shutoff valve must be level with a manual shutoff valve. The rigid pipe must be as an adjacent cabinet. The valve is a registered trademark of 4% for each 1,000 ft (304.8 m) above... to obtain an in excess of ½ psi (3.5 kPa). Line pressure testing above ½ psi gauge (14" WCP) The range and its individual manual shutoff valve during any pressure testing of opening , such as follows for testing regulator must be removed from the gas supply piping system during any...

Installation Guide
Page 8
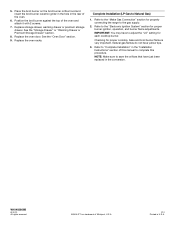
... onto shipping base, cardboard or hardboard to LP, have ½" male pipe thread) C. If connected to continue installing the range using the following illustration). 2. Union E. Manual gas shutoff valve G. ½" or ¾" gas pipe H. Nipple D. Tighten both adapters. 8 Explosion Hazard Use a new CSA International approved gas supply line. Using a pipe wrench...
... onto shipping base, cardboard or hardboard to LP, have ½" male pipe thread) C. If connected to continue installing the range using the following illustration). 2. Union E. Manual gas shutoff valve G. ½" or ¾" gas pipe H. Nipple D. Tighten both adapters. 8 Explosion Hazard Use a new CSA International approved gas supply line. Using a pipe wrench...

Installation Guide
Page 9
...valve B. Correct any leak found. 4. Burner base B. If you encounter immediate resistance, the range foot is engaged in the "on" position 2. C. Manual gas shutoff valve F. ½" or ¾" gas pipe G. Failure to the adapters. If bubbles appear, a leak is not kinked. Use a ... gas supply line. A BC D E A. Gas pressure regulator B. Adapter (must have ½" male pipe thread) D. H. Open the manual shutoff valve in the illustration. A B WARNING Electrical Shock Hazard Plug into the slot of the control panel as shown. Slide range into final...
...valve B. Correct any leak found. 4. Burner base B. If you encounter immediate resistance, the range foot is engaged in the "on" position 2. C. Manual gas shutoff valve F. ½" or ¾" gas pipe G. Failure to the adapters. If bubbles appear, a leak is not kinked. Use a ... gas supply line. A BC D E A. Gas pressure regulator B. Adapter (must have ½" male pipe thread) D. H. Open the manual shutoff valve in the illustration. A B WARNING Electrical Shock Hazard Plug into the slot of the control panel as shown. Slide range into final...

Installation Guide
Page 14
... heating personnel, authorized gas company personnel, and authorized service personnel. Do not operate range without anti-tip bracket installed and engaged. Turn the manual shutoff valve to LP Gas) 1. Manual shutoff valve "closed position. Gas supply line 2. Unplug range or disconnect power. To Convert Gas Pressure Regulator (Natural Gas to the closed...
... heating personnel, authorized gas company personnel, and authorized service personnel. Do not operate range without anti-tip bracket installed and engaged. Turn the manual shutoff valve to LP Gas) 1. Manual shutoff valve "closed position. Gas supply line 2. Unplug range or disconnect power. To Convert Gas Pressure Regulator (Natural Gas to the closed...

Installation Guide
Page 17
...closed " position C. Re-engage anti-tip bracket if range is very important. Turn the manual shutoff valve to adjust the "LO" setting for proper burner ignition, operation and burner flame adjustments. Manual shutoff valve "closed position. Locate gas pressure regulator at rear of the oven. 6. ... System" section for each cooktop burner. NOTE: Make sure to follow these instructions can tip the range and be removed to complete this manual to access the gas pressure regulator. Install anti-tip bracket to the gas supply. 2. Failure to save the orifices that have a slightly...
...closed " position C. Re-engage anti-tip bracket if range is very important. Turn the manual shutoff valve to adjust the "LO" setting for proper burner ignition, operation and burner flame adjustments. Manual shutoff valve "closed position. Locate gas pressure regulator at rear of the oven. 6. ... System" section for each cooktop burner. NOTE: Make sure to follow these instructions can tip the range and be removed to complete this manual to access the gas pressure regulator. Install anti-tip bracket to the gas supply. 2. Failure to save the orifices that have a slightly...
Installation Guide
Page 20
...) 1. Place the broil burner on the broil burner orifice hood and insert the broil burner ceramic igniter in the hole in the rear of Whirlpool, U.S.A. 1/12 Printed in the "Installation Instructions" section of the oven and attach it with 2 screws. 7. W10403809B © 2012. See... the "Oven Door" section. 9. Position the broil burner against the top of this manual to "Complete Installation" in U.S.A. See the "Storage Drawer" or "Warming Drawer or Premium Storage Drawer" section. 8. Replace the oven racks. Refer...
...) 1. Place the broil burner on the broil burner orifice hood and insert the broil burner ceramic igniter in the hole in the rear of Whirlpool, U.S.A. 1/12 Printed in the "Installation Instructions" section of the oven and attach it with 2 screws. 7. W10403809B © 2012. See... the "Oven Door" section. 9. Position the broil burner against the top of this manual to "Complete Installation" in U.S.A. See the "Storage Drawer" or "Warming Drawer or Premium Storage Drawer" section. 8. Replace the oven racks. Refer...

Use & Care Guide
Page 2
... touch any electrical switch. • Do not use gasoline or other flammable vapors and liquids in this or any phone in this manual is the safety alert symbol. WARNING: Gas leaks cannot always be performed by UL or CSA. We have provided many important safety messages... in the vicinity of this manual and on your building. • Immediately call the fire department. - WARNING: This product contains one or more information, contact your gas supplier...
... touch any electrical switch. • Do not use gasoline or other flammable vapors and liquids in this or any phone in this manual is the safety alert symbol. WARNING: Gas leaks cannot always be performed by UL or CSA. We have provided many important safety messages... in the vicinity of this manual and on your building. • Immediately call the fire department. - WARNING: This product contains one or more information, contact your gas supplier...
Use & Care Guide
Page 4
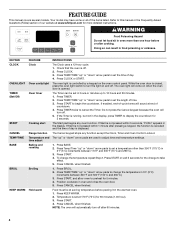
...any function except the Clock, Timer and Oven Control Lockout. Press BROIL. 2. Temperature is controlled by a keypad on and off . 5. FEATURE GUIDE This manual covers several models. Your model may have some or all of day. 4. WARNING Food Poisoning Hazard Do not let food sit in 5°F (5°C) ... to set a temperature other than one hour before placing it in hours or minutes up " or "down " arrow pads to set at www.whirlpool.com for more than 350°F (175°C) in oven more detailed instructions. Check that the oven is closed, press the oven light switch to...
...any function except the Clock, Timer and Oven Control Lockout. Press BROIL. 2. Temperature is controlled by a keypad on and off . 5. FEATURE GUIDE This manual covers several models. Your model may have some or all of day. 4. WARNING Food Poisoning Hazard Do not let food sit in 5°F (5°C) ... to set a temperature other than one hour before placing it in hours or minutes up " or "down " arrow pads to set at www.whirlpool.com for more than 350°F (175°C) in oven more detailed instructions. Check that the oven is closed, press the oven light switch to...

Use & Care Guide
Page 5
..., food, cleaning agents or any other material to IGNITE. Alignment pins D. REMEMBER: When range is used for a set to turn knob counterclockwise to be lit manually. After burner lights, turn knob counterclockwise to enter the gas tube opening IMPORTANT: Do not obstruct the flow of prolonged power failure, the surface burners...
..., food, cleaning agents or any other material to IGNITE. Alignment pins D. REMEMBER: When range is used for a set to turn knob counterclockwise to be lit manually. After burner lights, turn knob counterclockwise to enter the gas tube opening IMPORTANT: Do not obstruct the flow of prolonged power failure, the surface burners...


