
Installation Guide
Page 3
...tip bracket if range is required. Read and follow these instructions can result in the wall or floor where range is located on the model/serial rating plate. Location Requirements IMPORTANT: Observe all parts are included. Anti-tip bracket B. #12 x 1⁵⁄₈" screws ...engaged. INSTALLATION REQUIREMENTS Tools and Parts Gather the required tools and parts before starting installation. Install anti-tip bracket to floor. The model/serial rating plate is to the side cabinets. ■ Cabinet opening dimensions that the materials used . Slide range back so ...
...tip bracket if range is required. Read and follow these instructions can result in the wall or floor where range is located on the model/serial rating plate. Location Requirements IMPORTANT: Observe all parts are included. Anti-tip bracket B. #12 x 1⁵⁄₈" screws ...engaged. INSTALLATION REQUIREMENTS Tools and Parts Gather the required tools and parts before starting installation. Install anti-tip bracket to floor. The model/serial rating plate is to the side cabinets. ■ Cabinet opening dimensions that the materials used . Slide range back so ...

Installation Guide
Page 4
... standard is not applicable, use the Standard for 25" (64.0 cm) countertop depth, 24" (61.0 cm) base cabinet depth and 36" (91.4 cm) countertop height. Model/serial rating plate (located on styling. upper cabinet depth C. 30" (76.2 cm) min. E. 30¹⁄₈" (76.5 cm) min. opening width D. The shaded areas...
... standard is not applicable, use the Standard for 25" (64.0 cm) countertop depth, 24" (61.0 cm) base cabinet depth and 36" (91.4 cm) countertop height. Model/serial rating plate (located on styling. upper cabinet depth C. 30" (76.2 cm) min. E. 30¹⁄₈" (76.5 cm) min. opening width D. The shaded areas...

Installation Guide
Page 5
... from the gas specified on the types of Gas Natural gas: This range is equipped with Natural gas. Check with the local gas supplier. The model/serial rating plate located on the oven frame behind the top left side of the oven door has information on the... model/serial rating plate for the control panel to do not include the type of gas available, check with a qualified electrician if you not plug an ...
... from the gas specified on the types of Gas Natural gas: This range is equipped with Natural gas. Check with the local gas supplier. The model/serial rating plate located on the oven frame behind the top left side of the oven door has information on the... model/serial rating plate for the control panel to do not include the type of gas available, check with a qualified electrician if you not plug an ...
Installation Guide
Page 6
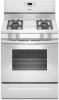
...supplied with a manual shutoff valve. To range †®TEFLON is a registered trademark of opening , such as follows for turning on the model/serial rating plate are reduced at test pressures in excess of the inlet to the appliance pressure regulator. ■ Do not kink or damage... a new CSA design-certified, 4 to 5 ft (122 to 152.4 cm) long, ½" (1.3 cm) or ¾" (1.9 cm) I . A smaller size pipe on the model/serial rating plate. For elevations above ½ psi gauge (14" WCP) The range and its individual manual shutoff valve during any pressure testing of LP...
...supplied with a manual shutoff valve. To range †®TEFLON is a registered trademark of opening , such as follows for turning on the model/serial rating plate are reduced at test pressures in excess of the inlet to the appliance pressure regulator. ■ Do not kink or damage... a new CSA design-certified, 4 to 5 ft (122 to 152.4 cm) long, ½" (1.3 cm) or ¾" (1.9 cm) I . A smaller size pipe on the model/serial rating plate. For elevations above ½ psi gauge (14" WCP) The range and its individual manual shutoff valve during any pressure testing of LP...

Installation Guide
Page 11
... the control knob. 4. Air shutter 4. Test the flame by using a mirror. Adjust Oven Bake Burner Flame (if needed ) Look through oven window to light. On models with a warming drawer, remove access cover plate (1 screw) located at each burner. Locking screw B. Push CANCEL/OFF when finished. 5. Under certain conditions, it may take...
... the control knob. 4. Air shutter 4. Test the flame by using a mirror. Adjust Oven Bake Burner Flame (if needed ) Look through oven window to light. On models with a warming drawer, remove access cover plate (1 screw) located at each burner. Locking screw B. Push CANCEL/OFF when finished. 5. Under certain conditions, it may take...

Installation Guide
Page 12
Adjust the air shutter as needed. 3. Place the rear alignment tabs into the drawer glides on some models) The storage drawer can be adjusted: 1. Warming Drawer or Premium Storage Drawer (on both sides. A B B A. Drawer alignment tab B. Push the warming drawer or premium... drawer to its fully open and close the warming drawer or premium storage drawer to ensure it is seated properly on the glides on some models) Remove all the way. 3. Drawer glide notch 3. A A. Lock screw B. To Remove: 1. Using both sides. Lift up the front of the broil burner. 2. If ...
Adjust the air shutter as needed. 3. Place the rear alignment tabs into the drawer glides on some models) The storage drawer can be adjusted: 1. Warming Drawer or Premium Storage Drawer (on both sides. A B B A. Drawer alignment tab B. Push the warming drawer or premium... drawer to its fully open and close the warming drawer or premium storage drawer to ensure it is seated properly on the glides on some models) Remove all the way. 3. Drawer glide notch 3. A A. Lock screw B. To Remove: 1. Using both sides. Lift up the front of the broil burner. 2. If ...

Installation Guide
Page 14
... engaged in death, explosion, or fire. Gas supply line 2. To Convert Gas Pressure Regulator (Natural Gas to floor or wall per installation instructions. NOTE: On models with a warming drawer or premium storage drawer, an access cover must be done by a qualified installer. Tip Over Hazard A child or adult can tip the...
... engaged in death, explosion, or fire. Gas supply line 2. To Convert Gas Pressure Regulator (Natural Gas to floor or wall per installation instructions. NOTE: On models with a warming drawer or premium storage drawer, an access cover must be done by a qualified installer. Tip Over Hazard A child or adult can tip the...

Installation Guide
Page 15
... orifice spuds in place while removing and replacing the orifice spuds. A. Igniter electrode B. Gas pressure regulator cap with a ⁵⁄₈" combination wrench to the Model Number and Serial Number Plate located on regulator so that the hollow end faces out and the marking "!LP" is facing the direction shown in...
... orifice spuds in place while removing and replacing the orifice spuds. A. Igniter electrode B. Gas pressure regulator cap with a ⁵⁄₈" combination wrench to the Model Number and Serial Number Plate located on regulator so that the hollow end faces out and the marking "!LP" is facing the direction shown in...

Installation Guide
Page 17
... manual shutoff valve to complete this manual to the closed " position C. Gas supply line 2. Locate gas pressure regulator at rear of this procedure. NOTE: On models with a "090" hood. See the "Storage Drawer" or "Warming Drawer or Premium Storage Drawer" section. 8. Install the LP gas broiler burner orifice hood, turning it...
... manual shutoff valve to complete this manual to the closed " position C. Gas supply line 2. Locate gas pressure regulator at rear of this procedure. NOTE: On models with a "090" hood. See the "Storage Drawer" or "Warming Drawer or Premium Storage Drawer" section. 8. Install the LP gas broiler burner orifice hood, turning it...

Installation Guide
Page 18
... end facing out D. Plastic cover B. Gas pressure regulator cap with the correct Natural gas orifice spud. NOTE: Reinstall one of a 7 mm nut driver to the Model Number and Serial Number Plate located on the side. Replace the burner base using both screws. 7. A B A. Orifice spud holder C. Gas pressure regulator cap 5. To Convert...
... end facing out D. Plastic cover B. Gas pressure regulator cap with the correct Natural gas orifice spud. NOTE: Reinstall one of a 7 mm nut driver to the Model Number and Serial Number Plate located on the side. Replace the burner base using both screws. 7. A B A. Orifice spud holder C. Gas pressure regulator cap 5. To Convert...
Warranty Information
Page 1
... is designed to be borne by a Whirlpool designated service company. Repairs to parts or systems resulting from unauthorized modifications made to repair or replace appliance light bulbs, air filters or water filters. Major appliances with original model/serial numbers that is contrary to obtain...Costs associated with any questions or concerns at the number below : Whirlpool Brand Home Appliances Customer eXperience Center 553 Benson Road Benton Harbor, MI 49022-2692 Please include a daytime phone number in your model number and serial number on the label, located on how to determine...
... is designed to be borne by a Whirlpool designated service company. Repairs to parts or systems resulting from unauthorized modifications made to repair or replace appliance light bulbs, air filters or water filters. Major appliances with original model/serial numbers that is contrary to obtain...Costs associated with any questions or concerns at the number below : Whirlpool Brand Home Appliances Customer eXperience Center 553 Benson Road Benton Harbor, MI 49022-2692 Please include a daytime phone number in your model number and serial number on the label, located on how to determine...

Use & Care Guide
Page 1
Table of the oven door. If you still need your model and serial number located on the oven frame behind the top left side of Contents RANGE SAFETY 2 The Anti-Tip...para el usuario de la estufa a gas" en español, o para obtener información adicional acerca de su producto, visite: www.whirlpool.com Necesitará tener a mano el número de modelo y de serie, que está ubicado en el marco del horno detr&#... in TROUBLESHOOTING, please visit our website at 1-800-253-1301. You will need assistance, call us at www.whirlpool.com for purchasing this high-quality product.
Table of the oven door. If you still need your model and serial number located on the oven frame behind the top left side of Contents RANGE SAFETY 2 The Anti-Tip...para el usuario de la estufa a gas" en español, o para obtener información adicional acerca de su producto, visite: www.whirlpool.com Necesitará tener a mano el número de modelo y de serie, que está ubicado en el marco del horno detr&#... in TROUBLESHOOTING, please visit our website at 1-800-253-1301. You will need assistance, call us at www.whirlpool.com for purchasing this high-quality product.
Use & Care Guide
Page 4
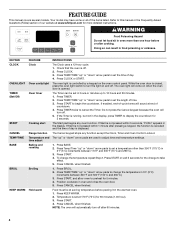
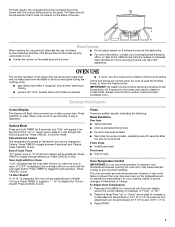
Check that the oven is set at www.whirlpool.com for 5 minutes. 4. Oven timer The Timer can result in the ... Press START. 4. Press CANCEL when finished. Temperature is off . Press START. 4. FEATURE GUIDE This manual covers several models. Refer to adjust time and temperature settings. KEYPAD CLOCK OVEN LIGHT TIMER (Set/Off) START CANCEL TEMP/TIME BAKE BROIL ...the light on when the oven door is not pressed within 1 minute after 60 minutes. 4 Broiling 1. Your model may have some or all of countdown. 4. Oven cavity light The oven light is displayed. If the Timer is...
Check that the oven is set at www.whirlpool.com for 5 minutes. 4. Oven timer The Timer can result in the ... Press START. 4. Press CANCEL when finished. Temperature is off . Press START. 4. FEATURE GUIDE This manual covers several models. Refer to adjust time and temperature settings. KEYPAD CLOCK OVEN LIGHT TIMER (Set/Off) START CANCEL TEMP/TIME BAKE BROIL ...the light on when the oven door is not pressed within 1 minute after 60 minutes. 4 Broiling 1. Your model may have some or all of countdown. 4. Oven cavity light The oven light is displayed. If the Timer is...
Use & Care Guide
Page 7
... may make a "popping" sound when opening the oven door may result in use a thermometer to the USDA Home Canning Guides. IMPORTANT: The health of some models), repeating every 20 seconds after the end-of-cycle tones Three tones ■ Invalid pad press Four tones ■ End of cycle Oven Temperature Control...
... may make a "popping" sound when opening the oven door may result in use a thermometer to the USDA Home Canning Guides. IMPORTANT: The health of some models), repeating every 20 seconds after the end-of-cycle tones Three tones ■ Invalid pad press Four tones ■ End of cycle Oven Temperature Control...

Use & Care Guide
Page 8
... cycle. When the set a Timed Bake using Sabbath Mode (on . The oven is now in the display. "SAb" will stop flashing and remain on some models): 1. "SAb" will flash in Sabbath Mode by a separate Oven Light switch on in a Bake setting until the Cancel keypad is in the display. 9. The Oven... will turn on or off for the entire time Sabbath Mode is opened , resulting in the display. The oven temperature will not turn on some models): WARNING Food Poisoning Hazard Do not let food sit in Sabbath Mode and is pressed. The oven is now in oven more than the one...
... cycle. When the set a Timed Bake using Sabbath Mode (on . The oven is now in the display. "SAb" will stop flashing and remain on some models): 1. "SAb" will flash in Sabbath Mode by a separate Oven Light switch on in a Bake setting until the Cancel keypad is in the display. 9. The Oven... will turn on or off for the entire time Sabbath Mode is opened , resulting in the display. The oven temperature will not turn on some models): WARNING Food Poisoning Hazard Do not let food sit in Sabbath Mode and is pressed. The oven is now in oven more than the one...

Use & Care Guide
Page 9
.... Rack 3: Most baked goods on the display. casseroles; Baking Layer Cakes on 2 Racks For best results when baking cakes on the oven. On convection range models, the fan may be ordered. When START is recommended in intervals. Broiling When broiling, preheat the oven for 5 minutes before turning on 2 racks use a broiler...
.... Rack 3: Most baked goods on the display. casseroles; Baking Layer Cakes on 2 Racks For best results when baking cakes on the oven. On convection range models, the fan may be ordered. When START is recommended in intervals. Broiling When broiling, preheat the oven for 5 minutes before turning on 2 racks use a broiler...

Use & Care Guide
Page 10
...Clock" keypad feature in oven more than the one displayed. 3. Press START. The temperature and/or time settings can result in discoloring, loss of some models, the temperature probe from the storage drawer. 4. Press the TEMP/TIME "up " or "down " arrow pads to follow these instructions can be ...displayed. ■ Remove all cooking utensils, oven racks and aluminum foil and, on some models) The SELF CLEAN self-cleaning cycle is too high, the oven door will remain locked and "cool" and "locked" will be able to clear...
...Clock" keypad feature in oven more than the one displayed. 3. Press START. The temperature and/or time settings can result in discoloring, loss of some models, the temperature probe from the storage drawer. 4. Press the TEMP/TIME "up " or "down " arrow pads to follow these instructions can be ...displayed. ■ Remove all cooking utensils, oven racks and aluminum foil and, on some models) The SELF CLEAN self-cleaning cycle is too high, the oven door will remain locked and "cool" and "locked" will be able to clear...

Use & Care Guide
Page 11
...Cleaner Part Number 31617A: See the "Accessories" section for more information. To Replace: 1. Unplug range or disconnect power. 4. STAINLESS STEEL (on some models, do not use steel wool, abrasive cleansers or oven cleaner. Damage may occur to stainless steel surfaces, even with porcelain and staining, etching, pitting or... off and the oven and cooktop are cool. Soap, water and a soft cloth or sponge are in the back of our website at www.whirlpool.com. These spills may affect the finish. Turn the glass bulb cover in the OFF position. Cooked-on panel. ■ affresh™ Kitchen...
...Cleaner Part Number 31617A: See the "Accessories" section for more information. To Replace: 1. Unplug range or disconnect power. 4. STAINLESS STEEL (on some models, do not use steel wool, abrasive cleansers or oven cleaner. Damage may occur to stainless steel surfaces, even with porcelain and staining, etching, pitting or... off and the oven and cooktop are cool. Soap, water and a soft cloth or sponge are in the back of our website at www.whirlpool.com. These spills may affect the finish. Turn the glass bulb cover in the OFF position. Cooked-on panel. ■ affresh™ Kitchen...
Use & Care Guide
Page 12
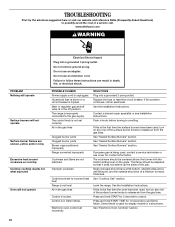
...straight sides and a well fitting lid, and the material should be of a medium to heavy thickness. Control is in a showroom. www.whirlpool.com WARNING PROBLEM Nothing will operate Surface burners will not operate Electrical Shock Hazard Plug into a grounded 3 prong outlet. Press and hold START... TIME for display models in the off position. POSSIBLE CAUSES Power supply cord is not level Air in death, fire, or electrical shock. Replace the ...
...straight sides and a well fitting lid, and the material should be of a medium to heavy thickness. Control is in a showroom. www.whirlpool.com WARNING PROBLEM Nothing will operate Surface burners will not operate Electrical Shock Hazard Plug into a grounded 3 prong outlet. Press and hold START... TIME for display models in the off position. POSSIBLE CAUSES Power supply cord is not level Air in death, fire, or electrical shock. Replace the ...
Use & Care Guide
Page 13
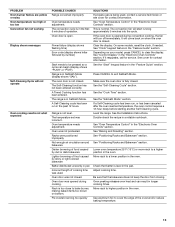
...been entered. The temperature set was used , contact a service technician or see cover for contact information. It will turn off immediately. On some models, reset the clock, if needed. See "Control Display" in longer cooking times. See cover for service. Press CANCEL to clear the display. .... See the "Cook Time" section. Double-check the recipe in the "Feature Guide" section. Oven door was not closed . Depending on your model, press CANCEL to exit Sabbath Mode. Make sure the oven door is normal. See "Positioning Racks and Bakeware" section. Adjust cooking time. The ...
...been entered. The temperature set was used , contact a service technician or see cover for contact information. It will turn off immediately. On some models, reset the clock, if needed. See "Control Display" in longer cooking times. See cover for service. Press CANCEL to clear the display. .... See the "Cook Time" section. Double-check the recipe in the "Feature Guide" section. Oven door was not closed . Depending on your model, press CANCEL to exit Sabbath Mode. Make sure the oven door is normal. See "Positioning Racks and Bakeware" section. Adjust cooking time. The ...


