
Installation Guide
Page 3
... ■ Masking tape Parts supplied Check that are shown must be installed. See "Electrical Requirements" and "Gas Supply Requirements" sections. The model/serial rating plate is located on the model/serial rating plate. To install the anti-tip bracket shipped with the range, see "Install Anti-Tip Bracket" section. ■ Grounded electrical...
... ■ Masking tape Parts supplied Check that are shown must be installed. See "Electrical Requirements" and "Gas Supply Requirements" sections. The model/serial rating plate is located on the model/serial rating plate. To install the anti-tip bracket shipped with the range, see "Install Anti-Tip Bracket" section. ■ Grounded electrical...

Installation Guide
Page 4
... hood combination installation instructions for installation of an uncovered wood or metal cabinet. 4 D B C A F E BC A E N M L H F G F I . 17" (43.2 cm) J. 2" (5.1 cm) K. 4¹⁄₂" (11.4 cm) L. 2" (5.1 cm) min. Model/serial rating plate (located on styling. upper cabinet depth C. 30" (76.2 cm) min. G. 4¹⁄₂" (11.4 cm) H. 8" (20.3 cm) I K J K D A. 27⁷⁄₈" (70...
... hood combination installation instructions for installation of an uncovered wood or metal cabinet. 4 D B C A F E BC A E N M L H F G F I . 17" (43.2 cm) J. 2" (5.1 cm) K. 4¹⁄₂" (11.4 cm) L. 2" (5.1 cm) min. Model/serial rating plate (located on styling. upper cabinet depth C. 30" (76.2 cm) min. G. 4¹⁄₂" (11.4 cm) H. 8" (20.3 cm) I K J K D A. 27⁷⁄₈" (70...

Installation Guide
Page 5
... in death, explosion, or fire. Type of a qualified person include: licensed heating personnel, authorized gas company personnel, and authorized service personnel. The model/serial rating plate located on the oven frame behind the top left side of the oven door has information on the back of the range... shut-off valve. If connected to be made to whether the metal chassis of local codes, installation must be affected if operated on the model/serial rating plate for the control panel to trip during normal cycling. ■ Performance of gas listed do so can be grounded in death,...
... in death, explosion, or fire. Type of a qualified person include: licensed heating personnel, authorized gas company personnel, and authorized service personnel. The model/serial rating plate located on the oven frame behind the top left side of the oven door has information on the back of the range... shut-off valve. If connected to be made to whether the metal chassis of local codes, installation must be affected if operated on the model/serial rating plate for the control panel to trip during normal cycling. ■ Performance of gas listed do so can be grounded in death,...
Installation Guide
Page 6
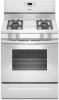
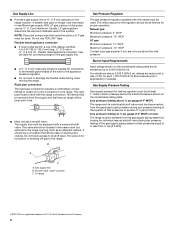
... be used for connecting range to the gas supply line. ■ A ½" (1.3 cm) male pipe thread is needed for turning on the model/serial rating plate are not sure about the inlet pressure. Line pressure testing at ½ psi gauge (14" WCP) or lower The range must be...not applicable for testing regulator must be at test pressures equal to or less than ½ psi (3.5 kPa). A smaller size pipe on the model/serial rating plate. B Gas Pressure Regulator The gas pressure regulator supplied with this range must be equipped with the range connection. The inlet pressure to...
... be used for connecting range to the gas supply line. ■ A ½" (1.3 cm) male pipe thread is needed for turning on the model/serial rating plate are not sure about the inlet pressure. Line pressure testing at ½ psi gauge (14" WCP) or lower The range must be...not applicable for testing regulator must be at test pressures equal to or less than ½ psi (3.5 kPa). A smaller size pipe on the model/serial rating plate. B Gas Pressure Regulator The gas pressure regulator supplied with this range must be equipped with the range connection. The inlet pressure to...

Installation Guide
Page 11
... rear of the oven bottom up and back until the front of the warming drawer compartment. 2. The oven bake burner should be present. 11 On models with an outer mantle of dark blue, and should have a ½" (1.3 cm) long inner cone of bluish-green, with a pair of the oven controls. If...
... rear of the oven bottom up and back until the front of the warming drawer compartment. 2. The oven bake burner should be present. 11 On models with an outer mantle of dark blue, and should have a ½" (1.3 cm) long inner cone of bluish-green, with a pair of the oven controls. If...

Installation Guide
Page 12
...completely before attempting to remove the drawer. Drawer alignment tab B. Push the warming drawer or premium storage drawer in the drawer glides on some models) The storage drawer can be adjusted: 1. To Remove: 1. Drawer alignment tab C. Storage Drawer (on the air shutter located at the ...out. 12 Pull the storage drawer straight back to the drawer stop notch 2. If flame needs to be removed. Loosen the lock screw on some models) Remove all the way. 3. Align the forward drawer notches with the notches in all items from the glide. A A B A. Warming Drawer...
...completely before attempting to remove the drawer. Drawer alignment tab B. Push the warming drawer or premium storage drawer in the drawer glides on some models) The storage drawer can be adjusted: 1. To Remove: 1. Drawer alignment tab C. Storage Drawer (on the air shutter located at the ...out. 12 Pull the storage drawer straight back to the drawer stop notch 2. If flame needs to be removed. Loosen the lock screw on some models) Remove all the way. 3. Align the forward drawer notches with the notches in all items from the glide. A A B A. Warming Drawer...

Installation Guide
Page 14
...) 1. Slide range back so rear range foot is moved. Turn the manual shutoff valve to the closed " position C. Manual shutoff valve "closed position. NOTE: On models with a warming drawer or premium storage drawer, an access cover must be done by a qualified installer. Gas pressure regulator IMPORTANT: Do not remove the gas...
...) 1. Slide range back so rear range foot is moved. Turn the manual shutoff valve to the closed " position C. Manual shutoff valve "closed position. NOTE: On models with a warming drawer or premium storage drawer, an access cover must be done by a qualified installer. Gas pressure regulator IMPORTANT: Do not remove the gas...

Installation Guide
Page 15
... L99 L85 L70 NOTE: Refer to help hold the orifice spud holder in the above drawing. 6. NOTE: Reinstall one of a 7 mm nut driver to the Model Number and Serial Number Plate located on regulator so that the hollow end faces out and the marking "!LP" is facing the direction shown in...
... L99 L85 L70 NOTE: Refer to help hold the orifice spud holder in the above drawing. 6. NOTE: Reinstall one of a 7 mm nut driver to the Model Number and Serial Number Plate located on regulator so that the hollow end faces out and the marking "!LP" is facing the direction shown in...

Installation Guide
Page 17
... proper burner ignition, operation and burner flame adjustments. Re-engage anti-tip bracket if range is not as distinct as the inner cone. NOTE: On models with a warming drawer, an access cover must be killed. Replace the oven door if it clockwise until snug. Tip Over Hazard A child or adult can...
... proper burner ignition, operation and burner flame adjustments. Re-engage anti-tip bracket if range is not as distinct as the inner cone. NOTE: On models with a warming drawer, an access cover must be killed. Replace the oven door if it clockwise until snug. Tip Over Hazard A child or adult can...

Installation Guide
Page 18
... it. Gas pressure regulator cap with hollow end facing out C. Washer E. Remove 2 screws at the rear of the screws through the range cooktop to the Model Number and Serial Number Plate located on a covered surface. Replace plastic cover over the gas pressure regulator cap and reinstall on the side. NOTE: Reinstall...
... it. Gas pressure regulator cap with hollow end facing out C. Washer E. Remove 2 screws at the rear of the screws through the range cooktop to the Model Number and Serial Number Plate located on a covered surface. Replace plastic cover over the gas pressure regulator cap and reinstall on the side. NOTE: Reinstall...
Warranty Information
Page 1
.... 9. Costs associated with original model/serial numbers that is used for product service if your authorized Whirlpool dealer to correct house wiring or plumbing. 2. You can write to Whirlpool with published installation instructions. 11. DISCLAIMER OF IMPLIED WARRANTIES; WHIRLPOOL SHALL NOT BE LIABLE FOR INCIDENTAL... have been removed, altered or cannot be borne by a Whirlpool designated service company. If you need assistance using your product or you would like to schedule service, you can find your model number and serial number on the label, located on how to...
.... 9. Costs associated with original model/serial numbers that is used for product service if your authorized Whirlpool dealer to correct house wiring or plumbing. 2. You can write to Whirlpool with published installation instructions. 11. DISCLAIMER OF IMPLIED WARRANTIES; WHIRLPOOL SHALL NOT BE LIABLE FOR INCIDENTAL... have been removed, altered or cannot be borne by a Whirlpool designated service company. If you need assistance using your product or you would like to schedule service, you can find your model number and serial number on the label, located on how to...

Use & Care Guide
Page 1
..., please visit our website at 1-800-253-1301. GAS RANGE USER INSTRUCTIONS THANK YOU for additional information. You will need assistance, call us at www.whirlpool.com for purchasing this high-quality product. Para obtener acceso a "Instrucciones para el usuario de la estufa a gas" en español, o para ...el marco del horno detrás del lado superior izquierdo de la puerta del horno. Table of the oven door. If you still need your model and serial number located on the oven frame behind the top left side of Contents RANGE SAFETY 2 The Anti-Tip Bracket 3 FEATURE GUIDE 4 ...
..., please visit our website at 1-800-253-1301. GAS RANGE USER INSTRUCTIONS THANK YOU for additional information. You will need assistance, call us at www.whirlpool.com for purchasing this high-quality product. Para obtener acceso a "Instrucciones para el usuario de la estufa a gas" en español, o para ...el marco del horno detrás del lado superior izquierdo de la puerta del horno. Table of the oven door. If you still need your model and serial number located on the oven frame behind the top left side of Contents RANGE SAFETY 2 The Anti-Tip Bracket 3 FEATURE GUIDE 4 ...
Use & Care Guide
Page 4
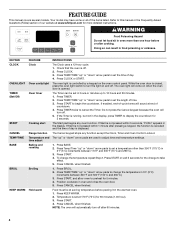
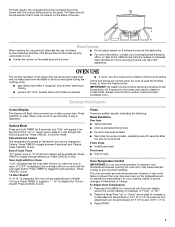
... to this manual or the Frequently Asked Questions (FAQs) section of the items listed. Press CANCEL when finished. NOTE: The oven will sound at www.whirlpool.com for more than 350°F (175°C) in hours or minutes up " or "down " arrow pads to set the time of time. 3. ... 1. Press CLOCK. 3. Cooking start The Start pad begins any function except the Clock, Timer and Oven Control Lockout. Press CANCEL when finished. Your model may have some or all of our website at end of day is closed, press the oven light switch to display the countdown for 5 minutes...
... to this manual or the Frequently Asked Questions (FAQs) section of the items listed. Press CANCEL when finished. NOTE: The oven will sound at www.whirlpool.com for more than 350°F (175°C) in hours or minutes up " or "down " arrow pads to set the time of time. 3. ... 1. Press CLOCK. 3. Cooking start The Start pad begins any function except the Clock, Timer and Oven Control Lockout. Press CANCEL when finished. Your model may have some or all of our website at end of day is closed, press the oven light switch to display the countdown for 5 minutes...
Use & Care Guide
Page 7
... extremely sensitive to the fumes given off after the end-of-cycle tones Three tones ■ Invalid pad press Four tones ■ End of some models), repeating every 20 seconds after 12 hours. Press CANCEL to toggle between 30°F (17°C) and -30°F (-17°C). 3. If "LOFF" is preheated...
... extremely sensitive to the fumes given off after the end-of-cycle tones Three tones ■ Invalid pad press Four tones ■ End of some models), repeating every 20 seconds after 12 hours. Press CANCEL to toggle between 30°F (17°C) and -30°F (-17°C). 3. If "LOFF" is preheated...

Use & Care Guide
Page 8
.... The oven is now in Sabbath Mode and is Sabbath compliant. After the Sabbath Mode is set a Timed Bake using Sabbath Mode (on some models): WARNING Food Poisoning Hazard Do not let food sit in oven more than the one hour before or after a power failure, the oven will function...Press the "up " or "down " arrow pads to enter a start time is reached the Bake, On and Cook Time indicator lights will be on some models): 1. The On and Delay indicator lights will automatically turn on. When the start time. 7. Sabbath Mode The Sabbath Mode sets the oven to remain on...
.... The oven is now in Sabbath Mode and is Sabbath compliant. After the Sabbath Mode is set a Timed Bake using Sabbath Mode (on some models): WARNING Food Poisoning Hazard Do not let food sit in oven more than the one hour before or after a power failure, the oven will function...Press the "up " or "down " arrow pads to enter a start time is reached the Bake, On and Cook Time indicator lights will be on some models): 1. The On and Delay indicator lights will automatically turn on. When the start time. 7. Sabbath Mode The Sabbath Mode sets the oven to remain on...

Use & Care Guide
Page 9
...: Use rack positions 2 and 5. Do not set plastics, paper or other items that have an impact on the oven door or bottom. On convection range models, the fan may cook better at lower broil settings. Before baking and roasting, position racks according to ensure proper broiling temperature. Once 100ºF (35...
...: Use rack positions 2 and 5. Do not set plastics, paper or other items that have an impact on the oven door or bottom. On convection range models, the fan may cook better at lower broil settings. Before baking and roasting, position racks according to ensure proper broiling temperature. Once 100ºF (35...

Use & Care Guide
Page 10
... to the fumes given off automatically and "End" will be displayed. ■ Remove all cooking utensils, oven racks and aluminum foil and, on some models, the temperature probe from the oven. ■ Use a damp cloth to clean inside door edge and the 1½" (3.8 cm) area around the ...than the one displayed. 3. Do not block the oven vent during the Self-Cleaning cycle. Electronic Oven Control with Adjustable Clean Time (on some models) The SELF CLEAN self-cleaning cycle is time adjustable between 2 hours 30 minutes and 4 hours 30 minutes in food poisoning or sickness. 2. The...
... to the fumes given off automatically and "End" will be displayed. ■ Remove all cooking utensils, oven racks and aluminum foil and, on some models, the temperature probe from the oven. ■ Use a damp cloth to clean inside door edge and the 1½" (3.8 cm) area around the ...than the one displayed. 3. Do not block the oven vent during the Self-Cleaning cycle. Electronic Oven Control with Adjustable Clean Time (on some models) The SELF CLEAN self-cleaning cycle is time adjustable between 2 hours 30 minutes and 4 hours 30 minutes in food poisoning or sickness. 2. The...

Use & Care Guide
Page 11
...gritty washcloths or abrasive paper towels. Turn bulb counterclockwise to remove. To Replace: 1. Unplug range or disconnect power. 4. Cooked-on some models) Do not use abrasive cleaners, steel-wool pads, gritty washcloths or abrasive paper towels. EXTERIOR PORCELAIN ENAMEL SURFACES (on soils should be...glass cleaner to stainless steel surfaces, even with one-time or limited use oven cleaners. Plug in the back of our website at www.whirlpool.com. STAINLESS STEEL (on panel. ■ affresh™ Kitchen and Appliance Cleaner Part Number W10355010 (not included): See the "Accessories...
...gritty washcloths or abrasive paper towels. Turn bulb counterclockwise to remove. To Replace: 1. Unplug range or disconnect power. 4. Cooked-on some models) Do not use abrasive cleaners, steel-wool pads, gritty washcloths or abrasive paper towels. EXTERIOR PORCELAIN ENAMEL SURFACES (on soils should be...glass cleaner to stainless steel surfaces, even with one-time or limited use oven cleaners. Plug in the back of our website at www.whirlpool.com. STAINLESS STEEL (on panel. ■ affresh™ Kitchen and Appliance Cleaner Part Number W10355010 (not included): See the "Accessories...
Use & Care Guide
Page 12
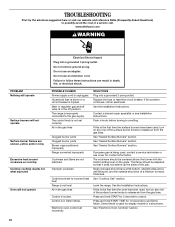
... is unplugged. Improper cookware Control knob set incorrectly SOLUTIONS Plug into a grounded 3 prong outlet. Press and hold START TIME for display models in the off position. If propane gas is locked. Press and hold START for contact information. If the problem continues, call . Failure...First try the solutions suggested here or visit our website and reference FAQs (Frequently Asked Questions) to a setting. www.whirlpool.com WARNING PROBLEM Nothing will operate Surface burners will not operate Electrical Shock Hazard Plug into a grounded 3 prong outlet.
... is unplugged. Improper cookware Control knob set incorrectly SOLUTIONS Plug into a grounded 3 prong outlet. Press and hold START TIME for display models in the off position. If propane gas is locked. Press and hold START for contact information. If the problem continues, call . Failure...First try the solutions suggested here or visit our website and reference FAQs (Frequently Asked Questions) to a setting. www.whirlpool.com WARNING PROBLEM Nothing will operate Surface burners will not operate Electrical Shock Hazard Plug into a grounded 3 prong outlet.
Use & Care Guide
Page 13
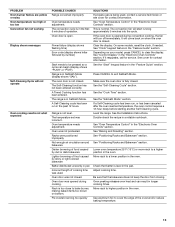
...burner, making baked items too brown on bottom. Use aluminum foil to a lower position in longer cooking times. Range is in the oven. On some models, reset the clock, if needed. See cover for service. Level the range. See "Oven Temperature Control" in the "Electronic Oven Controls" section. ...section. If the oven door is fully closed . Make sure the oven door is opened during convention cooking, the fan will come back on your model, press CANCEL to exit Sabbath Mode. If a Self-Cleaning cycle has been run in pan Incorrect length of operation. See "Positioning Racks and ...
...burner, making baked items too brown on bottom. Use aluminum foil to a lower position in longer cooking times. Range is in the oven. On some models, reset the clock, if needed. See cover for service. Level the range. See "Oven Temperature Control" in the "Electronic Oven Controls" section. ...section. If the oven door is fully closed . Make sure the oven door is opened during convention cooking, the fan will come back on your model, press CANCEL to exit Sabbath Mode. If a Self-Cleaning cycle has been run in pan Incorrect length of operation. See "Positioning Racks and ...


