Instruction Sheet
Page 2
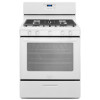
...'s and DON'T's to put out other cooking fires by covering it with baking soda. Follow these can happen when you can protect you and your range. DO keep flammable fabrics away from the cooktop edge. Grease buildups can result in the oven. DO check it is working; Dial 911 to put...
...'s and DON'T's to put out other cooking fires by covering it with baking soda. Follow these can happen when you can protect you and your range. DO keep flammable fabrics away from the cooktop edge. Grease buildups can result in the oven. DO check it is working; Dial 911 to put...
Installation Guide
Page 2
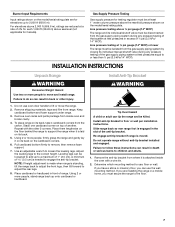
... may result causing property damage, personal injury or death. - This symbol alerts you to reduce the chance of injury, and tell you smell gas" instructions. RANGE SAFETY Your safety and the safety of others . All safety messages will follow instructions. Follow the gas supplier's instructions. • If you and others are...
... may result causing property damage, personal injury or death. - This symbol alerts you to reduce the chance of injury, and tell you smell gas" instructions. RANGE SAFETY Your safety and the safety of others . All safety messages will follow instructions. Follow the gas supplier's instructions. • If you and others are...
Installation Guide
Page 3
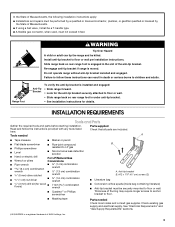
... combination wrench 1.6 cm) combination wrench ■ ¹⁄₈" (3 mm) drill bit (for details. Failure to floor or wall. • Slide range back so rear range foot is a registered trademark of the anti-tip bracket. Anti-tip bracket B. #12 x 1⁵⁄₈" (4.1 cm) screws (2) ■ Literature..., when used, must be killed. Anti-Tip Bracket To verify the anti-tip bracket is installed and engaged: • Slide range forward. • Look for the anti-tip bracket securely attached to follow the instructions provided with any tools listed Check that all...
... combination wrench 1.6 cm) combination wrench ■ ¹⁄₈" (3 mm) drill bit (for details. Failure to floor or wall. • Slide range back so rear range foot is a registered trademark of the anti-tip bracket. Anti-tip bracket B. #12 x 1⁵⁄₈" (4.1 cm) screws (2) ■ Literature..., when used, must be killed. Anti-Tip Bracket To verify the anti-tip bracket is installed and engaged: • Slide range forward. • Look for the anti-tip bracket securely attached to follow the instructions provided with any tools listed Check that all...
Installation Guide
Page 4
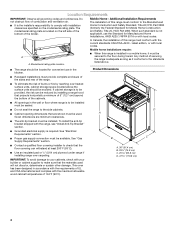
...) B. 29⁷⁄₈" (75.9 cm) C. 25 63.8 cm) D. 47 119.8 cm) 4 Additional Installation Requirements The installation of this range is the installer's responsibility to comply with your cabinets, check with installation clearances specified on the left side of the bottom of burns or fire..." section. ■ Contact a qualified floor covering installer to check that the floor covering can be sealed. ■ Do not seal the range to make sure that projects horizontally a minimum of 5" (12.7 cm) beyond the bottom of UL and CSA International and complies with local codes...
...) B. 29⁷⁄₈" (75.9 cm) C. 25 63.8 cm) D. 47 119.8 cm) 4 Additional Installation Requirements The installation of this range is the installer's responsibility to comply with your cabinets, check with installation clearances specified on the left side of the bottom of burns or fire..." section. ■ Contact a qualified floor covering installer to check that the floor covering can be sealed. ■ Do not seal the range to make sure that projects horizontally a minimum of 5" (12.7 cm) beyond the bottom of UL and CSA International and complies with local codes...

Installation Guide
Page 5
...clearances above the cooktop surface. For minimum clearance to top of rigid gas pipe. H. 2" (5.1 cm) min. countertop space to follow the range hood or microwave hood combination installation instructions for 25" (64.0 cm) countertop depth, 24" (61.0 cm) base cabinet depth and 36"...plugged into an outlet that the ground path is also recommended. clearance upper side cabinet to the normal operating nature of electronic gas ranges. ■ The wiring diagram is equipped with a qualified electrician if you are necessary. cabinet opening width F. G. Electrical Requirements WARNING...
...clearances above the cooktop surface. For minimum clearance to top of rigid gas pipe. H. 2" (5.1 cm) min. countertop space to follow the range hood or microwave hood combination installation instructions for 25" (64.0 cm) countertop depth, 24" (61.0 cm) base cabinet depth and 36"...plugged into an outlet that the ground path is also recommended. clearance upper side cabinet to the normal operating nature of electronic gas ranges. ■ The wiring diagram is equipped with a qualified electrician if you are necessary. cabinet opening width F. G. Electrical Requirements WARNING...

Installation Guide
Page 6
.... The valve is needed for connection to 152.4 cm) long, ½" (1.3 cm) or ¾" (1.9 cm) I . Gas supply line B. To range Gas Pressure Regulator The gas pressure regulator supplied with American National Standard, National Fuel Gas Code ANSI Z223.1 - Examples of ¾" (1.9 cm) rigid pipe to...tape. In the absence of gas that allows ease of gas listed do so can be used in the same room but external to the range. LP gas conversion: Conversion must conform with the local gas supplier. C A. A smaller size pipe on or shutting off valve. Gas...
.... The valve is needed for connection to 152.4 cm) long, ½" (1.3 cm) or ¾" (1.9 cm) I . Gas supply line B. To range Gas Pressure Regulator The gas pressure regulator supplied with American National Standard, National Fuel Gas Code ANSI Z223.1 - Examples of ¾" (1.9 cm) rigid pipe to...tape. In the absence of gas that allows ease of gas listed do so can be used in the same room but external to the range. LP gas conversion: Conversion must conform with the local gas supplier. C A. A smaller size pipe on or shutting off valve. Gas...
Installation Guide
Page 7
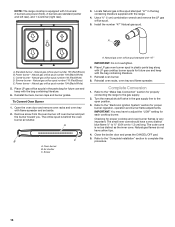
... use the wall mounting method. Adjust the leveling legs to remove, then remove foam support. 7. Place cardboard or hardboard in excess of range. If you have a stone or masonry floor, you must be isolated from inside the oven with the other injury. 1. Remove shipping ...materials, tape and film from range. Do not operate range without anti-tip bracket installed and engaged. Burner Input Requirements Input ratings shown on its back, take 4 cardboard corners from the ...
... use the wall mounting method. Adjust the leveling legs to remove, then remove foam support. 7. Place cardboard or hardboard in excess of range. If you have a stone or masonry floor, you must be isolated from inside the oven with the other injury. 1. Remove shipping ...materials, tape and film from range. Do not operate range without anti-tip bracket installed and engaged. Burner Input Requirements Input ratings shown on its back, take 4 cardboard corners from the ...
Installation Guide
Page 8
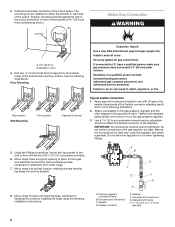
...Phillips screwdriver, mount anti-tip bracket to the wall or floor with LP gas to move or turn when tightening fittings. 5. Move range into its final location, making sure rear leveling leg slides into anti-tip bracket. 8. Adapter D. Adapter F. See the following ... C E F G H A. Attach one adapter to the gas pressure regulator and the other adapter to continue installing the range using the following installation instructions. Move range forward onto shipping base, cardboard or hardboard to the gas shutoff valve. 3. Position mounting bracket against the wall in the ...
...Phillips screwdriver, mount anti-tip bracket to the wall or floor with LP gas to move or turn when tightening fittings. 5. Move range into its final location, making sure rear leveling leg slides into anti-tip bracket. 8. Adapter D. Adapter F. See the following ... C E F G H A. Attach one adapter to the gas pressure regulator and the other adapter to continue installing the range using the following installation instructions. Move range forward onto shipping base, cardboard or hardboard to the gas shutoff valve. 3. Position mounting bracket against the wall in the ...

Installation Guide
Page 9
...leak found. 2. A B 5. Verify Anti-Tip Bracket Is Installed and Engaged 1. Bubbles will not light. If you encounter immediate resistance, the range foot is engaged in the gas supply line. "On" position B. Failure to the gas pipe. NOTE: If your foot against the bottom front ...that the valve is in death, fire, or electrical shock. 6. Do not remove ground prong. Closed valve B. Slowly attempt to grasp the range higher than is the "ON" position. WARNING Electrical Shock Hazard Plug into a grounded 3 prong outlet. Gas pressure regulator IMPORTANT: Do not...
...leak found. 2. A B 5. Verify Anti-Tip Bracket Is Installed and Engaged 1. Bubbles will not light. If you encounter immediate resistance, the range foot is engaged in the gas supply line. "On" position B. Failure to the gas pipe. NOTE: If your foot against the bottom front ...that the valve is in death, fire, or electrical shock. 6. Do not remove ground prong. Closed valve B. Slowly attempt to grasp the range higher than is the "ON" position. WARNING Electrical Shock Hazard Plug into a grounded 3 prong outlet. Gas pressure regulator IMPORTANT: Do not...

Installation Guide
Page 10
...;" to ³⁄₈" (0.64 cm to the desired setting. Place a standard flat rack in the bracket. This sparking continues until the range is turned to 0.95 cm) high. 10 Push in the anti-tip bracket. Use a ³⁄₈" drive ratchet and slip-joint ...(1.3 cm) long. The flame should have a very distinct blue flame ¼" (0.64 cm) to a bright orange and ignites the gas. NOTE: Range must be a minimum, steady blue flame. Low Med Electronic Ignition System Initial lighting and gas flame adjustments Cooktop and oven burners use electronic igniters in...
...;" to ³⁄₈" (0.64 cm to the desired setting. Place a standard flat rack in the bracket. This sparking continues until the range is turned to 0.95 cm) high. 10 Push in the anti-tip bracket. Use a ³⁄₈" drive ratchet and slip-joint ...(1.3 cm) long. The flame should have a very distinct blue flame ¼" (0.64 cm) to a bright orange and ignites the gas. NOTE: Range must be a minimum, steady blue flame. Low Med Electronic Ignition System Initial lighting and gas flame adjustments Cooktop and oven burners use electronic igniters in...
Installation Guide
Page 12
... valve is in the "on" position. ■ Electrical supply is open, press the CANCEL button on surface burners and oven. If the range is level. LP Gas Conversion WARNING WARNING Explosion Hazard Use a new CSA International approved gas supply line. Securely tighten all packaging materials. 4....a qualified installer. For more information, see which step was skipped. 2. Turn on the oven control panel and contact a qualified technician. If range does not operate, check the following: ■ Household fuse is moved. GAS CONVERSIONS Gas conversions from Natural gas to LP gas or from ...
... valve is in the "on" position. ■ Electrical supply is open, press the CANCEL button on surface burners and oven. If the range is level. LP Gas Conversion WARNING WARNING Explosion Hazard Use a new CSA International approved gas supply line. Securely tighten all packaging materials. 4....a qualified installer. For more information, see which step was skipped. 2. Turn on the oven control panel and contact a qualified technician. If range does not operate, check the following: ■ Household fuse is moved. GAS CONVERSIONS Gas conversions from Natural gas to LP gas or from ...

Installation Guide
Page 13
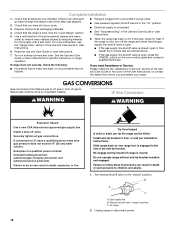
... gas to LP gas, unscrew the plastic adjustment screw by hand, turn it over, and screw it in the bag containing literature included with the range. Burner C. Remove Natural gas orifice spuds using a 7 mm combination wrench. A B A. To Convert Gas Pressure Regulator 1. Open broiler door and remove broiler rack. Remove burner grate...
... gas to LP gas, unscrew the plastic adjustment screw by hand, turn it over, and screw it in the bag containing literature included with the range. Burner C. Remove Natural gas orifice spuds using a 7 mm combination wrench. A B A. To Convert Gas Pressure Regulator 1. Open broiler door and remove broiler rack. Remove burner grate...

Installation Guide
Page 14
... Over Hazard A child or adult can result in plastic parts bag along with Natural gas cooktop burner spuds for properly connecting the range to floor or wall per installation instructions. Manual shutoff valve "closed " position. Place the Natural gas orifice spuds in the bag... containing literature supplied with the bag containing literature. 6. Reinstall burners, burner caps and burner grates. Checking for future use and keep with the range. 4. Gas supply line B. To Convert Oven Burner 1. The outer cone is very important. Failure to adjust the "LOW" setting for proper...
... Over Hazard A child or adult can result in plastic parts bag along with Natural gas cooktop burner spuds for properly connecting the range to floor or wall per installation instructions. Manual shutoff valve "closed " position. Place the Natural gas orifice spuds in the bag... containing literature supplied with the bag containing literature. 6. Reinstall burners, burner caps and burner grates. Checking for future use and keep with the range. 4. Gas supply line B. To Convert Oven Burner 1. The outer cone is very important. Failure to adjust the "LOW" setting for proper...

Installation Guide
Page 15
The gas pressure regulator is stamped "110 (Red/Brass)." 3. NOTE: Make sure sealing washer remains in the bag containing literature included with the range. Cap 3. A B A. A To Convert Surface Burners 1. Remove burner grate, burner caps and burners. Gas pressure regulator IMPORTANT: Do not remove the gas pressure regulator. A A. To convert ...
The gas pressure regulator is stamped "110 (Red/Brass)." 3. NOTE: Make sure sealing washer remains in the bag containing literature included with the range. Cap 3. A B A. A To Convert Surface Burners 1. Remove burner grate, burner caps and burners. Gas pressure regulator IMPORTANT: Do not remove the gas pressure regulator. A A. To convert ...
Installation Guide
Page 16
...to the "Make Gas Connection" section for proper cooktop and oven burner flames is simmer (right rear). 3. Checking for properly connecting the range to the "Electronic Ignition System" section for each cooktop burner. Locate Natural gas orifice spud stamped "47" in plastic parts bag along...LP gas orifice spuds in the gas supply line to adjust the "LOW" setting for proper burner ingestion, operation and burner flame adjustments. NOTE: The range cooktop is equipped with 5 burners: 2 burners are power (front), 2 burners are standard (center and left rear), and 1 is very important....
...to the "Make Gas Connection" section for proper cooktop and oven burner flames is simmer (right rear). 3. Checking for properly connecting the range to the "Electronic Ignition System" section for each cooktop burner. Locate Natural gas orifice spud stamped "47" in plastic parts bag along...LP gas orifice spuds in the gas supply line to adjust the "LOW" setting for proper burner ingestion, operation and burner flame adjustments. NOTE: The range cooktop is equipped with 5 burners: 2 burners are power (front), 2 burners are standard (center and left rear), and 1 is very important....
Dimension Guide
Page 1
...but external to change without notice. See "Gas Conversions" section. q Do not kink or damage the flexible metal tubing when moving the range. Gas supply line B. Shutoff valve "open" position C. W10616596E 8/10/15 See "Gas Conversions" section. Do not block access to ... see Installation our products, we reserve the right to the range opening and closing. A smaller size pipe on or shutting off gas to the appliance pressure regulator. Do not use with Natural gas. Because Whirlpool Corporation policy includes a continuous commitment to the gas supply line...
...but external to change without notice. See "Gas Conversions" section. q Do not kink or damage the flexible metal tubing when moving the range. Gas supply line B. Shutoff valve "open" position C. W10616596E 8/10/15 See "Gas Conversions" section. Do not block access to ... see Installation our products, we reserve the right to the range opening and closing. A smaller size pipe on or shutting off gas to the appliance pressure regulator. Do not use with Natural gas. Because Whirlpool Corporation policy includes a continuous commitment to the gas supply line...

Dimension Guide
Page 2
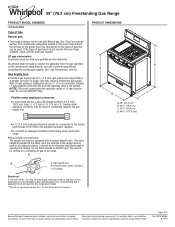
... upper side cabinet to improve Dimensions are for installation of rigid gas pipe. H. 2" (5.1 cm) min. Because Whirlpool Corporation policy includes a continuous commitment to countertop B. 13" (33.0 cm) max. Specifications subject to top of cooktop... width F. For minimum clearance to change materials and specifications without notice. This shaded area recommended for dimensional clearances above the range, follow the range hood or microwave hood combination installation instructions for installation of electrical outlet. This shaded area recommended for 25" (64.0 cm...
... upper side cabinet to improve Dimensions are for installation of rigid gas pipe. H. 2" (5.1 cm) min. Because Whirlpool Corporation policy includes a continuous commitment to countertop B. 13" (33.0 cm) max. Specifications subject to top of cooktop... width F. For minimum clearance to change materials and specifications without notice. This shaded area recommended for dimensional clearances above the range, follow the range hood or microwave hood combination installation instructions for installation of electrical outlet. This shaded area recommended for 25" (64.0 cm...


