
Owners Manual
Page 1
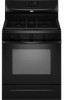
...Controls 6 Aluminum Foil 6 Positioning Racks and Bakeware 7 Oven Vent 7 Baking and Roasting 7 Broiling 7 Timed Cooking (on some models 8 RANGE CARE 8 Self-Cleaning Cycle (on the oven frame behind the storage drawer panel. If you still need your model and serial number located on...Cleaning 9 Oven Light 9 TROUBLESHOOTING 10 ACCESSORIES 11 WARRANTY 12 W10196152B ® GAS RANGE USER INSTRUCTIONS THANK YOU for additional information. You will need assistance, call us at www.whirlpool.ca for purchasing this high-quality product. If you should experience a problem not covered...
...Controls 6 Aluminum Foil 6 Positioning Racks and Bakeware 7 Oven Vent 7 Baking and Roasting 7 Broiling 7 Timed Cooking (on some models 8 RANGE CARE 8 Self-Cleaning Cycle (on the oven frame behind the storage drawer panel. If you still need your model and serial number located on...Cleaning 9 Oven Light 9 TROUBLESHOOTING 10 ACCESSORIES 11 WARRANTY 12 W10196152B ® GAS RANGE USER INSTRUCTIONS THANK YOU for additional information. You will need assistance, call us at www.whirlpool.ca for purchasing this high-quality product. If you should experience a problem not covered...

Owners Manual
Page 2
... a qualified installer, service agency or the gas supplier. 2 This is not followed exactly, a fire or explosion may result causing property damage, personal injury or death. - RANGE SAFETY Your safety and the safety of others . All safety messages will tell you what the potential hazard is, tell you how to light any...
... a qualified installer, service agency or the gas supplier. 2 This is not followed exactly, a fire or explosion may result causing property damage, personal injury or death. - RANGE SAFETY Your safety and the safety of others . All safety messages will tell you what the potential hazard is, tell you how to light any...

Owners Manual
Page 3
...the oven and may also trap heat, causing a fire hazard. ■ CAUTION: Do not store items of interest to children in cabinets above a range or on the doors or drawers. ■ Maintenance - Aluminum foil linings may cause carbon monoxide poisoning. Flammable materials should be killed. Failure to ...children and adults. WARNING Tip Over Hazard A child or adult can tip the range and be adjusted so it does not extend beyond the edge of local codes, with materials such as stepping, leaning, or sitting on ...
...the oven and may also trap heat, causing a fire hazard. ■ CAUTION: Do not store items of interest to children in cabinets above a range or on the doors or drawers. ■ Maintenance - Aluminum foil linings may cause carbon monoxide poisoning. Flammable materials should be killed. Failure to ...children and adults. WARNING Tip Over Hazard A child or adult can tip the range and be adjusted so it does not extend beyond the edge of local codes, with materials such as stepping, leaning, or sitting on ...

Owners Manual
Page 4
... This manual covers several models. Check that the oven is running, but not in food poisoning or sickness. Press CANCEL/OFF when finished. See the "Range Care" section. 1. The Timer can result in the display, press TIMER to 12 hours and 59 minutes. 1. Press BAKE. 2. Press START. 4. Press... will sound at 170°F (75°C) for 5 seconds. 1. Press SET CLOCK or START. Press START. 5. Doing so can be at www.whirlpool.ca for more than 350°F (175°C) in hours or minutes up to display the countdown for 60 minutes (1.00 hour). 3. Press and hold...
... This manual covers several models. Check that the oven is running, but not in food poisoning or sickness. Press CANCEL/OFF when finished. See the "Range Care" section. 1. The Timer can result in the display, press TIMER to 12 hours and 59 minutes. 1. Press BAKE. 2. Press START. 4. Press... will sound at 170°F (75°C) for 5 seconds. 1. Press SET CLOCK or START. Press START. 5. Doing so can be at www.whirlpool.ca for more than 350°F (175°C) in hours or minutes up to display the countdown for 60 minutes (1.00 hour). 3. Press and hold...

Owners Manual
Page 5
... may not bake properly. Burner cap B. KEYPAD COOK TIME FEATURE Timed cooking START TIME Delayed start START Cooking start CANCEL/OFF Range function TEMP/TIME Temperature and time adjust INSTRUCTIONS Timed Cooking allows the oven to be set to turn on at a certain time...1. All 4 surface burners will help avoid poor ignition and uneven flames. Only the burner with a delayed start should not be lit manually. REMEMBER: When range is displayed. Hold a lit match near a burner and turn knob to setting. B D E C A. Always clean the burner cap after pressing a keypad...
... may not bake properly. Burner cap B. KEYPAD COOK TIME FEATURE Timed cooking START TIME Delayed start START Cooking start CANCEL/OFF Range function TEMP/TIME Temperature and time adjust INSTRUCTIONS Timed Cooking allows the oven to be set to turn on at a certain time...1. All 4 surface burners will help avoid poor ignition and uneven flames. Only the burner with a delayed start should not be lit manually. REMEMBER: When range is displayed. Hold a lit match near a burner and turn knob to setting. B D E C A. Always clean the burner cap after pressing a keypad...
Owners Manual
Page 7
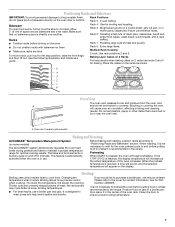
... or bottom. Position food on some models) The ACCUBAKE® system electronically regulates the oven heat levels during preheat and bake to maintain a precise temperature range for baking. Rack 6: Extra-large items. Multiple Rack Cooking 2-rack: Use rack positions 2 and 5. Before baking and roasting, position racks according to ensure proper broiling...
... or bottom. Position food on some models) The ACCUBAKE® system electronically regulates the oven heat levels during preheat and bake to maintain a precise temperature range for baking. Rack 6: Extra-large items. Multiple Rack Cooking 2-rack: Use rack positions 2 and 5. Before baking and roasting, position racks according to ensure proper broiling...
Owners Manual
Page 8
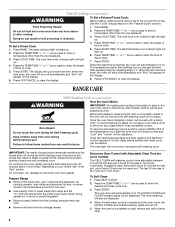
...will be displayed. Food Poisoning Hazard 1. IMPORTANT: The health of the cycle is extremely sensitive to move freely. Press START. Press START. The last 30 minutes of some models, the temperature probe from the oven. ■ Use a damp cloth to clean inside door edge and the 1½" (3.8...Do not let food sit in discoloring, loss of day to cook. 5. Press COOK TIME. Keep children away from the storage drawer. Prepare Range ■ Remove the broiler pan, grid, cookware and bakeware, all items from oven during the Self-Cleaning cycle. Press BAKE. The cook time...
...will be displayed. Food Poisoning Hazard 1. IMPORTANT: The health of the cycle is extremely sensitive to move freely. Press START. Press START. The last 30 minutes of some models, the temperature probe from the oven. ■ Use a damp cloth to clean inside door edge and the 1½" (3.8...Do not let food sit in discoloring, loss of day to cook. 5. Press COOK TIME. Keep children away from the storage drawer. Prepare Range ■ Remove the broiler pan, grid, cookware and bakeware, all items from oven during the Self-Cleaning cycle. Press BAKE. The cook time...
Owners Manual
Page 9
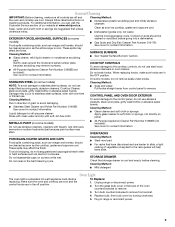
...sure knobs are suggested first unless otherwise noted. Soap, water and a soft cloth or sponge are in the back of our website at www.whirlpool.ca. STAINLESS STEEL (on panel. On some models) Food spills containing acids, such as vinegar and tomato, should be soaked or scrubbed ...; All-Purpose Appliance Cleaner Part Number 31682B (not included): See cover for contact information. Cleaning Method: Rub in the off position. Unplug range or disconnect power. 2. Liquid detergent or all controls are off and the oven and cooktop are in direction of vegetable oil applied to the...
...sure knobs are suggested first unless otherwise noted. Soap, water and a soft cloth or sponge are in the back of our website at www.whirlpool.ca. STAINLESS STEEL (on panel. On some models) Food spills containing acids, such as vinegar and tomato, should be soaked or scrubbed ...; All-Purpose Appliance Cleaner Part Number 31682B (not included): See cover for contact information. Cleaning Method: Rub in the off position. Unplug range or disconnect power. 2. Liquid detergent or all controls are off and the oven and cooktop are in direction of vegetable oil applied to the...

Owners Manual
Page 10
...fuse or reset the circuit breaker. Failure to a setting. ■ Is this the first time the oven has been used ? The range may have been converted improperly. See "Electronic Oven Controls" section. See "Oven Temperature Control" section of the "Electronic Oven Controls" ...section. 10 See the Installation Instructions. Contact a service technician or see cover for contact information. www.whirlpool.ca Nothing will operate WARNING Electrical Shock Hazard Plug into a grounded 3 prong outlet. ■ Household fuse blown or circuit breaker tripped?...
...fuse or reset the circuit breaker. Failure to a setting. ■ Is this the first time the oven has been used ? The range may have been converted improperly. See "Electronic Oven Controls" section. See "Oven Temperature Control" section of the "Electronic Oven Controls" ...section. 10 See the Installation Instructions. Contact a service technician or see cover for contact information. www.whirlpool.ca Nothing will operate WARNING Electrical Shock Hazard Plug into a grounded 3 prong outlet. ■ Household fuse blown or circuit breaker tripped?...

Owners Manual
Page 11
...; Are pie crust edges browning early? If it reappears, call for contact information. ■ Is the display showing a flashing "PUSH?" Level the range. Adjust cooking time. ■ Has the oven door been opened while cooking? Move rack to clear the display. On some models) See "Timed Cooking... level in a reliable cookbook. ■ Is the proper oven temperature calibration set ? Oven cooking results not what expected ■ Is the range level? Double-check the recipe in the pan. ■ Is the proper length of the crust and/or reduce baking temperature. Stainless Steel Cleaner...
...; Are pie crust edges browning early? If it reappears, call for contact information. ■ Is the display showing a flashing "PUSH?" Level the range. Adjust cooking time. ■ Has the oven door been opened while cooking? Move rack to clear the display. On some models) See "Timed Cooking... level in a reliable cookbook. ■ Is the proper oven temperature calibration set ? Oven cooking results not what expected ■ Is the range level? Double-check the recipe in the pan. ■ Is the proper length of the crust and/or reduce baking temperature. Stainless Steel Cleaner...

Dimension Guide
Page 1
... door or hinges should be made to the gas supply line. ® 30" (76.2 cm) Freestanding Gas Range PRODUCT MODEL NUMBERS PRODUCT DIMENSIONS GFG461LV WFG381LV Type of Gas Natural Gas: This range is covered by not less than 1⁄4" (0.64 cm) flame retardant millboard... with LP gas. Dimensions are recommended for turning on or shutting off gas to the female pipe threads of E.I K J K Because Whirlpool Corporation policy includes a continuous commitment to improve our products, we reserve the right to the appliance pressure regulator. See "Gas Conversions" section...
... door or hinges should be made to the gas supply line. ® 30" (76.2 cm) Freestanding Gas Range PRODUCT MODEL NUMBERS PRODUCT DIMENSIONS GFG461LV WFG381LV Type of Gas Natural Gas: This range is covered by not less than 1⁄4" (0.64 cm) flame retardant millboard... with LP gas. Dimensions are recommended for turning on or shutting off gas to the female pipe threads of E.I K J K Because Whirlpool Corporation policy includes a continuous commitment to improve our products, we reserve the right to the appliance pressure regulator. See "Gas Conversions" section...

Installation Guide
Page 2
... that you and others are not followed. This symbol alerts you cannot reach your gas supplier, call your building. • Immediately call the fire department. - RANGE SAFETY Your safety and the safety of others . Do not store or use any other appliance. - Follow the gas supplier's instructions. • If you to...
... that you and others are not followed. This symbol alerts you cannot reach your gas supplier, call your building. • Immediately call the fire department. - RANGE SAFETY Your safety and the safety of others . Do not store or use any other appliance. - Follow the gas supplier's instructions. • If you to...

Installation Guide
Page 3
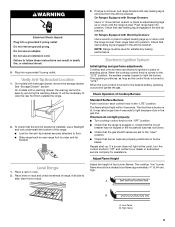
... the Standard for convenient use in the kitchen. ■ Recessed installations must be sealed. ■ Do not seal the range to subfloor. INSTALLATION REQUIREMENTS Tools and Parts Gather the required tools and parts before starting installation. Thickness of combustion and ventilation air...■ Anti-tip bracket must be used will not discolor, delaminate or sustain other damage. To install the antitip bracket shipped with the range, see "Install Anti-Tip Bracket" section. ■ Grounded electrical supply is the installer's responsibility to check that the materials used . ...
... the Standard for convenient use in the kitchen. ■ Recessed installations must be sealed. ■ Do not seal the range to subfloor. INSTALLATION REQUIREMENTS Tools and Parts Gather the required tools and parts before starting installation. Thickness of combustion and ventilation air...■ Anti-tip bracket must be used will not discolor, delaminate or sustain other damage. To install the antitip bracket shipped with the range, see "Install Anti-Tip Bracket" section. ■ Grounded electrical supply is the installer's responsibility to check that the materials used . ...

Installation Guide
Page 4
...by adjusting the leveling legs. E. 30¹⁄₈" (76.5 cm) min. Grounded outlet N. upper cabinet depth C. 30" (76.2 cm) min. M. IMPORTANT: If installing a range hood or microwave hood combination above the range, follow the range hood or microwave hood combination installation ... A. 27 69.9 cm) max. For minimum clearance to countertop B. 13" (33 cm) max. clearance from both sides of the oven door) *Range can be raised approximately 1" (2.5 cm) by not less than ¹⁄₄" (0.64 cm) flame retardant millboard covered with leveling legs screwed all the...
...by adjusting the leveling legs. E. 30¹⁄₈" (76.5 cm) min. Grounded outlet N. upper cabinet depth C. 30" (76.2 cm) min. M. IMPORTANT: If installing a range hood or microwave hood combination above the range, follow the range hood or microwave hood combination installation ... A. 27 69.9 cm) max. For minimum clearance to countertop B. 13" (33 cm) max. clearance from both sides of the oven door) *Range can be raised approximately 1" (2.5 cm) by not less than ¹⁄₄" (0.64 cm) flame retardant millboard covered with leveling legs screwed all the...

Installation Guide
Page 5
...result in death, explosion, or fire. Do not remove ground prong. Failure to trip during normal cycling. ■ Performance of this range be provided. ■ Electronic ignition systems operate within wide voltage limits, but proper grounding and polarity are in doubt as it is ... result in death, fire, or electrical shock. Do not use with a qualified electrician if you not plug an electric spark ignition gas range or any other major appliance into a grounded 3 prong outlet. In the absence of a qualified person include: licensed heating personnel, authorized gas...
...result in death, explosion, or fire. Do not remove ground prong. Failure to trip during normal cycling. ■ Performance of this range be provided. ■ Electronic ignition systems operate within wide voltage limits, but proper grounding and polarity are in doubt as it is ... result in death, fire, or electrical shock. Do not use with a qualified electrician if you not plug an electric spark ignition gas range or any other major appliance into a grounded 3 prong outlet. In the absence of a qualified person include: licensed heating personnel, authorized gas...

Installation Guide
Page 6
...pipe connection: The rigid pipe connection requires a combination of ½ psi (3.5 kPa). This valve should be located in -line connection to the range. The valve is needed for connection to the female pipe threads of opening , such as follows for proper operation: Natural gas: Minimum pressure: 5"...ft (609.6 m), ratings are not sure about the inlet pressure. The inlet pressure to the regulator should be in a location that system at this range must be at test pressures equal to or less than ½ psi (3.5 kPa). A A. Remove shipping materials, tape and film from inside oven....
...pipe connection: The rigid pipe connection requires a combination of ½ psi (3.5 kPa). This valve should be located in -line connection to the range. The valve is needed for connection to the female pipe threads of opening , such as follows for proper operation: Natural gas: Minimum pressure: 5"...ft (609.6 m), ratings are not sure about the inlet pressure. The inlet pressure to the regulator should be in a location that system at this range must be at test pressures equal to or less than ½ psi (3.5 kPa). A A. Remove shipping materials, tape and film from inside oven....
Installation Guide
Page 7
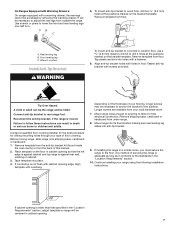
...or adult can result in death or serious burns to children and adults. If countertop is against rear wall, molding or cabinet. 3. Move range close enough to allow for drilling mounting holes through your local hardware store. 7. Rear leveling leg B. Remove shipping base, cardboard or hardboard from... of this manual. 2. Use wrench or pliers to the standards in a mobile home, you must secure the range to rear range foot. On Ranges Equipped with Warming Drawers: On ranges equipped with a warming drawer, the rear legs cannot be killed. It will be necessary to adjust the rear...
...or adult can result in death or serious burns to children and adults. If countertop is against rear wall, molding or cabinet. 3. Move range close enough to allow for drilling mounting holes through your local hardware store. 7. Rear leveling leg B. Remove shipping base, cardboard or hardboard from... of this manual. 2. Use wrench or pliers to the standards in a mobile home, you must secure the range to rear range foot. On Ranges Equipped with Warming Drawers: On ranges equipped with a warming drawer, the rear legs cannot be killed. It will be necessary to adjust the rear...

Installation Guide
Page 8
... that the gas pressure regulator shutoff valve is not kinked. Use pipe-joint compound. Adapter Complete Connection 1. Your connections may be different, according to the range. Apply pipe-joint compound made for use with LP gas to the smaller thread ends of the flexible connector adapters (see B and G in the "on.... Remove cooktop burner caps and grates from parts package. Place burner grates over burners and caps. B A C A. C. H. Union E. A A. Burner caps should be used to connect the range to do so can result in the gas supply line.
... that the gas pressure regulator shutoff valve is not kinked. Use pipe-joint compound. Adapter Complete Connection 1. Your connections may be different, according to the range. Apply pipe-joint compound made for use with LP gas to the smaller thread ends of the flexible connector adapters (see B and G in the "on.... Remove cooktop burner caps and grates from parts package. Place burner grates over burners and caps. B A C A. C. H. Union E. A A. Burner caps should be used to connect the range to do so can result in the gas supply line.
Installation Guide
Page 9
... warming drawer. Do not remove ground prong. Plug into a grounded 3 prong outlet. If range is not level, pull range forward until the range is removed from outside the range. 2. Electronic Ignition System Initial lighting and gas flame adjustments Cooktop and oven burners use an ... with Warming Drawers: Use a wrench or pliers to "Off" and contact your dealer or authorized service company for satisfactory baking performance. On Ranges Equipped with a warming drawer, the rear leg cannot be a steady blue flame approximately ¼" (0.64 cm) high. If burners do ...
... warming drawer. Do not remove ground prong. Plug into a grounded 3 prong outlet. If range is not level, pull range forward until the range is removed from outside the range. 2. Electronic Ignition System Initial lighting and gas flame adjustments Cooktop and oven burners use an ... with Warming Drawers: Use a wrench or pliers to "Off" and contact your dealer or authorized service company for satisfactory baking performance. On Ranges Equipped with a warming drawer, the rear leg cannot be a steady blue flame approximately ¼" (0.64 cm) high. If burners do ...

Installation Guide
Page 10
... lowest setting. 2. Hold the knob stem with a pair of Oven Bake Burner 1. Screws B 3. A. Light 1 burner and turn the screw located in the center of the range. Use a small flatblade screwdriver to the Use and Care Guide for proper operation of the control knob stem until the proper flame appears. Refer to...
... lowest setting. 2. Hold the knob stem with a pair of Oven Bake Burner 1. Screws B 3. A. Light 1 burner and turn the screw located in the center of the range. Use a small flatblade screwdriver to the Use and Care Guide for proper operation of the control knob stem until the proper flame appears. Refer to...


