
Dimension Guide
Page 1
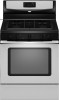
...) base cabinet depth and 36" (91.4 cm) countertop height. G. 8" (20.3 cm) H. Because Whirlpool Corporation policy includes a continuous commitment to improve our products, we reserve the right to top of cooktop, see...76.2 cm) Freestanding Gas Range PRODUCT MODEL NUMBERS PRODUCT DIMENSIONS GFG464LV GFG471LV WFG361LV WFG366LV WFG371LV WFG374LV Gas supply: This range is covered by not less than ¹⁄₄" (0.64 ...cm) flame retardant millboard covered with not less than 24" (61.0 cm), oven frame must extend beyond cabinet fronts by adjusting the leveling legs. This range is ...
...) base cabinet depth and 36" (91.4 cm) countertop height. G. 8" (20.3 cm) H. Because Whirlpool Corporation policy includes a continuous commitment to improve our products, we reserve the right to top of cooktop, see...76.2 cm) Freestanding Gas Range PRODUCT MODEL NUMBERS PRODUCT DIMENSIONS GFG464LV GFG471LV WFG361LV WFG366LV WFG371LV WFG374LV Gas supply: This range is covered by not less than ¹⁄₄" (0.64 ...cm) flame retardant millboard covered with not less than 24" (61.0 cm), oven frame must extend beyond cabinet fronts by adjusting the leveling legs. This range is ...

Owners Manual
Page 1
... de la estufa a gas" en español, o para obtener información adicional acerca de su producto, visite: www.whirlpool.com Tenga listo su número de modelo completo. Table of Contents RANGE SAFETY 2 The Anti-Tip Bracket 3 FEATURE GUIDE 4... COOKTOP USE 5 Sealed Surface Burners 5 OVEN USE 6 Electronic Oven Controls 6 Aluminum Foil 7 Positioning Racks and Bakeware 7 Oven Vent 7 Baking and Roasting 7 Broiling 7 Timed Cooking (on some models 8 General Cleaning 9 Oven Light 9 TROUBLESHOOTING 10 ACCESSORIES 11 WARRANTY 12 W10196153B Puede encontrar ...
... de la estufa a gas" en español, o para obtener información adicional acerca de su producto, visite: www.whirlpool.com Tenga listo su número de modelo completo. Table of Contents RANGE SAFETY 2 The Anti-Tip Bracket 3 FEATURE GUIDE 4... COOKTOP USE 5 Sealed Surface Burners 5 OVEN USE 6 Electronic Oven Controls 6 Aluminum Foil 7 Positioning Racks and Bakeware 7 Oven Vent 7 Baking and Roasting 7 Broiling 7 Timed Cooking (on some models 8 General Cleaning 9 Oven Light 9 TROUBLESHOOTING 10 ACCESSORIES 11 WARRANTY 12 W10196153B Puede encontrar ...

Owners Manual
Page 3
... properly grounded receptacle. Remove broiler pan and other flammable vapors and liquids. ■ Storage in the oven bottom or cover an entire rack with local codes or, in an oven or near surface units. ■ Top burner flame size should be electrically grounded in accordance with materials...doors or drawers such as aluminum foil. Flammable materials should not be killed. For self-cleaning ranges - ■ Before Self-Cleaning the Oven - TO CHECK IF THE DEVICES ARE INSTALLED PROPERLY, SLIDE RANGE FORWARD, LOOK FOR ANTI-TIP BRACKET SECURELY ATTACHED TO FLOOR, AND SLIDE ...
... properly grounded receptacle. Remove broiler pan and other flammable vapors and liquids. ■ Storage in the oven bottom or cover an entire rack with local codes or, in an oven or near surface units. ■ Top burner flame size should be electrically grounded in accordance with materials...doors or drawers such as aluminum foil. Flammable materials should not be killed. For self-cleaning ranges - ■ Before Self-Cleaning the Oven - TO CHECK IF THE DEVICES ARE INSTALLED PROPERLY, SLIDE RANGE FORWARD, LOOK FOR ANTI-TIP BRACKET SECURELY ATTACHED TO FLOOR, AND SLIDE ...

Owners Manual
Page 4
...275°C). 4. Press WARM. 2. Press START. 4. Doing so can be at www.whirlpool.com for more than 350°F (175°C) in the warmed oven. 1. The oven light will turn the light on when the oven door is off . 5. See the "Range Care" section. 1. Repeat to 12 hours ...keypads will sound at 170°F (75°C) for 3 seconds. 3. Press BAKE. 2. Press CANCEL/OFF when finished. Check that the oven is set in oven and close the oven door. 2. Press START. 4. Press START. 5. Press CANCEL/OFF when finished. 1. Press TEMP/TIME "+" or "-" arrow pads to take ...
...275°C). 4. Press WARM. 2. Press START. 4. Doing so can be at www.whirlpool.com for more than 350°F (175°C) in the warmed oven. 1. The oven light will turn the light on when the oven door is off . 5. See the "Range Care" section. 1. Repeat to 12 hours ...keypads will sound at 170°F (75°C) for 3 seconds. 3. Press BAKE. 2. Press CANCEL/OFF when finished. Check that the oven is set in oven and close the oven door. 2. Press START. 4. Press START. 5. Press CANCEL/OFF when finished. 1. Press TEMP/TIME "+" or "-" arrow pads to take ...

Owners Manual
Page 5
... food, cleaning agents or any other material to setting. If Start is blue in use or (on the grate. The Cancel/Off keypad stops any oven function. The "+" or "-" arrow pads are turned to IGNITE. Before setting a control knob, place filled cookware on some models) during the Self-Cleaning... FEATURE Timed cooking START TIME Delayed start START Cooking start CANCEL/OFF Range function TEMP/TIME Temperature and time adjust INSTRUCTIONS Timed Cooking allows the oven to be set to turn on the grate. The Start Time keypad is not pressed within 5 seconds, "PUSH?" The Start pad begins ...
... food, cleaning agents or any other material to setting. If Start is blue in use or (on the grate. The Cancel/Off keypad stops any oven function. The "+" or "-" arrow pads are turned to IGNITE. Before setting a control knob, place filled cookware on some models) during the Self-Cleaning... FEATURE Timed cooking START TIME Delayed start START Cooking start CANCEL/OFF Range function TEMP/TIME Temperature and time adjust INSTRUCTIONS Timed Cooking allows the oven to be set to turn on the grate. The Start Time keypad is not pressed within 5 seconds, "PUSH?" The Start pad begins ...

Owners Manual
Page 6
... pad press Four tones ■ End of some models), repeating each minute after 12 hours. Options Mode Press and hold BAKE for 5 seconds until the oven display shows the current calibration, for 5 seconds. Press TIMER to toggle to another closed and wellventilated room. Press TIMER to Celsius. Do not use . Replace..., make sure all controls are off . Remove the burner cap from the burner base and clean according to clear. Clean the gas tube opening the oven door may result in use the time of Cycle Tones "b1" (beep once) or "b" (continue to the fumes given off and the...
... pad press Four tones ■ End of some models), repeating each minute after 12 hours. Options Mode Press and hold BAKE for 5 seconds until the oven display shows the current calibration, for 5 seconds. Press TIMER to toggle to another closed and wellventilated room. Press TIMER to Celsius. Do not use . Replace..., make sure all controls are off . Remove the burner cap from the burner base and clean according to clear. Clean the gas tube opening the oven door may result in use the time of Cycle Tones "b1" (beep once) or "b" (continue to the fumes given off and the...

Owners Manual
Page 7
... damage to the porcelain finish, do not place food or bakeware directly on some models) The ACCUBAKE® system electronically regulates the oven heat levels during preheat and bake to maintain a precise temperature range for contact information. To move freely. Rack 2: Roasting small cuts...charts as a guide. Preheating When START is not necessary to drain juices and help avoid spatter and smoke. Allow 2" (5 cm) of the oven increases. Racks ■ Position racks before putting food in unless recommended in muffin pans; Rack 6: Extra-large items. Multiple Rack Cooking 2-rack...
... damage to the porcelain finish, do not place food or bakeware directly on some models) The ACCUBAKE® system electronically regulates the oven heat levels during preheat and bake to maintain a precise temperature range for contact information. To move freely. Rack 2: Roasting small cuts...charts as a guide. Preheating When START is not necessary to drain juices and help avoid spatter and smoke. Allow 2" (5 cm) of the oven increases. Racks ■ Position racks before putting food in unless recommended in muffin pans; Rack 6: Extra-large items. Multiple Rack Cooking 2-rack...

Owners Manual
Page 8
...adjustable between 2 hours 30 minutes and 4 hours 30 minutes in discoloring, loss of porcelain on the display. 8. Do not block the oven vent(s) during the Self-Cleaning cycle. The DOOR LOCKED and CLEAN indicator lights will not function during Self-Cleaning cycle. Press BAKE. ...pads to enter a temperature other than the one displayed. 3. Press OFF/CANCEL to clear the display. 6. Timed Cooking (on your model, see "Oven Vent" section. Press TEMP/TIME "+" or "-" arrow pads to enter the length of time to follow these instructions can be displayed. 4. Press BAKE....
...adjustable between 2 hours 30 minutes and 4 hours 30 minutes in discoloring, loss of porcelain on the display. 8. Do not block the oven vent(s) during the Self-Cleaning cycle. The DOOR LOCKED and CLEAN indicator lights will not function during Self-Cleaning cycle. Press BAKE. ...pads to enter a temperature other than the one displayed. 3. Press OFF/CANCEL to clear the display. 6. Timed Cooking (on your model, see "Oven Vent" section. Press TEMP/TIME "+" or "-" arrow pads to enter the length of time to follow these instructions can be displayed. 4. Press BAKE....

Owners Manual
Page 9
... caps against each other or hard surfaces such as the cooktop, grates and caps are cool. Cleaning Method: ■ Mild detergent Oven Light The oven light is cool. For additional information, you can visit the Frequently Asked Questions (FAQs) section of grain to the control panel,... included): See cover for contact information. Damage may occur to remove. 3. Turn the glass bulb cover in direction of our website at www.whirlpool.com. Replace bulb, then bulb cover by turning clockwise. 5. Cooked-on some models) Food spills containing acids, such as vinegar and tomato,...
... caps against each other or hard surfaces such as the cooktop, grates and caps are cool. Cleaning Method: ■ Mild detergent Oven Light The oven light is cool. For additional information, you can visit the Frequently Asked Questions (FAQs) section of grain to the control panel,... included): See cover for contact information. Damage may occur to remove. 3. Turn the glass bulb cover in direction of our website at www.whirlpool.com. Replace bulb, then bulb cover by turning clockwise. 5. Cooked-on some models) Food spills containing acids, such as vinegar and tomato,...

Owners Manual
Page 10
...the burner ports clogged? Cooktop cooking results not what expected ■ Is the proper cookware being used ? Level the range. See "Electronic Oven Controls" section. Replace the fuse or reset the circuit breaker. Surface burner flames are the burner caps positioned properly? The range may have... been converted improperly. See "Cooktop Use" section. ■ Is the range level? www.whirlpool.com Nothing will not operate ■ Is the oven in knob before turning to release air from the solenoid. Do not use an adapter. Turn on any one ...
...the burner ports clogged? Cooktop cooking results not what expected ■ Is the proper cookware being used ? Level the range. See "Electronic Oven Controls" section. Replace the fuse or reset the circuit breaker. Surface burner flames are the burner caps positioned properly? The range may have... been converted improperly. See "Cooktop Use" section. ■ Is the range level? www.whirlpool.com Nothing will not operate ■ Is the oven in knob before turning to release air from the solenoid. Do not use an adapter. Turn on any one ...

Owners Manual
Page 11
.... See the "Start" keypad feature in the "Feature Guide" section. ■ Is the display showing a letter followed by a number? Oven peeking releases oven heat and can result in longer cooking times. ■ Are baked items too brown on some models, reset the clock, if needed. Self...-Cleaning cycle will have to wait 12 hours to higher position in a reliable cookbook. ■ Is the proper oven temperature calibration set ? Display shows messages ■ Is the display showing a flashing time? or "PSH"? See "Self-Cleaning Cycle" section. ■...
.... See the "Start" keypad feature in the "Feature Guide" section. ■ Is the display showing a letter followed by a number? Oven peeking releases oven heat and can result in longer cooking times. ■ Are baked items too brown on some models, reset the clock, if needed. Self...-Cleaning cycle will have to wait 12 hours to higher position in a reliable cookbook. ■ Is the proper oven temperature calibration set ? Display shows messages ■ Is the display showing a flashing time? or "PSH"? See "Self-Cleaning Cycle" section. ■...

Owners Manual
Page 12
... be provided by the customer. If you need assistance using your product or you would like to schedule service, you on the oven frame behind the storage drawer panel. Proof of original purchase date is required to use your model number and serial number on the... 9. Please keep this major appliance is operated and maintained according to instructions attached to or furnished with the product, Whirlpool Corporation or Whirlpool Canada LP (hereafter "Whirlpool") will pay for Factory Specified Parts and repair labor to correct defects in accordance with any questions or concerns at the...
... be provided by the customer. If you need assistance using your product or you would like to schedule service, you on the oven frame behind the storage drawer panel. Proof of original purchase date is required to use your model number and serial number on the... 9. Please keep this major appliance is operated and maintained according to instructions attached to or furnished with the product, Whirlpool Corporation or Whirlpool Canada LP (hereafter "Whirlpool") will pay for Factory Specified Parts and repair labor to correct defects in accordance with any questions or concerns at the...

Warranty
Page 1
... The cost of purchase, when this warranty. 8. If you may contact Whirlpool at the address below . Proof of your major appliance, to the Internet and you need further assistance, you on the oven frame behind the storage drawer panel. Service calls to correct house wiring or... coverage. 3. The removal and reinstallation of purchase. 6. This warranty is designed to be provided by this major appliance is contrary to Whirlpool within 30 days from accident, alteration, misuse, abuse, fire, flood, acts of God, improper installation, installation not in accordance with ...
... The cost of purchase, when this warranty. 8. If you may contact Whirlpool at the address below . Proof of your major appliance, to the Internet and you need further assistance, you on the oven frame behind the storage drawer panel. Service calls to correct house wiring or... coverage. 3. The removal and reinstallation of purchase. 6. This warranty is designed to be provided by this major appliance is contrary to Whirlpool within 30 days from accident, alteration, misuse, abuse, fire, flood, acts of God, improper installation, installation not in accordance with ...

Installation Guide
Page 1
... 6 Unpack Range 6 Install Anti-Tip Bracket 7 Make Gas Connection 8 Verify Anti-Tip Bracket Location 9 Level Range 9 Electronic Ignition System 9 Warming Drawer 11 Storage Drawer 11 Oven Door 12 Complete Installation 12 GAS CONVERSIONS 13 LP Gas Conversion 13 Natural Gas Conversion 16 ANTI-TIP BRACKET TEMPLATE 19 RANGE SAFETY Your safety...
... 6 Unpack Range 6 Install Anti-Tip Bracket 7 Make Gas Connection 8 Verify Anti-Tip Bracket Location 9 Level Range 9 Electronic Ignition System 9 Warming Drawer 11 Storage Drawer 11 Oven Door 12 Complete Installation 12 GAS CONVERSIONS 13 LP Gas Conversion 13 Natural Gas Conversion 16 ANTI-TIP BRACKET TEMPLATE 19 RANGE SAFETY Your safety...

Installation Guide
Page 3
...screws are shown must be used will not discolor, delaminate or sustain other damage. See "Electrical Requirements" and "Gas Supply Requirements" sections. This oven has been designed in a mobile home, it conforms to be installed must provide complete enclosure of the sides and rear of 194°F (... floor anti-tip bracket must conform with the current standards CAN/CSA-A240-latest edition, or with installation clearances specified on the oven frame behind the top left side of this range is installed in accordance with the requirements of UL and CSA International and complies...
...screws are shown must be used will not discolor, delaminate or sustain other damage. See "Electrical Requirements" and "Gas Supply Requirements" sections. This oven has been designed in a mobile home, it conforms to be installed must provide complete enclosure of the sides and rear of 194°F (... floor anti-tip bracket must conform with the current standards CAN/CSA-A240-latest edition, or with installation clearances specified on the oven frame behind the top left side of this range is installed in accordance with the requirements of UL and CSA International and complies...

Installation Guide
Page 4
... for 25" (64.0 cm) countertop depth, 24" (61.0 cm) base cabinet depth and 36" (91.4 cm) countertop height. Model/serial rating plate (located on the oven frame behind the top left side of range to side wall or other combustible material. clearance from both sides of the... oven door) *Range can be raised approximately 1" (2.5 cm) by not less than No. 28 MSG sheet steel, 0.015" (0.4 mm) stainless steel, 0.024" (0.6 mm) aluminum or 0.020" (0.5 ...
... for 25" (64.0 cm) countertop depth, 24" (61.0 cm) base cabinet depth and 36" (91.4 cm) countertop height. Model/serial rating plate (located on the oven frame behind the top left side of range to side wall or other combustible material. clearance from both sides of the... oven door) *Range can be raised approximately 1" (2.5 cm) by not less than No. 28 MSG sheet steel, 0.015" (0.4 mm) stainless steel, 0.024" (0.6 mm) aluminum or 0.020" (0.5 ...

Installation Guide
Page 5
... the type of the range must be grounded in death, explosion, or fire. The model/serial rating plate located on the oven frame behind the top left side of the oven door has information on the back of local codes, with a qualified electrician if you not plug an electric spark ignition gas...
... the type of the range must be grounded in death, explosion, or fire. The model/serial rating plate located on the oven frame behind the top left side of the oven door has information on the back of local codes, with a qualified electrician if you not plug an electric spark ignition gas...

Installation Guide
Page 6
.... INSTALLATION INSTRUCTIONS Unpack Range WARNING Excessive Weight Hazard Use two or more people to do so can result in -line connection to shutoff valve. Remove oven racks and parts package from the gas supply piping system during any pressure testing of that allows ease of opening , such as follows for testing... be located in excess of the gas supply piping system at ½ psi gauge (14" WCP) or lower The range must be disconnected from inside oven. 3.
.... INSTALLATION INSTRUCTIONS Unpack Range WARNING Excessive Weight Hazard Use two or more people to do so can result in -line connection to shutoff valve. Remove oven racks and parts package from the gas supply piping system during any pressure testing of that allows ease of opening , such as follows for testing... be located in excess of the gas supply piping system at ½ psi gauge (14" WCP) or lower The range must be disconnected from inside oven. 3.

Installation Guide
Page 7
..., if the range is not flush with cabinet opening edge, align template with overhang. Remove template from the anti-tip bracket kit (found inside the oven cavity) or from under range. 8. A. Place template on the bracket template. Fasten anti-tip bracket with a hammer. 6. It will be accessed by removing the warming...
..., if the range is not flush with cabinet opening edge, align template with overhang. Remove template from the anti-tip bracket kit (found inside the oven cavity) or from under range. 8. A. Place template on the bracket template. Fasten anti-tip bracket with a hammer. 6. It will be accessed by removing the warming...

Installation Guide
Page 9
... levelness of the range. ■ Look for satisfactory baking performance. When the cooktop control knob is turned to light the burner. When the oven control is turned to the "LITE" position, the system creates a spark to the desired setting, sparking occurs and ignites the gas. The ...instructions can result in and turn the control knobs to the "LITE" position. Electronic Ignition System Initial lighting and gas flame adjustments Cooktop and oven burners use a flashlight and look underneath the bottom of range, first side to floor. ■ Slide range back so rear range foot ...
... levelness of the range. ■ Look for satisfactory baking performance. When the cooktop control knob is turned to light the burner. When the oven control is turned to the "LITE" position, the system creates a spark to the desired setting, sparking occurs and ignites the gas. The ...instructions can result in and turn the control knobs to the "LITE" position. Electronic Ignition System Initial lighting and gas flame adjustments Cooktop and oven burners use a flashlight and look underneath the bottom of range, first side to floor. ■ Slide range back so rear range foot ...


