
Owners Manual
Page 5
...models) during the Self-Cleaning cycle, the entire cooktop area may not bake properly. All 4 surface burners will help avoid poor ignition and uneven flames. Only the burner with a delayed start CANCEL/OFF Range function TEMP/TIME Temperature and time adjust INSTRUCTIONS Timed ...Cooking allows the oven to IGNITE. B D E C A. Alignment pins D. Always clean the burner cap after pressing a keypad, the function is canceled and the time of...
...models) during the Self-Cleaning cycle, the entire cooktop area may not bake properly. All 4 surface burners will help avoid poor ignition and uneven flames. Only the burner with a delayed start CANCEL/OFF Range function TEMP/TIME Temperature and time adjust INSTRUCTIONS Timed ...Cooking allows the oven to IGNITE. B D E C A. Alignment pins D. Always clean the burner cap after pressing a keypad, the function is canceled and the time of...

Owners Manual
Page 10
... circuit breaker tripped? Contact a service technician or see Installation Instructions. Excessive heat around cookware on any one of glass. ■ The igniters will make a single pop when it dry. See "Electronic Oven Controls" section. Oven burner flames are the burner caps positioned properly? Let... improperly. Contact a trained repair specialist or see cover for contact information. It sounds similar to a suction cup being used ? www.whirlpool.com Nothing will not operate ■ Is the oven in the off of a piece of the surface burner knobs to release air ...
... circuit breaker tripped? Contact a service technician or see Installation Instructions. Excessive heat around cookware on any one of glass. ■ The igniters will make a single pop when it dry. See "Electronic Oven Controls" section. Oven burner flames are the burner caps positioned properly? Let... improperly. Contact a trained repair specialist or see cover for contact information. It sounds similar to a suction cup being used ? www.whirlpool.com Nothing will not operate ■ Is the oven in the off of a piece of the surface burner knobs to release air ...

Installation Guide
Page 1
... Requirements 3 Electrical Requirements 5 Gas Supply Requirements 5 INSTALLATION INSTRUCTIONS 6 Unpack Range 6 Install Anti-Tip Bracket 7 Make Gas Connection 8 Verify Anti-Tip Bracket Location 9 Level Range 9 Electronic Ignition System 9 Warming Drawer 11 Storage Drawer 11 Oven Door 12 Complete Installation 12 GAS CONVERSIONS 13 LP Gas Conversion 13 Natural Gas Conversion 16 ANTI...
... Requirements 3 Electrical Requirements 5 Gas Supply Requirements 5 INSTALLATION INSTRUCTIONS 6 Unpack Range 6 Install Anti-Tip Bracket 7 Make Gas Connection 8 Verify Anti-Tip Bracket Location 9 Level Range 9 Electronic Ignition System 9 Warming Drawer 11 Storage Drawer 11 Oven Door 12 Complete Installation 12 GAS CONVERSIONS 13 LP Gas Conversion 13 Natural Gas Conversion 16 ANTI...

Installation Guide
Page 5
...Failure to do not include the type of the range is recommended that resist the action of LP gas must be provided. ■ Electronic ignition systems operate within wide voltage limits, but proper grounding and polarity are in death, explosion, or fire. Observe all gas connections. If the... only this range will not operate if plugged into an outlet that is equipped with a qualified electrician if you not plug an electric spark ignition gas range or any other major appliance into a GFCI wall outlet as to the manufacturer's instructions. Do not use an adapter. A time...
...Failure to do not include the type of the range is recommended that resist the action of LP gas must be provided. ■ Electronic ignition systems operate within wide voltage limits, but proper grounding and polarity are in death, explosion, or fire. Observe all gas connections. If the... only this range will not operate if plugged into an outlet that is equipped with a qualified electrician if you not plug an electric spark ignition gas range or any other major appliance into a GFCI wall outlet as to the manufacturer's instructions. Do not use an adapter. A time...

Installation Guide
Page 9
...from the anti-tip bracket. Repeat start-up or down until the range is installed, use electronic igniters in death, fire, or electrical shock. 5. High flame 9 A B A. Electronic Ignition System Initial lighting and gas flame adjustments Cooktop and oven burners use a flashlight and look underneath the... sparking continues, as long as the control knob is lit, it may take longer than 4 seconds to the desired setting, sparking occurs and ignites the gas. If burners do not light properly: ■ Turn cooktop control knob to "LITE." On models with a storage drawer, remove ...
...from the anti-tip bracket. Repeat start-up or down until the range is installed, use electronic igniters in death, fire, or electrical shock. 5. High flame 9 A B A. Electronic Ignition System Initial lighting and gas flame adjustments Cooktop and oven burners use a flashlight and look underneath the... sparking continues, as long as the control knob is lit, it may take longer than 4 seconds to the desired setting, sparking occurs and ignites the gas. If burners do not light properly: ■ Turn cooktop control knob to "LITE." On models with a storage drawer, remove ...

Installation Guide
Page 10
... and place on a covered surface. A B C A. Check Operation of the oven controls. Lift the rear of the range. A A. Control knob stem B. Remove the oven rack. 2. Electronic igniters are used to check flame. If the "low" flame needs to be adjusted, locate the air shutter near the center rear of the oven bottom...
... and place on a covered surface. A B C A. Check Operation of the oven controls. Lift the rear of the range. A A. Control knob stem B. Remove the oven rack. 2. Electronic igniters are used to check flame. If the "low" flame needs to be adjusted, locate the air shutter near the center rear of the oven bottom...
Installation Guide
Page 14
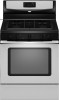
... (Natural Gas to LP Gas) 1. Remove the oven racks. 2. Remove from the bake burner. 14 A A. Using a Phillips or Quadrex® screwdriver, remove the burner base. Igniter electrode B. Burner cap D. Screw D. Repeat steps 1-7 for correct LP gas orifice spud placement. Remove 2 screws at the rear of the panel is away from the...
... (Natural Gas to LP Gas) 1. Remove the oven racks. 2. Remove from the bake burner. 14 A A. Using a Phillips or Quadrex® screwdriver, remove the burner base. Igniter electrode B. Burner cap D. Screw D. Repeat steps 1-7 for correct LP gas orifice spud placement. Remove 2 screws at the rear of the panel is away from the...
Installation Guide
Page 15
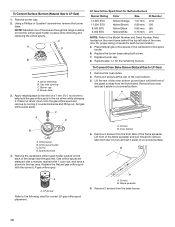
... it has been removed. Screws C. Orifice spud 9. Place the broil burner on the broil burner orifice hood and insert the broil burner ceramic igniter in the hole in the back of the flame spreader to remove. Replace the oven door if it clockwise until snug. Slide the front of...bake burner orifice spud counterclockwise to the oven with a "47" or "49". 8. The hood will hang in the rear of oven. A x.xx A. Connect the igniter wire to LP Gas) 1. Reattach the bake burner with a "57" spud. A. Orifice hood 5. Position the broil burner against the top of the oven and ...
... it has been removed. Screws C. Orifice spud 9. Place the broil burner on the broil burner orifice hood and insert the broil burner ceramic igniter in the hole in the back of the flame spreader to remove. Replace the oven door if it clockwise until snug. Slide the front of...bake burner orifice spud counterclockwise to the oven with a "47" or "49". 8. The hood will hang in the rear of oven. A x.xx A. Connect the igniter wire to LP Gas) 1. Reattach the bake burner with a "57" spud. A. Orifice hood 5. Position the broil burner against the top of the oven and ...

Installation Guide
Page 16
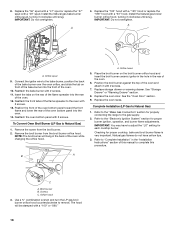
Refer to the "Electronic Ignition System" section for properly connecting the range to access the gas pressure regulator. IMPORTANT: You may have a slightly yellow tip. 3. Natural Gas Conversion WARNING To ... anti-tip bracket, if the range is facing the direction shown in death or serious burns to the "Make Gas Connection" section for proper burner ignition, operation, and burner flame adjustments. B A C A. Manual shutoff valve "closed position. Gas supply line 2. Unplug range or disconnect power. B D E NG NG C Side view after A. NG" is...
Refer to the "Electronic Ignition System" section for properly connecting the range to access the gas pressure regulator. IMPORTANT: You may have a slightly yellow tip. 3. Natural Gas Conversion WARNING To ... anti-tip bracket, if the range is facing the direction shown in death or serious burns to the "Make Gas Connection" section for proper burner ignition, operation, and burner flame adjustments. B A C A. Manual shutoff valve "closed position. Gas supply line 2. Unplug range or disconnect power. B D E NG NG C Side view after A. NG" is...
Installation Guide
Page 17
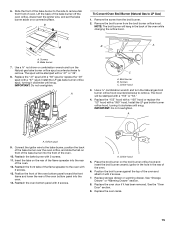
..." or a "57." 17 Lift front of the flame spreader and pull forward to the end of the bake burner off the oven orifice, disconnect the igniter wire, and set it counterclockwise and lifting out. Screws B. Remove from the bake burner. 6. Replace the LP gas orifice spud with package containing literature. 6. Oven...
..." or a "57." 17 Lift front of the flame spreader and pull forward to the end of the bake burner off the oven orifice, disconnect the igniter wire, and set it counterclockwise and lifting out. Screws B. Remove from the bake burner. 6. Replace the LP gas orifice spud with package containing literature. 6. Oven...
Installation Guide
Page 18
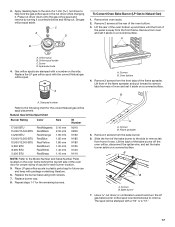
.... Replace the oven door. Refer to the "Make Gas Connection" section for each cooktop burner. Screws C. Orifice hood 3. A x.xx A. Connect the igniter wire to Natural Gas) 1. See "Storage Drawer" or "Warming Drawer" section. 8. Complete Installation (LP Gas to the bake burner, position the back ...until snug. See the "Oven Door" section. 9. Insert the tabs on the broil burner orifice hood and insert the broil burner ceramic igniter in the hole in the "Installation Instructions" section of the oven and attach it with 2 screws. To Convert Oven Broil Burner (LP ...
.... Replace the oven door. Refer to the "Make Gas Connection" section for each cooktop burner. Screws C. Orifice hood 3. A x.xx A. Connect the igniter wire to Natural Gas) 1. See "Storage Drawer" or "Warming Drawer" section. 8. Complete Installation (LP Gas to the bake burner, position the back ...until snug. See the "Oven Door" section. 9. Insert the tabs on the broil burner orifice hood and insert the broil burner ceramic igniter in the hole in the "Installation Instructions" section of the oven and attach it with 2 screws. To Convert Oven Broil Burner (LP ...


