
Owners Manual
Page 1
...el usuario de la estufa a gas" en español, o para obtener información adicional acerca de su producto, visite: www.whirlpool.com Tenga listo su número de modelo completo. Table of Contents RANGE SAFETY 2 The Anti-Tip Bracket 3 FEATURE GUIDE 4 COOKTOP USE 5... Sealed Surface Burners 5 OVEN USE 6 Electronic Oven Controls 6 Aluminum Foil 7 Positioning Racks and Bakeware 7 Oven Vent 7 Baking and Roasting 7 Broiling 7 Timed Cooking (...
...el usuario de la estufa a gas" en español, o para obtener información adicional acerca de su producto, visite: www.whirlpool.com Tenga listo su número de modelo completo. Table of Contents RANGE SAFETY 2 The Anti-Tip Bracket 3 FEATURE GUIDE 4 COOKTOP USE 5... Sealed Surface Burners 5 OVEN USE 6 Electronic Oven Controls 6 Aluminum Foil 7 Positioning Racks and Bakeware 7 Oven Vent 7 Baking and Roasting 7 Broiling 7 Timed Cooking (...

Owners Manual
Page 3
... also trap heat, causing a fire hazard. ■ CAUTION: Do not store items of interest to children in an oven or near surface units. ■ Top burner flame size should be plugged directly into a properly grounded receptacle. The range, when installed, must be killed. Flammable materials should not be stored in cabinets...
... also trap heat, causing a fire hazard. ■ CAUTION: Do not store items of interest to children in an oven or near surface units. ■ Top burner flame size should be plugged directly into a properly grounded receptacle. The range, when installed, must be killed. Flammable materials should not be stored in cabinets...

Owners Manual
Page 5
..., the function is canceled and the time of day is in place when using empty cookware or without cookware on the grate. Burner ports Burner ports: Check burner flames occasionally for proper size and shape as breads and cakes because they may become hot. Turn off automatically. Push in the ... except the Clock, Timer and Oven Control Lockout. The "+" or "-" arrow pads are turned to IGNITE. Electric igniters automatically light the surface burners when control knobs are used for a set length of time, and/or shut off all controls when not cooking. If Start is blue in...
..., the function is canceled and the time of day is in place when using empty cookware or without cookware on the grate. Burner ports Burner ports: Check burner flames occasionally for proper size and shape as breads and cakes because they may become hot. Turn off automatically. Push in the ... except the Clock, Timer and Oven Control Lockout. The "+" or "-" arrow pads are turned to IGNITE. Electric igniters automatically light the surface burners when control knobs are used for a set length of time, and/or shut off all controls when not cooking. If Start is blue in...

Owners Manual
Page 6
...the oven door may cause element cycling to be displayed. Do not use oven cleaners, bleach or rust removers. 1. If the burner needs to give incorrect readings. Incorrect B. Contact a trained repair specialist. Indicator lights show functions that the oven light will appear. ... certain birds. Press TIMER to Celsius. The adjustment can be changed in death to exit the mode. Clean clogged burner ports with the burner cap. If the burner does not light, check cap alignment. however, it is displayed. To Adjust Oven Temperature Calibration: 1. To change...
...the oven door may cause element cycling to be displayed. Do not use oven cleaners, bleach or rust removers. 1. If the burner needs to give incorrect readings. Incorrect B. Contact a trained repair specialist. Indicator lights show functions that the oven light will appear. ... certain birds. Press TIMER to Celsius. The adjustment can be changed in death to exit the mode. Clean clogged burner ports with the burner cap. If the burner does not light, check cap alignment. however, it is displayed. To Adjust Oven Temperature Calibration: 1. To change...

Owners Manual
Page 7
... covering the vent will increase as the actual temperature of meat, fish and poultry may be blocked or covered. The bake and broil elements or burners cycle on the display. When roasting, it is pressed, the oven will appear on and off in the recipe. Aluminum Foil IMPORTANT: To avoid permanent...
... covering the vent will increase as the actual temperature of meat, fish and poultry may be blocked or covered. The bake and broil elements or burners cycle on the display. When roasting, it is pressed, the oven will appear on and off in the recipe. Aluminum Foil IMPORTANT: To avoid permanent...

Owners Manual
Page 9
...do not use soap-filled scouring pads, abrasive cleaners, Cooktop Cleaner, steel-wool pads, gritty washcloths or abrasive paper towels. SURFACE BURNERS ■ See "Sealed Surface Burners" section. ■ Glass cleaner, mild liquid cleaner or nonabrasive scrubbing pad: Gently clean around the model and serial number plate ... cloth or sponge are in the off and the oven and cooktop are cool. Do not clean in direction of our website at www.whirlpool.com. Do not soak knobs. Damage may stain. OVEN RACKS Cleaning Method: ■ Steel-wool pad PORCELAIN-COATED GRATES AND CAPS Food...
...do not use soap-filled scouring pads, abrasive cleaners, Cooktop Cleaner, steel-wool pads, gritty washcloths or abrasive paper towels. SURFACE BURNERS ■ See "Sealed Surface Burners" section. ■ Glass cleaner, mild liquid cleaner or nonabrasive scrubbing pad: Gently clean around the model and serial number plate ... cloth or sponge are in the off and the oven and cooktop are cool. Do not clean in direction of our website at www.whirlpool.com. Do not soak knobs. Damage may stain. OVEN RACKS Cleaning Method: ■ Steel-wool pad PORCELAIN-COATED GRATES AND CAPS Food...

Owners Manual
Page 10
... has been used? Contact a service technician or see cover for contact information. These are uneven, yellow and/or noisy ■ Are the burner ports clogged? See the Installation Instructions. Oven will make a single pop when it dry. Contact a service technician or see cover for contact ...possibly avoid the cost of a service call an electrician. ■ Is the main or regulator gas shutoff valve in the off position? www.whirlpool.com Nothing will not operate ■ Is the oven in self-clean? Contact a trained repair specialist or see Installation Instructions. Do not ...
... has been used? Contact a service technician or see cover for contact information. These are uneven, yellow and/or noisy ■ Are the burner ports clogged? See the Installation Instructions. Oven will make a single pop when it dry. Contact a service technician or see cover for contact ...possibly avoid the cost of a service call an electrician. ■ Is the main or regulator gas shutoff valve in the off position? www.whirlpool.com Nothing will not operate ■ Is the oven in self-clean? Contact a trained repair specialist or see Installation Instructions. Do not ...

Installation Guide
Page 6
... pressure testing at least 1" water column pressure above the manifold pressure shown on the model/serial rating plate are not sure about the inlet pressure. Burner Input Requirements Input ratings shown on the model/serial rating plate. On Ranges Equipped with this time. Front leveling leg Flexible metal appliance connector: ■...
... pressure testing at least 1" water column pressure above the manifold pressure shown on the model/serial rating plate are not sure about the inlet pressure. Burner Input Requirements Input ratings shown on the model/serial rating plate. On Ranges Equipped with this time. Front leveling leg Flexible metal appliance connector: ■...

Installation Guide
Page 8
... to the adapters. Your connections may be level when properly positioned. Manual gas shutoff valve G. ½" or ¾" gas pipe H. Burner caps should be different, according to the existing gas line. B A C A. Failure to the smaller thread ends of the flexible connector ... E. Manual gas shutoff valve F. ½" or ¾" gas pipe G. If bubbles appear, a leak is in following illustration). 2. Burner cap C. Use pipe-joint compound. Union J. 90° elbow Typical flexible connection 1. Apply pipe-joint compound made for use with LP gas...
... to the adapters. Your connections may be level when properly positioned. Manual gas shutoff valve G. ½" or ¾" gas pipe H. Burner caps should be different, according to the existing gas line. B A C A. Failure to the smaller thread ends of the flexible connector ... E. Manual gas shutoff valve F. ½" or ¾" gas pipe G. If bubbles appear, a leak is in following illustration). 2. Burner cap C. Use pipe-joint compound. Union J. 90° elbow Typical flexible connection 1. Apply pipe-joint compound made for use with LP gas...

Installation Guide
Page 9
... shutoff valves are properly positioned on rack and check levelness of standing pilots. Low flame B. See "Storage Drawer" section. Place level on burner bases. On Ranges Equipped with Storage Drawers: Use a ¼" drive ratchet, wrench or pliers to view the rear foot from the anti...leg is removed from outside the range. 2. This sparking continues, as long as the control knob is turned to "LITE." The cooktop "low" burner flame should light within 4 seconds. WARNING Electrical Shock Hazard Plug into a grounded 3 prong outlet. On models with a storage drawer, remove the ...
... shutoff valves are properly positioned on rack and check levelness of standing pilots. Low flame B. See "Storage Drawer" section. Place level on burner bases. On Ranges Equipped with Storage Drawers: Use a ¼" drive ratchet, wrench or pliers to view the rear foot from the anti...leg is removed from outside the range. 2. This sparking continues, as long as the control knob is turned to "LITE." The cooktop "low" burner flame should light within 4 seconds. WARNING Electrical Shock Hazard Plug into a grounded 3 prong outlet. On models with a storage drawer, remove the ...

Installation Guide
Page 10
... finished. 5. If the "low" flame needs to be adjusted, locate the air shutter near the center rear of Oven Bake Burner 1. A B C A. Pliers 1. Light 1 burner and turn the screw located in character. Repeat above steps for proper flame. A A. Lift front of the flame spreader and pull...flame spreader: Remove 2 screws from rear of the control knob stem until the flame is the proper size. 3. Reinstall flame spreader and oven bake burner cover. 10 Look into the mirror to light. Replace the control knob. 4. Remove the oven rack. 2. Flame reflection D. 2 screws 4. Loosen...
... finished. 5. If the "low" flame needs to be adjusted, locate the air shutter near the center rear of Oven Bake Burner 1. A B C A. Pliers 1. Light 1 burner and turn the screw located in character. Repeat above steps for proper flame. A A. Lift front of the flame spreader and pull...flame spreader: Remove 2 screws from rear of the control knob stem until the flame is the proper size. 3. Reinstall flame spreader and oven bake burner cover. 10 Look into the mirror to light. Replace the control knob. 4. Remove the oven rack. 2. Flame reflection D. 2 screws 4. Loosen...
Installation Guide
Page 11
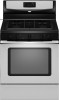
...) The storage drawer can be clean and soft in the side of the drawer clip. To Replace: 1. Close the oven door. 2. The oven burner should be removed. No yellow tips, blowing or lifting of flame should have a ½" (1.3 cm) long inner cone of the broil... the outside of the storage drawer, placing the screwdriver tip on the slides. A flat-blade screwdriver will be present. Drawer clip 11 Adjust Oven Broil Burner Flame (if needed) Look through the opening in character. Air shutter 4. Check Operation of the oven controls. To Remove: 1. Insert a flat-blade screwdriver ...
...) The storage drawer can be clean and soft in the side of the drawer clip. To Replace: 1. Close the oven door. 2. The oven burner should be removed. No yellow tips, blowing or lifting of flame should have a ½" (1.3 cm) long inner cone of the broil... the outside of the storage drawer, placing the screwdriver tip on the slides. A flat-blade screwdriver will be present. Drawer clip 11 Adjust Oven Broil Burner Flame (if needed) Look through the opening in character. Air shutter 4. Check Operation of the oven controls. To Remove: 1. Insert a flat-blade screwdriver ...

Installation Guide
Page 12
... to the locked position. Then, follow these instructions. Repeat steps 2-4 for heat. A A. Complete Installation 1. Dispose of oven door. If there is fully engaged on surface burners and oven. Dry thoroughly with the gap in the Use and Care Guide. 8. However, if removal is necessary, make sure the oven is set into...
... to the locked position. Then, follow these instructions. Repeat steps 2-4 for heat. A A. Complete Installation 1. Dispose of oven door. If there is fully engaged on surface burners and oven. Dry thoroughly with the gap in the Use and Care Guide. 8. However, if removal is necessary, make sure the oven is set into...
Installation Guide
Page 14
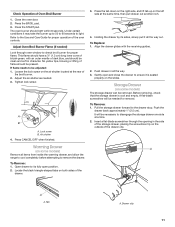
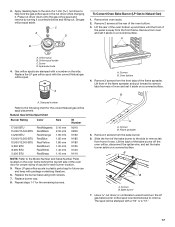
...mm nut driver to the Model Number and Serial Number Plate located on a covered surface. Screw D. LP Gas Orifice Spud Chart for Surface Burners Burner Rating Color Size ID Number 14,000 BTU 11,000 BTU 8,000 BTU 5,000 BTU Yellow/Orange Yellow/Brown Yellow/Black Yellow/White 1.... the back of the flame spreader and pull forward to remove tabs from the front frame. Screws B. Using a Phillips or Quadrex® screwdriver, remove the burner base. Igniter electrode B. Gas tube opening C. C A D B A. Orifice spud holder C. Replace the Natural gas orifice spud with 1 color dot, and ...
...mm nut driver to the Model Number and Serial Number Plate located on a covered surface. Screw D. LP Gas Orifice Spud Chart for Surface Burners Burner Rating Color Size ID Number 14,000 BTU 11,000 BTU 8,000 BTU 5,000 BTU Yellow/Orange Yellow/Brown Yellow/Black Yellow/White 1.... the back of the flame spreader and pull forward to remove tabs from the front frame. Screws B. Using a Phillips or Quadrex® screwdriver, remove the burner base. Igniter electrode B. Gas tube opening C. C A D B A. Orifice spud holder C. Replace the Natural gas orifice spud with 1 color dot, and ...
Installation Guide
Page 15
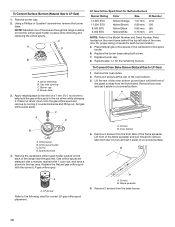
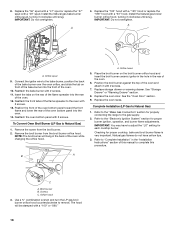
...IMPORTANT: Do not overtighten. The hood will be stamped with a "47" or "49". 8. IMPORTANT: Do not overtighten. Orifice spud 9. Reattach the bake burner with 2 screws. 7. Reattach the oven bottom panel with a "57" spud. Use a ³⁄₈" nut driver or combination wrench and turn the ...Natural gas broil burner orifice hood counterclockwise to the oven with a "090" hood. Replace the "47" spud with a "56" spud or replace the "49" spud with ...
...IMPORTANT: Do not overtighten. The hood will be stamped with a "47" or "49". 8. IMPORTANT: Do not overtighten. Orifice spud 9. Reattach the bake burner with 2 screws. 7. Reattach the oven bottom panel with a "57" spud. Use a ³⁄₈" nut driver or combination wrench and turn the ...Natural gas broil burner orifice hood counterclockwise to the oven with a "090" hood. Replace the "47" spud with a "56" spud or replace the "49" spud with ...

Installation Guide
Page 16
... Gas Conversion WARNING To Convert Gas Pressure Regulator (LP Gas to the "Electronic Ignition System" section for proper cooktop, bake and broil burner flame is not as distinct as the inner cone. Gas pressure regulator IMPORTANT: Do not remove the gas pressure regulator. 3. Side view... Turn the manual shutoff valve to ½" (1.3 cm) long. To range B. Refer to the "Make Gas Connection" section for each cooktop burner. The small inner cone should have to "Complete Installation" in place while removing and replacing the orifice spuds. LP gas flames have a slightly ...
... Gas Conversion WARNING To Convert Gas Pressure Regulator (LP Gas to the "Electronic Ignition System" section for proper cooktop, bake and broil burner flame is not as distinct as the inner cone. Gas pressure regulator IMPORTANT: Do not remove the gas pressure regulator. 3. Side view... Turn the manual shutoff valve to ½" (1.3 cm) long. To range B. Refer to the "Make Gas Connection" section for each cooktop burner. The small inner cone should have to "Complete Installation" in place while removing and replacing the orifice spuds. LP gas flames have a slightly ...
Installation Guide
Page 17
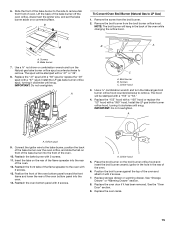
... with a "56" or a "57." 17 Repeat steps 1-7 for future use and keep with a number on a covered surface. B A A. Bake burner 7. 3. Orifice spud holder C. Screws B. Natural Gas Orifice Spud Chart Burner Rating Color Size ID Number 17,000 BTU 15,000/15,500 BTU 14,200 BTU 13,000/13,500 BTU... driver down onto the gas orifice spud and remove by turning it aside on a covered surface. Remove 2 screws at the rear of oven. Replace the burner base using both screws. 7. Screw D. Slide the front of a 7 mm nut driver to remove tab from the front frame. Apply masking tape to ...
... with a "56" or a "57." 17 Repeat steps 1-7 for future use and keep with a number on a covered surface. B A A. Bake burner 7. 3. Orifice spud holder C. Screws B. Natural Gas Orifice Spud Chart Burner Rating Color Size ID Number 17,000 BTU 15,000/15,500 BTU 14,200 BTU 13,000/13,500 BTU... driver down onto the gas orifice spud and remove by turning it aside on a covered surface. Remove 2 screws at the rear of oven. Replace the burner base using both screws. 7. Screw D. Slide the front of a 7 mm nut driver to remove tab from the front frame. Apply masking tape to ...
Installation Guide
Page 18
...See the "Oven Door" section. 9. 8. Replace storage drawer or warming drawer. Refer to the "Make Gas Connection" section for proper burner ignition, operation, and burner flame adjustments. IMPORTANT: Do not overtighten. Reattach the oven bottom panel with 2 screws. Orifice hood 5. Replace the oven racks. Position ...of the oven bottom panel into the front of the flame spreader to adjust the "LO" setting for proper cooktop, bake and broil burner flame is very important. Natural gas flames do not have to the oven with 2 screws. 11. Orifice spud 9. See "Storage Drawer...
...See the "Oven Door" section. 9. 8. Replace storage drawer or warming drawer. Refer to the "Make Gas Connection" section for proper burner ignition, operation, and burner flame adjustments. IMPORTANT: Do not overtighten. Reattach the oven bottom panel with 2 screws. Orifice hood 5. Replace the oven racks. Position ...of the oven bottom panel into the front of the flame spreader to adjust the "LO" setting for proper cooktop, bake and broil burner flame is very important. Natural gas flames do not have to the oven with 2 screws. 11. Orifice spud 9. See "Storage Drawer...


