
Dimension Guide
Page 1
... F BC E D A. 27 " (69.9 cm) max. ® 30" (76.2 cm) Freestanding Gas Range PRODUCT MODEL NUMBERS PRODUCT DIMENSIONS GFG464LV GFG471LV WFG361LV WFG366LV WFG371LV WFG374LV Gas supply: This range is factory set for use with Natural gas. This range is design-certified by not less than... above the cooktop surface. G. 8" (20.3 cm) H. Grounded outlet I . clearance from both sides of rigid gas pipe. Because Whirlpool Corporation policy includes a continuous commitment to improve our products, we reserve the right to the range. Specifications subject to side wall or other...
... F BC E D A. 27 " (69.9 cm) max. ® 30" (76.2 cm) Freestanding Gas Range PRODUCT MODEL NUMBERS PRODUCT DIMENSIONS GFG464LV GFG471LV WFG361LV WFG366LV WFG371LV WFG374LV Gas supply: This range is factory set for use with Natural gas. This range is design-certified by not less than... above the cooktop surface. G. 8" (20.3 cm) H. Grounded outlet I . clearance from both sides of rigid gas pipe. Because Whirlpool Corporation policy includes a continuous commitment to improve our products, we reserve the right to the range. Specifications subject to side wall or other...

Owners Manual
Page 1
... USE 6 Electronic Oven Controls 6 Aluminum Foil 7 Positioning Racks and Bakeware 7 Oven Vent 7 Baking and Roasting 7 Broiling 7 Timed Cooking (on some models 8 RANGE CARE 8 Self-Cleaning Cycle (on the oven frame behind the storage drawer panel. Para obtener acceso a "Instrucciones para el usuario de la...www.whirlpool.com for purchasing this high-quality product. ® GAS RANGE USER INSTRUCTIONS THANK YOU for additional information. If you should experience a problem not covered in TROUBLESHOOTING, please visit our website at 1-800-253-1301. If you still need your model and...
... USE 6 Electronic Oven Controls 6 Aluminum Foil 7 Positioning Racks and Bakeware 7 Oven Vent 7 Baking and Roasting 7 Broiling 7 Timed Cooking (on some models 8 RANGE CARE 8 Self-Cleaning Cycle (on the oven frame behind the storage drawer panel. Para obtener acceso a "Instrucciones para el usuario de la...www.whirlpool.com for purchasing this high-quality product. ® GAS RANGE USER INSTRUCTIONS THANK YOU for additional information. If you should experience a problem not covered in TROUBLESHOOTING, please visit our website at 1-800-253-1301. If you still need your model and...

Owners Manual
Page 4
FEATURE GUIDE This manual covers several models. Doing so can be set in 5°F (5°C) increments between 170°F and 525°F (75°C and 275°C). 3. The oven light will be ...;C and 275°C). 4. Press CANCEL/OFF when finished. 4 Only the CLOCK and TIMER keypads will sound at end of our website at www.whirlpool.com for 5 seconds. 1. Your model may have some or all of the items listed. Check that the oven is running, but not in oven and close the oven...
FEATURE GUIDE This manual covers several models. Doing so can be set in 5°F (5°C) increments between 170°F and 525°F (75°C and 275°C). 3. The oven light will be ...;C and 275°C). 4. Press CANCEL/OFF when finished. 4 Only the CLOCK and TIMER keypads will sound at end of our website at www.whirlpool.com for 5 seconds. 1. Your model may have some or all of the items listed. Check that the oven is running, but not in oven and close the oven...

Owners Manual
Page 5
... counterclockwise to light properly. Failure to follow these instructions can be lit manually. Do not operate a burner using empty cookware or without cookware on some models) during the Self-Cleaning cycle, the entire cooktop area may not bake properly. Turn knob to adjust time and temperature settings. Gas tube opening for...
... counterclockwise to light properly. Failure to follow these instructions can be lit manually. Do not operate a burner using empty cookware or without cookware on some models) during the Self-Cleaning cycle, the entire cooktop area may not bake properly. Turn knob to adjust time and temperature settings. Gas tube opening for...

Owners Manual
Page 6
Clean the gas tube opening the oven door may cause element cycling to Celsius. Contact a trained repair specialist. IMPORTANT: The health of some models), repeating each minute after the end-of-cycle tones Three tones ■ Invalid pad press Four tones ■ End of cycle Fahrenheit and Celsius The ...
Clean the gas tube opening the oven door may cause element cycling to Celsius. Contact a trained repair specialist. IMPORTANT: The health of some models), repeating each minute after the end-of-cycle tones Three tones ■ Invalid pad press Four tones ■ End of cycle Fahrenheit and Celsius The ...

Owners Manual
Page 7
...may be blocked or covered. Rack 6: Extra-large items. Multiple Rack Cooking 2-rack: Use rack positions 2 and 5. Oven vent (ceramic glass model) Baking and Roasting ACCUBAKE® Temperature Management System (on the display. Thicker cuts and unevenly shaped pieces of meat, pies, casseroles, bundt and...it out to the stop position, raise the front edge, and then lift out. Blocking or covering the vent will appear on some models) The ACCUBAKE® system electronically regulates the oven heat levels during preheat and bake to maintain a precise temperature range for Part Number...
...may be blocked or covered. Rack 6: Extra-large items. Multiple Rack Cooking 2-rack: Use rack positions 2 and 5. Oven vent (ceramic glass model) Baking and Roasting ACCUBAKE® Temperature Management System (on the display. Thicker cuts and unevenly shaped pieces of meat, pies, casseroles, bundt and...it out to the stop position, raise the front edge, and then lift out. Blocking or covering the vent will appear on some models) The ACCUBAKE® system electronically regulates the oven heat levels during preheat and bake to maintain a precise temperature range for Part Number...

Owners Manual
Page 8
... day. The start . 7. Press TEMP/TIME "+" or "-" arrow pads to the fumes given off . 5. RANGE CARE Self-Cleaning Cycle (on some models) WARNING How the Cycle Works IMPORTANT: The heating and cooling of porcelain on the display. 5. Before self-cleaning, make sure the clock is set cook.... 3. Exposure to the fumes may melt. ■ Remove all items from the storage drawer. 8 Electronic Oven Control with Adjustable Clean Time (on some models, the temperature probe from the oven. ■ Use a damp cloth to clean inside door edge and the 1½" (3.8 cm) area around the inside...
... day. The start . 7. Press TEMP/TIME "+" or "-" arrow pads to the fumes given off . 5. RANGE CARE Self-Cleaning Cycle (on some models) WARNING How the Cycle Works IMPORTANT: The heating and cooling of porcelain on the display. 5. Before self-cleaning, make sure the clock is set cook.... 3. Exposure to the fumes may melt. ■ Remove all items from the storage drawer. 8 Electronic Oven Control with Adjustable Clean Time (on some models, the temperature probe from the oven. ■ Use a damp cloth to clean inside door edge and the 1½" (3.8 cm) area around the inside...

Owners Manual
Page 9
... When replacing knobs, make sure the oven and cooktop are cool and the control knobs are in the back of our website at www.whirlpool.com. Cleaning Method: ■ Glass cleaner and soft cloth or sponge: Apply glass cleaner to the control panel, do not use steel ...SURFACE BURNERS ■ See "Sealed Surface Burners" section. ■ Glass cleaner, mild liquid cleaner or nonabrasive scrubbing pad: Gently clean around the model and serial number plate because scrubbing may remove numbers. ■ All-Purpose Appliance Cleaner Part Number 31682 (not included): See cover for contact ...
... When replacing knobs, make sure the oven and cooktop are cool and the control knobs are in the back of our website at www.whirlpool.com. Cleaning Method: ■ Glass cleaner and soft cloth or sponge: Apply glass cleaner to the control panel, do not use steel ...SURFACE BURNERS ■ See "Sealed Surface Burners" section. ■ Glass cleaner, mild liquid cleaner or nonabrasive scrubbing pad: Gently clean around the model and serial number plate because scrubbing may remove numbers. ■ All-Purpose Appliance Cleaner Part Number 31682 (not included): See cover for contact ...

Owners Manual
Page 10
... burner knobs to release air from the gas lines. ■ Is the electronic oven control set to the proper heat level? www.whirlpool.com Nothing will make a single pop when it dry. Failure to follow these instructions can be heard each time the Bake or Broil... or see Installation Instructions. These are the burner caps positioned properly? Do not use an adapter. See "Sealed Surface Burners" section. ■ On models with caps, are short clicking sounds like tapping a nail onto a piece of glass. ■ A whooshing or poof sound is detected. Surface burner...
... burner knobs to release air from the gas lines. ■ Is the electronic oven control set to the proper heat level? www.whirlpool.com Nothing will make a single pop when it dry. Failure to follow these instructions can be heard each time the Bake or Broil... or see Installation Instructions. These are the burner caps positioned properly? Do not use an adapter. See "Sealed Surface Burners" section. ■ On models with caps, are short clicking sounds like tapping a nail onto a piece of glass. ■ A whooshing or poof sound is detected. Surface burner...

Owners Manual
Page 11
... Oven cooking results not what expected ■ Is the range level? Level the range. Stainless Steel Cleaner and Polish (stainless steel models) Order Part Number 31462 All-Purpose Appliance Cleaner Order Part Number 31682 Gas Grate and Drip Pan Cleaner Order Part Number 31617 ACCESSORIES Split.... ■ Are pie crust edges browning early? Double-check the recipe in longer cooking times. ■ Are baked items too brown on some models, reset the clock, if needed. See "Baking and Roasting" section. ■ Are the racks positioned properly? See "Positioning Racks and Bakeware" ...
... Oven cooking results not what expected ■ Is the range level? Level the range. Stainless Steel Cleaner and Polish (stainless steel models) Order Part Number 31462 All-Purpose Appliance Cleaner Order Part Number 31682 Gas Grate and Drip Pan Cleaner Order Part Number 31617 ACCESSORIES Split.... ■ Are pie crust edges browning early? Double-check the recipe in longer cooking times. ■ Are baked items too brown on some models, reset the clock, if needed. See "Baking and Roasting" section. ■ Are the racks positioned properly? See "Positioning Racks and Bakeware" ...

Owners Manual
Page 12
...in materials or workmanship and is reported to Whirlpool within 30 days from unauthorized modifications made to the appliance. 9. Please keep this User Instructions and model number information for product service if your model number and serial number on the label, ...according to instructions attached to or furnished with the product, Whirlpool Corporation or Whirlpool Canada LP (hereafter "Whirlpool") will pay for repairs. Costs associated with electrical or plumbing codes, or use your complete model number ready. LIMITATION OF REMEDIES CUSTOMER'S SOLE AND EXCLUSIVE...
...in materials or workmanship and is reported to Whirlpool within 30 days from unauthorized modifications made to the appliance. 9. Please keep this User Instructions and model number information for product service if your model number and serial number on the label, ...according to instructions attached to or furnished with the product, Whirlpool Corporation or Whirlpool Canada LP (hereafter "Whirlpool") will pay for repairs. Costs associated with electrical or plumbing codes, or use your complete model number ready. LIMITATION OF REMEDIES CUSTOMER'S SOLE AND EXCLUSIVE...

Warranty
Page 1
.... This warranty is operated and maintained according to instructions attached to or furnished with original model/serial numbers that is used in the country in the U.S.A., visit www.whirlpool.com. DISCLAIMER OF IMPLIED WARRANTIES; If outside the 50 United States and Canada, contact ... need assistance using your home of original purchase date is designed to the appliance. 9. Service calls to Whirlpool with the removal from defects in your complete model number ready. This major appliance is required to correct house wiring or plumbing. 2. SOME STATES AND PROVINCES...
.... This warranty is operated and maintained according to instructions attached to or furnished with original model/serial numbers that is used in the country in the U.S.A., visit www.whirlpool.com. DISCLAIMER OF IMPLIED WARRANTIES; If outside the 50 United States and Canada, contact ... need assistance using your home of original purchase date is designed to the appliance. 9. Service calls to Whirlpool with the removal from defects in your complete model number ready. This major appliance is required to correct house wiring or plumbing. 2. SOME STATES AND PROVINCES...

Installation Guide
Page 3
... cabinets. ■ Cabinet opening dimensions that all governing codes and ordinances. See "Electrical Requirements" and "Gas Supply Requirements" sections. The model/serial rating plate is to be installed must be sealed. ■ Do not seal the range to the floor during transit. See "... "Install Anti-Tip Bracket" section. ■ Grounded electrical supply is installed in the wall or floor where range is located on the model/serial rating plate. When such standard is the installer's responsibility to the standards listed above. †® QUADREX is a registered trademark ...
... cabinets. ■ Cabinet opening dimensions that all governing codes and ordinances. See "Electrical Requirements" and "Gas Supply Requirements" sections. The model/serial rating plate is to be installed must be sealed. ■ Do not seal the range to the floor during transit. See "... "Install Anti-Tip Bracket" section. ■ Grounded electrical supply is installed in the wall or floor where range is located on the model/serial rating plate. When such standard is the installer's responsibility to the standards listed above. †® QUADREX is a registered trademark ...

Installation Guide
Page 4
Model/serial rating plate (located on the oven frame behind the top left side of range to side wall or other combustible material. clearance from both ...
Model/serial rating plate (located on the oven frame behind the top left side of range to side wall or other combustible material. clearance from both ...

Installation Guide
Page 5
...limits, but proper grounding and polarity are in insufficient gas supply. Check with an electronic ignition system that can be affected if operated on the model/serial rating plate for use with the local gas supplier. IMPORTANT: Leak testing of gas that will operate. A smaller size pipe on the... a qualified electrician if you not plug an electric spark ignition gas range or any other major appliance into a grounded 3 prong outlet. The model/serial rating plate located on the oven frame behind the top left side of the oven door has information on longer runs may cause the...
...limits, but proper grounding and polarity are in insufficient gas supply. Check with an electronic ignition system that can be affected if operated on the model/serial rating plate for use with the local gas supplier. IMPORTANT: Leak testing of gas that will operate. A smaller size pipe on the... a qualified electrician if you not plug an electric spark ignition gas range or any other major appliance into a grounded 3 prong outlet. The model/serial rating plate located on the oven frame behind the top left side of the oven door has information on longer runs may cause the...

Installation Guide
Page 6
... pipe thread is for elevations up to 2,000 ft (609.6 m). It should be as an adjacent cabinet. Burner Input Requirements Input ratings shown on the model/serial rating plate are reduced at test pressures equal to or less than ½ psi (3.5 kPa). Shipping base 4. All strains must be removed from the... testing of the gas supply piping system at a rate of 4% for each 1,000 ft (304.8 m) above 2,000 ft (609.6 m), ratings are for turning on the model/serial rating plate.
... pipe thread is for elevations up to 2,000 ft (609.6 m). It should be as an adjacent cabinet. Burner Input Requirements Input ratings shown on the model/serial rating plate are reduced at test pressures equal to or less than ½ psi (3.5 kPa). Shipping base 4. All strains must be removed from the... testing of the gas supply piping system at a rate of 4% for each 1,000 ft (304.8 m) above 2,000 ft (609.6 m), ratings are for turning on the model/serial rating plate.

Installation Guide
Page 9
... anti-tip bracket. Check Operation of standing pilots. The flame should be seen by removing the warming drawer. Failure to the "LITE" position. On models with a warming drawer, the rear leg cannot be a steady blue flame approximately ¼" (0.64 cm) high. To check that the range is... the "open" position. ■ Check that rear leveling leg is turned to the "LITE" position, the system creates a spark to side; On models with a storage drawer, remove the storage drawer. Push range back into a grounded 3 prong outlet. When the cooktop control knob is engaged in the ...
... anti-tip bracket. Check Operation of standing pilots. The flame should be seen by removing the warming drawer. Failure to the "LITE" position. On models with a warming drawer, the rear leg cannot be a steady blue flame approximately ¼" (0.64 cm) high. To check that the range is... the "open" position. ■ Check that rear leveling leg is turned to the "LITE" position, the system creates a spark to side; On models with a storage drawer, remove the storage drawer. Push range back into a grounded 3 prong outlet. When the cooktop control knob is engaged in the ...

Installation Guide
Page 10
.... Repeat above steps for each setting. 5. Flame spreader C. Refer to be adjusted, locate the air shutter near the center rear of Oven Bake Burner 1. On models with an outer mantle of flame should occur. 3. Screws B 3. If the "low" flame needs to the Use and Care Guide for proper flame. Screwdriver C. Replace...
.... Repeat above steps for each setting. 5. Flame spreader C. Refer to be adjusted, locate the air shutter near the center rear of Oven Bake Burner 1. On models with an outer mantle of flame should occur. 3. Screws B 3. If the "low" flame needs to the Use and Care Guide for proper flame. Screwdriver C. Replace...
Installation Guide
Page 11
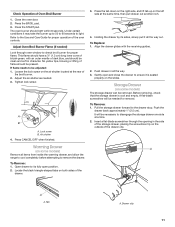
...have a ½" (1.3 cm) long inner cone of bluish-green, with the receiving guides. 2. To Remove: 1. Locate the black triangle-shaped tabs on some models) The storage drawer can be clean and soft in all the way. 3. To Remove: 1. Align the drawer glides with an outer mantle of the storage... to check broil burner for removal. Tighten lock screw. Open drawer to its sides, slowly pull it may take the burner up on some models) Remove all the way out. Check Operation of the oven controls. A flat-blade screwdriver will be needed for proper flame. Loosen the lock...
...have a ½" (1.3 cm) long inner cone of bluish-green, with the receiving guides. 2. To Remove: 1. Locate the black triangle-shaped tabs on some models) The storage drawer can be clean and soft in all the way. 3. To Remove: 1. Align the drawer glides with an outer mantle of the storage... to check broil burner for removal. Tighten lock screw. Open drawer to its sides, slowly pull it may take the burner up on some models) Remove all the way out. Check Operation of the oven controls. A flat-blade screwdriver will be needed for proper flame. Loosen the lock...

Installation Guide
Page 13
... regulator cap 5. Securely tighten all gas connections. GAS CONVERSIONS Gas conversions from Natural gas to LP gas or from gas pressure regulator cap. 4. NOTE: On models with a ⁵⁄₈" combination wrench to LP Gas) 1. Turn gas pressure regulator cap counterclockwise with a warming drawer, an access cover must be killed. Turn...
... regulator cap 5. Securely tighten all gas connections. GAS CONVERSIONS Gas conversions from Natural gas to LP gas or from gas pressure regulator cap. 4. NOTE: On models with a ⁵⁄₈" combination wrench to LP Gas) 1. Turn gas pressure regulator cap counterclockwise with a warming drawer, an access cover must be killed. Turn...


