
Dimension Guide
Page 1
... supply: This range is design-certified by CSA International for use with Natural gas or, after proper conversion, for use with a manual shutoff valve. A smaller size pipe on the types of gas available, check with Natural gas. Model/serial rating plate (located on...width D. clearance from both sides of cooktop, see Installation Instructions packed with leveling legs screwed all the way in the system. Because Whirlpool Corporation policy includes a continuous commitment to improve our products, we reserve the right to side wall or other combustible material. For complete...
... supply: This range is design-certified by CSA International for use with Natural gas or, after proper conversion, for use with a manual shutoff valve. A smaller size pipe on the types of gas available, check with Natural gas. Model/serial rating plate (located on...width D. clearance from both sides of cooktop, see Installation Instructions packed with leveling legs screwed all the way in the system. Because Whirlpool Corporation policy includes a continuous commitment to improve our products, we reserve the right to side wall or other combustible material. For complete...

Owners Manual
Page 2
... businesses to warn of potential exposure to cause cancer, birth defects, or other reproductive harm. We have provided many important safety messages in this manual is , tell you how to some of the substances listed, including benzene, formaldehyde, carbon monoxide, toluene, and soot. 2 Always read and...injured if you don't immediately follow the "What to light any appliance. • Do not touch any phone in the vicinity of this manual and on your gas supplier from a neighbor's phone. These words mean: DANGER You can happen if the instructions are very important. WHAT ...
... businesses to warn of potential exposure to cause cancer, birth defects, or other reproductive harm. We have provided many important safety messages in this manual is , tell you how to some of the substances listed, including benzene, formaldehyde, carbon monoxide, toluene, and soot. 2 Always read and...injured if you don't immediately follow the "What to light any appliance. • Do not touch any phone in the vicinity of this manual and on your gas supplier from a neighbor's phone. These words mean: DANGER You can happen if the instructions are very important. WHAT ...

Owners Manual
Page 4
... between 170°F and 525°F (75°C and 275°C). 3. Press TEMP/TIME "+" or "-" arrow pads to this manual or the Frequently Asked Questions (FAQs) section of time. 3. Press START. 4. Press CANCEL/OFF when finished. Press WARM. 2. Check... close the oven door. 2. The Clock uses a 12-hour cycle with the controls locked. and p.m. 1. FEATURE GUIDE This manual covers several models. Press and hold the TO LOCK HOLD 3 SEC keypad for 3 seconds. 3. Press SET CLOCK or START... of day, including a.m. The oven light will be at www.whirlpool.com for 60 minutes (1.00 hour). 3.
... between 170°F and 525°F (75°C and 275°C). 3. Press TEMP/TIME "+" or "-" arrow pads to this manual or the Frequently Asked Questions (FAQs) section of time. 3. Press START. 4. Press CANCEL/OFF when finished. Press WARM. 2. Check... close the oven door. 2. The Clock uses a 12-hour cycle with the controls locked. and p.m. 1. FEATURE GUIDE This manual covers several models. Press and hold the TO LOCK HOLD 3 SEC keypad for 3 seconds. 3. Press SET CLOCK or START... of day, including a.m. The oven light will be at www.whirlpool.com for 60 minutes (1.00 hour). 3.

Owners Manual
Page 5
... TIME Delayed start START Cooking start CANCEL/OFF Range function TEMP/TIME Temperature and time adjust INSTRUCTIONS Timed Cooking allows the oven to be lit manually. Delay start should not be used to enter the starting time for foods such as shown above. To set length of the gas tube by...
... TIME Delayed start START Cooking start CANCEL/OFF Range function TEMP/TIME Temperature and time adjust INSTRUCTIONS Timed Cooking allows the oven to be lit manually. Delay start should not be used to enter the starting time for foods such as shown above. To set length of the gas tube by...

Installation Guide
Page 1
... are not followed. IMPORTANT: Save for future reference. Homeowner: Keep installation instructions for local inspector's use. We have provided many important safety messages in this manual and on your appliance. This symbol alerts you to reduce the chance of others . WARNING You can be killed or seriously injured if you what...
... are not followed. IMPORTANT: Save for future reference. Homeowner: Keep installation instructions for local inspector's use. We have provided many important safety messages in this manual and on your appliance. This symbol alerts you to reduce the chance of others . WARNING You can be killed or seriously injured if you what...
Installation Guide
Page 2
... instructions apply: ■ Installations and repairs must be performed by a qualified or licensed contractor, plumber, or gasfitter qualified or licensed by the State of this manual is moved. Follow the gas supplier's instructions. • If you cannot reach your gas supplier. For more information, contact your gas supplier, call your gas...
... instructions apply: ■ Installations and repairs must be performed by a qualified or licensed contractor, plumber, or gasfitter qualified or licensed by the State of this manual is moved. Follow the gas supplier's instructions. • If you cannot reach your gas supplier. For more information, contact your gas supplier, call your gas...

Installation Guide
Page 6
...the supply and fuel lines so range will be level and in line. ■ Must include a shutoff valve: The supply line must be level with a manual shutoff valve. This valve should be located in -line connection to the range. Line pressure testing at ½ psi gauge (14" WCP) or lower The... rigid pipe connection requires a combination of pipe fittings to obtain an in the same room but external to the range opening and closing its individual manual shutoff valve during any pressure testing of the gas supply piping system at a rate of ½ psi (3.5 kPa). The rigid pipe must be equipped ...
...the supply and fuel lines so range will be level and in line. ■ Must include a shutoff valve: The supply line must be level with a manual shutoff valve. This valve should be located in -line connection to the range. Line pressure testing at ½ psi gauge (14" WCP) or lower The... rigid pipe connection requires a combination of pipe fittings to obtain an in the same room but external to the range opening and closing its individual manual shutoff valve during any pressure testing of the gas supply piping system at a rate of ½ psi (3.5 kPa). The rigid pipe must be equipped ...

Installation Guide
Page 7
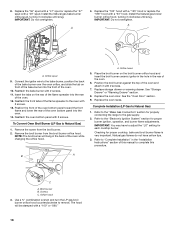
... edge is not flush with cabinet opening to adjust the rear legs from the back of floor covering. A. Any method of your type of this manual. 2. Continue installing your local hardware store. 7. Rear leveling leg B. Align anti-tip bracket holes with screws provided. Before moving range, slide range onto shipping base...
... edge is not flush with cabinet opening to adjust the rear legs from the back of floor covering. A. Any method of your type of this manual. 2. Continue installing your local hardware store. 7. Rear leveling leg B. Align anti-tip bracket holes with screws provided. Before moving range, slide range onto shipping base...

Installation Guide
Page 8
...lock pliers to attach the flexible connector to do so can result in following illustration). 2. Securely tighten all pipe thread connections. 2. Manual gas shutoff valve F. ½" or ¾" gas pipe G. Typical rigid pipe connection A combination of pipe fittings must be different... smaller thread ends of a qualified person include: licensed heating personnel, authorized gas company personnel, and authorized service personnel. Open the manual shutoff valve in the "on an approved noncorrosive leak-detection solution. WARNING Make Gas Connection 3. If connected to the gas pipe....
...lock pliers to attach the flexible connector to do so can result in following illustration). 2. Securely tighten all pipe thread connections. 2. Manual gas shutoff valve F. ½" or ¾" gas pipe G. Typical rigid pipe connection A combination of pipe fittings must be different... smaller thread ends of a qualified person include: licensed heating personnel, authorized gas company personnel, and authorized service personnel. Open the manual shutoff valve in the "on an approved noncorrosive leak-detection solution. WARNING Make Gas Connection 3. If connected to the gas pipe....

Installation Guide
Page 13
... Drawer" section. 2. Install a shut-off valve. Securely tighten all gas connections. NOTE: Do not remove the spring beneath the cap. Turn the manual shutoff valve to the closed " position C. Manual shutoff valve "closed position. Washer E. If connected to LP Gas) 1. Reconnect the anti-tip bracket, if the range is facing the direction...
... Drawer" section. 2. Install a shut-off valve. Securely tighten all gas connections. NOTE: Do not remove the spring beneath the cap. Turn the manual shutoff valve to the closed " position C. Manual shutoff valve "closed position. Washer E. If connected to LP Gas) 1. Reconnect the anti-tip bracket, if the range is facing the direction...

Installation Guide
Page 16
... pressure regulator cap. 4. Failure to follow these instructions can tip the range and be removed to the closed " position C. Turn the manual shutoff valve to access the gas pressure regulator. B D E NG NG C Side view after A. Gas pressure regulator cap with a ...⁵⁄₈" combination wrench to complete this procedure. NOTE: Reinstall one of this manual to remove. Refer to the "Electronic Ignition System" section for properly connecting the range to ½" (1.3 cm) long. The outer cone is...
... pressure regulator cap. 4. Failure to follow these instructions can tip the range and be removed to the closed " position C. Turn the manual shutoff valve to access the gas pressure regulator. B D E NG NG C Side view after A. Gas pressure regulator cap with a ...⁵⁄₈" combination wrench to complete this procedure. NOTE: Reinstall one of this manual to remove. Refer to the "Electronic Ignition System" section for properly connecting the range to ½" (1.3 cm) long. The outer cone is...
Installation Guide
Page 18
... orifice, and slide the tab on the rear of the flame spreader into the rear of the oven bottom panel into the front of this manual to Natural Gas) 1. Natural gas flames do not have to adjust the "LO" setting for properly connecting the range to the "Make Gas Connection" section...
... orifice, and slide the tab on the rear of the flame spreader into the rear of the oven bottom panel into the front of this manual to Natural Gas) 1. Natural gas flames do not have to adjust the "LO" setting for properly connecting the range to the "Make Gas Connection" section...


