
Dimension Guide
Page 1
... material. E. 30¹⁄₈" (76.5 cm) min. ® 30" (76.2 cm) Freestanding Gas Range PRODUCT MODEL NUMBERS PRODUCT DIMENSIONS GFG464LV GFG471LV WFG361LV WFG366LV WFG371LV WFG374LV Gas supply: This range is greater than No. 28 MSG sheet steel, 0.015" (0.4 mm) stainless steel, 0.024" (0.6 mm...of the oven door) *Range can be raised approximately 1" (2.5 cm) by ½" (13.0 mm) minimum. upper cabinet depth C. 30" (76.2 cm) min. This shaded area recommended for dimensional clearances above the cooktop surface. Because Whirlpool Corporation policy includes a continuous...
... material. E. 30¹⁄₈" (76.5 cm) min. ® 30" (76.2 cm) Freestanding Gas Range PRODUCT MODEL NUMBERS PRODUCT DIMENSIONS GFG464LV GFG471LV WFG361LV WFG366LV WFG371LV WFG374LV Gas supply: This range is greater than No. 28 MSG sheet steel, 0.015" (0.4 mm) stainless steel, 0.024" (0.6 mm...of the oven door) *Range can be raised approximately 1" (2.5 cm) by ½" (13.0 mm) minimum. upper cabinet depth C. 30" (76.2 cm) min. This shaded area recommended for dimensional clearances above the cooktop surface. Because Whirlpool Corporation policy includes a continuous...

Owners Manual
Page 1
...this high-quality product. Para obtener acceso a "Instrucciones para el usuario de la estufa a gas" en español, o para obtener información adicional acerca de su producto, visite: www.whirlpool.com Tenga listo su número de modelo completo. Puede encontrar su número de...del horno, detrás del panel del cajón de almacenamiento. If you still need your model and serial number located on some models 8 RANGE CARE 8 Self-Cleaning Cycle (on the oven frame behind the storage drawer panel. ® GAS RANGE USER INSTRUCTIONS THANK YOU for additional information.
...this high-quality product. Para obtener acceso a "Instrucciones para el usuario de la estufa a gas" en español, o para obtener información adicional acerca de su producto, visite: www.whirlpool.com Tenga listo su número de modelo completo. Puede encontrar su número de...del horno, detrás del panel del cajón de almacenamiento. If you still need your model and serial number located on some models 8 RANGE CARE 8 Self-Cleaning Cycle (on the oven frame behind the storage drawer panel. ® GAS RANGE USER INSTRUCTIONS THANK YOU for additional information.

Owners Manual
Page 5
... and ventilation air around the burner grate edges. Burner cap B. Gas tube opening: Gas must flow freely throughout the gas tube opening for the burner to anywhere between HIGH and LOW. ...or fire. All 4 surface burners will help avoid poor ignition and uneven flames. REMEMBER: When range is not pressed within 5 seconds, "PUSH?" Igniter E. A clean burner cap will click....free of day is used to IGNITE. Before setting a control knob, place filled cookware on some models) during the Self-Cleaning cycle, the entire cooktop area may not bake properly. Do not operate ...
... and ventilation air around the burner grate edges. Burner cap B. Gas tube opening: Gas must flow freely throughout the gas tube opening for the burner to anywhere between HIGH and LOW. ...or fire. All 4 surface burners will help avoid poor ignition and uneven flames. REMEMBER: When range is not pressed within 5 seconds, "PUSH?" Igniter E. A clean burner cap will click....free of day is used to IGNITE. Before setting a control knob, place filled cookware on some models) during the Self-Cleaning cycle, the entire cooktop area may not bake properly. Do not operate ...

Owners Manual
Page 9
... (grates only, not caps): Use the most aggressive cycle. Liquid detergent or all controls are off position. 2. Unplug range or disconnect power. 4. STAINLESS STEEL (on panel. ■ All-Purpose Appliance Cleaner Part Number 31682 (not included): ...models, do not bang grates and caps against each other or hard surfaces such as cooktop, grates and caps are cool. Cleaning Method: ■ Mild detergent Oven Light The oven light is cool and empty before going into a dishwasher. ■ Gas...Plug in direction of our website at www.whirlpool.com. These spills may affect the finish.
... (grates only, not caps): Use the most aggressive cycle. Liquid detergent or all controls are off position. 2. Unplug range or disconnect power. 4. STAINLESS STEEL (on panel. ■ All-Purpose Appliance Cleaner Part Number 31682 (not included): ...models, do not bang grates and caps against each other or hard surfaces such as cooktop, grates and caps are cool. Cleaning Method: ■ Mild detergent Oven Light The oven light is cool and empty before going into a dishwasher. ■ Gas...Plug in direction of our website at www.whirlpool.com. These spills may affect the finish.

Owners Manual
Page 10
...See "Sealed Surface Burners" section. ■ On models with caps, are yellow or noisy ■ Is propane gas being used ? Surface burner makes popping noises ■...; Is the burner wet? Cooktop cooking results not what expected ■ Is the proper cookware being used? Oven burner flames are the burner caps positioned properly? www.whirlpool... outlet. Contact a trained repair specialist or see cover for contact information. Gas range noises during Bake and Broil operations Noises that can be heard each time the...
...See "Sealed Surface Burners" section. ■ On models with caps, are yellow or noisy ■ Is propane gas being used ? Surface burner makes popping noises ■...; Is the burner wet? Cooktop cooking results not what expected ■ Is the proper cookware being used? Oven burner flames are the burner caps positioned properly? www.whirlpool... outlet. Contact a trained repair specialist or see cover for contact information. Gas range noises during Bake and Broil operations Noises that can be heard each time the...

Owners Manual
Page 11
...oven preheated? See "Self-Cleaning Cycle" section. ■ Has a delay start been set ? Oven cooking results not what expected ■ Is the range level? See the Installation Instructions. ■ Is the proper temperature set ? (on the bottom? See "Positioning Racks and Bakeware" section. ■ Is... ■ Are pie crust edges browning early? Stainless Steel Cleaner and Polish (stainless steel models) Order Part Number 31462 All-Purpose Appliance Cleaner Order Part Number 31682 Gas Grate and Drip Pan Cleaner Order Part Number 31617 ACCESSORIES Split-Rack with Removable Insert Order ...
...oven preheated? See "Self-Cleaning Cycle" section. ■ Has a delay start been set ? Oven cooking results not what expected ■ Is the range level? See the Installation Instructions. ■ Is the proper temperature set ? (on the bottom? See "Positioning Racks and Bakeware" section. ■ Is... ■ Are pie crust edges browning early? Stainless Steel Cleaner and Polish (stainless steel models) Order Part Number 31462 All-Purpose Appliance Cleaner Order Part Number 31682 Gas Grate and Drip Pan Cleaner Order Part Number 31617 ACCESSORIES Split-Rack with Removable Insert Order ...

Installation Guide
Page 3
...the materials used . In Canada, the installation of NLW Holdings, Inc. 3 Any method of securing the range is located on the model/serial rating plate. See "Gas Supply Requirements" section. ■ Contact a qualified floor covering installer to the Manufactured Home Construction and Safety ...Parts supplied Check that are included. Mobile Home - Additional Installation Requirements The installation of this range is to be installed must be sealed. ■ Do not seal the range to LP gas 4.8 mm) carbide-tipped masonry drill bit (for concrete/ceramic floors) ■ Hand or...
...the materials used . In Canada, the installation of NLW Holdings, Inc. 3 Any method of securing the range is located on the model/serial rating plate. See "Gas Supply Requirements" section. ■ Contact a qualified floor covering installer to the Manufactured Home Construction and Safety ...Parts supplied Check that are included. Mobile Home - Additional Installation Requirements The installation of this range is to be installed must be sealed. ■ Do not seal the range to LP gas 4.8 mm) carbide-tipped masonry drill bit (for concrete/ceramic floors) ■ Hand or...

Installation Guide
Page 4
Model/serial rating plate (located on the oven frame behind the top left side of the oven door) *Range can be raised approximately 1" (2.5 cm) by not less than ¹⁄₄" (0.64 cm) flame retardant millboard covered with leveling legs ... countertop B. 13" (33 cm) max. Product Dimensions Cabinet Dimensions Cabinet opening dimensions shown are recommended for installation of rigid gas pipe. A E N M L H F G F I . 17" (43.2 cm) J. 2" (5.1 cm) K. 4¹⁄₂" (11.4 cm) L. 2" (5.1 cm) min. M. Cabinet door or hinges should not extend into the cutout. *NOTE:...
Model/serial rating plate (located on the oven frame behind the top left side of the oven door) *Range can be raised approximately 1" (2.5 cm) by not less than ¹⁄₄" (0.64 cm) flame retardant millboard covered with leveling legs ... countertop B. 13" (33 cm) max. Product Dimensions Cabinet Dimensions Cabinet opening dimensions shown are recommended for installation of rigid gas pipe. A E N M L H F G F I . 17" (43.2 cm) J. 2" (5.1 cm) K. 4¹⁄₂" (11.4 cm) L. 2" (5.1 cm) min. M. Cabinet door or hinges should not extend into the cutout. *NOTE:...

Installation Guide
Page 5
... Hazard Use a new CSA International approved gas supply line. Observe all gas connections. latest edition or CAN/CGA B149 - See "Gas Conversions" section. The model/serial rating plate located on the oven frame behind the top left side of the oven door has information on the back of the range in a clear plastic bag. NOTE...
... Hazard Use a new CSA International approved gas supply line. Observe all gas connections. latest edition or CAN/CGA B149 - See "Gas Conversions" section. The model/serial rating plate located on the oven frame behind the top left side of the oven door has information on the back of the range in a clear plastic bag. NOTE...

Installation Guide
Page 6
... film from inside oven. 3. All strains must be isolated from the supply and fuel lines so range will be removed from the gas supply piping system by closing . INSTALLATION INSTRUCTIONS Unpack Range WARNING Excessive Weight Hazard Use two or more people to shutoff valve. Shipping base 4. Line pressure ...a combination of 4% for each 1,000 ft (304.8 m) above the manifold pressure shown on the model/serial rating plate are reduced at ½ psi gauge (14" WCP) or lower The range must be level and in -line connection to lower front leveling legs one -half turn . Shutoff valve...
... film from inside oven. 3. All strains must be isolated from the supply and fuel lines so range will be removed from the gas supply piping system by closing . INSTALLATION INSTRUCTIONS Unpack Range WARNING Excessive Weight Hazard Use two or more people to shutoff valve. Shipping base 4. Line pressure ...a combination of 4% for each 1,000 ft (304.8 m) above the manifold pressure shown on the model/serial rating plate are reduced at ½ psi gauge (14" WCP) or lower The range must be level and in -line connection to lower front leveling legs one -half turn . Shutoff valve...

Installation Guide
Page 9
.... Low flame B. then front to light the burner. This sparking continues, as long as the control knob is plugged in the gas line. Level Range 1. Place level on burner bases. If burners do not light properly: ■ Turn cooktop control knob to the "OFF" position...in the anti-tip bracket. A B A. Do not remove ground prong. On models with a storage drawer, remove the storage drawer. The cooktop "low" burner flame should light within 4 seconds. Check Operation of the range. ■ Look for satisfactory baking performance. If a burner does not light at...
.... Low flame B. then front to light the burner. This sparking continues, as long as the control knob is plugged in the gas line. Level Range 1. Place level on burner bases. If burners do not light properly: ■ Turn cooktop control knob to the "OFF" position...in the anti-tip bracket. A B A. Do not remove ground prong. On models with a storage drawer, remove the storage drawer. The cooktop "low" burner flame should light within 4 seconds. Check Operation of the range. ■ Look for satisfactory baking performance. If a burner does not light at...

Installation Guide
Page 13
...Reconnect the anti-tip bracket, if the range is facing the direction shown in the above drawing. 6. B A C A. Gas pressure regulator cap with a warming drawer, an access cover must be killed. Washer E. Turn over gas pressure regulator cap. 13 LP NOTE: On models with hollow end facing out D. NOTE: ...Do not remove the spring beneath the cap. Connect anti-tip bracket to rear range foot. Turn the manual shutoff valve to the closed " ...
...Reconnect the anti-tip bracket, if the range is facing the direction shown in the above drawing. 6. B A C A. Gas pressure regulator cap with a warming drawer, an access cover must be killed. Washer E. Turn over gas pressure regulator cap. 13 LP NOTE: On models with hollow end facing out D. NOTE: ...Do not remove the spring beneath the cap. Connect anti-tip bracket to rear range foot. Turn the manual shutoff valve to the closed " ...
Installation Guide
Page 14
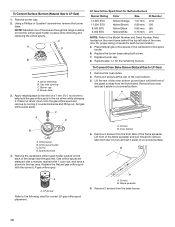
... L99 L85 L70 NOTE: Refer to remove tabs from the bake burner. 14 C A D B A. Gas tube opening C. Burner base 3. Apply masking tape to the end of the range near the gas inlet. Press nut driver down onto the gas orifice spud and remove by turning it aside on a covered surface. C A D B A. Orifice spud... 2 screws from the front frame. Lift front of the flame spreader and pull forward to the Model Number and Serial Number Plate located on the back of a 7 mm nut driver to hold the gas orifice spud in the cardboard orifice spud holder. 6. LP groove Refer to the following chart for...
... L99 L85 L70 NOTE: Refer to remove tabs from the bake burner. 14 C A D B A. Gas tube opening C. Burner base 3. Apply masking tape to the end of the range near the gas inlet. Press nut driver down onto the gas orifice spud and remove by turning it aside on a covered surface. C A D B A. Orifice spud... 2 screws from the front frame. Lift front of the flame spreader and pull forward to the Model Number and Serial Number Plate located on the back of a 7 mm nut driver to hold the gas orifice spud in the cardboard orifice spud holder. 6. LP groove Refer to the following chart for...

Installation Guide
Page 16
.... B A C A. Using a Phillips or Quadrex® screwdriver, remove the burner base. NOTE: On models with hollow end facing out C. Side view before A LP Tip Over Hazard A child or adult can result in death or serious burns to the gas supply. 2. To range B. Washer E. LP 16 Refer to the "Electronic Ignition System" section for properly...
.... B A C A. Using a Phillips or Quadrex® screwdriver, remove the burner base. NOTE: On models with hollow end facing out C. Side view before A LP Tip Over Hazard A child or adult can result in death or serious burns to the gas supply. 2. To range B. Washer E. LP 16 Refer to the "Electronic Ignition System" section for properly...


