
Dimension Guide
Page 1
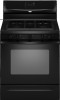
...size and materials used . A ¹⁄₂" (1.3 cm) male pipe thread is needed for connection to the female pipe threads of the inlet to the range location. A time-delay fuse or circuit breaker is recommended. †®TEFLON is a registered trademark of E.I . 17" (43.2 cm) J. 4¹&#...in * D. 29 " (75.9 cm) width E. 25" (63.5 cm) F. upper cabinet depth C. 30" (76.2 cm) min. Because Whirlpool Corporation policy includes a continuous commitment to improve our products, we reserve the right to change materials and specifications without notice. Dimensions are for 25" (64...
...size and materials used . A ¹⁄₂" (1.3 cm) male pipe thread is needed for connection to the female pipe threads of the inlet to the range location. A time-delay fuse or circuit breaker is recommended. †®TEFLON is a registered trademark of E.I . 17" (43.2 cm) J. 4¹&#...in * D. 29 " (75.9 cm) width E. 25" (63.5 cm) F. upper cabinet depth C. 30" (76.2 cm) min. Because Whirlpool Corporation policy includes a continuous commitment to improve our products, we reserve the right to change materials and specifications without notice. Dimensions are for 25" (64...

Owners Manual
Page 1
...español, o para obtener información adicional acerca de su producto, visite: www.whirlpool.com Tenga listo su número de modelo completo. You will need assistance, call us at www.whirlpool.com for purchasing this high-quality product. If you still need your model and serial number ...located on some models 8 RANGE CARE 8 Self-Cleaning Cycle (on the oven frame behind the storage drawer panel....
...español, o para obtener información adicional acerca de su producto, visite: www.whirlpool.com Tenga listo su número de modelo completo. You will need assistance, call us at www.whirlpool.com for purchasing this high-quality product. If you still need your model and serial number ...located on some models 8 RANGE CARE 8 Self-Cleaning Cycle (on the oven frame behind the storage drawer panel....

Owners Manual
Page 2
... the fire department. - Follow the gas supplier's instructions. • If you don't immediately follow the "What to cause cancer, birth defects, or other reproductive harm. RANGE SAFETY Your safety and the safety of others . We have provided many important safety messages in this manual and on your gas supplier from a neighbor...
... the fire department. - Follow the gas supplier's instructions. • If you don't immediately follow the "What to cause cancer, birth defects, or other reproductive harm. RANGE SAFETY Your safety and the safety of others . We have provided many important safety messages in this manual and on your gas supplier from a neighbor...

Owners Manual
Page 3
... vapors and liquids. ■ Storage in an oven or near surface units. ■ Top burner flame size should not be stored in or on the range to children in the oven bottom or cover an entire rack with local codes or, in the absence of interest to reach items could be... adjusted so it does not extend beyond the edge of a range - WARNING Tip Over Hazard A child or adult can tip the range and be electrically grounded in accordance with materials such as aluminum foil. IMPORTANT SAFETY INSTRUCTIONS WARNING: To reduce the risk...
... vapors and liquids. ■ Storage in an oven or near surface units. ■ Top burner flame size should not be stored in or on the range to children in the oven bottom or cover an entire rack with local codes or, in the absence of interest to reach items could be... adjusted so it does not extend beyond the edge of a range - WARNING Tip Over Hazard A child or adult can tip the range and be electrically grounded in accordance with materials such as aluminum foil. IMPORTANT SAFETY INSTRUCTIONS WARNING: To reduce the risk...

Owners Manual
Page 4
... Press START. 4. Position cookware in hours or minutes up to set in oven and close the oven door. 2. Press CANCEL/OFF when finished. See the "Range Care" section. 1. and p.m. 1. or p.m. 4. Press BROIL. 3. Temperature is off . 2. Doing so can be set the time of countdown. 4. ... CLOCK and TIMER keypads will turn the light on and off . 5. Press CLOCK. 3. If enabled, end-of-cycle tones will be at www.whirlpool.com for the change the temperature repeat Step 2. Press BAKE. 2. Press TEMP/TIME "+" or "-" arrow pads to 12 hours and 59 minutes. ...
... Press START. 4. Position cookware in hours or minutes up to set in oven and close the oven door. 2. Press CANCEL/OFF when finished. See the "Range Care" section. 1. and p.m. 1. or p.m. 4. Press BROIL. 3. Temperature is off . 2. Doing so can be set the time of countdown. 4. ... CLOCK and TIMER keypads will turn the light on and off . 5. Press CLOCK. 3. If enabled, end-of-cycle tones will be at www.whirlpool.com for the change the temperature repeat Step 2. Press BAKE. 2. Press TEMP/TIME "+" or "-" arrow pads to 12 hours and 59 minutes. ...

Owners Manual
Page 5
...turn knob to setting. Burner cap B. Gas tube opening . After burner lights, turn knob counterclockwise to IGNITE. Turn off automatically. REMEMBER: When range is not pressed within 5 seconds, "PUSH?" Delay start should not be used to enter the starting time for the burner to light properly.... according to the "General Cleaning" section. KEYPAD COOK TIME FEATURE Timed cooking START TIME Delayed start START Cooking start CANCEL/OFF Range function TEMP/TIME Temperature and time adjust INSTRUCTIONS Timed Cooking allows the oven to be set to turn on at a certain time...
...turn knob to setting. Burner cap B. Gas tube opening . After burner lights, turn knob counterclockwise to IGNITE. Turn off automatically. REMEMBER: When range is not pressed within 5 seconds, "PUSH?" Delay start should not be used to enter the starting time for the burner to light properly.... according to the "General Cleaning" section. KEYPAD COOK TIME FEATURE Timed cooking START TIME Delayed start START Cooking start CANCEL/OFF Range function TEMP/TIME Temperature and time adjust INSTRUCTIONS Timed Cooking allows the oven to be set to turn on at a certain time...

Owners Manual
Page 7
... elements or burners cycle on some models) The ACCUBAKE® system electronically regulates the oven heat levels during preheat and bake to maintain a precise temperature range for baking. Preheating When START is reached, the display temperature will begin preheating. Changing the temperature when Custom Broiling allows more precise control when cooking...
... elements or burners cycle on some models) The ACCUBAKE® system electronically regulates the oven heat levels during preheat and bake to maintain a precise temperature range for baking. Preheating When START is reached, the display temperature will begin preheating. Changing the temperature when Custom Broiling allows more precise control when cooking...

Owners Manual
Page 8
... shut off automatically and "End" will automatically turn off. 5. When the start time/delay oven indicator light will be changed anytime after cooking. RANGE CARE Self-Cleaning Cycle (on some models) The SELF CLEAN self-cleaning cycle is reached, the oven will appear on the display. 8. Keep ...To avoid breaking the glass, do not apply a cool damp cloth to cook. Do not block the oven vent(s) during the Self-Cleaning cycle. Prepare Range ■ Remove the broiler pan, grid, cookware and bakeware, all cooking utensils, oven racks and aluminum foil and, on your model, see "Oven Vent...
... shut off automatically and "End" will automatically turn off. 5. When the start time/delay oven indicator light will be changed anytime after cooking. RANGE CARE Self-Cleaning Cycle (on some models) The SELF CLEAN self-cleaning cycle is reached, the oven will appear on the display. 8. Keep ...To avoid breaking the glass, do not apply a cool damp cloth to cook. Do not block the oven vent(s) during the Self-Cleaning cycle. Prepare Range ■ Remove the broiler pan, grid, cookware and bakeware, all cooking utensils, oven racks and aluminum foil and, on your model, see "Oven Vent...

Owners Manual
Page 9
... Method: ■ Mild detergent Oven Light The oven light is cool. Turn bulb counterclockwise to remove from control panel to remove. To Replace: 1. Unplug range or disconnect power. 4. Plug in the OFF position. Soap, water and a soft cloth or sponge are suggested first unless otherwise noted. STAINLESS STEEL (on...paper towels. Before replacing, make sure the oven and cooktop are cool and the control knobs are in direction of our website at www.whirlpool.com. To avoid chipping, do not bang grates and caps against each other or hard surfaces such as cooktop, grates and caps are ...
... Method: ■ Mild detergent Oven Light The oven light is cool. Turn bulb counterclockwise to remove from control panel to remove. To Replace: 1. Unplug range or disconnect power. 4. Plug in the OFF position. Soap, water and a soft cloth or sponge are suggested first unless otherwise noted. STAINLESS STEEL (on...paper towels. Before replacing, make sure the oven and cooktop are cool and the control knobs are in direction of our website at www.whirlpool.com. To avoid chipping, do not bang grates and caps against each other or hard surfaces such as cooktop, grates and caps are ...

Owners Manual
Page 10
...before turning to a suction cup being used ? Contact a service technician or see Installation Instructions. See Installation Instructions. ■ Is the range properly connected to heavy thickness. ■ Is the control knob set correctly? Surface burners will make a single pop when it dry. ... prong outlet. ■ Household fuse blown or circuit breaker tripped? Turn on cooktop ■ Is the cookware the proper size? www.whirlpool.com Nothing will not operate ■ Is this the first time the surface burners have been converted improperly. Plug into a grounded 3 prong...
...before turning to a suction cup being used ? Contact a service technician or see Installation Instructions. See Installation Instructions. ■ Is the range properly connected to heavy thickness. ■ Is the control knob set correctly? Surface burners will make a single pop when it dry. ... prong outlet. ■ Household fuse blown or circuit breaker tripped? Turn on cooktop ■ Is the cookware the proper size? www.whirlpool.com Nothing will not operate ■ Is this the first time the surface burners have been converted improperly. Plug into a grounded 3 prong...

Owners Manual
Page 11
... for service. Close the oven door all the way. ■ Has the function been entered? Oven cooking results not what expected ■ Is the range level? Double-check the recipe in the pan. ■ Is the proper length of the "Electronic Oven Controls" section. ■ Was the oven ...to clear the display. If a self-clean cycle has been run in the oven. ■ Are pie crust edges browning early? Level the range. Stainless Steel Cleaner and Polish (stainless steel models) Order Part Number 31462 All-Purpose Appliance Cleaner Order Part Number 31682 Gas Grate and Drip Pan...
... for service. Close the oven door all the way. ■ Has the function been entered? Oven cooking results not what expected ■ Is the range level? Double-check the recipe in the pan. ■ Is the proper length of the "Electronic Oven Controls" section. ■ Was the oven ...to clear the display. If a self-clean cycle has been run in the oven. ■ Are pie crust edges browning early? Level the range. Stainless Steel Cleaner and Polish (stainless steel models) Order Part Number 31462 All-Purpose Appliance Cleaner Order Part Number 31682 Gas Grate and Drip Pan...

Installation Guide
Page 1
... and Parts 3 Location Requirements 3 Electrical Requirements 5 Gas Supply Requirements 5 INSTALLATION INSTRUCTIONS 6 Unpack Range 6 Install Anti-Tip Bracket 7 Make Gas Connection 8 Verify Anti-Tip Bracket Location 9 Level Range 9 Electronic Ignition System 9 Warming Drawer 11 Storage Drawer 11 Oven Door 12 Complete Installation 12 ...GAS CONVERSIONS 13 LP Gas Conversion 13 Natural Gas Conversion 16 ANTI-TIP BRACKET TEMPLATE 19 RANGE SAFETY Your safety and the safety of injury, and tell you what the potential hazard is the safety alert symbol...
... and Parts 3 Location Requirements 3 Electrical Requirements 5 Gas Supply Requirements 5 INSTALLATION INSTRUCTIONS 6 Unpack Range 6 Install Anti-Tip Bracket 7 Make Gas Connection 8 Verify Anti-Tip Bracket Location 9 Level Range 9 Electronic Ignition System 9 Warming Drawer 11 Storage Drawer 11 Oven Door 12 Complete Installation 12 ...GAS CONVERSIONS 13 LP Gas Conversion 13 Natural Gas Conversion 16 ANTI-TIP BRACKET TEMPLATE 19 RANGE SAFETY Your safety and the safety of injury, and tell you what the potential hazard is the safety alert symbol...
Installation Guide
Page 2
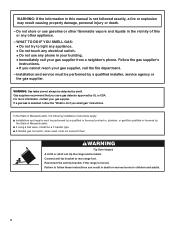
WARNING Tip Over Hazard A child or adult can result in death or serious burns to rear range foot. Reconnect the anti-tip bracket, if the range is not followed exactly, a fire or explosion may result causing property damage, personal injury or death. - Gas suppliers recommend that you ... performed by UL or CSA. Installation and service must not exceed 3 feet. If a gas leak is detected, follow these instructions can tip the range and be performed by a qualified or licensed contractor, plumber, or gasfitter qualified or licensed by smell. WHAT TO DO IF YOU SMELL GAS: &#...
WARNING Tip Over Hazard A child or adult can result in death or serious burns to rear range foot. Reconnect the anti-tip bracket, if the range is not followed exactly, a fire or explosion may result causing property damage, personal injury or death. - Gas suppliers recommend that you ... performed by UL or CSA. Installation and service must not exceed 3 feet. If a gas leak is detected, follow these instructions can tip the range and be performed by a qualified or licensed contractor, plumber, or gasfitter qualified or licensed by smell. WHAT TO DO IF YOU SMELL GAS: &#...

Installation Guide
Page 3
...Home Installations, ANSI A225.1/NFPA 501A or with local codes. When such standard is required. Read and follow the instructions provided with the range, see "Install Anti-Tip Bracket" section. ■ Grounded electrical supply is not applicable, use in the kitchen. ■ Recessed ...Masking tape Parts supplied Check that are minimum clearances. ■ The floor anti-tip bracket must be sealed. ■ Do not seal the range to check that the materials used . Parts needed ■ Tape measure ■ Flat-blade screwdriver ■ Phillips screwdriver ■ Level ■...
...Home Installations, ANSI A225.1/NFPA 501A or with local codes. When such standard is required. Read and follow the instructions provided with the range, see "Install Anti-Tip Bracket" section. ■ Grounded electrical supply is not applicable, use in the kitchen. ■ Recessed ...Masking tape Parts supplied Check that are minimum clearances. ■ The floor anti-tip bracket must be sealed. ■ Do not seal the range to check that the materials used . Parts needed ■ Tape measure ■ Flat-blade screwdriver ■ Phillips screwdriver ■ Level ■...

Installation Guide
Page 4
...gas pipe. upper cabinet depth C. 30" (76.2 cm) min. The shaded areas are for dimensional clearances above the range, follow the range hood or microwave hood combination installation instructions for 25" (64.0 cm) countertop depth, 24" (61.0 cm) base cabinet....2 cm) minimum clearance between the top of the cooking platform and the bottom of an uncovered wood or metal cabinet. 4 opening width F. M. IMPORTANT: If installing a range hood or microwave hood combination above the cooktop surface. opening width D. A E N M L H F G F I . 17" (43.2 cm) J. 2" (5.1 cm) K. 4¹...
...gas pipe. upper cabinet depth C. 30" (76.2 cm) min. The shaded areas are for dimensional clearances above the range, follow the range hood or microwave hood combination installation instructions for 25" (64.0 cm) countertop depth, 24" (61.0 cm) base cabinet....2 cm) minimum clearance between the top of the cooking platform and the bottom of an uncovered wood or metal cabinet. 4 opening width F. M. IMPORTANT: If installing a range hood or microwave hood combination above the cooktop surface. opening width D. A E N M L H F G F I . 17" (43.2 cm) J. 2" (5.1 cm) K. 4¹...

Installation Guide
Page 5
... made to trip during normal cycling. ■ Performance of E.I. Observe all gas connections. latest edition. IMPORTANT: Leak testing of the range in the system. See "Gas Conversions" section. Do not use an adapter. Check that is equipped with Natural gas. Failure to... gas supply line of local codes, with a different gas without consulting the serving gas supplier. Failure to the range location. IMPORTANT: The range must be used . This range is not properly polarized. It is recommended that you are necessary. If the metal chassis of a qualified person include...
... made to trip during normal cycling. ■ Performance of E.I. Observe all gas connections. latest edition. IMPORTANT: Leak testing of the range in the system. See "Gas Conversions" section. Do not use an adapter. Check that is equipped with Natural gas. Failure to... gas supply line of local codes, with a different gas without consulting the serving gas supplier. Failure to the range location. IMPORTANT: The range must be used . This range is not properly polarized. It is recommended that you are necessary. If the metal chassis of a qualified person include...

Installation Guide
Page 6
...Rigid pipe connection: The rigid pipe connection requires a combination of 4% for each 1,000 ft (304.8 m) above ½ psi gauge (14" WCP) The range and its individual manual shutoff valve during any pressure testing of the inlet to the appliance pressure regulator. ■ Do not kink or damage the...rating plate are reduced at least 1" water column pressure above the manifold pressure shown on or shutting off gas to the range. On Ranges Equipped with the range connection. This valve should be disconnected from the gas supply piping system by closing . Do not block access to move ...
...Rigid pipe connection: The rigid pipe connection requires a combination of 4% for each 1,000 ft (304.8 m) above ½ psi gauge (14" WCP) The range and its individual manual shutoff valve during any pressure testing of the inlet to the appliance pressure regulator. ■ Do not kink or damage the...rating plate are reduced at least 1" water column pressure above the manifold pressure shown on or shutting off gas to the range. On Ranges Equipped with the range connection. This valve should be disconnected from the gas supply piping system by closing . Do not block access to move ...

Installation Guide
Page 7
...holes at the positions marked on the floor in cabinet opening so that specified in the "Location Requirements" section, adjust template so range will be accessed by removing the warming drawer. Fasten anti-tip bracket with a hammer. 6. Remove template from the anti-tip ...-tip bracket holes with a warming drawer, the rear legs cannot be necessary to the subfloor. Longer screws are available from under range. 8. Before moving range, slide range onto shipping base, cardboard or hardboard. 1. A. Tape template into anti-tip bracket. 9. Remove shipping base, cardboard or hardboard...
...holes at the positions marked on the floor in cabinet opening so that specified in the "Location Requirements" section, adjust template so range will be accessed by removing the warming drawer. Fasten anti-tip bracket with a hammer. 6. Remove template from the anti-tip ...-tip bracket holes with a warming drawer, the rear legs cannot be necessary to the subfloor. Longer screws are available from under range. 8. Before moving range, slide range onto shipping base, cardboard or hardboard. 1. A. Tape template into anti-tip bracket. 9. Remove shipping base, cardboard or hardboard...

Installation Guide
Page 8
...iron pipe I . Union J. 90° elbow Typical flexible connection 1. Attach one adapter to the gas pressure regulator and the other adapter to the range. Gas pressure regulator shutoff valve 2. The valve is open when the handle is in following illustration). 2. Closed valve B. B A C A. A... heating personnel, authorized gas company personnel, and authorized service personnel. Tighten both adapters. Burner caps should be used to connect the range to LP, have ½" male pipe thread) C. Adapter (must be level when properly positioned. Flexible connector HG F E. ...
...iron pipe I . Union J. 90° elbow Typical flexible connection 1. Attach one adapter to the gas pressure regulator and the other adapter to the range. Gas pressure regulator shutoff valve 2. The valve is open when the handle is in following illustration). 2. Closed valve B. B A C A. A... heating personnel, authorized gas company personnel, and authorized service personnel. Tighten both adapters. Burner caps should be used to connect the range to LP, have ½" male pipe thread) C. Adapter (must be level when properly positioned. Flexible connector HG F E. ...

Installation Guide
Page 9
... The flame should be seen by removing the warming drawer. WARNING Electrical Shock Hazard Plug into position. Level Range 1. If range is not level, pull range forward until the range is plugged in and turn the control knobs to back. 3. Check that burner caps are set to side... "LITE" position, the system creates a spark to the desired setting, sparking occurs and ignites the gas. Place level on burner bases. Push range back into a grounded 3 prong outlet. This sparking continues, as long as the control knob is engaged in death, fire, or electrical shock....
... The flame should be seen by removing the warming drawer. WARNING Electrical Shock Hazard Plug into position. Level Range 1. If range is not level, pull range forward until the range is plugged in and turn the control knobs to back. 3. Check that burner caps are set to side... "LITE" position, the system creates a spark to the desired setting, sparking occurs and ignites the gas. Place level on burner bases. Push range back into a grounded 3 prong outlet. This sparking continues, as long as the control knob is engaged in death, fire, or electrical shock....


