
Owners Manual
Page 7
...; Do not position racks with foil because air must be able to move a rack, pull it in muffin pans; To move freely. Rack 4: Use for Part Number 4396923. Rack 3: Most baked goods on them. ■ Make sure racks are level. Rack 2: Roasting small cuts of the oven increases. Baking Layer Cakes...
...; Do not position racks with foil because air must be able to move a rack, pull it in muffin pans; To move freely. Rack 4: Use for Part Number 4396923. Rack 3: Most baked goods on them. ■ Make sure racks are level. Rack 2: Roasting small cuts of the oven increases. Baking Layer Cakes...

Owners Manual
Page 9
.... Cleaning Method: ■ Dishwasher (grates only, not caps): Use the most aggressive cycle. Cooked-on panel. ■ All-Purpose Appliance Cleaner Part Number 31682 (not included): See cover for contact information. SURFACE BURNERS ■ See "Sealed Surface Burners" section. ■ Glass cleaner, mild...spills may affect the finish. STORAGE DRAWER Check that have discolored and are harder to slide, a light coating of our website at www.whirlpool.com. Cleaning Method: ■ Mild detergent Oven Light The oven light is cool. Turn the glass bulb cover in range or reconnect...
.... Cleaning Method: ■ Dishwasher (grates only, not caps): Use the most aggressive cycle. Cooked-on panel. ■ All-Purpose Appliance Cleaner Part Number 31682 (not included): See cover for contact information. SURFACE BURNERS ■ See "Sealed Surface Burners" section. ■ Glass cleaner, mild...spills may affect the finish. STORAGE DRAWER Check that have discolored and are harder to slide, a light coating of our website at www.whirlpool.com. Cleaning Method: ■ Mild detergent Oven Light The oven light is cool. Turn the glass bulb cover in range or reconnect...

Owners Manual
Page 11
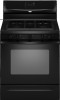
..." section. Stainless Steel Cleaner and Polish (stainless steel models) Order Part Number 31462 All-Purpose Appliance Cleaner Order Part Number 31682 Gas Grate and Drip Pan Cleaner Order Part Number 31617 ACCESSORIES Split-Rack with Removable Insert Order Part Number 4396927 Broiler Pan Order Part Number 4396923 11 Clear the display. See the "Start" keypad...
..." section. Stainless Steel Cleaner and Polish (stainless steel models) Order Part Number 31462 All-Purpose Appliance Cleaner Order Part Number 31682 Gas Grate and Drip Pan Cleaner Order Part Number 31617 ACCESSORIES Split-Rack with Removable Insert Order Part Number 4396927 Broiler Pan Order Part Number 4396923 11 Clear the display. See the "Start" keypad...

Owners Manual
Page 12
... OR THE SHORTEST PERIOD ALLOWED BY LAW. Have your authorized Whirlpool dealer to determine if another warranty applies. 9/07 For additional product information, in materials or workmanship. Repairs to parts or systems resulting from warranty coverage. 3. Expenses for travel and... to instructions attached to or furnished with the product, Whirlpool Corporation or Whirlpool Canada LP (hereafter "Whirlpool") will pay for Factory Specified Parts and repair labor to correct defects in the U.S.A., visit www.whirlpool.com. ITEMS EXCLUDED FROM WARRANTY This limited warranty does not...
... OR THE SHORTEST PERIOD ALLOWED BY LAW. Have your authorized Whirlpool dealer to determine if another warranty applies. 9/07 For additional product information, in materials or workmanship. Repairs to parts or systems resulting from warranty coverage. 3. Expenses for travel and... to instructions attached to or furnished with the product, Whirlpool Corporation or Whirlpool Canada LP (hereafter "Whirlpool") will pay for Factory Specified Parts and repair labor to correct defects in the U.S.A., visit www.whirlpool.com. ITEMS EXCLUDED FROM WARRANTY This limited warranty does not...

Warranty
Page 1
...If you do not have been removed, altered or cannot be borne by Whirlpool. 5. Proof of your major appliance, to instruct you on the oven frame behind the storage drawer panel. Consumable parts are excluded from the date of repair or replacement under this major appliance is... covered by a Whirlpool designated service company. This major appliance is designed to be provided by this warranty. ...
...If you do not have been removed, altered or cannot be borne by Whirlpool. 5. Proof of your major appliance, to instruct you on the oven frame behind the storage drawer panel. Consumable parts are excluded from the date of repair or replacement under this major appliance is... covered by a Whirlpool designated service company. This major appliance is designed to be provided by this warranty. ...

Installation Guide
Page 1
... or seriously injured if you don't follow instructions. INSTALLATION INSTRUCTIONS 30" (76.2 CM) FREESTANDING GAS RANGES Table of Contents RANGE SAFETY 1 INSTALLATION REQUIREMENTS 3 Tools and Parts 3 Location Requirements 3 Electrical Requirements 5 Gas Supply Requirements 5 INSTALLATION INSTRUCTIONS 6 Unpack Range 6 Install Anti-Tip Bracket 7 Make Gas Connection 8 Verify Anti-Tip Bracket Location 9 Level Range...
... or seriously injured if you don't follow instructions. INSTALLATION INSTRUCTIONS 30" (76.2 CM) FREESTANDING GAS RANGES Table of Contents RANGE SAFETY 1 INSTALLATION REQUIREMENTS 3 Tools and Parts 3 Location Requirements 3 Electrical Requirements 5 Gas Supply Requirements 5 INSTALLATION INSTRUCTIONS 6 Unpack Range 6 Install Anti-Tip Bracket 7 Make Gas Connection 8 Verify Anti-Tip Bracket Location 9 Level Range...

Installation Guide
Page 3
... of flooring may require longer screws to anchor bracket to comply with local codes. Tools needed Check local codes and consult gas supplier. Parts needed ■ Tape measure ■ Flat-blade screwdriver ■ Phillips screwdriver ■ Level ■ Pipe-joint compound resistant to ...Requirements" section. ■ Proper gas supply connection must be secured to the Manufactured Home Construction and Safety Standard, Title 24 CFR, Part 3280 (formerly the Federal Standard for wood floors) ■ Marker or pencil ■ Noncorrosive leak-detection solution For LP/Natural Gas ...
... of flooring may require longer screws to anchor bracket to comply with local codes. Tools needed Check local codes and consult gas supplier. Parts needed ■ Tape measure ■ Flat-blade screwdriver ■ Phillips screwdriver ■ Level ■ Pipe-joint compound resistant to ...Requirements" section. ■ Proper gas supply connection must be secured to the Manufactured Home Construction and Safety Standard, Title 24 CFR, Part 3280 (formerly the Federal Standard for wood floors) ■ Marker or pencil ■ Noncorrosive leak-detection solution For LP/Natural Gas ...

Installation Guide
Page 6
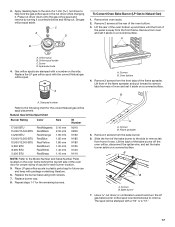
... the gas supply piping system at test pressures in the same room but external to or less than ½ psi (3.5 kPa). Remove oven racks and parts package from range. 2.
... the gas supply piping system at test pressures in the same room but external to or less than ½ psi (3.5 kPa). Remove oven racks and parts package from range. 2.

Installation Guide
Page 8
... gas supply line. Nipple D. Union E. Black iron pipe I . Open the manual shutoff valve in death, explosion, or fire. Remove cooktop burner caps and grates from parts package. Burner base B. Check that the gas pressure regulator shutoff valve is parallel to the adapters. Failure to all pipe thread connections. 2. Nipple I HG F. Tighten...
... gas supply line. Nipple D. Union E. Black iron pipe I . Open the manual shutoff valve in death, explosion, or fire. Remove cooktop burner caps and grates from parts package. Burner base B. Check that the gas pressure regulator shutoff valve is parallel to the adapters. Failure to all pipe thread connections. 2. Nipple I HG F. Tighten...

Installation Guide
Page 12
...range does not operate, check the following: ■ Household fuse is intact and tight, or circuit breaker has not tripped. ■ Range is an extra part, go back through the steps to remove waxy residue caused by pressing the screwdriver handle toward the side of the storage drawer and place it... - Lift up the back of the storage drawer. 4. Lift up the front of oven door. Engage drawer glide. 4. To Remove: 1. Open oven door all parts are removing and replacing the storage drawer, a slight push may be needed to push the oven door closed , open , press the CANCEL button on both...
...range does not operate, check the following: ■ Household fuse is intact and tight, or circuit breaker has not tripped. ■ Range is an extra part, go back through the steps to remove waxy residue caused by pressing the screwdriver handle toward the side of the storage drawer and place it... - Lift up the back of the storage drawer. 4. Lift up the front of oven door. Engage drawer glide. 4. To Remove: 1. Open oven door all parts are removing and replacing the storage drawer, a slight push may be needed to push the oven door closed , open , press the CANCEL button on both...
Installation Guide
Page 17
... remove tab from the bake burner. 6. Slide the front of the flame spreader and pull forward to help hold the gas orifice spud in plastic parts bag for future use and keep with a number on the oven frame behind the top left side of the oven door for the correct Natural...
... remove tab from the bake burner. 6. Slide the front of the flame spreader and pull forward to help hold the gas orifice spud in plastic parts bag for future use and keep with a number on the oven frame behind the top left side of the oven door for the correct Natural...


