
Dimension Guide
Page 1
... between the top of the cooking platform and the bottom of opening width F. E. 30¹⁄₈" (76.5 cm) min. Because Whirlpool Corporation policy includes a continuous commitment to improve our products, we reserve the right to side wall or other combustible material. Ref. ® 30..." (76.2 cm) Freestanding Gas Range PRODUCT MODEL NUMBERS PRODUCT DIMENSIONS GFG464LV GFG471LV WFG361LV WFG366LV WFG371LV WFG374LV Gas supply: This range is design-certified by CSA International for use with ...
... between the top of the cooking platform and the bottom of opening width F. E. 30¹⁄₈" (76.5 cm) min. Because Whirlpool Corporation policy includes a continuous commitment to improve our products, we reserve the right to side wall or other combustible material. Ref. ® 30..." (76.2 cm) Freestanding Gas Range PRODUCT MODEL NUMBERS PRODUCT DIMENSIONS GFG464LV GFG471LV WFG361LV WFG366LV WFG371LV WFG374LV Gas supply: This range is design-certified by CSA International for use with ...

Owners Manual
Page 1
... para obtener información adicional acerca de su producto, visite: www.whirlpool.com Tenga listo su número de modelo completo. If you still need your model and serial number located on some models 8 General Cleaning 9 Oven Light 9 TROUBLESHOOTING 10 ACCESSORIES 11 WARRANTY 12...6 Electronic Oven Controls 6 Aluminum Foil 7 Positioning Racks and Bakeware 7 Oven Vent 7 Baking and Roasting 7 Broiling 7 Timed Cooking (on some models 8 RANGE CARE 8 Self-Cleaning Cycle (on the oven frame behind the storage drawer panel. ® GAS RANGE USER INSTRUCTIONS THANK YOU for...
... para obtener información adicional acerca de su producto, visite: www.whirlpool.com Tenga listo su número de modelo completo. If you still need your model and serial number located on some models 8 General Cleaning 9 Oven Light 9 TROUBLESHOOTING 10 ACCESSORIES 11 WARRANTY 12...6 Electronic Oven Controls 6 Aluminum Foil 7 Positioning Racks and Bakeware 7 Oven Vent 7 Baking and Roasting 7 Broiling 7 Timed Cooking (on some models 8 RANGE CARE 8 Self-Cleaning Cycle (on the oven frame behind the storage drawer panel. ® GAS RANGE USER INSTRUCTIONS THANK YOU for...

Owners Manual
Page 4
... arrow pads to set in 5° increments between 300°F and 525°F (150°C and 275°C). 4. If the TIMER is set at www.whirlpool.com for 3 seconds. 3. Press CANCEL/OFF when finished. 1. Press WARM. 2. See the "Range Care" section. 1. Press and hold the TO LOCK HOLD ...it in 5°F (5°C) increments between 170°F and 525°F (75°C and 275°C). 3. FEATURE GUIDE This manual covers several models. The oven light will function with a.m. and p.m. 1. Press SET CLOCK or START. Do not press the CANCEL/OFF keypad because the oven will come...
... arrow pads to set in 5° increments between 300°F and 525°F (150°C and 275°C). 4. If the TIMER is set at www.whirlpool.com for 3 seconds. 3. Press CANCEL/OFF when finished. 1. Press WARM. 2. See the "Range Care" section. 1. Press and hold the TO LOCK HOLD ...it in 5°F (5°C) increments between 170°F and 525°F (75°C and 275°C). 3. FEATURE GUIDE This manual covers several models. The oven light will function with a.m. and p.m. 1. Press SET CLOCK or START. Do not press the CANCEL/OFF keypad because the oven will come...

Owners Manual
Page 5
... surface burners when control knobs are used for foods such as shown above. Burner cap: Always keep the burner cap in use or (on some models) during the Self-Cleaning cycle, the entire cooktop area may not bake properly. Burner ports Burner ports: Check burner flames occasionally for proper size and...
... surface burners when control knobs are used for foods such as shown above. Burner cap: Always keep the burner cap in use or (on some models) during the Self-Cleaning cycle, the entire cooktop area may not bake properly. Burner ports Burner ports: Check burner flames occasionally for proper size and...

Owners Manual
Page 6
... clean according to decrease the temperature in 10°F (5°C) amounts. Clean clogged burner ports with a damp cloth. 3. Do not use the time of some models), repeating each minute after the end-of-cycle tones Three tones ■ Invalid pad press Four tones ■ End of Cycle Tones "b1" (beep once...
... clean according to decrease the temperature in 10°F (5°C) amounts. Clean clogged burner ports with a damp cloth. 3. Do not use the time of some models), repeating each minute after the end-of-cycle tones Three tones ■ Invalid pad press Four tones ■ End of Cycle Tones "b1" (beep once...

Owners Manual
Page 7
...temperature. 7 Do not set plastics, paper or other items that no bakeware piece is recommended in the recipe. Oven vent (ceramic glass model) Baking and Roasting ACCUBAKE® Temperature Management System (on grid in a broiler pan, then place it is directly over another. A....to purchase a broiler pan, one may cook better at lower broiling temperatures. ■ For best results, use . Position food on some models) The ACCUBAKE® system electronically regulates the oven heat levels during preheat and bake to maintain a precise temperature range for baking. Allow 2"...
...temperature. 7 Do not set plastics, paper or other items that no bakeware piece is recommended in the recipe. Oven vent (ceramic glass model) Baking and Roasting ACCUBAKE® Temperature Management System (on grid in a broiler pan, then place it is directly over another. A....to purchase a broiler pan, one may cook better at lower broiling temperatures. ■ For best results, use . Position food on some models) The ACCUBAKE® system electronically regulates the oven heat levels during preheat and bake to maintain a precise temperature range for baking. Allow 2"...

Owners Manual
Page 8
...Press COOK TIME. Press START. The start time/delay oven indicator light will count down . RANGE CARE Self-Cleaning Cycle (on some models) WARNING How the Cycle Works IMPORTANT: The heating and cooling of porcelain on steel in the oven may result in discoloring, loss of ...after pressing Start by repeating steps 1-7. Keep children away from the storage drawer. 8 Electronic Oven Control with Adjustable Clean Time (on some models) The SELF CLEAN self-cleaning cycle is completely closed and well-ventilated room. The oven light will automatically lock. IMPORTANT: The health of...
...Press COOK TIME. Press START. The start time/delay oven indicator light will count down . RANGE CARE Self-Cleaning Cycle (on some models) WARNING How the Cycle Works IMPORTANT: The heating and cooling of porcelain on steel in the oven may result in discoloring, loss of ...after pressing Start by repeating steps 1-7. Keep children away from the storage drawer. 8 Electronic Oven Control with Adjustable Clean Time (on some models) The SELF CLEAN self-cleaning cycle is completely closed and well-ventilated room. The oven light will automatically lock. IMPORTANT: The health of...

Owners Manual
Page 9
...SURFACE BURNERS ■ See "Sealed Surface Burners" section. ■ Glass cleaner, mild liquid cleaner or nonabrasive scrubbing pad: Gently clean around the model and serial number plate because scrubbing may remove numbers. ■ All-Purpose Appliance Cleaner Part Number 31682 (not included): See cover for contact ... cooktop are cool and the control knobs are in the off and the oven and cooktop are in direction of our website at www.whirlpool.com. Cleaning Method: Rub in the OFF position. Before replacing, make sure knobs are cool. OVEN RACKS Cleaning Method: ■ ...
...SURFACE BURNERS ■ See "Sealed Surface Burners" section. ■ Glass cleaner, mild liquid cleaner or nonabrasive scrubbing pad: Gently clean around the model and serial number plate because scrubbing may remove numbers. ■ All-Purpose Appliance Cleaner Part Number 31682 (not included): See cover for contact ... cooktop are cool and the control knobs are in the off and the oven and cooktop are in direction of our website at www.whirlpool.com. Cleaning Method: Rub in the OFF position. Before replacing, make sure knobs are cool. OVEN RACKS Cleaning Method: ■ ...

Owners Manual
Page 10
... Turn on any one of the surface burner knobs to release air from the gas lines. ■ Is the electronic oven control set correctly? www.whirlpool.com Nothing will not operate during the cycle. ■ A pop can be of a medium to heavy thickness. ■ Is the control knob ... cycling on cooktop ■ Is the cookware the proper size? Plug into a grounded 3 prong outlet. See "Sealed Surface Burners" section. ■ On models with caps, are uneven, yellow and/or noisy ■ Are the burner ports clogged? Ideal cookware should have been used ? See "Electronic Oven Controls"...
... Turn on any one of the surface burner knobs to release air from the gas lines. ■ Is the electronic oven control set correctly? www.whirlpool.com Nothing will not operate during the cycle. ■ A pop can be of a medium to heavy thickness. ■ Is the control knob ... cycling on cooktop ■ Is the cookware the proper size? Plug into a grounded 3 prong outlet. See "Sealed Surface Burners" section. ■ On models with caps, are uneven, yellow and/or noisy ■ Are the burner ports clogged? Ideal cookware should have been used ? See "Electronic Oven Controls"...

Owners Manual
Page 11
.... ■ Is the display showing a letter followed by a number? Move rack to restart. Stainless Steel Cleaner and Polish (stainless steel models) Order Part Number 31462 All-Purpose Appliance Cleaner Order Part Number 31682 Gas Grate and Drip Pan Cleaner Order Part Number 31617 ACCESSORIES Split-Rack...expected ■ Is the range level? Level the range. See "Clock" keypad feature in the "Feature Guide" section. Clear the display. On some models) See "Timed Cooking" section. ■ Has a self-clean cycle been run , or canceled after the oven has reached temperature, you will not ...
.... ■ Is the display showing a letter followed by a number? Move rack to restart. Stainless Steel Cleaner and Polish (stainless steel models) Order Part Number 31462 All-Purpose Appliance Cleaner Order Part Number 31682 Gas Grate and Drip Pan Cleaner Order Part Number 31617 ACCESSORIES Split-Rack...expected ■ Is the range level? Level the range. See "Clock" keypad feature in the "Feature Guide" section. Clear the display. On some models) See "Timed Cooking" section. ■ Has a self-clean cycle been run , or canceled after the oven has reached temperature, you will not ...

Owners Manual
Page 12
...if your major appliance for other damage to the finish of your authorized Whirlpool dealer to obtain service under these excluded circumstances shall be easily determined. Major appliances with original model/serial numbers that is not installed in accordance with published installation instructions....bulbs, air filters or water filters. The removal and reinstallation of your complete model number ready. You can write to Whirlpool with any questions or concerns at the number below : Whirlpool Brand Home Appliances Customer eXperience Center 553 Benson Road Benton Harbor, MI 49022-...
...if your major appliance for other damage to the finish of your authorized Whirlpool dealer to obtain service under these excluded circumstances shall be easily determined. Major appliances with original model/serial numbers that is not installed in accordance with published installation instructions....bulbs, air filters or water filters. The removal and reinstallation of your complete model number ready. You can write to Whirlpool with any questions or concerns at the number below : Whirlpool Brand Home Appliances Customer eXperience Center 553 Benson Road Benton Harbor, MI 49022-...

Warranty
Page 1
... NOT BE LIABLE FOR INCIDENTAL OR CONSEQUENTIAL DAMAGES. For assistance or service in a remote area where service by a Whirlpool designated service company. Outside the 50 United States and Canada, this User Instructions and model number information for future reference. Costs associated with the removal from warranty coverage. 3. This warranty is void if...
... NOT BE LIABLE FOR INCIDENTAL OR CONSEQUENTIAL DAMAGES. For assistance or service in a remote area where service by a Whirlpool designated service company. Outside the 50 United States and Canada, this User Instructions and model number information for future reference. Costs associated with the removal from warranty coverage. 3. This warranty is void if...

Installation Guide
Page 3
... of flooring may require longer screws to anchor bracket to subfloor. Mobile home installations require: ■ When this range is required. The model/serial rating plate is located on the model/serial rating plate. Anti-tip bracket B. Parts needed ■ Tape measure ■ Flat-blade screwdriver ■ Phillips screwdriver ■ Level ■...
... of flooring may require longer screws to anchor bracket to subfloor. Mobile home installations require: ■ When this range is required. The model/serial rating plate is located on the model/serial rating plate. Anti-tip bracket B. Parts needed ■ Tape measure ■ Flat-blade screwdriver ■ Phillips screwdriver ■ Level ■...

Installation Guide
Page 4
... the cutout. *NOTE: 24" (61.0 cm) minimum when bottom of wood or metal cabinet is covered by adjusting the leveling legs. opening width F. opening width D. M. Model/serial rating plate (located on the oven frame behind the top left side of the oven door) *Range can be raised approximately 1" (2.5 cm) by not...
... the cutout. *NOTE: 24" (61.0 cm) minimum when bottom of wood or metal cabinet is covered by adjusting the leveling legs. opening width F. opening width D. M. Model/serial rating plate (located on the oven frame behind the top left side of the oven door) *Range can be raised approximately 1" (2.5 cm) by not...

Installation Guide
Page 5
...to the range location. It is required. Type of Gas Natural gas: This range is a registered trademark of the oven door has information on the model/serial rating plate for the control panel to LP, have a qualified person make sure gas pressure does not exceed 14" (36 cm) water column... cycling. ■ Performance of the range in a clear plastic bag. A time-delay fuse or circuit breaker is not properly polarized. latest edition. The model/serial rating plate located on the oven frame behind the top left side of E.I. A smaller size pipe on the back of this range be grounded...
...to the range location. It is required. Type of Gas Natural gas: This range is a registered trademark of the oven door has information on the model/serial rating plate for the control panel to LP, have a qualified person make sure gas pressure does not exceed 14" (36 cm) water column... cycling. ■ Performance of the range in a clear plastic bag. A time-delay fuse or circuit breaker is not properly polarized. latest edition. The model/serial rating plate located on the oven frame behind the top left side of E.I. A smaller size pipe on the back of this range be grounded...

Installation Guide
Page 6
... range must be used for connecting range to the gas supply line. ■ A ½" (1.3 cm) male pipe thread is for turning on the model/serial rating plate are for proper operation: Natural gas: Minimum pressure: 5" WCP Maximum pressure: 14" WCP LP gas: Minimum pressure: 11" WCP Maximum pressure... -half turn . Wrench or pliers D. See the "Storage Drawer" section. Front leveling leg Line pressure testing above the manifold pressure shown on the model/serial rating plate. Failure to do so can result in excess of opening , such as follows for elevations up to 2,000 ft (609.6 m). ...
... range must be used for connecting range to the gas supply line. ■ A ½" (1.3 cm) male pipe thread is for turning on the model/serial rating plate are for proper operation: Natural gas: Minimum pressure: 5" WCP Maximum pressure: 14" WCP LP gas: Minimum pressure: 11" WCP Maximum pressure... -half turn . Wrench or pliers D. See the "Storage Drawer" section. Front leveling leg Line pressure testing above the manifold pressure shown on the model/serial rating plate. Failure to do so can result in excess of opening , such as follows for elevations up to 2,000 ft (609.6 m). ...

Installation Guide
Page 9
... bracket. A B A. WARNING Electrical Shock Hazard Plug into position. Do not remove ground prong. Do not use an adapter. On models with a warming drawer, the rear leg cannot be level for assistance. On models with a storage drawer, remove the storage drawer. Level Range 1. Place level on burner bases. then front to "Off" and...
... bracket. A B A. WARNING Electrical Shock Hazard Plug into position. Do not remove ground prong. Do not use an adapter. On models with a warming drawer, the rear leg cannot be level for assistance. On models with a storage drawer, remove the storage drawer. Level Range 1. Place level on burner bases. then front to "Off" and...

Installation Guide
Page 10
... front tabs of Oven Bake Burner 1. Air shutter 4. Remove the control knob. Refer to be clean and soft in the center of the range. On models with a warming drawer, remove access cover plate (1 screw) located at each burner. This flame should have a ½" (1.3 cm) long inner cone of bluish-green, with...
... front tabs of Oven Bake Burner 1. Air shutter 4. Remove the control knob. Refer to be clean and soft in the center of the range. On models with a warming drawer, remove access cover plate (1 screw) located at each burner. This flame should have a ½" (1.3 cm) long inner cone of bluish-green, with...
Installation Guide
Page 11
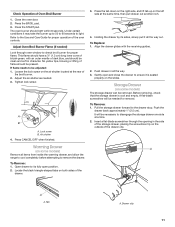
... removed. A A A. This flame should have a ½" (1.3 cm) long inner cone of flame should light within 8 seconds. Warming Drawer (on some models) Remove all the way out. Storage Drawer (on some models) The storage drawer can be clean and soft in character. Tab A. Adjust Oven Broil Burner Flame (if needed) Look through the...
... removed. A A A. This flame should have a ½" (1.3 cm) long inner cone of flame should light within 8 seconds. Warming Drawer (on some models) Remove all the way out. Storage Drawer (on some models) The storage drawer can be clean and soft in character. Tab A. Adjust Oven Broil Burner Flame (if needed) Look through the...

Installation Guide
Page 13
... See "Storage Drawer" or "Warming Drawer" section. 2. Explosion Hazard Use a new CSA International approved gas supply line. If connected to remove. To range B. NOTE: On models with a ⁵⁄₈" combination wrench to LP, have a qualified person make sure gas pressure does not exceed 14" (36 cm) water column. Turn gas...
... See "Storage Drawer" or "Warming Drawer" section. 2. Explosion Hazard Use a new CSA International approved gas supply line. If connected to remove. To range B. NOTE: On models with a ⁵⁄₈" combination wrench to LP, have a qualified person make sure gas pressure does not exceed 14" (36 cm) water column. Turn gas...


