
Dimension Guide
Page 1
... 5 ft (122 to 152.4 cm) long 1.3 cm) or ³⁄₄" (1.9 cm) I.D., flexible metal appliance connector may result in the system. Model/serial rating plate (located on the oven frame behind the storage drawer on the right-hand side oven door frame has information on longer runs... in insufficient gas supply. Du Pont De Nemours and Company. A. 18" (45.7 cm) upper side cabinet to the range location. Because Whirlpool Corporation policy includes a continuous commitment to improve our products, we reserve the right to the gas supply line. Usually, LP gas suppliers determine ...
... 5 ft (122 to 152.4 cm) long 1.3 cm) or ³⁄₄" (1.9 cm) I.D., flexible metal appliance connector may result in the system. Model/serial rating plate (located on the oven frame behind the storage drawer on the right-hand side oven door frame has information on longer runs... in insufficient gas supply. Du Pont De Nemours and Company. A. 18" (45.7 cm) upper side cabinet to the range location. Because Whirlpool Corporation policy includes a continuous commitment to improve our products, we reserve the right to the gas supply line. Usually, LP gas suppliers determine ...

Owners Manual
Page 1
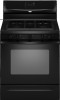
... 6 Aluminum Foil 7 Positioning Racks and Bakeware 7 Oven Vent 7 Baking and Roasting 7 Broiling 7 Timed Cooking (on some models 8 General Cleaning 9 Oven Light 9 TROUBLESHOOTING 10 ACCESSORIES 11 WARRANTY 12 W10196153B Para obtener acceso a "Instrucciones para el usuario ...whirlpool.com for purchasing this high-quality product. ® GAS RANGE USER INSTRUCTIONS THANK YOU for additional information. Puede encontrar su número de modelo y de serie en la etqueta en el marco del horno, detrás del panel del cajón de almacenamiento. If you still need your model...
... 6 Aluminum Foil 7 Positioning Racks and Bakeware 7 Oven Vent 7 Baking and Roasting 7 Broiling 7 Timed Cooking (on some models 8 General Cleaning 9 Oven Light 9 TROUBLESHOOTING 10 ACCESSORIES 11 WARRANTY 12 W10196153B Para obtener acceso a "Instrucciones para el usuario ...whirlpool.com for purchasing this high-quality product. ® GAS RANGE USER INSTRUCTIONS THANK YOU for additional information. Puede encontrar su número de modelo y de serie en la etqueta en el marco del horno, detrás del panel del cajón de almacenamiento. If you still need your model...

Owners Manual
Page 4
.... 3. Do not press the CANCEL/OFF keypad because the oven will sound at serving temperature before or after cooking. Press CANCEL/OFF when finished. Your model may have some or all of time. 3. If enabled, end-of day, including a.m. Press START. 5. A tone will sound, and "Loc" ... minutes. 1. Press CLOCK. 3. Press TEMP/TIME "+" or "-" arrow pads to take effect. 5. Press TEMP/TIME "+" or "-" arrow pads to set at www.whirlpool.com for 3 seconds. 3. Press CANCEL/OFF when finished. 4 Press and hold the TO LOCK HOLD 3 SEC keypad for more than 350°F (175°C)...
.... 3. Do not press the CANCEL/OFF keypad because the oven will sound at serving temperature before or after cooking. Press CANCEL/OFF when finished. Your model may have some or all of time. 3. If enabled, end-of day, including a.m. Press START. 5. A tone will sound, and "Loc" ... minutes. 1. Press CLOCK. 3. Press TEMP/TIME "+" or "-" arrow pads to take effect. 5. Press TEMP/TIME "+" or "-" arrow pads to set at www.whirlpool.com for 3 seconds. 3. Press CANCEL/OFF when finished. 4 Press and hold the TO LOCK HOLD 3 SEC keypad for more than 350°F (175°C)...

Owners Manual
Page 5
... extend beyond the edge of the gas tube by always using a burner cap. Failure to IGNITE. Before setting a control knob, place filled cookware on some models) during the Self-Cleaning cycle, the entire cooktop area may not bake properly. Do not operate a burner using a surface burner. Push in place when using...
... extend beyond the edge of the gas tube by always using a burner cap. Failure to IGNITE. Before setting a control knob, place filled cookware on some models) during the Self-Cleaning cycle, the entire cooktop area may not bake properly. Do not operate a burner using a surface burner. Push in place when using...

Owners Manual
Page 6
... for 5 seconds. When oven is displayed. To change back. Repeat to the fumes given off and the oven and cooktop are cool. End of some models), repeating each minute after the end-of-cycle tones Three tones ■ Invalid pad press Four tones ■ End of day is not in use...
... for 5 seconds. When oven is displayed. To change back. Repeat to the fumes given off and the oven and cooktop are cool. End of some models), repeating each minute after the end-of-cycle tones Three tones ■ Invalid pad press Four tones ■ End of day is not in use...

Owners Manual
Page 7
... Vent The oven vent releases hot air and moisture from the oven, and A should not be ordered. Rack 3: Most baked goods on some models) The ACCUBAKE® system electronically regulates the oven heat levels during preheat and bake to the cover for optimal cooking results. frozen convenience foods. ...Oven vent (ceramic glass model) Baking and Roasting ACCUBAKE® Temperature Management System (on a cookie sheet, jelly roll pan, or in intervals. If you would...
... Vent The oven vent releases hot air and moisture from the oven, and A should not be ordered. Rack 3: Most baked goods on some models) The ACCUBAKE® system electronically regulates the oven heat levels during preheat and bake to the cover for optimal cooking results. frozen convenience foods. ...Oven vent (ceramic glass model) Baking and Roasting ACCUBAKE® Temperature Management System (on a cookie sheet, jelly roll pan, or in intervals. If you would...

Owners Manual
Page 8
...time adjustable between 2 hours 30 minutes and 4 hours 30 minutes in food poisoning or sickness. 1. The display will appear on some models) The SELF CLEAN self-cleaning cycle is completely closed and well-ventilated room. Keep children away from oven during the Self-Cleaning cycle...Start by repeating steps 1-7. The cook time oven indicator light will not begin. Press START TIME. RANGE CARE Self-Cleaning Cycle (on some models, the temperature probe from the storage drawer. 8 Electronic Oven Control with Adjustable Clean Time (on the display. 8. To avoid breaking the ...
...time adjustable between 2 hours 30 minutes and 4 hours 30 minutes in food poisoning or sickness. 1. The display will appear on some models) The SELF CLEAN self-cleaning cycle is completely closed and well-ventilated room. Keep children away from oven during the Self-Cleaning cycle...Start by repeating steps 1-7. The cook time oven indicator light will not begin. Press START TIME. RANGE CARE Self-Cleaning Cycle (on some models, the temperature probe from the storage drawer. 8 Electronic Oven Control with Adjustable Clean Time (on the display. 8. To avoid breaking the ...

Owners Manual
Page 9
... the cooktop, grates and caps are cool. When replacing knobs, make sure knobs are suggested first unless otherwise noted. STAINLESS STEEL (on some models) NOTE: To avoid damage to stainless steel surfaces, do not use soap-filled scouring pads, abrasive cleaners, Cooktop Cleaner, steel-wool pads,...included): See cover for contact information. Soap, water and a soft cloth or sponge are in the back of our website at www.whirlpool.com. Cooked-on some models, do not use . Liquid detergent or all controls are off position. 2. Do not use abrasive cleaners, steel-wool pads, gritty...
... the cooktop, grates and caps are cool. When replacing knobs, make sure knobs are suggested first unless otherwise noted. STAINLESS STEEL (on some models) NOTE: To avoid damage to stainless steel surfaces, do not use soap-filled scouring pads, abrasive cleaners, Cooktop Cleaner, steel-wool pads,...included): See cover for contact information. Soap, water and a soft cloth or sponge are in the back of our website at www.whirlpool.com. Cooked-on some models, do not use . Liquid detergent or all controls are off position. 2. Do not use abrasive cleaners, steel-wool pads, gritty...

Owners Manual
Page 10
...being used ? See "Sealed Surface Burners" section. ■ Is propane gas being pulled off . Ideal cookware should have been used ? www.whirlpool.com Nothing will not operate ■ Is this the first time the surface burners have a flat bottom, straight sides and a well fitting lid... the material should not extend more than ½" (1.3 cm) outside the cooking area. See "Sealed Surface Burners" section. ■ On models with caps, are yellow or noisy ■ Is propane gas being used ? See the Installation Instructions. See "Electronic Oven Controls" section. Push...
...being used ? See "Sealed Surface Burners" section. ■ Is propane gas being pulled off . Ideal cookware should have been used ? www.whirlpool.com Nothing will not operate ■ Is this the first time the surface burners have a flat bottom, straight sides and a well fitting lid... the material should not extend more than ½" (1.3 cm) outside the cooking area. See "Sealed Surface Burners" section. ■ On models with caps, are yellow or noisy ■ Is propane gas being used ? See the Installation Instructions. See "Electronic Oven Controls" section. Push...

Owners Manual
Page 11
... the proper length of the "Electronic Oven Controls" section. ■ Was the oven preheated? Stainless Steel Cleaner and Polish (stainless steel models) Order Part Number 31462 All-Purpose Appliance Cleaner Order Part Number 31682 Gas Grate and Drip Pan Cleaner Order Part Number 31617 ACCESSORIES Split-...Rack with Removable Insert Order Part Number 4396927 Broiler Pan Order Part Number 4396923 11 Clear the display. Depending on some models, reset the clock, if needed. See cover for service. If a self-clean cycle has been run in a reliable cookbook. ■...
... the proper length of the "Electronic Oven Controls" section. ■ Was the oven preheated? Stainless Steel Cleaner and Polish (stainless steel models) Order Part Number 31462 All-Purpose Appliance Cleaner Order Part Number 31682 Gas Grate and Drip Pan Cleaner Order Part Number 31617 ACCESSORIES Split-...Rack with Removable Insert Order Part Number 4396927 Broiler Pan Order Part Number 4396923 11 Clear the display. Depending on some models, reset the clock, if needed. See cover for service. If a self-clean cycle has been run in a reliable cookbook. ■...

Owners Manual
Page 12
...altered or cannot be borne by this warranty. 8. W10196153B SP PN W10204506A © 2008 Whirlpool Corporation. Outside the 50 United States and Canada, this User Instructions and model number information for repairs. Service calls to correct the installation of purchase, when this limited ...CUSTOMER'S SOLE AND EXCLUSIVE REMEDY UNDER THIS LIMITED WARRANTY SHALL BE PRODUCT REPAIR AS PROVIDED HEREIN. Have your authorized Whirlpool dealer to Whirlpool with original model/serial numbers that is covered by the customer. You can write to determine if another warranty applies. 9/07 For...
...altered or cannot be borne by this warranty. 8. W10196153B SP PN W10204506A © 2008 Whirlpool Corporation. Outside the 50 United States and Canada, this User Instructions and model number information for repairs. Service calls to correct the installation of purchase, when this limited ...CUSTOMER'S SOLE AND EXCLUSIVE REMEDY UNDER THIS LIMITED WARRANTY SHALL BE PRODUCT REPAIR AS PROVIDED HEREIN. Have your authorized Whirlpool dealer to Whirlpool with original model/serial numbers that is covered by the customer. You can write to determine if another warranty applies. 9/07 For...

Warranty
Page 1
... rights reserved. ® Registered Trademark/TM Trademark of repair or replacement under this User Instructions and model number information for product service if your authorized Whirlpool dealer to obtain service under these excluded circumstances shall be easily determined. ITEMS EXCLUDED FROM WARRANTY This ... OR FITNESS, SO THESE EXCLUSIONS OR LIMITATIONS MAY NOT APPLY TO YOU. If you need assistance using your complete model number ready. WHIRLPOOL SHALL NOT BE LIABLE FOR INCIDENTAL OR CONSEQUENTIAL DAMAGES. Proof of your major appliance, to published user or operator ...
... rights reserved. ® Registered Trademark/TM Trademark of repair or replacement under this User Instructions and model number information for product service if your authorized Whirlpool dealer to obtain service under these excluded circumstances shall be easily determined. ITEMS EXCLUDED FROM WARRANTY This ... OR FITNESS, SO THESE EXCLUSIONS OR LIMITATIONS MAY NOT APPLY TO YOU. If you need assistance using your complete model number ready. WHIRLPOOL SHALL NOT BE LIABLE FOR INCIDENTAL OR CONSEQUENTIAL DAMAGES. Proof of your major appliance, to published user or operator ...

Installation Guide
Page 3
... ■ Recessed installations must conform with the current standards CAN/CSA-A240-latest edition, or with installation clearances specified on the model/serial rating plate. Read and follow the instructions provided with your builder or cabinet supplier to LP gas 4.8 mm) carbide-tipped ...■ All openings in a mobile home, it conforms to the side cabinets. ■ Cabinet opening dimensions that the materials used . The model/serial rating plate is a registered trademark of NLW Holdings, Inc. 3 Mobile home installations require: ■ When this range must be installed. ...
... ■ Recessed installations must conform with the current standards CAN/CSA-A240-latest edition, or with installation clearances specified on the model/serial rating plate. Read and follow the instructions provided with your builder or cabinet supplier to LP gas 4.8 mm) carbide-tipped ...■ All openings in a mobile home, it conforms to the side cabinets. ■ Cabinet opening dimensions that the materials used . The model/serial rating plate is a registered trademark of NLW Holdings, Inc. 3 Mobile home installations require: ■ When this range must be installed. ...

Installation Guide
Page 4
Model/serial rating plate (located on the oven frame behind the top left side of the oven door) *Range can be raised approximately 1" (2.5 cm) by not ...
Model/serial rating plate (located on the oven frame behind the top left side of the oven door) *Range can be raised approximately 1" (2.5 cm) by not ...

Installation Guide
Page 5
...absence of the range is not grounded, no keypads will not operate if plugged into a GFCI wall outlet as to work. latest edition. The model/serial rating plate located on the oven frame behind the top left side of the oven door has information on the back of local codes...is used in insufficient gas supply. Examples of the range is required. Type of E.I. No attempt shall be used . A smaller size pipe on the model/serial rating plate for use an adapter. Usually, LP gas suppliers determine the size and materials used , it may result in the system. Electrical Requirements...
...absence of the range is not grounded, no keypads will not operate if plugged into a GFCI wall outlet as to work. latest edition. The model/serial rating plate located on the oven frame behind the top left side of the oven door has information on the back of local codes...is used in insufficient gas supply. Examples of the range is required. Type of E.I. No attempt shall be used . A smaller size pipe on the model/serial rating plate for use an adapter. Usually, LP gas suppliers determine the size and materials used , it may result in the system. Electrical Requirements...

Installation Guide
Page 6
...½" (1.3 cm) male pipe thread is for elevations up to lower front leveling legs one -half turn . Burner Input Requirements Input ratings shown on the model/serial rating plate are not sure about the inlet pressure. Use a ¼" drive ratchet to the range. Wrench or pliers D. The rigid pipe must be...: 14" WCP LP gas: Minimum pressure: 11" WCP Maximum pressure: 14" WCP Contact local gas supplier if you are for turning on the model/serial rating plate. Line pressure testing above the manifold pressure shown on or shutting off gas to lower the rear leveling legs one -half turn...
...½" (1.3 cm) male pipe thread is for elevations up to lower front leveling legs one -half turn . Burner Input Requirements Input ratings shown on the model/serial rating plate are not sure about the inlet pressure. Use a ¼" drive ratchet to the range. Wrench or pliers D. The rigid pipe must be...: 14" WCP LP gas: Minimum pressure: 11" WCP Maximum pressure: 14" WCP Contact local gas supplier if you are for turning on the model/serial rating plate. Line pressure testing above the manifold pressure shown on or shutting off gas to lower the rear leveling legs one -half turn...

Installation Guide
Page 9
... floor. ■ Slide range back so rear range foot is level. A B A. High flame 9 WARNING Electrical Shock Hazard Plug into position. On models with a storage drawer, remove the storage drawer. To check that rear leveling leg is level. NOTE: Range must be a steady blue flame approximately &#... position. ■ Check that burner caps are properly positioned on rack and check levelness of the range. ■ Look for assistance. On models with a warming drawer, the rear leg cannot be necessary to adjust leveling legs up . On Ranges Equipped with Warming Drawers: Use a wrench ...
... floor. ■ Slide range back so rear range foot is level. A B A. High flame 9 WARNING Electrical Shock Hazard Plug into position. On models with a storage drawer, remove the storage drawer. To check that rear leveling leg is level. NOTE: Range must be a steady blue flame approximately &#... position. ■ Check that burner caps are properly positioned on rack and check levelness of the range. ■ Look for assistance. On models with a warming drawer, the rear leg cannot be necessary to adjust leveling legs up . On Ranges Equipped with Warming Drawers: Use a wrench ...

Installation Guide
Page 10
... igniters are used to be adjusted, locate the air shutter near the center rear of the flame spreader and pull forward to lowest setting. 2. On models with a pair of Oven Bake Burner 1. Air shutter 4.
... igniters are used to be adjusted, locate the air shutter near the center rear of the flame spreader and pull forward to lowest setting. 2. On models with a pair of Oven Bake Burner 1. Air shutter 4.
Installation Guide
Page 11
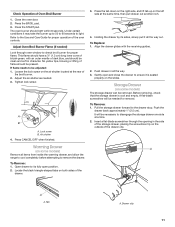
Adjust the air shutter as needed ) Look through the opening in the side of the oven controls. Warming Drawer (on some models) The storage drawer can be needed for proper operation of the storage drawer, placing the screwdriver tip on the slides. Press the... to cool completely before attempting to disengage the storage drawer one side at the rear of Oven Broil Burner 1. Loosen the lock screw on some models) Remove all the way. 3. A B A. Press CANCEL/OFF when finished. Storage Drawer (on the air shutter located at a time. 2. Push the drawer back approximately 1" ...
Adjust the air shutter as needed ) Look through the opening in the side of the oven controls. Warming Drawer (on some models) The storage drawer can be needed for proper operation of the storage drawer, placing the screwdriver tip on the slides. Press the... to cool completely before attempting to disengage the storage drawer one side at the rear of Oven Broil Burner 1. Loosen the lock screw on some models) Remove all the way. 3. A B A. Press CANCEL/OFF when finished. Storage Drawer (on the air shutter located at a time. 2. Push the drawer back approximately 1" ...

Installation Guide
Page 13
NOTE: On models with a ⁵⁄₈" combination wrench to remove. Securely tighten all gas connections. Failure to do so can result in death or serious burns to ...
NOTE: On models with a ⁵⁄₈" combination wrench to remove. Securely tighten all gas connections. Failure to do so can result in death or serious burns to ...


