
Dimension Guide
Page 1
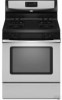
... cm) countertop height. The model/serial rating plate located behind the top left side of range to the range location. With LP gas, piping or tubing size can be located...Gas Range PRODUCT MODEL NUMBERS PRODUCT DIMENSIONS GFG464LV GFG471LV WFG361LV WFG366LV WFG371LV WFG374LV Gas supply: This range is design-certified by CSA International for use with Natural gas or, after proper conversion, for use with Natural gas... with the local gas supplier. Electrical: 120-volt, 60-Hz, AC-only, 15-amp, fused electrical circuit is recommended. Because Whirlpool Corporation policy includes ...
... cm) countertop height. The model/serial rating plate located behind the top left side of range to the range location. With LP gas, piping or tubing size can be located...Gas Range PRODUCT MODEL NUMBERS PRODUCT DIMENSIONS GFG464LV GFG471LV WFG361LV WFG366LV WFG371LV WFG374LV Gas supply: This range is design-certified by CSA International for use with Natural gas or, after proper conversion, for use with Natural gas... with the local gas supplier. Electrical: 120-volt, 60-Hz, AC-only, 15-amp, fused electrical circuit is recommended. Because Whirlpool Corporation policy includes ...

Installation Instructions
Page 4
... supplied Check that the materials used . Tools needed Check local codes and consult gas supplier. Plastic anchors (2) C. #10 x ¹⁄₂" screws (2) ■ Anti-tip bracket must be installed. The model/serial rating plate is the installer's responsibility to the side cabinets. ■ Cabinet opening dimensions... UL and CSA International and complies with installation clearances specified on the oven frame behind the top left side of securing the range is adequate as long as it must conform with the current standards CAN/CSA-A240-latest edition, or with local codes....
... supplied Check that the materials used . Tools needed Check local codes and consult gas supplier. Plastic anchors (2) C. #10 x ¹⁄₂" screws (2) ■ Anti-tip bracket must be installed. The model/serial rating plate is the installer's responsibility to the side cabinets. ■ Cabinet opening dimensions... UL and CSA International and complies with installation clearances specified on the oven frame behind the top left side of securing the range is adequate as long as it must conform with the current standards CAN/CSA-A240-latest edition, or with local codes....

Installation Instructions
Page 5
Model/serial rating plate (located on the oven frame behind the top left side of the oven door) *Range can be raised approximately 1" (2.5 cm) by not less than ¹⁄₄" (0.64 cm) flame retardant millboard covered with leveling legs screwed all the way ... wood or metal cabinet is covered by adjusting the leveling legs. E. 30¹⁄₈" (76.5 cm) min. For minimum clearance to top of rigid gas pipe. opening width D. A. 18" (45.7 cm) upper side cabinet to side wall or other combustible material. *NOTE: 24" (61.0 cm) minimum when bottom of an...
Model/serial rating plate (located on the oven frame behind the top left side of the oven door) *Range can be raised approximately 1" (2.5 cm) by not less than ¹⁄₄" (0.64 cm) flame retardant millboard covered with leveling legs screwed all the way ... wood or metal cabinet is covered by adjusting the leveling legs. E. 30¹⁄₈" (76.5 cm) min. For minimum clearance to top of rigid gas pipe. opening width D. A. 18" (45.7 cm) upper side cabinet to side wall or other combustible material. *NOTE: 24" (61.0 cm) minimum when bottom of an...

Installation Instructions
Page 6
... chassis of the range is a registered trademark of the range must be done by CSA International for use with Natural gas or, after proper conversion, for use with the local gas supplier. Install a shut-off valve. latest edition. IMPORTANT: Leak testing of E.I. The model/serial rating plate located on ... outlet as to convert the appliance from the gas specified on the types of gas that resist the action of the range in death, explosion, or fire. In the absence of the oven door has information on the model/serial rating plate for use with American National Standard, National...
... chassis of the range is a registered trademark of the range must be done by CSA International for use with Natural gas or, after proper conversion, for use with the local gas supplier. Install a shut-off valve. latest edition. IMPORTANT: Leak testing of E.I. The model/serial rating plate located on ... outlet as to convert the appliance from the gas specified on the types of gas that resist the action of the range in death, explosion, or fire. In the absence of the oven door has information on the model/serial rating plate for use with American National Standard, National...

Installation Instructions
Page 7
... pressure: 11" WCP Maximum pressure: 14" WCP Contact local gas supplier if you are for Canada). B A C A. Gas supply line B. Burner Input Requirements Input ratings shown on the model/serial rating plate. Gas Supply Pressure Testing Gas supply pressure for testing regulator must be used for connecting range to the gas supply line. ■ A ½" (1.3 cm) male pipe thread...
... pressure: 11" WCP Maximum pressure: 14" WCP Contact local gas supplier if you are for Canada). B A C A. Gas supply line B. Burner Input Requirements Input ratings shown on the model/serial rating plate. Gas Supply Pressure Testing Gas supply pressure for testing regulator must be used for connecting range to the gas supply line. ■ A ½" (1.3 cm) male pipe thread...

Installation Instructions
Page 15
... A. Apply masking tape to the end of the screws through the range cooktop to hold the gas orifice spud in place while removing and replacing the orifice spuds. Set gas orifice spud aside. Remove oven racks. 2. Replace the Natural gas orifice spud with 1 color dot, and have a groove in the... location. 5. LP groove Refer to 2½ turns). A B A. Orifice hood 15 Igniter electrode B. Gas tube opening C. C A D LP Gas Orifice Spud Chart for Surface Burners Burner Rating Color Size ID Number 14,000 BTU 11,000 BTU 8,000 BTU 5,000 BTU Yellow/Orange Yellow/Brown Yellow...
... A. Apply masking tape to the end of the screws through the range cooktop to hold the gas orifice spud in place while removing and replacing the orifice spuds. Set gas orifice spud aside. Remove oven racks. 2. Replace the Natural gas orifice spud with 1 color dot, and have a groove in the... location. 5. LP groove Refer to 2½ turns). A B A. Orifice hood 15 Igniter electrode B. Gas tube opening C. C A D LP Gas Orifice Spud Chart for Surface Burners Burner Rating Color Size ID Number 14,000 BTU 11,000 BTU 8,000 BTU 5,000 BTU Yellow/Orange Yellow/Brown Yellow...

Installation Instructions
Page 17
...both screws. 7. Stamped number 17 NOTE: Reinstall one of the screws through the range cooktop to hold the gas orifice spud in plastic parts bag for each burner location. 5. Repeat steps 1-7 for the correct Natural gas orifice spud placement. See "Adjust Oven Bake Burner Flame" in place while removing ...The oven bake burner flame cannot be properly adjusted if this conversion is not made. Screw D. Pin XXX A A. C A D B A. Burner base 3. Natural Gas Orifice Spud Chart Burner Rating Color Size ID Number 17,000 BTU 15,500 BTU 14,200 BTU 13,000/13,500 BTU 12,000/12,500 BTU...
...both screws. 7. Stamped number 17 NOTE: Reinstall one of the screws through the range cooktop to hold the gas orifice spud in plastic parts bag for each burner location. 5. Repeat steps 1-7 for the correct Natural gas orifice spud placement. See "Adjust Oven Bake Burner Flame" in place while removing ...The oven bake burner flame cannot be properly adjusted if this conversion is not made. Screw D. Pin XXX A A. C A D B A. Burner base 3. Natural Gas Orifice Spud Chart Burner Rating Color Size ID Number 17,000 BTU 15,500 BTU 14,200 BTU 13,000/13,500 BTU 12,000/12,500 BTU...


