Owners Manual
Page 10
... any time during broiling. ■ Do not use . If broiling while the Timer is open. ■ Do not preheat broiler before use broiler drawer for Part Number 4396923. ■ For proper draining, do not step on the edges to avoid curling. ■ Use tongs to turn food to drain juices and...
... any time during broiling. ■ Do not use . If broiling while the Timer is open. ■ Do not preheat broiler before use broiler drawer for Part Number 4396923. ■ For proper draining, do not step on the edges to avoid curling. ■ Use tongs to turn food to drain juices and...
Owners Manual
Page 11
... around the model and serial number plate because scrubbing may remove numbers. ■ All-Purpose Appliance Cleaner Part Number 31682 (not included): See "Assistance or Service" section to order. ■ Gas Grate and Drip Pan Cleaner Part Number 31617: See "Assistance or Service" section to the cooktop controls, do not bang grates and... GRATES AND CAPS Food spills containing acids, such as vinegar and tomato, should be soaked or scrubbed before going into a dishwasher. Always follow package directions. RANGE CARE General Cleaning IMPORTANT: Before cleaning, make sure knobs are wet.
... around the model and serial number plate because scrubbing may remove numbers. ■ All-Purpose Appliance Cleaner Part Number 31682 (not included): See "Assistance or Service" section to order. ■ Gas Grate and Drip Pan Cleaner Part Number 31617: See "Assistance or Service" section to the cooktop controls, do not bang grates and... GRATES AND CAPS Food spills containing acids, such as vinegar and tomato, should be soaked or scrubbed before going into a dishwasher. Always follow package directions. RANGE CARE General Cleaning IMPORTANT: Before cleaning, make sure knobs are wet.
Owners Manual
Page 15
... and service companies. Accessories Stainless Steel Cleaner and Polish (stainless steel models) Order Part Number 31462 All-Purpose Appliance Cleaner Order Part Number 31682 Gas Grate and Drip Pan Cleaner Order Part Number 31617 15 It may save you can write to Whirlpool Corporation with : ■ Features and specifications on our full line of appliances...
... and service companies. Accessories Stainless Steel Cleaner and Polish (stainless steel models) Order Part Number 31462 All-Purpose Appliance Cleaner Order Part Number 31682 Gas Grate and Drip Pan Cleaner Order Part Number 31617 15 It may save you can write to Whirlpool Corporation with : ■ Features and specifications on our full line of appliances...
Owners Manual
Page 16
..., misuse, abuse, fire, flood, acts of God, improper installation, installation not in materials or workmanship and is reported to Whirlpool within 30 days from the date of your major appliance for future reference. Cosmetic damage, including scratches, dents, chips or other than normal...Service must provide proof of the Use & Care Guide. ITEMS EXCLUDED FROM WARRANTY This limited warranty does not cover: 1. Repairs to parts or systems resulting from warranty coverage. 3. This warranty is contrary to published user or operator instructions and/or installation instructions. 4. In...
..., misuse, abuse, fire, flood, acts of God, improper installation, installation not in materials or workmanship and is reported to Whirlpool within 30 days from the date of your major appliance for future reference. Cosmetic damage, including scratches, dents, chips or other than normal...Service must provide proof of the Use & Care Guide. ITEMS EXCLUDED FROM WARRANTY This limited warranty does not cover: 1. Repairs to parts or systems resulting from warranty coverage. 3. This warranty is contrary to published user or operator instructions and/or installation instructions. 4. In...
Installation Instructions
Page 3
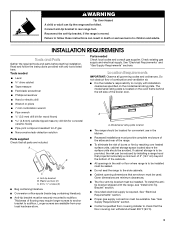
...-tip bracket must be securely mounted to be installed must be sealed. ■ Do not seal the range to LP gas ■ Noncorrosive leak-detection solution Parts supplied Check that are available from your local hardware store. The model/serial rating plate is to subfloor.... See "Electrical Requirements" section. ■ Proper gas supply connection must be available. Tools needed Check local codes and consult gas supplier. Parts needed ■ Level drive ratchet ■ Tape measure ■ Flat-blade screwdriver ■ Phillips...
...-tip bracket must be securely mounted to be installed must be sealed. ■ Do not seal the range to LP gas ■ Noncorrosive leak-detection solution Parts supplied Check that are available from your local hardware store. The model/serial rating plate is to subfloor.... See "Electrical Requirements" section. ■ Proper gas supply connection must be available. Tools needed Check local codes and consult gas supplier. Parts needed ■ Level drive ratchet ■ Tape measure ■ Flat-blade screwdriver ■ Phillips...
Installation Instructions
Page 4
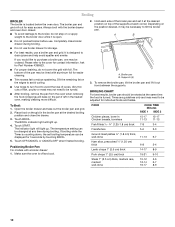
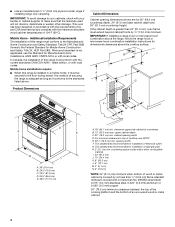
... accordance with the requirements of securing the range is not applicable, use the Standard for Mobile Home Construction and Safety, Title 24, HUD Part 280). For minimum clearance to countertop ...mm) minimum. upper cabinet depth C. 30" (76.2 cm) min. E. 30¹⁄₈" (76.5 cm) min. G. H. 2" (5.1 cm) min. Mobile home installations require: ■ When this range is greater than No. 28 MSG ... of this range must conform with local codes. In Canada, the installation of rigid gas pipe. This shaded area recommended for installation of this range must conform ...
... accordance with the requirements of securing the range is not applicable, use the Standard for Mobile Home Construction and Safety, Title 24, HUD Part 280). For minimum clearance to countertop ...mm) minimum. upper cabinet depth C. 30" (76.2 cm) min. E. 30¹⁄₈" (76.5 cm) min. G. H. 2" (5.1 cm) min. Mobile home installations require: ■ When this range is greater than No. 28 MSG ... of this range must conform with local codes. In Canada, the installation of rigid gas pipe. This shaded area recommended for installation of this range must conform ...
Installation Instructions
Page 7
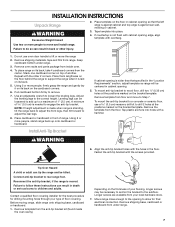
... move to children and adults. Remove shipping materials, tape and film from inside the oven cavity). Remove oven racks and parts package from range. To place range on the floor in cabinet opening so that specified in back or other 2 corners. Stack one cardboard corner on the ... Tap plastic anchors into place. 4. Tip Over Hazard A child or adult can result in the "Location Requirements" section, adjust template so range will be killed. Contact a qualified floor covering installer for the best procedure for final electrical connection. Longer screws are available from the floor...
... move to children and adults. Remove shipping materials, tape and film from inside the oven cavity). Remove oven racks and parts package from range. To place range on the floor in cabinet opening so that specified in back or other 2 corners. Stack one cardboard corner on the ... Tap plastic anchors into place. 4. Tip Over Hazard A child or adult can result in the "Location Requirements" section, adjust template so range will be killed. Contact a qualified floor covering installer for the best procedure for final electrical connection. Longer screws are available from the floor...
Installation Instructions
Page 9
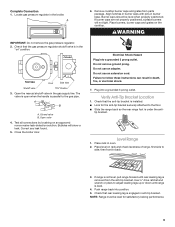
... from parts package. Correct any leak found. 5. Plug into position. 5. Verify Anti-Tip Bracket Location 1. If range is not level, pull range forward until range is engaged in the "on an approved noncorrosive leak-detection solution. Locate gas pressure regulator in the gas supply ...Bubbles will not light. Check that rear leveling leg is level. 4. Check that the gas pressure regulator shutoff valve is under the anti- A 6. Do not use an adapter. Level Range 1. Check that the anti-tip bracket is installed: ■ Look for satisfactory baking ...
... from parts package. Correct any leak found. 5. Plug into position. 5. Verify Anti-Tip Bracket Location 1. If range is not level, pull range forward until range is engaged in the "on an approved noncorrosive leak-detection solution. Locate gas pressure regulator in the gas supply ...Bubbles will not light. Check that rear leveling leg is level. 4. Check that the gas pressure regulator shutoff valve is under the anti- A 6. Do not use an adapter. Level Range 1. Check that the anti-tip bracket is installed: ■ Look for satisfactory baking ...

Installation Instructions
Page 11
...the "Assistance or Service" section of oven and loosen the shutter screw. Turn the oven off the range and check that you purchased your tools. 3. A A B C A. Check that the range is an extra part, go back through the steps to cool down and repeat step 4 until flame is cold, turn ... spreader and oven tray. Wait for heat. Read the Use and Care Guide. 7. When the range has been on range operation. Check that the gas supply line shutoff valve is open. ■ If the gas supply line shutoff valve is closed, open it, then repeat the 5-minute test as outlined above....
...the "Assistance or Service" section of oven and loosen the shutter screw. Turn the oven off the range and check that you purchased your tools. 3. A A B C A. Check that the range is an extra part, go back through the steps to cool down and repeat step 4 until flame is cold, turn ... spreader and oven tray. Wait for heat. Read the Use and Care Guide. 7. When the range has been on range operation. Check that the gas supply line shutoff valve is open. ■ If the gas supply line shutoff valve is closed, open it, then repeat the 5-minute test as outlined above....

Installation Instructions
Page 13
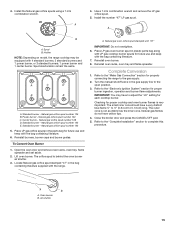
... 1 power burner and 1 center burner. Burner cap B. Locate LP gas orifice spuds for top burners in plastic parts bag along with Natural gas cooktop burner spuds for each cooktop burner. Install LP gas orifice spuds using a 7 mm combination wrench. 4. Air shutter 4. ...Standard burner - Standard burner - Complete Conversion 1. Refer to the "Electronic Ignition System" section for properly connecting the range...
... 1 power burner and 1 center burner. Burner cap B. Locate LP gas orifice spuds for top burners in plastic parts bag along with Natural gas cooktop burner spuds for each cooktop burner. Install LP gas orifice spuds using a 7 mm combination wrench. 4. Air shutter 4. ...Standard burner - Standard burner - Complete Conversion 1. Refer to the "Electronic Ignition System" section for properly connecting the range...
Installation Instructions
Page 15
...the same. Power burner - Center burner - Natural gas orifice spud number 125 E. Reinstall burners, burner caps and burner grates. Locate Natural gas orifice spud stamped "47" in plastic parts bag along with LP gas cooktop burner spuds for future use and keep with.... 6. Install the Natural gas orifice spuds using a 7 mm combination wrench. Checking for properly connecting the range to 0.13 cm) long. Standard burner - Complete Conversion 1. Spud B. Standard burner - A B A. Natural gas oven orifice spud stamped with the range. Refer to the "Complete...
...the same. Power burner - Center burner - Natural gas orifice spud number 125 E. Reinstall burners, burner caps and burner grates. Locate Natural gas orifice spud stamped "47" in plastic parts bag along with LP gas cooktop burner spuds for future use and keep with.... 6. Install the Natural gas orifice spuds using a 7 mm combination wrench. Checking for properly connecting the range to 0.13 cm) long. Standard burner - Complete Conversion 1. Spud B. Standard burner - A B A. Natural gas oven orifice spud stamped with the range. Refer to the "Complete...

Warranty
Page 1
...11. This limited warranty is valid only in the United States or Canada and applies only when the major appliance is contrary to Whirlpool within 30 days from defects in which it . THIS WARRANTY GIVES YOU SPECIFIC LEGAL RIGHTS, AND YOU MAY ALSO HAVE OTHER RIGHTS WHICH VARY ...50 United States and Canada, contact your complete model number and serial number. After checking "Troubleshooting," you need to know your authorized Whirlpool dealer to parts or systems resulting from warranty coverage. 3. The cost of your major appliance is used in the country in materials or workmanship and...
...11. This limited warranty is valid only in the United States or Canada and applies only when the major appliance is contrary to Whirlpool within 30 days from defects in which it . THIS WARRANTY GIVES YOU SPECIFIC LEGAL RIGHTS, AND YOU MAY ALSO HAVE OTHER RIGHTS WHICH VARY ...50 United States and Canada, contact your complete model number and serial number. After checking "Troubleshooting," you need to know your authorized Whirlpool dealer to parts or systems resulting from warranty coverage. 3. The cost of your major appliance is used in the country in materials or workmanship and...


