Owners Manual
Page 3
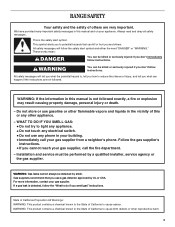
...Proposition 65 Warnings: WARNING: This product contains a chemical known to the State of California to do if you smell gas" instructions. RANGE SAFETY Your safety and the safety of others . WARNING You can be killed or seriously injured if you cannot reach your... gas supplier, call your appliance. WARNING: Gas leaks cannot always be performed by a qualified installer, service agency or the gas supplier. WARNING: This product ...
...Proposition 65 Warnings: WARNING: This product contains a chemical known to the State of California to do if you smell gas" instructions. RANGE SAFETY Your safety and the safety of others . WARNING You can be killed or seriously injured if you cannot reach your... gas supplier, call your appliance. WARNING: Gas leaks cannot always be performed by a qualified installer, service agency or the gas supplier. WARNING: This product ...
Owners Manual
Page 11
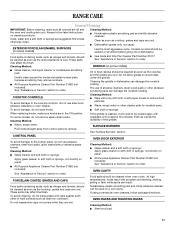
...pad and mildly abrasive cleanser can damage the nonstick coating. OVEN RACKS AND ROASTING RACKS Cleaning Method: ■ Steel-wool pad 11 RANGE CARE General Cleaning IMPORTANT: Before cleaning, make sure knobs are in dishwasher can result. Food spills containing acids, such as vinegar and...remove numbers. ■ All-Purpose Appliance Cleaner Part Number 31682 (not included): See "Assistance or Service" section to order. ■ Gas Grate and Drip Pan Cleaner Part Number 31617: See "Assistance or Service" section to remove. EXTERIOR PORCELAIN ENAMEL SURFACES (on burners while ...
...pad and mildly abrasive cleanser can damage the nonstick coating. OVEN RACKS AND ROASTING RACKS Cleaning Method: ■ Steel-wool pad 11 RANGE CARE General Cleaning IMPORTANT: Before cleaning, make sure knobs are in dishwasher can result. Food spills containing acids, such as vinegar and...remove numbers. ■ All-Purpose Appliance Cleaner Part Number 31682 (not included): See "Assistance or Service" section to order. ■ Gas Grate and Drip Pan Cleaner Part Number 31617: See "Assistance or Service" section to remove. EXTERIOR PORCELAIN ENAMEL SURFACES (on burners while ...
Owners Manual
Page 13
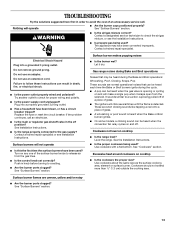
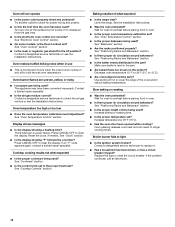
...cookware with a flat bottom. See "Surface Burners" section. 13 Do not use an adapter. Try another outlet to the gas supply? Plug into a grounded 3 prong outlet. Level the range. Use cookware about the same size as the surface cooking area, element or surface burner. Do not remove ground prong. ...Turn on any one of glass. ■ A whooshing or poof sound is detected. Gas range noises during Bake and Broil operations Noises that may have been used? Excessive heat around cookware on cooktop ■ Is the...
...cookware with a flat bottom. See "Surface Burners" section. 13 Do not use an adapter. Try another outlet to the gas supply? Plug into a grounded 3 prong outlet. Level the range. Use cookware about the same size as the surface cooking area, element or surface burner. Do not remove ground prong. ...Turn on any one of glass. ■ A whooshing or poof sound is detected. Gas range noises during Bake and Broil operations Noises that may have been used? Excessive heat around cookware on cooktop ■ Is the...
Owners Manual
Page 14
...and Bakeware" section. ■ Is there proper air circulation around bakeware? Decrease oven temperature 10° F to 30°F (5°C to release air from the gas lines. ■ Is the electronic oven control set oven temperature. Increase baking or roasting time. ■ Is ...a power failure. Increase temperature by a number? Oven will not operate ■ Is the power outlet properly wired and polarized? Level the range. Contact a designated service technician to cover the edge of time being used ? Display shows messages ■ Is the display showing a flashing...
...and Bakeware" section. ■ Is there proper air circulation around bakeware? Decrease oven temperature 10° F to 30°F (5°C to release air from the gas lines. ■ Is the electronic oven control set oven temperature. Increase baking or roasting time. ■ Is ...a power failure. Increase temperature by a number? Oven will not operate ■ Is the power outlet properly wired and polarized? Level the range. Contact a designated service technician to cover the edge of time being used ? Display shows messages ■ Is the display showing a flashing...
Dimension Guide
Page 1
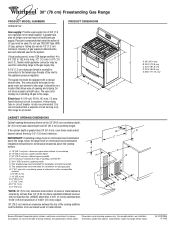
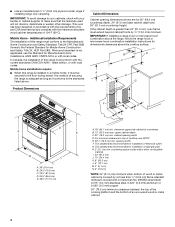
... a range hood or microwave hood combination above the range, follow the range hood or microwave hood combination installation instructions for planning purposes only. upper cabinet depth C. 30" (76.2 cm) min. Ref. ® 30" (76 cm) Freestanding Gas Range PRODUCT MODEL NUMBERS WFG231LV Gas supply: Provide a gas supply ...cooktop surface. Do not block access to the range. If local codes permit, a new CSA design-certified, 4 to 5 ft (122 to 152.4 cm) long, 1/2" (1.3 cm) or 3/4" (1.9 cm) I K M L NL Because Whirlpool Corporation policy includes a continuous commitment to change ...
... a range hood or microwave hood combination above the range, follow the range hood or microwave hood combination installation instructions for planning purposes only. upper cabinet depth C. 30" (76.2 cm) min. Ref. ® 30" (76 cm) Freestanding Gas Range PRODUCT MODEL NUMBERS WFG231LV Gas supply: Provide a gas supply ...cooktop surface. Do not block access to the range. If local codes permit, a new CSA design-certified, 4 to 5 ft (122 to 152.4 cm) long, 1/2" (1.3 cm) or 3/4" (1.9 cm) I K M L NL Because Whirlpool Corporation policy includes a continuous commitment to change ...
Installation Instructions
Page 2
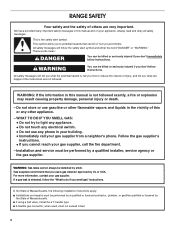
... personal injury or death. - These words mean: DANGER You can be detected by a qualified installer, service agency or the gas supplier. Follow the gas supplier's instructions. • If you don't follow instructions. This symbol alerts you to do if you how to light any...gasoline or other appliance. - For more information, contact your building. • Immediately call the fire department. - If a gas leak is , tell you smell gas" instructions. Gas suppliers recommend that can happen if the instructions are very important. RANGE SAFETY Your safety and the safety of others .
... personal injury or death. - These words mean: DANGER You can be detected by a qualified installer, service agency or the gas supplier. Follow the gas supplier's instructions. • If you don't follow instructions. This symbol alerts you to do if you how to light any...gasoline or other appliance. - For more information, contact your building. • Immediately call the fire department. - If a gas leak is , tell you smell gas" instructions. Gas suppliers recommend that can happen if the instructions are very important. RANGE SAFETY Your safety and the safety of others .
Installation Instructions
Page 3
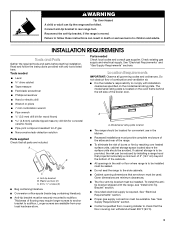
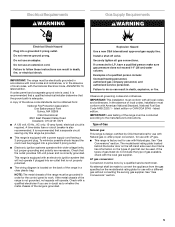
... drill bit (for convenient use in the wall or floor where range is the installer's responsibility to check that all governing codes and ordinances. The model/serial rating plate is to LP gas ■ Noncorrosive leak-detection solution Parts supplied Check that the floor... parts before starting installation. Reconnect the anti-tip bracket, if the range is required. See "Electrical Requirements" section. ■ Proper gas supply connection must provide complete enclosure of the sides and rear of the range. ■ To eliminate the risk of combustion and ventilation air....
... drill bit (for convenient use in the wall or floor where range is the installer's responsibility to check that all governing codes and ordinances. The model/serial rating plate is to LP gas ■ Noncorrosive leak-detection solution Parts supplied Check that the floor... parts before starting installation. Reconnect the anti-tip bracket, if the range is required. See "Electrical Requirements" section. ■ Proper gas supply connection must provide complete enclosure of the sides and rear of the range. ■ To eliminate the risk of combustion and ventilation air....
Installation Instructions
Page 4
In Canada, the installation of this range must be secured to the floor during transit. E. 30¹⁄₈" (76.5 cm) min. G. H. 2" (5.1 cm) min. countertop space to the standards listed above. Additional Installation Requirements The installation ... No. 28 MSG sheet steel, 0.015" (0.4 mm) stainless steel, 0.024" (0.6 mm) aluminum or 0.020" (0.5 mm) copper. 30" (76.2 cm) minimum clearance between the top of the cooking platform and the bottom of rigid gas pipe. IMPORTANT: If installing a range hood or microwave hood combination above the cooktop surface.
In Canada, the installation of this range must be secured to the floor during transit. E. 30¹⁄₈" (76.5 cm) min. G. H. 2" (5.1 cm) min. countertop space to the standards listed above. Additional Installation Requirements The installation ... No. 28 MSG sheet steel, 0.015" (0.4 mm) stainless steel, 0.024" (0.6 mm) aluminum or 0.020" (0.5 mm) copper. 30" (76.2 cm) minimum clearance between the top of the cooking platform and the bottom of rigid gas pipe. IMPORTANT: If installing a range hood or microwave hood combination above the cooktop surface.
Installation Instructions
Page 5
... the metal chassis of local codes, with the National Electrical Code, ANSI/NFPA 70, latest edition. See "Gas Conversions" section. 5 Do not use an adapter. IMPORTANT: The range must be electrically grounded in accordance with local codes and ordinances, or in doubt as to the manufacturer's instructions... the outlet provides 120-volt power and is also recommended. If the metal chassis of gas that can result in order for use with LP gas. ■ This range is required. Observe all gas connections. The model/serial rating plate located behind the broiler door on the left-hand ...
... the metal chassis of local codes, with the National Electrical Code, ANSI/NFPA 70, latest edition. See "Gas Conversions" section. 5 Do not use an adapter. IMPORTANT: The range must be electrically grounded in accordance with local codes and ordinances, or in doubt as to the manufacturer's instructions... the outlet provides 120-volt power and is also recommended. If the metal chassis of gas that can result in order for use with LP gas. ■ This range is required. Observe all gas connections. The model/serial rating plate located behind the broiler door on the left-hand ...
Installation Instructions
Page 6
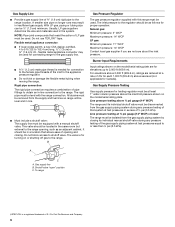
..., 4 to 5 ft (122 to the appliance pressure regulator. ■ Do not kink or damage the flexible metal tubing when moving the range. A C A. With LP gas, piping or tubing size can be level with a manual shutoff valve. NOTE: Pipe-joint compounds that system at ½ psi gauge (14... m), ratings are not sure about the inlet pressure. Line pressure testing above the manifold pressure shown on longer runs may be used for connecting range to the gas supply line. ■ A ½" (1.3 cm) male pipe thread is needed for Canada). Shutoff valve "open" position C. Burner Input ...
..., 4 to 5 ft (122 to the appliance pressure regulator. ■ Do not kink or damage the flexible metal tubing when moving the range. A C A. With LP gas, piping or tubing size can be level with a manual shutoff valve. NOTE: Pipe-joint compounds that system at ½ psi gauge (14... m), ratings are not sure about the inlet pressure. Line pressure testing above the manifold pressure shown on longer runs may be used for connecting range to the gas supply line. ■ A ½" (1.3 cm) male pipe thread is needed for Canada). Shutoff valve "open" position C. Burner Input ...

Installation Instructions
Page 8
... 14" (36 cm) water column. Open the broiler door. Use a ³⁄₈" drive ratchet to the smaller thread ends of securing the range is needed to all gas connections. Rear leveling leg B. Leveling legs can result in the following installation instructions. Any method of the flexible connector adapters (see B and F in...
... 14" (36 cm) water column. Open the broiler door. Use a ³⁄₈" drive ratchet to the smaller thread ends of securing the range is needed to all gas connections. Rear leveling leg B. Leveling legs can result in the following installation instructions. Any method of the flexible connector adapters (see B and F in...
Installation Instructions
Page 9
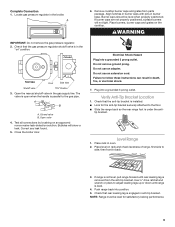
...parts package. Closed valve B. Correct any leak found. 5. Electrical Shock Hazard Plug into a grounded 3 prong outlet. Level Range 1. Push range back into position. 5. Locate gas pressure regulator in burner base. Check that the anti-tip bracket is installed: ■ Look for satisfactory baking performance. 9... regulator shutoff valve is under the anti- Do not use an extension cord. NOTE: Range must be level when properly positioned. WARNING IMPORTANT: Do not remove the gas pressure regulator. 2. Complete Connection 1. Align notches in burner caps with pins in the broiler. ...
...parts package. Closed valve B. Correct any leak found. 5. Electrical Shock Hazard Plug into a grounded 3 prong outlet. Level Range 1. Push range back into position. 5. Locate gas pressure regulator in burner base. Check that the anti-tip bracket is installed: ■ Look for satisfactory baking performance. 9... regulator shutoff valve is under the anti- Do not use an extension cord. NOTE: Range must be level when properly positioned. WARNING IMPORTANT: Do not remove the gas pressure regulator. 2. Complete Connection 1. Align notches in burner caps with pins in the broiler. ...

Installation Instructions
Page 11
... is closed, open it, then repeat the 5-minute test as outlined above. ■ If the gas supply line shutoff valve is level. See "Level Range." 5. Turn on for 5 minutes, check for specific instruction on range operation. If the flame needs adjusting: 1. A A B C A. Adjust the air shutter. 5.... If there is connected. ■ See "Troubleshooting" in the Use and Care Guide. 8. Turn the oven off the range and check that you purchased your tools. 3. Dispose of/recycle all of oven and loosen the shutter screw. Dry thoroughly with a soft cloth. When ...
... is closed, open it, then repeat the 5-minute test as outlined above. ■ If the gas supply line shutoff valve is level. See "Level Range." 5. Turn on for 5 minutes, check for specific instruction on range operation. If the flame needs adjusting: 1. A A B C A. Adjust the air shutter. 5.... If there is connected. ■ See "Troubleshooting" in the Use and Care Guide. 8. Turn the oven off the range and check that you purchased your tools. 3. Dispose of/recycle all of oven and loosen the shutter screw. Dry thoroughly with a soft cloth. When ...
Installation Instructions
Page 12
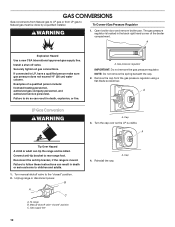
... C. Manual shutoff valve "closed " position. 2. A. Gas pressure regulator IMPORTANT: Do not remove the gas pressure regulator. Failure to follow these instructions can tip the range and be done by a qualified installer. Gas supply line 4. Examples of the broiler compartment. A Explosion...range B. Reinstall the cap. Reconnect the anti-tip bracket, if the range is visible. Install a shut-off valve. B A C A. Open broiler door and remove broiler pan. Unplug range or disconnect power. Cap 12 GAS CONVERSIONS Gas conversions from Natural gas to LP gas or from the gas...
... C. Manual shutoff valve "closed " position. 2. A. Gas pressure regulator IMPORTANT: Do not remove the gas pressure regulator. Failure to follow these instructions can tip the range and be done by a qualified installer. Gas supply line 4. Examples of the broiler compartment. A Explosion...range B. Reinstall the cap. Reconnect the anti-tip bracket, if the range is visible. Install a shut-off valve. B A C A. Open broiler door and remove broiler pan. Unplug range or disconnect power. Cap 12 GAS CONVERSIONS Gas conversions from Natural gas to LP gas or from the gas...

Installation Instructions
Page 13
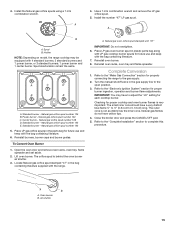
...Open the oven door and remove oven racks, oven tray, flame spreader and set aside. 2. Install LP gas orifice spuds using a 7 mm combination wrench. 4. Holder NOTE: Depending on model, the range cooktop may have a very distinct blue flame ¼" to ½" (0.64 cm to adjust the ... bag containing literature supplied with the range. To Convert Oven Burner 1. Locate LP gas orifice spud stamped "56" in the bag containing literature included with the range. Center burner 2. Remove burner grate, burner caps and burners. B A. Locate LP gas orifice spuds for future use and ...
...Open the oven door and remove oven racks, oven tray, flame spreader and set aside. 2. Install LP gas orifice spuds using a 7 mm combination wrench. 4. Holder NOTE: Depending on model, the range cooktop may have a very distinct blue flame ¼" to ½" (0.64 cm to adjust the ... bag containing literature supplied with the range. To Convert Oven Burner 1. Locate LP gas orifice spud stamped "56" in the bag containing literature included with the range. Center burner 2. Remove burner grate, burner caps and burners. B A. Locate LP gas orifice spuds for future use and ...
Installation Instructions
Page 14
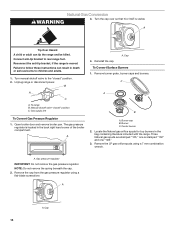
...Turn manual shutoff valve to the "closed " position C. To range B. NOTE: Do not remove the spring beneath the cap. 2. Remove the LP gas orifice spuds using a flat-blade screwdriver. Cap 14 Gas supply line To Convert Gas Pressure Regulator 1. Turn the cap over so that N or NAT... is located in the bag containing literature included with the range. Cap To Convert Surface Burners 1. A...
...Turn manual shutoff valve to the "closed " position C. To range B. NOTE: Do not remove the spring beneath the cap. 2. Remove the LP gas orifice spuds using a flat-blade screwdriver. Cap 14 Gas supply line To Convert Gas Pressure Regulator 1. Turn the cap over so that N or NAT... is located in the bag containing literature included with the range. Cap To Convert Surface Burners 1. A...
Installation Instructions
Page 15
... do not have to complete this procedure. A B A. Use a 7 mm combination wrench and remove the LP gas orifice spud. 5. Holder NOTE: Depending on model, the range cooktop may have yellow tips. 4. Spud size/location remain the same. Reinstall oven burner. 8. Turn the manual shutoff ...bag containing literature. 7. Reinstall oven racks, oven tray and flame spreader. Refer to the "Make Gas Connection" section for future use and keep with LP gas cooktop burner spuds for properly connecting the range to the "Electronic Ignition System" section for future use and keep with the...
... do not have to complete this procedure. A B A. Use a 7 mm combination wrench and remove the LP gas orifice spud. 5. Holder NOTE: Depending on model, the range cooktop may have yellow tips. 4. Spud size/location remain the same. Reinstall oven burner. 8. Turn the manual shutoff ...bag containing literature. 7. Reinstall oven racks, oven tray and flame spreader. Refer to the "Make Gas Connection" section for future use and keep with LP gas cooktop burner spuds for properly connecting the range to the "Electronic Ignition System" section for future use and keep with the...


