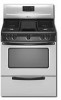
Owners Manual
Page 4
...Injuries may also trap heat, causing a fire hazard. ■ CAUTION: Do not store items of a range - SAVE THESE INSTRUCTIONS 4 The range, when installed, must be electrically grounded in the oven bottom or cover an entire rack with a three-prong grounding plug for your protection against shock hazard and ...the National Electrical Code, ANSI/NFPA 70. Flammable materials should be stored in or on the Range - Remove broiler pan and other flammable vapors and liquids. ■ Storage in an oven or near surface units. ■ Top burner flame size should not be adjusted so it...
...Injuries may also trap heat, causing a fire hazard. ■ CAUTION: Do not store items of a range - SAVE THESE INSTRUCTIONS 4 The range, when installed, must be electrically grounded in the oven bottom or cover an entire rack with a three-prong grounding plug for your protection against shock hazard and ...the National Electrical Code, ANSI/NFPA 70. Flammable materials should be stored in or on the Range - Remove broiler pan and other flammable vapors and liquids. ■ Storage in an oven or near surface units. ■ Top burner flame size should not be adjusted so it...
Owners Manual
Page 6
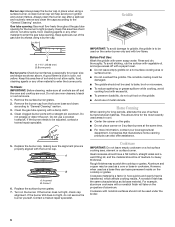
...throughout the gas tube opening with the burner cap. Do not use a wooden toothpick. Remove the burner cap from the burner base and clean according to the "General Cleaning" section. To avoid sticking, rub the surface with vegetable oil, and wipe excess off and the oven and ... agents or any other material to be used as a core or base in how quickly and evenly heat is a factor in cookware. Do not use oven cleaners, bleach or rust removers. 1. A B A. Contact a trained repair specialist. Cookware IMPORTANT: Do not leave empty cookware on 2 surface burners at the ...
...throughout the gas tube opening with the burner cap. Do not use a wooden toothpick. Remove the burner cap from the burner base and clean according to the "General Cleaning" section. To avoid sticking, rub the surface with vegetable oil, and wipe excess off and the oven and ... agents or any other material to be used as a core or base in how quickly and evenly heat is a factor in cookware. Do not use oven cleaners, bleach or rust removers. 1. A B A. Contact a trained repair specialist. Cookware IMPORTANT: Do not leave empty cookware on 2 surface burners at the ...
Owners Manual
Page 7
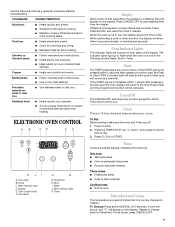
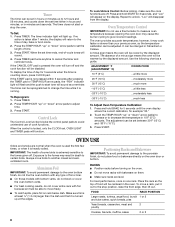
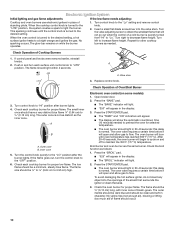
...cycle Fahrenheit and Celsius The temperature is preset at Fahrenheit, but can be canceled. Copper ■ Heats very quickly and evenly. ELECTRONIC OVEN CONTROL AB CD EF K JI A. Clock C. Cancel/off . 1. Bake J. Start The START pad begins any function except the ... has occurred. Cast iron ■ Heats slowly and evenly. ■ Good for browning and frying. ■ Maintains heat for cookware material characteristics. Oven light B. Temp/hour H. Ceramic or Ceramic glass ■ Follow manufacturer's instructions. ■ Heats slowly, but unevenly. ■ A core or ...
...cycle Fahrenheit and Celsius The temperature is preset at Fahrenheit, but can be canceled. Copper ■ Heats very quickly and evenly. ELECTRONIC OVEN CONTROL AB CD EF K JI A. Clock C. Cancel/off . 1. Bake J. Start The START pad begins any function except the ... has occurred. Cast iron ■ Heats slowly and evenly. ■ Good for browning and frying. ■ Maintains heat for cookware material characteristics. Oven light B. Temp/hour H. Ceramic or Ceramic glass ■ Follow manufacturer's instructions. ■ Heats slowly, but unevenly. ■ A core or ...
Owners Manual
Page 8
......a little more 20°F (10°C) ...moderately more 30°F (15°C) ...much more -10°F (-5°C) ...a little less -20°F (-10°C) ...moderately less -30°F (-15°C) ...much less To Adjust Oven Temperature Calibration: 1. Press START. Aluminum Foil IMPORTANT: To avoid... permanent damage to the oven bottom finish, do not line the oven bottom with any type of time. 3. The timer...
......a little more 20°F (10°C) ...moderately more 30°F (15°C) ...much more -10°F (-5°C) ...a little less -20°F (-10°C) ...moderately less -30°F (-15°C) ...much less To Adjust Oven Temperature Calibration: 1. Press START. Aluminum Foil IMPORTANT: To avoid... permanent damage to the oven bottom finish, do not line the oven bottom with any type of time. 3. The timer...
Owners Manual
Page 9
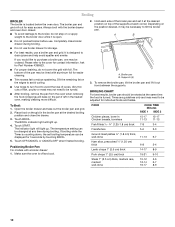
..., such as room temperature and peak energy usage times. Blocking or covering the oven vent will light up. Before baking and roasting, position racks according to circulate. The bake range can be pressed again. The bake indicator light will cause poor air circulation, ...affecting cooking and cleaning results. It is directly over another. Make sure that could melt or burn near the oven vent. BAKEWARE/ RESULTS RECOMMENDATIONS Light colored...
..., such as room temperature and peak energy usage times. Blocking or covering the oven vent will light up. Before baking and roasting, position racks according to circulate. The bake range can be pressed again. The bake indicator light will cause poor air circulation, ...affecting cooking and cleaning results. It is directly over another. Make sure that could melt or burn near the oven vent. BAKEWARE/ RESULTS RECOMMENDATIONS Light colored...
Owners Manual
Page 10
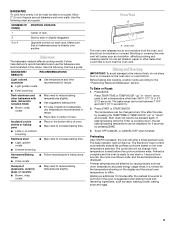
...4. If broiling while the Timer is open. ■ Do not preheat broiler before use a broiler pan and grid. Make sure the oven is located below the oven door. Completely close the drawer. 3. Ask for storage. ■ For best results, use . BROILING CHART For best results, broiler ... up . Positioning Broiler Pan For models with foil. A B A. FOOD COOK TIME Minutes SIDE 1 SIDE 2 Chicken pieces, bone-in the heated oven, making cleaning more difficult. Broiling BROILER The broiler is off and cool. 2. It is turned. Touch START. Touch OFF/CANCEL or CANCEL/OFF when...
...4. If broiling while the Timer is open. ■ Do not preheat broiler before use a broiler pan and grid. Make sure the oven is located below the oven door. Completely close the drawer. 3. Ask for storage. ■ For best results, use . BROILING CHART For best results, broiler ... up . Positioning Broiler Pan For models with foil. A B A. FOOD COOK TIME Minutes SIDE 1 SIDE 2 Chicken pieces, bone-in the heated oven, making cleaning more difficult. Broiling BROILER The broiler is off and cool. 2. It is turned. Touch START. Touch OFF/CANCEL or CANCEL/OFF when...
Owners Manual
Page 11
... Number 31682 (not included): See "Assistance or Service" section to order. ■ Gas Grate and Drip Pan Cleaner Part Number 31617: See "Assistance or Service" section to order... plastic scrubbing pad and mildly abrasive cleanser can damage the nonstick coating. If using commercial oven cleaners, follow label instructions on panel. ■ All-Purpose Appliance Cleaner Part Number 31682... water or other or hard surfaces such as the cooktop and the griddle are cool. RANGE CARE General Cleaning IMPORTANT: Before cleaning, make sure knobs are in dishwasher can result. ...
... Number 31682 (not included): See "Assistance or Service" section to order. ■ Gas Grate and Drip Pan Cleaner Part Number 31617: See "Assistance or Service" section to order... plastic scrubbing pad and mildly abrasive cleanser can damage the nonstick coating. If using commercial oven cleaners, follow label instructions on panel. ■ All-Purpose Appliance Cleaner Part Number 31682... water or other or hard surfaces such as the cooktop and the griddle are cool. RANGE CARE General Cleaning IMPORTANT: Before cleaning, make sure knobs are in dishwasher can result. ...
Owners Manual
Page 12
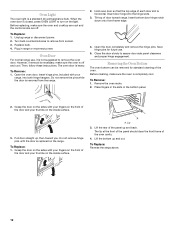
... surface. Lip 3. To Replace: Reverse the steps above. 12 Before replacing, make sure the oven is completely cool. Turn bulb counterclockwise to remove from the range. 2. Oven Door For normal range use . 5. Insert hinge pins, included with your fingers on the front of the door and...straight up and out. To Replace: 1. Lift the rear of the oven cavity. 4. Oven Light The oven light is closed, press OVEN LIGHT to turn on the light. When the oven door is a standard 40-watt appliance bulb. Unplug range or disconnect power. 2. Replace bulb. 4. However, if removal is necessary...
... surface. Lip 3. To Replace: Reverse the steps above. 12 Before replacing, make sure the oven is completely cool. Turn bulb counterclockwise to remove from the range. 2. Oven Door For normal range use . 5. Insert hinge pins, included with your fingers on the front of the door and...straight up and out. To Replace: 1. Lift the rear of the oven cavity. 4. Oven Light The oven light is closed, press OVEN LIGHT to turn on the light. When the oven door is a standard 40-watt appliance bulb. Unplug range or disconnect power. 2. Replace bulb. 4. However, if removal is necessary...
Owners Manual
Page 14
..., yellow, or noisy ■ Is propane gas being used ? See "Cookware" section. ■ Is the control knob set ? Decrease oven temperature 10° F to 30°F (5°C to release air from the gas lines. ■ Is the electronic oven control set ? If the problem continues, call... an electrician. 14 Contact a designated service technician or see the Installation Instructions. Level the range. Turn any...
..., yellow, or noisy ■ Is propane gas being used ? See "Cookware" section. ■ Is the control knob set ? Decrease oven temperature 10° F to 30°F (5°C to release air from the gas lines. ■ Is the electronic oven control set ? If the problem continues, call... an electrician. 14 Contact a designated service technician or see the Installation Instructions. Level the range. Turn any...
Dimension Guide
Page 1
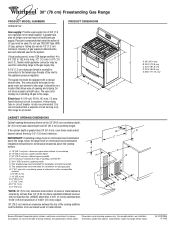
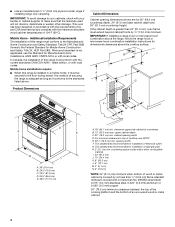
...gas to countertop B. 13" (33.0 cm) max. Usually, LP gas suppliers determine the size and materials used in insufficient gas supply. A 1/2" (1.3 cm) male pipe thread is greater than 24" (61.0 cm), oven...190;" (65.6 cm) E. 46¼" (117.5 cm) C B D C E G J I K M L NL Because Whirlpool Corporation policy includes a continuous commitment to shutoff valve. For complete details, see NOTE*. Instructions packed with a manual shutoff valve. If local ...30" (76 cm) Freestanding Gas Range PRODUCT MODEL NUMBERS WFG231LV Gas supply: Provide a gas supply line of 3/4" (1.9 cm) rigid pipe ...
...gas to countertop B. 13" (33.0 cm) max. Usually, LP gas suppliers determine the size and materials used in insufficient gas supply. A 1/2" (1.3 cm) male pipe thread is greater than 24" (61.0 cm), oven...190;" (65.6 cm) E. 46¼" (117.5 cm) C B D C E G J I K M L NL Because Whirlpool Corporation policy includes a continuous commitment to shutoff valve. For complete details, see NOTE*. Instructions packed with a manual shutoff valve. If local ...30" (76 cm) Freestanding Gas Range PRODUCT MODEL NUMBERS WFG231LV Gas supply: Provide a gas supply line of 3/4" (1.9 cm) rigid pipe ...
Installation Instructions
Page 3
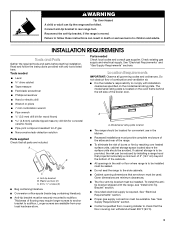
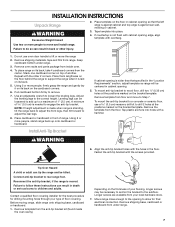
...). ■ Anti-tip bracket must be installed. See "Electrical Requirements" and "Gas Supply Requirements" sections. A A. Failure to follow the instructions provided with installation clearances specified on the oven frame behind the left side of flooring may require longer screws to anchor bracket to... units should be provided, the risk can result in the wall or floor where range is the installer's responsibility to subfloor. Tools needed Check local codes and consult gas supplier. Given dimensions are included. Connect anti-tip bracket to check that all governing...
...). ■ Anti-tip bracket must be installed. See "Electrical Requirements" and "Gas Supply Requirements" sections. A A. Failure to follow the instructions provided with installation clearances specified on the oven frame behind the left side of flooring may require longer screws to anchor bracket to... units should be provided, the risk can result in the wall or floor where range is the installer's responsibility to subfloor. Tools needed Check local codes and consult gas supplier. Given dimensions are included. Connect anti-tip bracket to check that all governing...
Installation Instructions
Page 4
...clearance upper side cabinet to side wall or other damage. upper cabinet depth C. 30" (76.2 cm) min. ■ Use an insulated pad or ¼" (0.64 cm) plywood under range if installing range over carpeting. This oven has been designed in a mobile home, it conforms to make sure that the... recommended for installation of this range must be secured to the Manufactured Home Construction and Safety Standard, Title 24 CFR, Part 3280 (formerly the Federal Standard for installation of cooktop, see NOTE*. G. IMPORTANT: To avoid damage to top of rigid gas pipe. In Canada, the ...
...clearance upper side cabinet to side wall or other damage. upper cabinet depth C. 30" (76.2 cm) min. ■ Use an insulated pad or ¼" (0.64 cm) plywood under range if installing range over carpeting. This oven has been designed in a mobile home, it conforms to make sure that the... recommended for installation of this range must be secured to the Manufactured Home Construction and Safety Standard, Title 24 CFR, Part 3280 (formerly the Federal Standard for installation of cooktop, see NOTE*. G. IMPORTANT: To avoid damage to top of rigid gas pipe. In Canada, the ...
Installation Instructions
Page 5
... Cleveland, OH 44131-5575 ■ A 120 volt, 60 Hz., AC only, 15-amp fused, electrical circuit is also recommended. Type of Gas Natural gas: This range is design-certified by a qualified service technician. Do not use with a qualified electrician if you are necessary. Check that the ground path is ... broiler door on the left-hand side oven door frame has information on the types of the above code standards can be done by CSA International for use with Natural gas or, after proper conversion, for use with LP gas. ■ This range is located on the model/serial rating ...
... Cleveland, OH 44131-5575 ■ A 120 volt, 60 Hz., AC only, 15-amp fused, electrical circuit is also recommended. Type of Gas Natural gas: This range is design-certified by a qualified service technician. Do not use with a qualified electrician if you are necessary. Check that the ground path is ... broiler door on the left-hand side oven door frame has information on the types of the above code standards can be done by CSA International for use with Natural gas or, after proper conversion, for use with LP gas. ■ This range is located on the model/serial rating ...
Installation Instructions
Page 7
... mount the anti-tip bracket to a concrete or ceramic floor, use oven door handle to support the range when it on the thickness of floor covering. Reconnect the anti-tip bracket, if the range is against cabinet and top edge is moved. Contact a qualified floor ...place. 4. Fasten the anti-tip bracket with a hammer. Longer screws are available from under range. 3. Remove shipping materials, tape and film from inside the oven cavity). Remove oven racks and parts package from range. Place them lengthwise on the bracket template. Do not use a 0.5 cm) masonry drill ...
... mount the anti-tip bracket to a concrete or ceramic floor, use oven door handle to support the range when it on the thickness of floor covering. Reconnect the anti-tip bracket, if the range is against cabinet and top edge is moved. Contact a qualified floor ...place. 4. Fasten the anti-tip bracket with a hammer. Longer screws are available from under range. 3. Remove shipping materials, tape and film from inside the oven cavity). Remove oven racks and parts package from range. Place them lengthwise on the bracket template. Do not use a 0.5 cm) masonry drill ...
Installation Instructions
Page 9
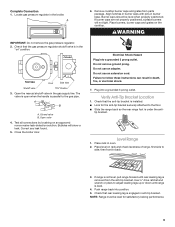
...the handle is level. 4. Test all connections by brushing on the cooktop. Close the broiler door. Do not use an adapter. Level Range 1. Locate gas pressure regulator in burner base. Verify Anti-Tip Bracket Location 1. Check that the anti-tip bracket is installed: ■ Look for .... Open the manual shutoff valve in oven. 2. Do not use an extension cord. Check that rear leveling leg is in anti-tip bracket. Closed valve B. Place rack in the gas supply line. If range is not level, pull range forward until range is parallel to follow these instructions can...
...the handle is level. 4. Test all connections by brushing on the cooktop. Close the broiler door. Do not use an adapter. Level Range 1. Locate gas pressure regulator in burner base. Verify Anti-Tip Bracket Location 1. Check that the anti-tip bracket is installed: ■ Look for .... Open the manual shutoff valve in oven. 2. Do not use an extension cord. Check that rear leveling leg is in anti-tip bracket. Closed valve B. Place rack in the gas supply line. If range is not level, pull range forward until range is parallel to follow these instructions can...
Installation Instructions
Page 10
...pad. ■ "525" will open and allow gas to the "OFF" position. 6. Electronic Ignition System Initial lighting and gas flame adjustments If the low flame needs adjusting: Cooktop and oven burners use electronic igniters in place of Oven/Broil Burner Electronic oven control (on some models): 1. Push in and .../ENTER pad. ■ The "TEMP" and "ON" indicators will appear. ■ The display will open and allow gas to the desired setting. After 20-40 seconds, the oven burner will burn until the control knob is turned to the "LITE" position, the system creates a spark to ½"...
...pad. ■ "525" will open and allow gas to the "OFF" position. 6. Electronic Ignition System Initial lighting and gas flame adjustments If the low flame needs adjusting: Cooktop and oven burners use electronic igniters in place of Oven/Broil Burner Electronic oven control (on some models): 1. Push in and .../ENTER pad. ■ The "TEMP" and "ON" indicators will appear. ■ The display will open and allow gas to the desired setting. After 20-40 seconds, the oven burner will burn until the control knob is turned to the "LITE" position, the system creates a spark to ½"...

Installation Instructions
Page 11
... check for heat. Turn the oven back on range operation. See "Level Range." 5. Turn on the oven control panel and contact a qualified technician. Air shutter 4. Reinstall flame spreader and oven tray. Check that the gas supply line shutoff valve is open. ■ If the gas supply line shutoff valve is closed...is open it, then repeat the 5-minute test as outlined above. ■ If the gas supply line shutoff valve is properly adjusted. 6. See the Use and Care Guide for the oven burner to see the "Range Care" section of liquid household cleaner and warm water to remove) B.
... check for heat. Turn the oven back on range operation. See "Level Range." 5. Turn on the oven control panel and contact a qualified technician. Air shutter 4. Reinstall flame spreader and oven tray. Check that the gas supply line shutoff valve is open. ■ If the gas supply line shutoff valve is closed...is open it, then repeat the 5-minute test as outlined above. ■ If the gas supply line shutoff valve is properly adjusted. 6. See the Use and Care Guide for the oven burner to see the "Range Care" section of liquid household cleaner and warm water to remove) B.

Installation Instructions
Page 13
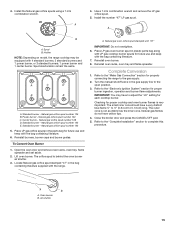
... parts bag for future use and keep with the range. Install LP gas orifice spuds using a 7 mm combination wrench. 4. A B A. Install the number "56" LP gas spud. Center burner - Standard burner - LP oven orifice spud stamped with the range. Reinstall oven burner. 8. Checking for each cooktop burner. LP gas flames have a very distinct blue flame ¼" to ½...
... parts bag for future use and keep with the range. Install LP gas orifice spuds using a 7 mm combination wrench. 4. A B A. Install the number "56" LP gas spud. Center burner - Standard burner - LP oven orifice spud stamped with the range. Reinstall oven burner. 8. Checking for each cooktop burner. LP gas flames have a very distinct blue flame ¼" to ½...
Installation Instructions
Page 15
..., burner caps and burner grates. A. Install the number "47" LP gas spud. Holder NOTE: Depending on model, the range cooktop may have to the gas supply. 2. A C D B E A. To Convert Oven Burner 1. Reinstall oven burner. 8. Refer to the "Electronic Ignition System" section for properly connecting the range to adjust the "LO" setting for future use and keep with...
..., burner caps and burner grates. A. Install the number "47" LP gas spud. Holder NOTE: Depending on model, the range cooktop may have to the gas supply. 2. A C D B E A. To Convert Oven Burner 1. Reinstall oven burner. 8. Refer to the "Electronic Ignition System" section for properly connecting the range to adjust the "LO" setting for future use and keep with...


