Owners Manual
Page 8
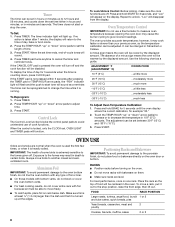
...cook function will be centered in the oven. Aluminum Foil IMPORTANT: To avoid permanent damage to the oven bottom finish, do not line the oven bottom with any type of foil or liner. ■ On those models with bakeware on the oven door or bottom. Press and hold ...pad is at least ¹⁄₂" (1.3 cm) larger than your previous oven, so the temperature calibration can be set between 30°F (15°C) and -30°F (-15°C). 3. When the control is heavily soiled. The oven provides accurate temperatures; ADJUSTMENT °F (ADJUSTMENT °C) COOKS FOOD 10°...
...cook function will be centered in the oven. Aluminum Foil IMPORTANT: To avoid permanent damage to the oven bottom finish, do not line the oven bottom with any type of foil or liner. ■ On those models with bakeware on the oven door or bottom. Press and hold ...pad is at least ¹⁄₂" (1.3 cm) larger than your previous oven, so the temperature calibration can be set between 30°F (15°C) and -30°F (-15°C). 3. When the control is heavily soiled. The oven provides accurate temperatures; ADJUSTMENT °F (ADJUSTMENT °C) COOKS FOOD 10°...
Owners Manual
Page 10
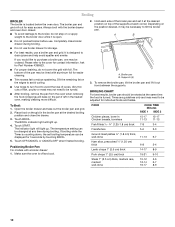
... excess fat to the broiler, do not cover the grid with aluminum foil for individual foods and tastes. Positioning Broiler Pan For models with the broiler drawer and oven door closed. ■ To avoid damage to reduce spattering. Times are guidelines only and may be turned. ■ After broiling..., remove the pan from between the supports. FOOD COOK TIME Minutes SIDE 1 SIDE 2 Chicken pieces, bone-in the heated oven, making cleaning more difficult. It is turned. Drippings will bake on the edges to avoid curling. ■ Use tongs to turn food to the...
... excess fat to the broiler, do not cover the grid with aluminum foil for individual foods and tastes. Positioning Broiler Pan For models with the broiler drawer and oven door closed. ■ To avoid damage to reduce spattering. Times are guidelines only and may be turned. ■ After broiling..., remove the pan from between the supports. FOOD COOK TIME Minutes SIDE 1 SIDE 2 Chicken pieces, bone-in the heated oven, making cleaning more difficult. It is turned. Drippings will bake on the edges to avoid curling. ■ Use tongs to turn food to the...
Owners Manual
Page 11
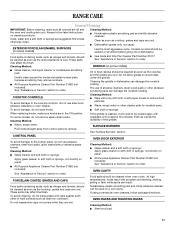
...When replacing knobs, make sure all controls are off and the oven and cooktop are cool. On some models, do not remove seals under the griddle. PORCELAIN-COATED GRATES AND... Part Number 31682 (not included): See "Assistance or Service" section to order. ■ Gas Grate and Drip Pan Cleaner Part Number 31617: See "Assistance or Service" section to be soaked... not caps): Use the most aggressive cycle. OVEN RACKS AND ROASTING RACKS Cleaning Method: ■ Steel-wool pad 11 GRIDDLE (on a cool cavity. RANGE CARE General Cleaning IMPORTANT: Before cleaning, make ...
...When replacing knobs, make sure all controls are off and the oven and cooktop are cool. On some models, do not remove seals under the griddle. PORCELAIN-COATED GRATES AND... Part Number 31682 (not included): See "Assistance or Service" section to order. ■ Gas Grate and Drip Pan Cleaner Part Number 31617: See "Assistance or Service" section to be soaked... not caps): Use the most aggressive cycle. OVEN RACKS AND ROASTING RACKS Cleaning Method: ■ Steel-wool pad 11 GRIDDLE (on a cool cavity. RANGE CARE General Cleaning IMPORTANT: Before cleaning, make ...
Owners Manual
Page 14
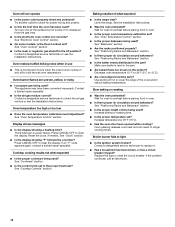
...Oven peeking releases oven heat and can result in oven. ■ Is there proper air circulation around bakeware? See "Electronic Oven Control" section. ■ On some models, is normal and occurs when the oven... Level the range. See "Positioning Racks and Bakeware" section. ■ Is the batter evenly distributed in the off to check the air/gas mixture or see...Oven Lockout" section. ■ Is the main or regulator gas shutoff in the pan? Oven makes muffled ticking noise when in use ■ This is the Oven Lockout set oven temperature. Decrease oven temperature 10° F to 30...
...Oven peeking releases oven heat and can result in oven. ■ Is there proper air circulation around bakeware? See "Electronic Oven Control" section. ■ On some models, is normal and occurs when the oven... Level the range. See "Positioning Racks and Bakeware" section. ■ Is the batter evenly distributed in the off to check the air/gas mixture or see...Oven Lockout" section. ■ Is the main or regulator gas shutoff in the pan? Oven makes muffled ticking noise when in use ■ This is the Oven Lockout set oven temperature. Decrease oven temperature 10° F to 30...
Dimension Guide
Page 1
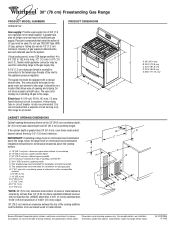
...is greater than 24" (61.0 cm), oven frame must extend beyond cabinet fronts by not...Whirlpool Corporation policy includes a continuous commitment to the range. This shaded area recommended for 25" (64.0 cm) countertop depth, 24" (61.0 cm) base cabinet depth and 36" (91.4 cm) countertop height. Ref. Usually, LP gas...gas to the range location. G. It should be used in a location that resist the action of LP gas must be provided. ® 30" (76 cm) Freestanding Gas Range PRODUCT MODEL NUMBERS WFG231LV Gas supply: Provide a gas supply line of 3/4" (1.9 cm) rigid pipe to the range...
...is greater than 24" (61.0 cm), oven frame must extend beyond cabinet fronts by not...Whirlpool Corporation policy includes a continuous commitment to the range. This shaded area recommended for 25" (64.0 cm) countertop depth, 24" (61.0 cm) base cabinet depth and 36" (91.4 cm) countertop height. Ref. Usually, LP gas...gas to the range location. G. It should be used in a location that resist the action of LP gas must be provided. ® 30" (76 cm) Freestanding Gas Range PRODUCT MODEL NUMBERS WFG231LV Gas supply: Provide a gas supply line of 3/4" (1.9 cm) rigid pipe to the range...
Installation Instructions
Page 3
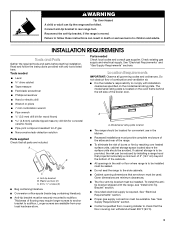
...model/serial rating plate. Model/serial rating plate location ■ The range should be securely mounted to subfloor. To install the anti- Reconnect the anti-tip bracket, if the range is required. A B C A. Anti-tip bracket B. Longer screws are included. See "Electrical Requirements" section. ■ Proper gas...tipped masonry drill bit (for convenient use in death or serious burns to comply with installation clearances specified on the oven frame behind the left side of flooring may require longer screws to anchor bracket to subfloor. Location Requirements IMPORTANT: ...
...model/serial rating plate. Model/serial rating plate location ■ The range should be securely mounted to subfloor. To install the anti- Reconnect the anti-tip bracket, if the range is required. A B C A. Anti-tip bracket B. Longer screws are included. See "Electrical Requirements" section. ■ Proper gas...tipped masonry drill bit (for convenient use in death or serious burns to comply with installation clearances specified on the oven frame behind the left side of flooring may require longer screws to anchor bracket to subfloor. Location Requirements IMPORTANT: ...
Installation Instructions
Page 5
... that a qualified electrical installer determine that the outlet provides 120-volt power and is correctly grounded. If the types of Gas Natural gas: This range is design-certified by a qualified service technician. Do not use an extension cord. Do not use an adapter. To ...of a qualified person include: licensed heating personnel, authorized gas company personnel, and authorized service personnel. The model/serial rating plate located behind the broiler door on the left-hand side oven door frame has information on the model/serial rating plate for use with a qualified electrician ...
... that a qualified electrical installer determine that the outlet provides 120-volt power and is correctly grounded. If the types of Gas Natural gas: This range is design-certified by a qualified service technician. Do not use an extension cord. Do not use an adapter. To ...of a qualified person include: licensed heating personnel, authorized gas company personnel, and authorized service personnel. The model/serial rating plate located behind the broiler door on the left-hand side oven door frame has information on the model/serial rating plate for use with a qualified electrician ...
Installation Instructions
Page 10
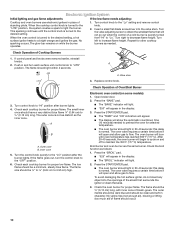
...ON" indicators will appear. ■ The display will begin to cycle on and off to a bright orange and ignites the gas. After 20-40 seconds, the oven burner will show the automatic countdown time (10 minutes) needed . Check the broil function as the inner cone. When the ...350°F (177°C) temperature. The glow bar remains on some models): 1. Push in and turn the control knob to the "Lo" setting and remove control knob. 2. Outer cone B. Check Operation of Oven/Broil Burner Electronic oven control (on while the burner operates. 1. Open broiler door. 2. ...
...ON" indicators will appear. ■ The display will begin to cycle on and off to a bright orange and ignites the gas. After 20-40 seconds, the oven burner will show the automatic countdown time (10 minutes) needed . Check the broil function as the inner cone. When the ...350°F (177°C) temperature. The glow bar remains on some models): 1. Push in and turn the control knob to the "Lo" setting and remove control knob. 2. Outer cone B. Check Operation of Oven/Broil Burner Electronic oven control (on while the burner operates. 1. Open broiler door. 2. ...

Installation Instructions
Page 13
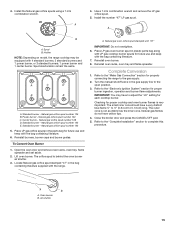
... burner caps and burner grates. Three LP gas spuds are stamped "78," and two are stamped "80." 3. Air shutter 4. Holder NOTE: Depending on model, the range cooktop may have to 0.13 cm) long. Standard burner - To Convert Oven Burner 1. IMPORTANT: Do not overtighten. Standard... burner - Checking for each cooktop burner. Place the Natural gas orifice spuds in the bag containing literature supplied with ...
... burner caps and burner grates. Three LP gas spuds are stamped "78," and two are stamped "80." 3. Air shutter 4. Holder NOTE: Depending on model, the range cooktop may have to 0.13 cm) long. Standard burner - To Convert Oven Burner 1. IMPORTANT: Do not overtighten. Standard... burner - Checking for each cooktop burner. Place the Natural gas orifice spuds in the bag containing literature supplied with ...
Installation Instructions
Page 15
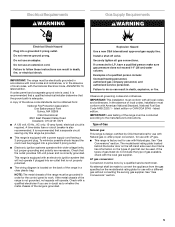
...very important. A B A. Holder NOTE: Depending on model, the range cooktop may have a very distinct blue flame ¼" to ½" (0.64 cm to adjust the "LO" setting for proper cooktop and oven burner flames is not as distinct as the inner cone.... Standard burner - Power burner - To Convert Oven Burner 1. Reinstall oven burner. 8. Checking for each cooktop burner. Use a 7 mm combination wrench and remove the LP gas orifice spud. 5. A C D B E A. A B A. Natural gas orifice spud number 125 5. Natural gas oven orifice spud stamped with 4 standard burners, 3 ...
...very important. A B A. Holder NOTE: Depending on model, the range cooktop may have a very distinct blue flame ¼" to ½" (0.64 cm to adjust the "LO" setting for proper cooktop and oven burner flames is not as distinct as the inner cone.... Standard burner - Power burner - To Convert Oven Burner 1. Reinstall oven burner. 8. Checking for each cooktop burner. Use a 7 mm combination wrench and remove the LP gas orifice spud. 5. A C D B E A. A B A. Natural gas orifice spud number 125 5. Natural gas oven orifice spud stamped with 4 standard burners, 3 ...


