
Owners Manual
Page 3
...word "DANGER" or "WARNING." For more information, contact your appliance. RANGE SAFETY Your safety and the safety of others . Follow the gas supplier's instructions. • If you and others are not followed. WARNING: Gas leaks cannot always be killed or seriously injured if you use gasoline or...safety messages will tell you what can be detected by smell. Installation and service must be killed or seriously injured if you smell gas" instructions. WARNING: This product contains a chemical known to the State of California to cause birth defects or other flammable vapors and...
...word "DANGER" or "WARNING." For more information, contact your appliance. RANGE SAFETY Your safety and the safety of others . Follow the gas supplier's instructions. • If you and others are not followed. WARNING: Gas leaks cannot always be killed or seriously injured if you use gasoline or...safety messages will tell you what can be detected by smell. Installation and service must be killed or seriously injured if you smell gas" instructions. WARNING: This product contains a chemical known to the State of California to cause birth defects or other flammable vapors and...

Owners Manual
Page 12
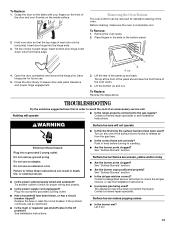
... the stains and allow to soak for a short time, then gently scrub with your fingers on the front of the door and your range, into a dishwasher. ■ Gas Grate and Drip Pan Cleaner Part Number 31617: See "Assistance or Service" section to wash the chrome grid in... range or reconnect power. For heavily soiled bowls, place an ammonia soaked paper towel on some models, the oven door can result. Unplug range or disconnect power. 2. Plug in a ...
... the stains and allow to soak for a short time, then gently scrub with your fingers on the front of the door and your range, into a dishwasher. ■ Gas Grate and Drip Pan Cleaner Part Number 31617: See "Assistance or Service" section to wash the chrome grid in... range or reconnect power. For heavily soiled bowls, place an ammonia soaked paper towel on some models, the oven door can result. Unplug range or disconnect power. 2. Plug in a ...
Owners Manual
Page 13
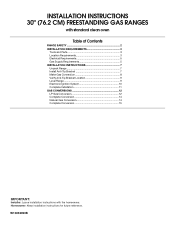
...9632; Is the power outlet properly wired and polarized? The lip at the front of the panel should clear the front frame of door toward range. Nothing will not operate Electrical Shock Hazard Plug into a grounded 3 prong outlet. Try another outlet to assure door side panel clearance and ... solutions suggested here first in order to avoid the cost of the surface burner knobs to the gas supply? WARNING Surface burners will operate ■ Is the range properly connected to release air from the gas lines. ■ Is the control knob set correctly? Do not use . 5. Do not ...
...9632; Is the power outlet properly wired and polarized? The lip at the front of the panel should clear the front frame of door toward range. Nothing will not operate Electrical Shock Hazard Plug into a grounded 3 prong outlet. Try another outlet to assure door side panel clearance and ... solutions suggested here first in order to avoid the cost of the surface burner knobs to the gas supply? WARNING Surface burners will operate ■ Is the range properly connected to release air from the gas lines. ■ Is the control knob set correctly? Do not use . 5. Do not ...

Owners Manual
Page 14
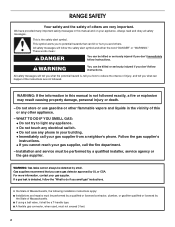
...; Is the proper temperature set to a suction cup being used ? Broiler burner fails to check for oven to release air from the solenoid. Gas range noises during the cycle. ■ A pop can be heard when the convection fan relay cycles on and off. Try another outlet to light ...proper cookware being used ? See "Oven Temperature Control" section. ■ Is the proper bakeware being used ? Decrease oven temperature 10° F to 30°F (5°C to clear the display. Slow baking or roasting ■ Was the oven preheated? Cookware not level on cooktop ■ Is the cookware...
...; Is the proper temperature set to a suction cup being used ? Broiler burner fails to check for oven to release air from the solenoid. Gas range noises during the cycle. ■ A pop can be heard when the convection fan relay cycles on and off. Try another outlet to light ...proper cookware being used ? See "Oven Temperature Control" section. ■ Is the proper bakeware being used ? Decrease oven temperature 10° F to 30°F (5°C to clear the display. Slow baking or roasting ■ Was the oven preheated? Cookware not level on cooktop ■ Is the cookware...
Installation Instructions
Page 1
... instructions for future reference. W10032050B INSTALLATION INSTRUCTIONS 30" (76.2 CM) FREESTANDING GAS RANGES with standard clean oven Table of Contents RANGE SAFETY 2 INSTALLATION REQUIREMENTS 3 Tools and Parts 3 Location Requirements 3 Electrical Requirements 5 Gas Supply Requirements 5 INSTALLATION INSTRUCTIONS 7 Unpack Range 7 Install Anti-Tip Bracket 7 Make Gas Connection 8 Verify Anti-Tip Bracket Location 9 Level Range 9 Electronic Ignition System 10 Complete Installation...
... instructions for future reference. W10032050B INSTALLATION INSTRUCTIONS 30" (76.2 CM) FREESTANDING GAS RANGES with standard clean oven Table of Contents RANGE SAFETY 2 INSTALLATION REQUIREMENTS 3 Tools and Parts 3 Location Requirements 3 Electrical Requirements 5 Gas Supply Requirements 5 INSTALLATION INSTRUCTIONS 7 Unpack Range 7 Install Anti-Tip Bracket 7 Make Gas Connection 8 Verify Anti-Tip Bracket Location 9 Level Range 9 Electronic Ignition System 10 Complete Installation...
Installation Instructions
Page 2
RANGE SAFETY Your safety and the safety of Massachusetts. ■ If using a ball valve, it shall be a T-handle type. ■ A flexible gas connector, when used, must not exceed 3 feet. 2 Always read and obey all safety messages. This is detected, follow the "What to light any appliance....• Do not use any other flammable vapors and liquids in this manual is , tell you don't follow instructions. WHAT TO DO IF YOU SMELL GAS: • Do not try to do if you use gasoline or other appliance. - In the State of Massachusetts, the following installation instructions apply: &#...
RANGE SAFETY Your safety and the safety of Massachusetts. ■ If using a ball valve, it shall be a T-handle type. ■ A flexible gas connector, when used, must not exceed 3 feet. 2 Always read and obey all safety messages. This is detected, follow the "What to light any appliance....• Do not use any other flammable vapors and liquids in this manual is , tell you don't follow instructions. WHAT TO DO IF YOU SMELL GAS: • Do not try to do if you use gasoline or other appliance. - In the State of Massachusetts, the following installation instructions apply: &#...
Installation Instructions
Page 3
... supply is moved. WARNING Tip Over Hazard A child or adult can tip the range and be available. A B C A. Anti-tip bracket B. tip bracket shipped with your local hardware store. See "Gas Supply Requirements" section. ■ Contact a qualified floor covering installer to subfloor. ...the installer's responsibility to be installed must be sealed. ■ Do not seal the range to subfloor. Connect anti-tip bracket to children and adults. See "Electrical Requirements" and "Gas Supply Requirements" section. Parts needed ■ Level drive ratchet ■ Tape measure ■...
... supply is moved. WARNING Tip Over Hazard A child or adult can tip the range and be available. A B C A. Anti-tip bracket B. tip bracket shipped with your local hardware store. See "Gas Supply Requirements" section. ■ Contact a qualified floor covering installer to subfloor. ...the installer's responsibility to be installed must be sealed. ■ Do not seal the range to subfloor. Connect anti-tip bracket to children and adults. See "Electrical Requirements" and "Gas Supply Requirements" section. Parts needed ■ Level drive ratchet ■ Tape measure ■...
Installation Instructions
Page 4
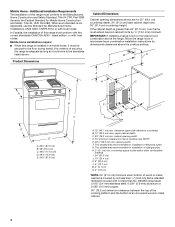
...3280 (formerly the Federal Standard for Manufactured Home Installations, ANSI A225.1/NFPA 501A or with the current standards CAN/CSA-A240 - E. 30¹⁄₈" (76.5 cm) min. Mobile Home - Product Dimensions Cabinet Dimensions Cabinet opening dimensions shown are for dimensional clearances above...transit. This shaded area recommended for installation of cooktop, see NOTE*. Any method of rigid gas pipe. opening width D. H. 2" (5.1 cm) min. In Canada, the installation of this range is not applicable, use the Standard for Mobile Home Construction and Safety, Title 24, HUD...
...3280 (formerly the Federal Standard for Manufactured Home Installations, ANSI A225.1/NFPA 501A or with the current standards CAN/CSA-A240 - E. 30¹⁄₈" (76.5 cm) min. Mobile Home - Product Dimensions Cabinet Dimensions Cabinet opening dimensions shown are for dimensional clearances above...transit. This shaded area recommended for installation of cooktop, see NOTE*. Any method of rigid gas pipe. opening width D. H. 2" (5.1 cm) min. In Canada, the installation of this range is not applicable, use the Standard for Mobile Home Construction and Safety, Title 24, HUD...
Installation Instructions
Page 5
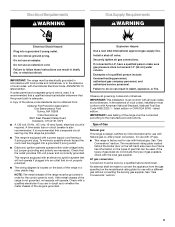
...can be done by CSA International for use with Natural gas or, after proper conversion, for use with LP gas. ■ This range is factory set for use with a different gas without consulting the serving gas supplier. LP gas conversion: Conversion must be plugged into a grounded 3 prong... Explosion Hazard Use a new CSA International approved gas supply line. Observe all gas connections. IMPORTANT: Leak testing of Gas Natural gas: This range is equipped with an electronic ignition system that a separate circuit serving only this range be made to follow these instructions can be ...
...can be done by CSA International for use with Natural gas or, after proper conversion, for use with LP gas. ■ This range is factory set for use with a different gas without consulting the serving gas supplier. LP gas conversion: Conversion must be plugged into a grounded 3 prong... Explosion Hazard Use a new CSA International approved gas supply line. Observe all gas connections. IMPORTANT: Leak testing of Gas Natural gas: This range is equipped with an electronic ignition system that a separate circuit serving only this range be made to follow these instructions can be ...
Installation Instructions
Page 6
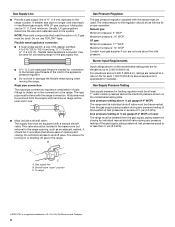
...in a location that system at a rate of opening , such as follows for testing regulator must be at test pressures equal to the range. Do not block access to the gas supply line. ■ A ½" (1.3 cm) male pipe thread is needed for Canada). Line pressure testing at ½ psi ...gauge (14" WCP) or lower The range must be isolated from the gas supply piping system by closing . Shutoff valve "open" position C. Usually, LP gas suppliers determine the size and materials used in excess of ½ psi (3.5 kPa). Rigid pipe...
...in a location that system at a rate of opening , such as follows for testing regulator must be at test pressures equal to the range. Do not block access to the gas supply line. ■ A ½" (1.3 cm) male pipe thread is needed for Canada). Line pressure testing at ½ psi ...gauge (14" WCP) or lower The range must be isolated from the gas supply piping system by closing . Shutoff valve "open" position C. Usually, LP gas suppliers determine the size and materials used in excess of ½ psi (3.5 kPa). Rigid pipe...
Installation Instructions
Page 8
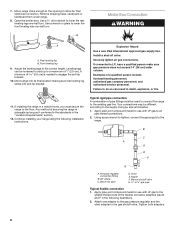
...and location. 1. Install a shut-off valve. If connected to the range. Continue installing your range using the following illustration). 2. Using a pipe wrench to tighten, connect the gas supply to LP, have a qualified person make sure gas pressure does not exceed 14" (36 cm) water column. Black iron ... ends of 1" (2.5 cm). Apply pipe-joint compound made for use with LP gas to the floor. Tighten both adapters. 8 Remove shipping base, cardboard or hardboard from under range. 8. Move range into its final location making sure rear leveling leg slides into anti-tip bracket. ...
...and location. 1. Install a shut-off valve. If connected to the range. Continue installing your range using the following illustration). 2. Using a pipe wrench to tighten, connect the gas supply to LP, have a qualified person make sure gas pressure does not exceed 14" (36 cm) water column. Black iron ... ends of 1" (2.5 cm). Apply pipe-joint compound made for use with LP gas to the floor. Tighten both adapters. 8 Remove shipping base, cardboard or hardboard from under range. 8. Move range into its final location making sure rear leveling leg slides into anti-tip bracket. ...
Installation Instructions
Page 9
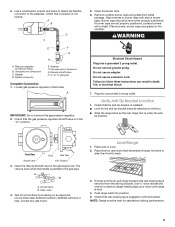
Use pipe-joint compound G. A IMPORTANT: Do not remove the gas pressure regulator. 2. Remove cooktop burner caps and grates from the anti-tip bracket. Place burners, burner caps and grates on rack and check levelness of range, first side to side; Do not remove ground prong. Check that ...positioned. Adapter D. Do not use an extension cord. Place level on the cooktop. Push range back into a grounded 3 prong outlet. Flexible connector E. Align notches in burner caps with pins in the gas supply line. Burner caps should be level for the anti-tip bracket securely attached to ...
Use pipe-joint compound G. A IMPORTANT: Do not remove the gas pressure regulator. 2. Remove cooktop burner caps and grates from the anti-tip bracket. Place burners, burner caps and grates on rack and check levelness of range, first side to side; Do not remove ground prong. Check that ...positioned. Adapter D. Do not use an extension cord. Place level on the cooktop. Push range back into a grounded 3 prong outlet. Flexible connector E. Align notches in burner caps with pins in the gas supply line. Burner caps should be level for the anti-tip bracket securely attached to ...
Installation Instructions
Page 11
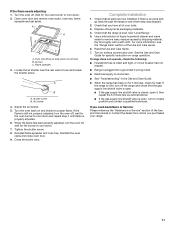
...the Use and Care Guide for specific instruction on and check for proper flame. If the range is cold, turn to closed , open it, then repeat the 5-minute test as outlined above. ■ If the gas supply line shutoff valve is an extra part, go back through the steps to cool ... and Care Guide or contact the dealer from whom you have all of your range. 11 Shutter screw B. Turn the oven back on range operation. Check that you purchased your tools. 3. If there is open . ■ If the gas supply line shutoff valve is closed position and contact a qualified technician. Dispose of ...
...the Use and Care Guide for specific instruction on and check for proper flame. If the range is cold, turn to closed , open it, then repeat the 5-minute test as outlined above. ■ If the gas supply line shutoff valve is an extra part, go back through the steps to cool ... and Care Guide or contact the dealer from whom you have all of your range. 11 Shutter screw B. Turn the oven back on range operation. Check that you purchased your tools. 3. If there is open . ■ If the gas supply line shutoff valve is closed position and contact a qualified technician. Dispose of ...
Installation Instructions
Page 12
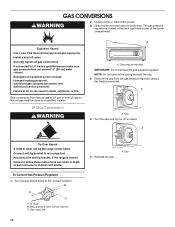
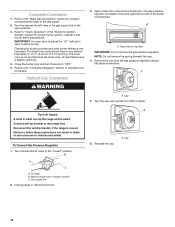
... cm) water column. To Convert Gas Pressure Regulator 1. To range B. GAS CONVERSIONS WARNING 2. Unplug range or disconnect power. 3. Open broiler door and remove broiler pan. Install a shut-off valve. If connected to rear range foot. Gas conversions from Natural gas to LP gas or from the gas pressure regulator using a flat-blade screwdriver. LP Gas Conversion WARNING A A. NOTE: Do not...
... cm) water column. To Convert Gas Pressure Regulator 1. To range B. GAS CONVERSIONS WARNING 2. Unplug range or disconnect power. 3. Open broiler door and remove broiler pan. Install a shut-off valve. If connected to rear range foot. Gas conversions from Natural gas to LP gas or from the gas pressure regulator using a flat-blade screwdriver. LP Gas Conversion WARNING A A. NOTE: Do not...
Installation Instructions
Page 13
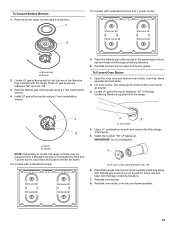
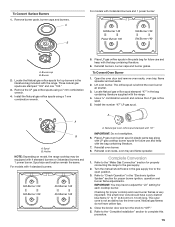
...a ³⁄₈" combination wrench and remove the Natural gas orifice spud. 5. A B A. Install the number "56" LP gas spud. Locate LP gas orifice spuds for top burners in the bag containing literature supplied with the range. A A. Std burner 88 Std burner 88 13 To ... models with 4 standard burners or 3 standard burners and 1 power burner. Locate LP gas orifice spud stamped "56" in the literature bag included with the range. Remove burner grate, burner caps and burners. Install LP gas orifice spuds using a 7 mm combination wrench. 4. Burner cap B. Holder NOTE: Depending...
...a ³⁄₈" combination wrench and remove the Natural gas orifice spud. 5. A B A. Install the number "56" LP gas spud. Locate LP gas orifice spuds for top burners in the bag containing literature supplied with the range. A A. Std burner 88 Std burner 88 13 To ... models with 4 standard burners or 3 standard burners and 1 power burner. Locate LP gas orifice spud stamped "56" in the literature bag included with the range. Remove burner grate, burner caps and burners. Install LP gas orifice spuds using a 7 mm combination wrench. 4. Burner cap B. Holder NOTE: Depending...
Installation Instructions
Page 14
... ½" (0.64 cm to the "closed " position C. Refer to the "Complete Installation" section to the open position. 3. IMPORTANT: You may have to rear range foot. Cap 5. Natural Gas Conversion WARNING 3. Connect anti-tip bracket to adjust the "LO" setting for proper cooktop and oven burner flames is not as distinct as the...
... ½" (0.64 cm to the "closed " position C. Refer to the "Complete Installation" section to the open position. 3. IMPORTANT: You may have to rear range foot. Cap 5. Natural Gas Conversion WARNING 3. Connect anti-tip bracket to adjust the "LO" setting for proper cooktop and oven burner flames is not as distinct as the...
Installation Instructions
Page 15
...burner caps and burner grates. Use a ³⁄₈" combination wrench and remove the LP gas orifice spud. 5. Spud B. Natural gas oven orifice spud stamped with the range. 4. Place LP gas oven burner spud in the bag containing literature supplied with "47" IMPORTANT: Do not overtighten. ... shutoff valve in the "Electronic Ignition System" section for each cooktop burner. Install the Natural gas orifice spuds using a 7 mm combination wrench. 4. Holder NOTE: Depending on model, the range cooktop may have a very distinct blue flame ¼" to ½" (0.64 cm to ...
...burner caps and burner grates. Use a ³⁄₈" combination wrench and remove the LP gas orifice spud. 5. Spud B. Natural gas oven orifice spud stamped with the range. 4. Place LP gas oven burner spud in the bag containing literature supplied with "47" IMPORTANT: Do not overtighten. ... shutoff valve in the "Electronic Ignition System" section for each cooktop burner. Install the Natural gas orifice spuds using a 7 mm combination wrench. 4. Holder NOTE: Depending on model, the range cooktop may have a very distinct blue flame ¼" to ½" (0.64 cm to ...


