Owners Manual
Page 3
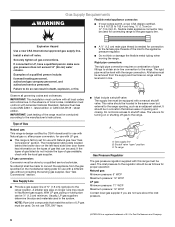
... that can happen if the instructions are very important. All safety messages will follow the safety alert symbol and either the word "DANGER" or "WARNING." RANGE SAFETY Your safety and the safety of others . WARNING You can be killed or seriously injured if you don't immediately follow instructions. The California Safe...
... that can happen if the instructions are very important. All safety messages will follow the safety alert symbol and either the word "DANGER" or "WARNING." RANGE SAFETY Your safety and the safety of others . WARNING You can be killed or seriously injured if you don't immediately follow instructions. The California Safe...
Owners Manual
Page 4
...s Top burner flame size should be electrically grounded in accordance with the National Electrical Code, ANSI/NFPA 70. However, the range can tip the range and be seriously injured. Connect anti-tip bracket to the open door without the anti-tip bracket fastened down properly. Reconnect ...the anti-tip bracket, if the range is properly installed and grounded by a qualified technician. s WARNING: NEVER cover any slots, holes or passages in carbon monoxide poisoning and...
...s Top burner flame size should be electrically grounded in accordance with the National Electrical Code, ANSI/NFPA 70. However, the range can tip the range and be seriously injured. Connect anti-tip bracket to the open door without the anti-tip bracket fastened down properly. Reconnect ...the anti-tip bracket, if the range is properly installed and grounded by a qualified technician. s WARNING: NEVER cover any slots, holes or passages in carbon monoxide poisoning and...
Owners Manual
Page 5
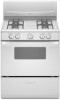
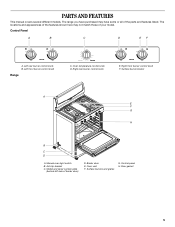
... have some or all of the parts and features listed. Right front burner control knob F. The range you have purchased may not match those of broiler door) D. Anti-tip bracket C. Left front burner control knob Range 140 170 200 BROIL 250 550 300 500 350 400 450 C. Surface burners and grates G. Door...
... have some or all of the parts and features listed. Right front burner control knob F. The range you have purchased may not match those of broiler door) D. Anti-tip bracket C. Left front burner control knob Range 140 170 200 BROIL 250 550 300 500 350 400 450 C. Surface burners and grates G. Door...
Owners Manual
Page 10
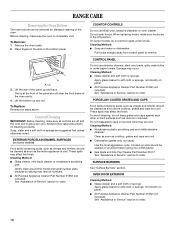
... sponge, not directly on cleaning products. CONTROL PANEL Do not use steel wool, abrasive cleansers or oven cleaner. Cooked-on burners while they are cool. A A. RANGE CARE Removing the Oven Bottom The oven bottom can be soaked or scrubbed before going into a dishwasher. These spills may affect the finish.
... sponge, not directly on cleaning products. CONTROL PANEL Do not use steel wool, abrasive cleansers or oven cleaner. Cooked-on burners while they are cool. A A. RANGE CARE Removing the Oven Bottom The oven bottom can be soaked or scrubbed before going into a dishwasher. These spills may affect the finish.
Owners Manual
Page 11
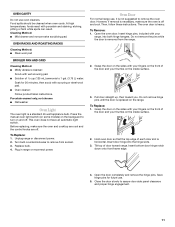
... product label instructions. Press the manual oven light switch (on some models) on the backguard to turn on the inside surface. 3. Plug in range or reconnect power. Then, follow these instructions. Grasp the door on the sides with scouring or steel-wool pad. To Replace: 1. Tilt top... a standard 40-watt appliance bulb. Porcelain enamel only, not chrome s Dishwasher Oven Light The oven light is not suggested to remove from the range. 2. Open the oven door. Open the door completely and remove the hinge pins. This oven does not have an automatic light switch. Do ...
... product label instructions. Press the manual oven light switch (on some models) on the backguard to turn on the inside surface. 3. Plug in range or reconnect power. Then, follow these instructions. Grasp the door on the sides with scouring or steel-wool pad. To Replace: 1. Tilt top... a standard 40-watt appliance bulb. Porcelain enamel only, not chrome s Dishwasher Oven Light The oven light is not suggested to remove from the range. 2. Open the oven door. Open the door completely and remove the hinge pins. This oven does not have an automatic light switch. Do ...
Owners Manual
Page 12
...air/gas mixture correct? Contact a designated service technician to check the air/gas mixture, or see the Installation Instructions. Level the range. Try another outlet to check the air/gas mixture or see the Installation Instructions. Oven makes muffled ticking noise when in use...? s Is the control knob set correctly? The appliance may have been converted improperly. Excessive heat around cookware on cooktop s Is the range level? See "Cooktop/Oven Temperature Controls" section. s Is the control knob set oven temperature. See Installation Instructions. See "Cookware" section....
...air/gas mixture correct? Contact a designated service technician to check the air/gas mixture, or see the Installation Instructions. Level the range. Try another outlet to check the air/gas mixture or see the Installation Instructions. Oven makes muffled ticking noise when in use...? s Is the control knob set correctly? The appliance may have been converted improperly. Excessive heat around cookware on cooktop s Is the range level? See "Cooktop/Oven Temperature Controls" section. s Is the control knob set oven temperature. See Installation Instructions. See "Cookware" section....
Dimension Guide
Page 1
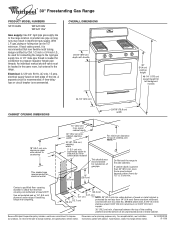
... (0.5 mm) copper. 30" (76.2 cm) min. For complete details, see NOTE.*** 24" (61 cm) This shaded area recommended for connecting the range to improve Dimensions are for tall backguard models CABINET OPENING DIMENSIONS 24-1/4" (61.6 cm) 29-7/8" (75.9 cm) width 18" (45.7 cm) min. ... Installation our products, we reserve the right to change without notice. Because Whirlpool Corporation policy includes a continuous commitment to the rigid gas supply line. ® 30" Freestanding Gas Range PRODUCT MODEL NUMBERS SF110AXS WFG110AV WFG111SV Gas supply: Use 3/4" rigid pipe gas...
... (0.5 mm) copper. 30" (76.2 cm) min. For complete details, see NOTE.*** 24" (61 cm) This shaded area recommended for connecting the range to improve Dimensions are for tall backguard models CABINET OPENING DIMENSIONS 24-1/4" (61.6 cm) 29-7/8" (75.9 cm) width 18" (45.7 cm) min. ... Installation our products, we reserve the right to change without notice. Because Whirlpool Corporation policy includes a continuous commitment to the rigid gas supply line. ® 30" Freestanding Gas Range PRODUCT MODEL NUMBERS SF110AXS WFG110AV WFG111SV Gas supply: Use 3/4" rigid pipe gas...
Installation Instructions
Page 1
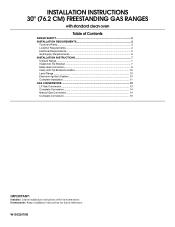
... 30" (76.2 CM) FREESTANDING GAS RANGES with standard clean oven Table of Contents RANGE SAFETY...2 INSTALLATION REQUIREMENTS 3 Tools and Parts...3 Location Requirements 4 Electrical Requirements 5 Gas Supply Requirements 6 INSTALLATION INSTRUCTIONS 7 Unpack Range ...7 Install Anti-Tip Bracket 7 Make Gas... Connection 9 Verify Anti-Tip Bracket Location 10 Level Range ...10 Electronic Ignition System 10 Complete Installation 11 GAS CONVERSIONS 12 LP...
... 30" (76.2 CM) FREESTANDING GAS RANGES with standard clean oven Table of Contents RANGE SAFETY...2 INSTALLATION REQUIREMENTS 3 Tools and Parts...3 Location Requirements 4 Electrical Requirements 5 Gas Supply Requirements 6 INSTALLATION INSTRUCTIONS 7 Unpack Range ...7 Install Anti-Tip Bracket 7 Make Gas... Connection 9 Verify Anti-Tip Bracket Location 10 Level Range ...10 Electronic Ignition System 10 Complete Installation 11 GAS CONVERSIONS 12 LP...

Installation Instructions
Page 2
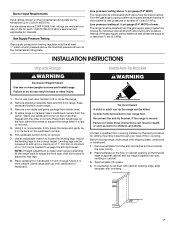
... injury or death. - WARNING: Gas leaks cannot always be killed or seriously injured if you don't follow the "What to reduce the chance of others . RANGE SAFETY Your safety and the safety of injury, and tell you what can be performed by smell. We have provided many important safety messages in...
... injury or death. - WARNING: Gas leaks cannot always be killed or seriously injured if you don't follow the "What to reduce the chance of others . RANGE SAFETY Your safety and the safety of injury, and tell you what can be performed by smell. We have provided many important safety messages in...
Installation Instructions
Page 3
...) ■ Pipe-joint compound resistant to subfloor. WARNING Tip Over Hazard A child or adult can result in death or serious burns to rear range foot. A ■ Level drive ratchet B ■ Tape measure ■ Flat-blade screwdriver ■ Phillips screwdriver ■ Hand or electric... T-handle type. ■ A flexible gas connector, when used, must be killed. Reconnect the anti-tip bracket, if the range is moved. INSTALLATION REQUIREMENTS Tools and Parts Gather the required tools and parts before starting installation. Read and follow these instructions can tip the...
...) ■ Pipe-joint compound resistant to subfloor. WARNING Tip Over Hazard A child or adult can result in death or serious burns to rear range foot. A ■ Level drive ratchet B ■ Tape measure ■ Flat-blade screwdriver ■ Phillips screwdriver ■ Hand or electric... T-handle type. ■ A flexible gas connector, when used, must be killed. Reconnect the anti-tip bracket, if the range is moved. INSTALLATION REQUIREMENTS Tools and Parts Gather the required tools and parts before starting installation. Read and follow these instructions can tip the...
Installation Instructions
Page 4
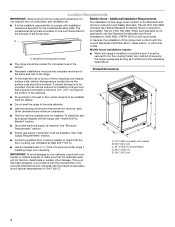
...280). B ■ Cabinet opening dimensions that the materials used . To install the anti- Additional Installation Requirements The installation of the range. See "Gas Supply Requirements" section. ■ Contact a qualified floor covering installer to the standards listed above the surface units ... the risk can withstand at least 200°F (93°C). ■ Use an insulated pad or ¼" (0.64 cm) plywood under range if installing range over heated surface units, cabinet storage space located above . A A. C tip bracket shipped with handle B. 36³⁄₈" (92.4 ...
...280). B ■ Cabinet opening dimensions that the materials used . To install the anti- Additional Installation Requirements The installation of the range. See "Gas Supply Requirements" section. ■ Contact a qualified floor covering installer to the standards listed above the surface units ... the risk can withstand at least 200°F (93°C). ■ Use an insulated pad or ¼" (0.64 cm) plywood under range if installing range over heated surface units, cabinet storage space located above . A A. C tip bracket shipped with handle B. 36³⁄₈" (92.4 ...
Installation Instructions
Page 5
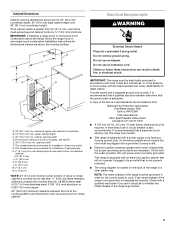
... with a qualified electrician if you are in death, fire, or electrical shock. It is recommended that a separate circuit serving only this range be electrically grounded in accordance with local codes and ordinances, or in the absence of the above code standards can result in doubt as ... cabinet depth is correctly grounded. This shaded area recommended for installation of cooktop, see NOTE*. Do not use an extension cord. This range is equipped with not less than ¹⁄₄" (0.64 cm) flame retardant millboard covered with an electronic ignition system that the ...
... with a qualified electrician if you are in death, fire, or electrical shock. It is recommended that a separate circuit serving only this range be electrically grounded in accordance with local codes and ordinances, or in the absence of the above code standards can result in doubt as ... cabinet depth is correctly grounded. This shaded area recommended for installation of cooktop, see NOTE*. Do not use an extension cord. This range is equipped with not less than ¹⁄₄" (0.64 cm) flame retardant millboard covered with an electronic ignition system that the ...
Installation Instructions
Page 6
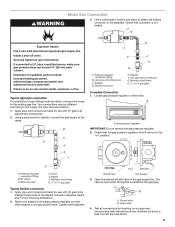
... is a registered trademark of gas that resist the action of local codes, installation must conform with the local gas supplier. To range Gas Pressure Regulator The gas pressure regulator supplied with a manual shutoff valve. If connected to shutoff valve. IMPORTANT: This installation must...pipe connection: The rigid pipe connection requires a combination of opening , such as follows for connection to the female pipe threads of the range must be as an adjacent cabinet. Gas supply line B. Gas Supply Requirements WARNING Flexible metal appliance connector: ■ If local codes ...
... is a registered trademark of gas that resist the action of local codes, installation must conform with the local gas supplier. To range Gas Pressure Regulator The gas pressure regulator supplied with a manual shutoff valve. If connected to shutoff valve. IMPORTANT: This installation must...pipe connection: The rigid pipe connection requires a combination of opening , such as follows for connection to the female pipe threads of the range must be as an adjacent cabinet. Gas supply line B. Gas Supply Requirements WARNING Flexible metal appliance connector: ■ If local codes ...
Installation Instructions
Page 7
...Supply Pressure Testing Gas supply pressure for Canada). Line pressure testing at least 1" water column pressure above ½ psi gauge (14" WCP) The range and its back, take 4 cardboard corners from the anti-tip bracket kit (found inside oven. 4. Remove oven racks and parts package from the gas... supply piping system during any pressure testing of 0.5 cm) is standing, tilt the range back to adjust the front legs, then tilt forward to engage the anti-tip bracket. Tape template into place. 4. If countertop is not flush...
...Supply Pressure Testing Gas supply pressure for Canada). Line pressure testing at least 1" water column pressure above ½ psi gauge (14" WCP) The range and its back, take 4 cardboard corners from the anti-tip bracket kit (found inside oven. 4. Remove oven racks and parts package from the gas... supply piping system during any pressure testing of 0.5 cm) is standing, tilt the range back to adjust the front legs, then tilt forward to engage the anti-tip bracket. Tape template into place. 4. If countertop is not flush...

Installation Instructions
Page 8
... Rear leveling leg A. Rear leveling leg B. A minimum of 0.5 cm) is needed to allow for final electrical connection. Longer screws are available from under range. 8. Remove the template from floor and move to lower the rear leveling legs one -half turn . Use a ³⁄₈" drive ratchet to ... hammer. 7. Depending on the bracket template. If cabinet opening is wider than that specified in the "Location Requirements" section, adjust template so range will be centered in the "Location Requirements" section. 12. To mount the anti-tip bracket to a concrete or ceramic floor, use a ...
... Rear leveling leg A. Rear leveling leg B. A minimum of 0.5 cm) is needed to allow for final electrical connection. Longer screws are available from under range. 8. Remove the template from floor and move to lower the rear leveling legs one -half turn . Use a ³⁄₈" drive ratchet to ... hammer. 7. Depending on the bracket template. If cabinet opening is wider than that specified in the "Location Requirements" section, adjust template so range will be centered in the "Location Requirements" section. 12. To mount the anti-tip bracket to a concrete or ceramic floor, use a ...
Installation Instructions
Page 9
Securely tighten all pipe thread connections. 2. Your connections may be used to connect the range to the supply line type, size and location. 1. Pressure regulator connection fitting B. Flexible connector E. G. G A. Attach one adapter to the gas pressure regulator ... handle is parallel to the gas shutoff valve. Test all connections by brushing on " position. Install a shut-off valve. If connected to the range. Typical rigid pipe connection A combination of pipe fittings must be different, according to the existing gas line. Use pipe-joint compound. Locate gas pressure...
Securely tighten all pipe thread connections. 2. Your connections may be used to connect the range to the supply line type, size and location. 1. Pressure regulator connection fitting B. Flexible connector E. G. G A. Attach one adapter to the gas pressure regulator ... handle is parallel to the gas shutoff valve. Test all connections by brushing on " position. Install a shut-off valve. If connected to the range. Typical rigid pipe connection A combination of pipe fittings must be different, according to the existing gas line. Use pipe-joint compound. Locate gas pressure...
Installation Instructions
Page 10
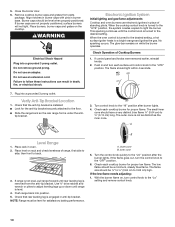
...is engaged in death, fire, or electrical shock. 7. No sparking occurs. Check each cooktop burner for satisfactory baking performance. A B Level Range 1. Outer cone B. The glow bar remains on the cooktop. Burner caps should be a minimum, steady blue flame. Check that rear leveling...is installed: ■ Look for proper low flame. WARNING Electrical Shock Hazard Plug into a grounded 3 prong outlet. If range is not level, pull range forward until the control knob is turned to the desired setting, a hot surface igniter heats to light the burner. 5....
...is engaged in death, fire, or electrical shock. 7. No sparking occurs. Check each cooktop burner for satisfactory baking performance. A B Level Range 1. Outer cone B. The glow bar remains on the cooktop. Burner caps should be a minimum, steady blue flame. Check that rear leveling...is installed: ■ Look for proper low flame. WARNING Electrical Shock Hazard Plug into a grounded 3 prong outlet. If range is not level, pull range forward until the control knob is turned to the desired setting, a hot surface igniter heats to light the burner. 5....
Installation Instructions
Page 11
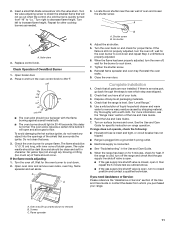
...until flame is still not properly adjusted, turn the oven control knob to cool down . 2. Dispose of oven and loosen the shutter screw. See "Level Range." 5. Dry thoroughly with the flame burning against a small metal bulb. ■ The oven burner should be ½" (0.13 cm) long, with ...inner cone of the shield that area. 3. Read the Use and Care Guide. 7. See the Use and Care Guide for proper flame. If the range is connected. ■ See "Troubleshooting" in 20-40 seconds; C A. Screws C. Open broiler door. 2. Do not clean that surrounds the igniter. The...
...until flame is still not properly adjusted, turn the oven control knob to cool down . 2. Dispose of oven and loosen the shutter screw. See "Level Range." 5. Dry thoroughly with the flame burning against a small metal bulb. ■ The oven burner should be ½" (0.13 cm) long, with ...inner cone of the shield that area. 3. Read the Use and Care Guide. 7. See the Use and Care Guide for proper flame. If the range is connected. ■ See "Troubleshooting" in 20-40 seconds; C A. Screws C. Open broiler door. 2. Do not clean that surrounds the igniter. The...
Installation Instructions
Page 12
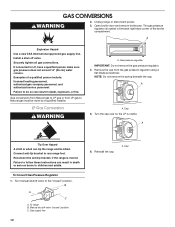
...A Explosion Hazard Use a new CSA International approved gas supply line. Securely tighten all gas connections. Turn the cap over so the LP is visible. To range B. Cap Gas supply line 12 6. Install a shut-off valve. Failure to Natural gas must be killed. B A C A. Examples of the broiler ... to LP, have a qualified person make sure gas pressure does not exceed 14" (36 cm) water column. GAS CONVERSIONS WARNING 2. Unplug range or disconnect power. 3. Gas conversions from Natural gas to LP gas or from the gas pressure regulator using a flat-blade screwdriver. LP Gas...
...A Explosion Hazard Use a new CSA International approved gas supply line. Securely tighten all gas connections. Turn the cap over so the LP is visible. To range B. Cap Gas supply line 12 6. Install a shut-off valve. Failure to Natural gas must be killed. B A C A. Examples of the broiler ... to LP, have a qualified person make sure gas pressure does not exceed 14" (36 cm) water column. GAS CONVERSIONS WARNING 2. Unplug range or disconnect power. 3. Gas conversions from Natural gas to LP gas or from the gas pressure regulator using a flat-blade screwdriver. LP Gas...
Installation Instructions
Page 13
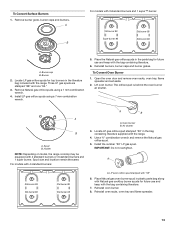
... LP gas orifice spuds for top burners in plastic parts bag along with Natural gas cooktop burner spuds for future use and keep with the range. 4. Install LP gas orifice spuds using a 7 mm combination wrench. 4. Place the Natural gas orifice spuds in the bag containing literature supplied with ...the bag containing literature. 6. Oven burner B. Locate LP gas orifice spud stamped "56" in the parts bag for future use and keep with the range. Install the number "56" LP gas spud. IMPORTANT: Do not overtighten. A Std burner 88 Std burner 88 Std burner 88 Std burner 88 A....
... LP gas orifice spuds for top burners in plastic parts bag along with Natural gas cooktop burner spuds for future use and keep with the range. 4. Install LP gas orifice spuds using a 7 mm combination wrench. 4. Place the Natural gas orifice spuds in the bag containing literature supplied with ...the bag containing literature. 6. Oven burner B. Locate LP gas orifice spud stamped "56" in the parts bag for future use and keep with the range. Install the number "56" LP gas spud. IMPORTANT: Do not overtighten. A Std burner 88 Std burner 88 Std burner 88 Std burner 88 A....


