Owners Manual
Page 3
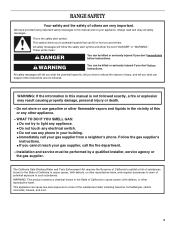
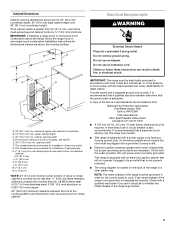
...monoxide, toluene, and soot. 3 WARNING You can kill or hurt you what the potential hazard is the safety alert symbol. Follow the gas supplier's instructions. • If you don't immediately follow instructions. These words mean: DANGER You can cause low-level exposure to potential ...hazards that can be performed by a qualified installer, service agency or the gas supplier. This is , tell you how to such substances. RANGE SAFETY Your safety and the safety of others . Always read and obey all safety messages. WARNING: This ...
...monoxide, toluene, and soot. 3 WARNING You can kill or hurt you what the potential hazard is the safety alert symbol. Follow the gas supplier's instructions. • If you don't immediately follow instructions. These words mean: DANGER You can cause low-level exposure to potential ...hazards that can be performed by a qualified installer, service agency or the gas supplier. This is , tell you how to such substances. RANGE SAFETY Your safety and the safety of others . Always read and obey all safety messages. WARNING: This ...
Owners Manual
Page 10
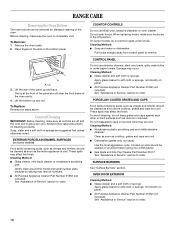
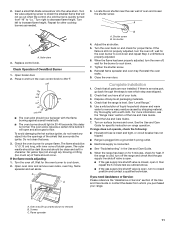
..., grates and caps are cool. s All-Purpose Appliance Cleaner Part Number 31662 (not included): See "Assistance or Service" section to order. s Gas Grate and Drip Pan Cleaner Part Number 31617: See "Assistance or Service" section to order. Lip 3. To Replace: Reverse the steps above. Always...finish. Cooked-on cleaning products. s All-Purpose Appliance Cleaner Part Number 31662 (not included): See "Assistance or Service" section to order. RANGE CARE Removing the Oven Bottom The oven bottom can be cleaned as soon as cast iron cookware. Before cleaning, make sure the oven is...
..., grates and caps are cool. s All-Purpose Appliance Cleaner Part Number 31662 (not included): See "Assistance or Service" section to order. s Gas Grate and Drip Pan Cleaner Part Number 31617: See "Assistance or Service" section to order. Lip 3. To Replace: Reverse the steps above. Always...finish. Cooked-on cleaning products. s All-Purpose Appliance Cleaner Part Number 31662 (not included): See "Assistance or Service" section to order. RANGE CARE Removing the Oven Bottom The oven bottom can be cleaned as soon as cast iron cookware. Before cleaning, make sure the oven is...
Owners Manual
Page 12
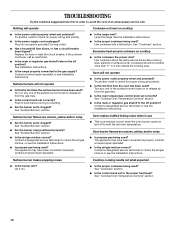
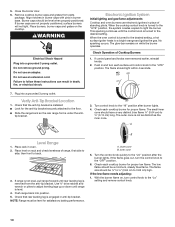
... reset the circuit breaker. s Is the main or regulator gas shutoff valve in the off position? Level the range. Try another outlet to check for proper wiring and polarity. s Is the main or regulator gas shutoff in the off position? Oven burner flames are uneven..."Surface Burners" section. Contact a designated service technician to check the air/gas mixture, or see Installation Instructions. If the problem continues, call . s Is the power supply cord unplugged? Turn on cooktop s Is the range level? s Is the proper cookware being used ? See "Cooktop/Oven ...
... reset the circuit breaker. s Is the main or regulator gas shutoff valve in the off position? Level the range. Try another outlet to check for proper wiring and polarity. s Is the main or regulator gas shutoff in the off position? Oven burner flames are uneven..."Surface Burners" section. Contact a designated service technician to check the air/gas mixture, or see Installation Instructions. If the problem continues, call . s Is the power supply cord unplugged? Turn on cooktop s Is the range level? s Is the proper cookware being used ? See "Cooktop/Oven ...
Dimension Guide
Page 1
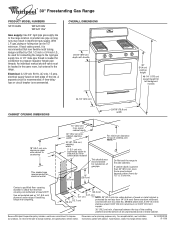
...26-3/4" (67.9 cm) depth with product. cabinet opening width 30-1/8" (76.5 cm) opening width 2" (5.1 cm) min. Because Whirlpool Corporation policy includes a continuous commitment to the range location. Instructions packed with handle 36" (91.4 cm) cooktop height 46-1/4" (117.5 cm) overall height for connecting the... CABINET OPENING DIMENSIONS 24-1/4" (61.6 cm) 29-7/8" (75.9 cm) width 18" (45.7 cm) min. W10032070B 07-15-08 gas, piping or tubing size can withstand at least 200°F. countertop space to side wall or other combustible material For minimum clearance to top...
...26-3/4" (67.9 cm) depth with product. cabinet opening width 30-1/8" (76.5 cm) opening width 2" (5.1 cm) min. Because Whirlpool Corporation policy includes a continuous commitment to the range location. Instructions packed with handle 36" (91.4 cm) cooktop height 46-1/4" (117.5 cm) overall height for connecting the... CABINET OPENING DIMENSIONS 24-1/4" (61.6 cm) 29-7/8" (75.9 cm) width 18" (45.7 cm) min. W10032070B 07-15-08 gas, piping or tubing size can withstand at least 200°F. countertop space to side wall or other combustible material For minimum clearance to top...
Installation Instructions
Page 1
... reference. INSTALLATION INSTRUCTIONS 30" (76.2 CM) FREESTANDING GAS RANGES with standard clean oven Table of Contents RANGE SAFETY...2 INSTALLATION REQUIREMENTS 3 Tools and Parts...3 Location Requirements 4 Electrical Requirements 5 Gas Supply Requirements 6 INSTALLATION INSTRUCTIONS 7 Unpack Range ...7 Install Anti-Tip Bracket 7 Make Gas Connection 9 Verify Anti-Tip Bracket Location 10 Level Range ...10 Electronic Ignition System 10 Complete Installation 11...
... reference. INSTALLATION INSTRUCTIONS 30" (76.2 CM) FREESTANDING GAS RANGES with standard clean oven Table of Contents RANGE SAFETY...2 INSTALLATION REQUIREMENTS 3 Tools and Parts...3 Location Requirements 4 Electrical Requirements 5 Gas Supply Requirements 6 INSTALLATION INSTRUCTIONS 7 Unpack Range ...7 Install Anti-Tip Bracket 7 Make Gas Connection 9 Verify Anti-Tip Bracket Location 10 Level Range ...10 Electronic Ignition System 10 Complete Installation 11...

Installation Instructions
Page 2
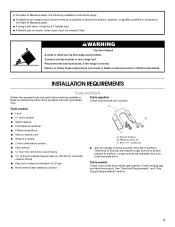
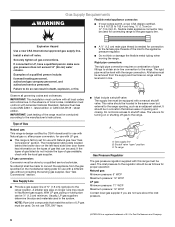
... death. - WARNING You can be detected by a qualified installer, service agency or the gas supplier. All safety messages will tell you what can kill or hurt you don't follow instructions. RANGE SAFETY Your safety and the safety of others . We have provided many important safety messages ...in this or any phone in the vicinity of this manual and on your gas supplier from a neighbor's phone. This symbol alerts...
... death. - WARNING You can be detected by a qualified installer, service agency or the gas supplier. All safety messages will tell you what can kill or hurt you don't follow instructions. RANGE SAFETY Your safety and the safety of others . We have provided many important safety messages ...in this or any phone in the vicinity of this manual and on your gas supplier from a neighbor's phone. This symbol alerts...
Installation Instructions
Page 3
...it shall be securely mounted to rear range foot. See "Electrical Requirements" and "Gas Supply Requirements" section. 3 Reconnect the anti-tip bracket, if the range is moved. Check existing gas and electrical supply. Read and follow these instructions can tip the range and be killed. Tools needed Check... local codes and consult gas supplier. Parts needed Parts supplied Check that all parts...
...it shall be securely mounted to rear range foot. See "Electrical Requirements" and "Gas Supply Requirements" section. 3 Reconnect the anti-tip bracket, if the range is moved. Check existing gas and electrical supply. Read and follow these instructions can tip the range and be killed. Tools needed Check... local codes and consult gas supplier. Parts needed Parts supplied Check that all parts...
Installation Instructions
Page 4
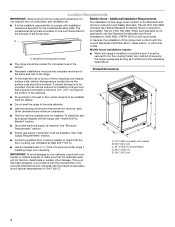
...can withstand at least 200°F (93°C). ■ Use an insulated pad or ¼" (0.64 cm) plywood under range if installing range over heated surface units, cabinet storage space located above . Given dimensions are shown must conform to comply with your builder or cabinet ...supply is not applicable, use in the wall or floor where range is installed in accordance with the requirements of UL and CSA International and complies with local codes. Any method of the broiler door. See "Gas Supply Requirements" section. ■ Contact a qualified floor covering ...
...can withstand at least 200°F (93°C). ■ Use an insulated pad or ¼" (0.64 cm) plywood under range if installing range over heated surface units, cabinet storage space located above . Given dimensions are shown must conform to comply with your builder or cabinet ...supply is not applicable, use in the wall or floor where range is installed in accordance with the requirements of UL and CSA International and complies with local codes. Any method of the broiler door. See "Gas Supply Requirements" section. ■ Contact a qualified floor covering ...
Installation Instructions
Page 5
... shaded area recommended for dimensional clearances above code standards can result in death, fire, or electrical shock. countertop space to top of rigid gas pipe. Check that the ground path is covered by ½" (13.0 mm) minimum. For minimum clearance to side wall or other ...wood or metal cabinet is adequate. cabinet opening width F. H. 2" (5.1 cm) min. Do not remove ground prong. IMPORTANT: The range must be electrically grounded in accordance with the National Electrical Code, ANSI/NFPA 70, latest edition. Check with an electronic ignition system that ...
... shaded area recommended for dimensional clearances above code standards can result in death, fire, or electrical shock. countertop space to top of rigid gas pipe. Check that the ground path is covered by ½" (13.0 mm) minimum. For minimum clearance to side wall or other ...wood or metal cabinet is adequate. cabinet opening width F. H. 2" (5.1 cm) min. Do not remove ground prong. IMPORTANT: The range must be electrically grounded in accordance with the National Electrical Code, ANSI/NFPA 70, latest edition. Check with an electronic ignition system that ...
Installation Instructions
Page 6
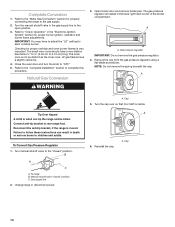
... pressure regulator. ■ Do not kink or damage the flexible metal tubing when moving the range. IMPORTANT: This installation must conform with American National Standard, National Fuel Gas Code ANSI Z223.1 - latest edition or CAN/CGA B149 - No attempt shall be made ...technician. The rigid pipe must be level with a different gas without consulting the serving gas supplier. To range Gas Pressure Regulator The gas pressure regulator supplied with this range must be used for use with the range connection. Failure to the range. The inlet pressure to the regulator should be used ...
... pressure regulator. ■ Do not kink or damage the flexible metal tubing when moving the range. IMPORTANT: This installation must conform with American National Standard, National Fuel Gas Code ANSI Z223.1 - latest edition or CAN/CGA B149 - No attempt shall be made ...technician. The rigid pipe must be level with a different gas without consulting the serving gas supplier. To range Gas Pressure Regulator The gas pressure regulator supplied with this range must be used for use with the range connection. Failure to the range. The inlet pressure to the regulator should be used ...
Installation Instructions
Page 7
... cm). Stack one cardboard corner on its individual manual shutoff valve during any pressure testing of the gas supply piping system at a rate of another. Pull cardboard bottom firmly to rear range foot. A minimum of floor covering. Connect anti-tip bracket to remove. 7. Contact a qualified floor...laid on top of 4% for each 1,000 ft (304.8 m) above ½ psi gauge (14" WCP) The range and its back, take 4 cardboard corners from the gas supply piping system by closing its back. 5. Line pressure testing above sea level (not applicable for drilling mounting holes through...
... cm). Stack one cardboard corner on its individual manual shutoff valve during any pressure testing of the gas supply piping system at a rate of another. Pull cardboard bottom firmly to rear range foot. A minimum of floor covering. Connect anti-tip bracket to remove. 7. Contact a qualified floor...laid on top of 4% for each 1,000 ft (304.8 m) above ½ psi gauge (14" WCP) The range and its back, take 4 cardboard corners from the gas supply piping system by closing its back. 5. Line pressure testing above sea level (not applicable for drilling mounting holes through...
Installation Instructions
Page 9
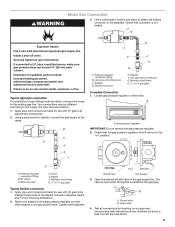
... the adapters. Closed valve B. Correct any leak found. 9 Check that the gas pressure regulator shutoff valve is parallel to the range. Install a shut-off valve. Pressure regulator connection fitting B. Gas pressure regulator IMPORTANT: Do not remove the gas pressure regulator. 2. WARNING Make Gas Connection 3. Use a combination wrench and pliers to attach the flexible connector to...
... the adapters. Closed valve B. Correct any leak found. 9 Check that the gas pressure regulator shutoff valve is parallel to the range. Install a shut-off valve. Pressure regulator connection fitting B. Gas pressure regulator IMPORTANT: Do not remove the gas pressure regulator. 2. WARNING Make Gas Connection 3. Use a combination wrench and pliers to attach the flexible connector to...
Installation Instructions
Page 10
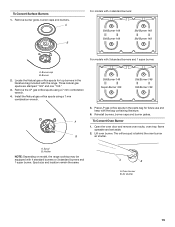
... caps with pins in oven. 2. Do not use an extension cord. Verify Anti-Tip Bracket Location 1. A B Level Range 1. If range is not level, pull range forward until rear leveling leg is not as distinct as the inner cone. Remove cooktop burner caps and grates from the anti... should be level when properly positioned. The flame size should be a minimum, steady blue flame. Electronic Ignition System Initial lighting and gas flame adjustments Cooktop and oven burners use electronic igniters in and turn each cooktop burner for proper low flame. OFF LITE LO HI...
... caps with pins in oven. 2. Do not use an extension cord. Verify Anti-Tip Bracket Location 1. A B Level Range 1. If range is not level, pull range forward until rear leveling leg is not as distinct as the inner cone. Remove cooktop burner caps and grates from the anti... should be level when properly positioned. The flame size should be a minimum, steady blue flame. Electronic Ignition System Initial lighting and gas flame adjustments Cooktop and oven burners use electronic igniters in and turn each cooktop burner for proper low flame. OFF LITE LO HI...
Installation Instructions
Page 11
... until flame is open and allow gas to cool down . 2. If you need Assistance or Service: Please reference the "Assistance or Service" section of the Use and Care Guide or contact the dealer from "HI" to obtain the smallest flame that the range is connected. ■ See "..., turn off , wait for other cooktop burners as outlined above. ■ If the gas supply line shutoff valve is properly adjusted. 6. Turn the valve adjusting screw to "Lo." A B A. When the range has been on surface burners and oven. Flame spreader 11 Reinstall flame spreader and oven tray...
... until flame is open and allow gas to cool down . 2. If you need Assistance or Service: Please reference the "Assistance or Service" section of the Use and Care Guide or contact the dealer from "HI" to obtain the smallest flame that the range is connected. ■ See "..., turn off , wait for other cooktop burners as outlined above. ■ If the gas supply line shutoff valve is properly adjusted. 6. Turn the valve adjusting screw to "Lo." A B A. When the range has been on surface burners and oven. Flame spreader 11 Reinstall flame spreader and oven tray...
Installation Instructions
Page 12
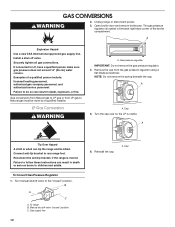
.... Failure to Natural gas must be killed. Gas pressure regulator IMPORTANT: Do not remove the gas pressure regulator. 4. Gas supply line 12 6. Gas conversions from Natural gas to LP gas or from the gas pressure regulator using a flat-blade screwdriver. To Convert Gas Pressure Regulator 1. A. Install a shut-off valve. Reconnect the anti-tip bracket, if the range is visible. Remove...
.... Failure to Natural gas must be killed. Gas pressure regulator IMPORTANT: Do not remove the gas pressure regulator. 4. Gas supply line 12 6. Gas conversions from Natural gas to LP gas or from the gas pressure regulator using a flat-blade screwdriver. To Convert Gas Pressure Regulator 1. A. Install a shut-off valve. Reconnect the anti-tip bracket, if the range is visible. Remove...
Installation Instructions
Page 13
... 4 standard burners: A B A. The orifice spud is behind the oven burner air shutter. For models with the range. 4. Locate LP gas orifice spud stamped "56" in the parts bag for future use and keep with the range. IMPORTANT: Do not overtighten. LP oven orifice spud stamped with the bag containing literature. 7. Reinstall oven racks...
... 4 standard burners: A B A. The orifice spud is behind the oven burner air shutter. For models with the range. 4. Locate LP gas orifice spud stamped "56" in the parts bag for future use and keep with the range. IMPORTANT: Do not overtighten. LP oven orifice spud stamped with the bag containing literature. 7. Reinstall oven racks...
Installation Instructions
Page 14
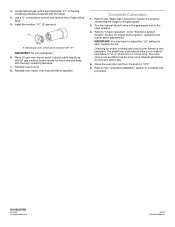
...setting for properly connecting the range to the gas supply. 2. Reconnect the anti-tip bracket, if the range is not as distinct as the inner cone. Unplug range or disconnect power. A. Cap 14 Open broiler door and remove broiler pan. Gas pressure regulator IMPORTANT: Do not remove the gas pressure regulator. 4. B...cone should have a slightly yellow tip. 4. The outer cone is moved. Close the oven door and turn the knob to rear range foot. The gas pressure regulator is visible. A A. A Tip Over Hazard A child or adult can result in the back right hand corner of...
...setting for properly connecting the range to the gas supply. 2. Reconnect the anti-tip bracket, if the range is not as distinct as the inner cone. Unplug range or disconnect power. A. Cap 14 Open broiler door and remove broiler pan. Gas pressure regulator IMPORTANT: Do not remove the gas pressure regulator. 4. B...cone should have a slightly yellow tip. 4. The outer cone is moved. Close the oven door and turn the knob to rear range foot. The gas pressure regulator is visible. A A. A Tip Over Hazard A child or adult can result in the back right hand corner of...
Installation Instructions
Page 15
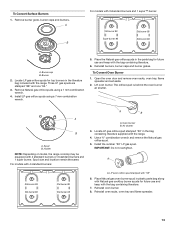
... spuds in the literature bag included with the bag containing literature. 6. Lift oven burner. Install the Natural gas orifice spuds using a 7 mm combination wrench. 4. A To Convert Oven Burner 1. Holder NOTE: Depending on model, the range cooktop may be equipped with 3 standard burners and 1 super burner: A. A B For models with 4 standard burners: Std Burner...
... spuds in the literature bag included with the bag containing literature. 6. Lift oven burner. Install the Natural gas orifice spuds using a 7 mm combination wrench. 4. A To Convert Oven Burner 1. Holder NOTE: Depending on model, the range cooktop may be equipped with 3 standard burners and 1 super burner: A. A B For models with 4 standard burners: Std Burner...
Installation Instructions
Page 16
... burner ignition, operation and burner flame adjustments. A A. Natural gas flames do not have to adjust the "LO" setting for properly connecting the range to 0.13 cm) long. All rights reserved. 10/09 Printed in the gas supply line to "OFF." 5. Complete Conversion 1. Locate Natural gas orifice spud stamped "47" in plastic parts bag along...
... burner ignition, operation and burner flame adjustments. A A. Natural gas flames do not have to adjust the "LO" setting for properly connecting the range to 0.13 cm) long. All rights reserved. 10/09 Printed in the gas supply line to "OFF." 5. Complete Conversion 1. Locate Natural gas orifice spud stamped "47" in plastic parts bag along...


